
How to Make a Copy of Google Slides? [An EASY Tutorial!]
By: Author Shrot Katewa
![How to Make a Copy of Google Slides? [An EASY Tutorial!]](https://artofpresentations.com/wp-content/uploads/2021/08/Featured-Image-How-to-Make-a-Copy-of-Google-Slides-optimized.jpg "copy presentation google slides")
When you share your Google Slides presentations with others, the changes that they make will most likely become visible on the main presentation. One way to avoid this problem is to make a copy of the Google Slides presentation before making any changes! But you may be wondering, how exactly does one make a copy of Google Slides?
Here’s how to make a copy of a Google Slides presentation –
- Click on the “File” menu.
- Select “Make a copy” from the dropdown.
- Then, click on “Entire Presentation”
- Finally, click “OK” in the pop-up window that opens up.
In this article, we will cover this topic in great detail. I will share with you two different methods along with the detailed steps of making a copy of Google Slides. Furthermore, I will also show you how you can force others to make a copy before they start editing a Google Slides presentation!
So, let’s get started!
1. How to Make a Copy of a Google Slides Presentation?
Basically, there are two ways in which you can make a copy of your Google Slides presentation.
The first method is to use the “ File ” menu option while the other method is to use the Google Drive Folder. Both of the methods are explained in the following section.
Method 1 – Using the File Menu Option
This method is the easiest as you can make a copy of your Google Slides presentation directly from the presentation file when it is open!
To make a copy of your Google Slides presentation using the “ File ” Menu option follow the simple steps explained below.
Step-1: Click on the “File” menu option
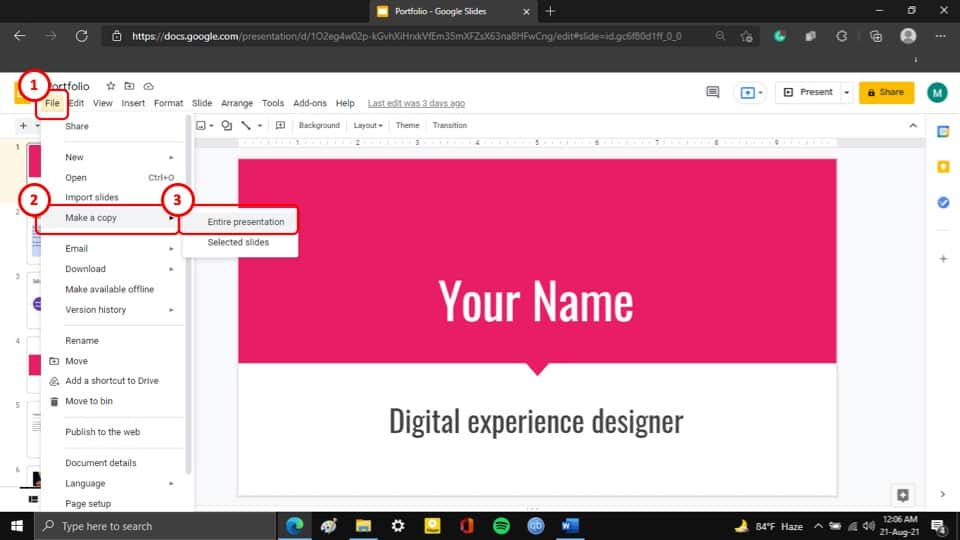
The first step of the process is to click on the “ File ” tab, which will open a drop-down menu.
From the dropdown menu, select the “ Make a copy ” option which will open yet another drop-down menu. Now select the “ Entire presentation ” option.
Step-2 : Hit the “Ok” button
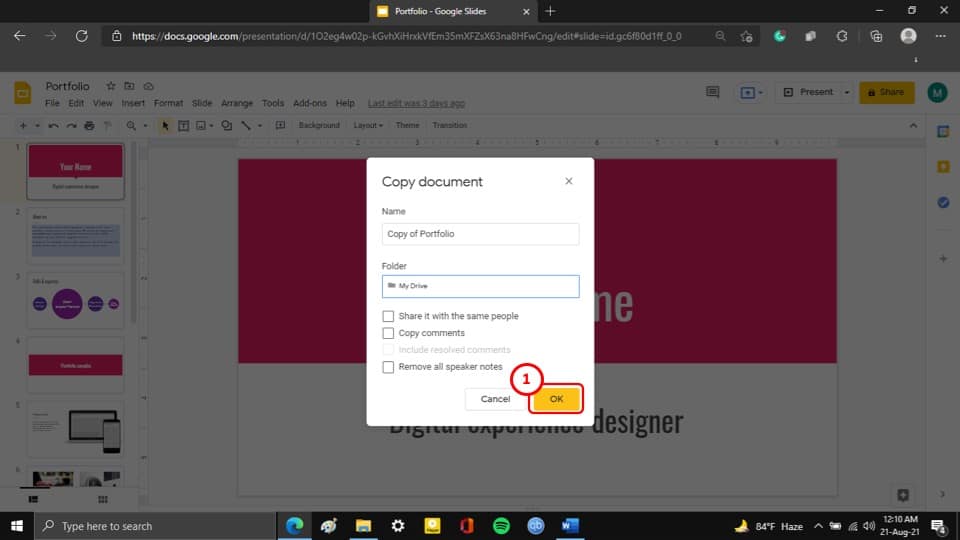
After you click on the “ Entire presentation ” option, a pop-up window will appear on your screen. Simply click on the “ OK ” button and a copy of your presentation will be saved on your Google Drive
Method 2 – Using the Google Drive Folder
This method is much like the traditional way you would copy and paste a file on your computer. Basically, in this method, you have to navigate to the folder where your file is saved and then make a copy.
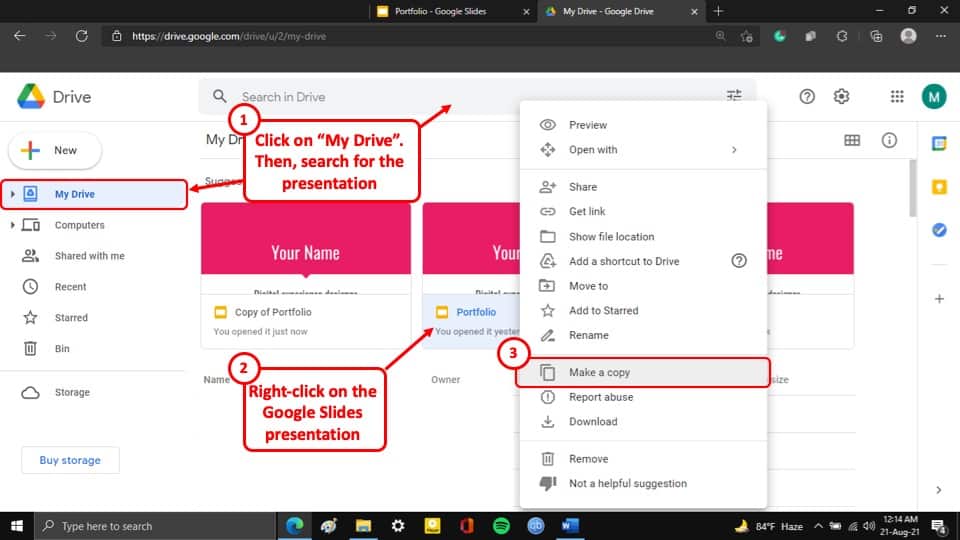
To make a copy of your Google Slides presentation, all you have to do is simply “Right -Click ” on the slide that you want to make a copy of and then select the “ Make a copy ” option from the drop-down menu. A copy of your Google Slides presentation will be saved on your Google Drive immediately.
2. How to Make a Copy of Selected Slides?
In case you don’t want to copy the complete presentation, you can also make a copy of a selected set of slides and open them as a separate presentation file.
To make a copy of selected slides in your Google Slides presentation, at first select the slides that you want to make a copy of and then follow the simple steps explained below.
Step-1: Click on the “File” tab

After you have selected the slides, you want to make a copy of, click on the “ File ” tab which will open a drop-down menu.
Step-2: Select the “Selected slides” option
Next, select the “ Selected slides ” option from the drop-down menu as shown in the image in the previous step.
Step-3: Hit the “OK” button
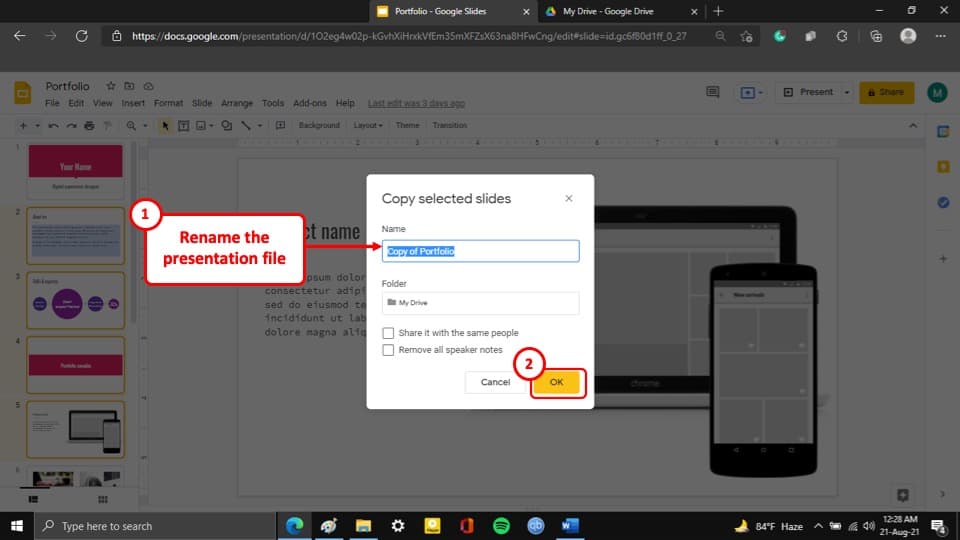
After you have selected the “ Selected slides ” option, a pop-up window will appear on your screen.
Here, you can rename the presentation. This is completely optional. Next, click on the “ OK ” button located at the bottom right corner and a copy of the selected slides will be saved on your Google Drive.
3. How to Force Users to Make a Copy of Google Slides?
Now, what if you are sharing a template of a presentation with multiple users and you want to prevent people from making changes to your master file in Google Slides? Well, the easiest way to do this is to force the user to make a copy of when you share the link of the file!
To force users to make a copy of your Google Slides presentation, edit the URL of your Google Slides presentation. Highlight everything after the last “/” in the URL of your browser, and instead write “copy”. Now, share the edited link with others. This will force a copy of your presentation.
The complete process is described step-by-step manner below –
Step-1: Remove the last part of the URL
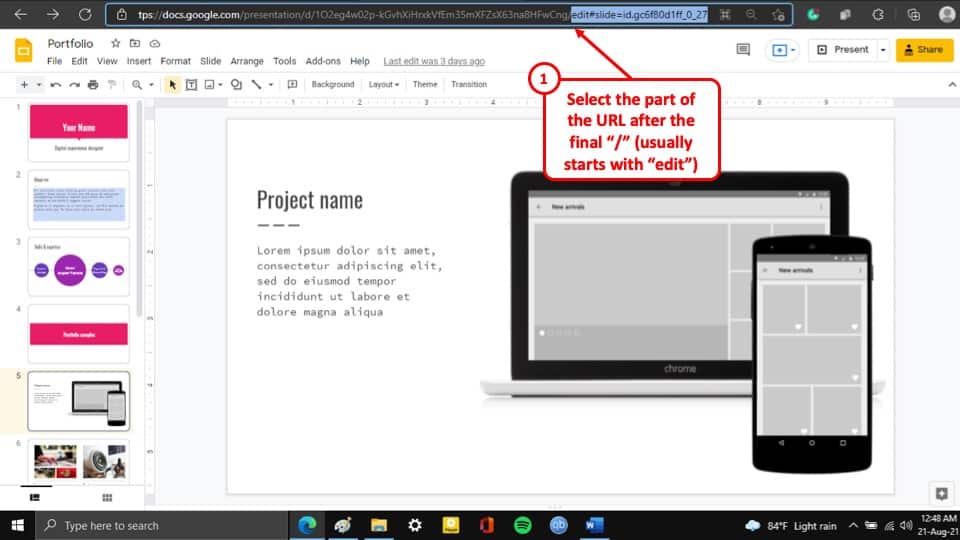
The first step of the process is to select the last part of the URL which will have the word “ Edit ” on it. This will be after the final “/” used in the URL.
Simply locate and select that part of the URL, and delete it.
Step-2: Write “Copy” in the last part of the URL
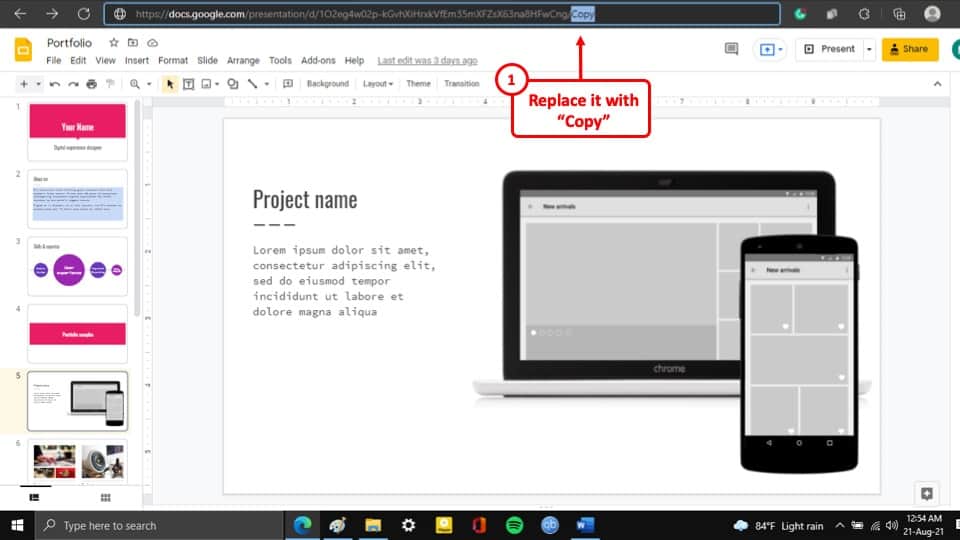
In the second step, after you have removed the “ Edit ” part of the URL, write “ Copy ” in its place. Now when you share this link with anybody, they will be forced to make a copy of your Google Slides presentation to view it.
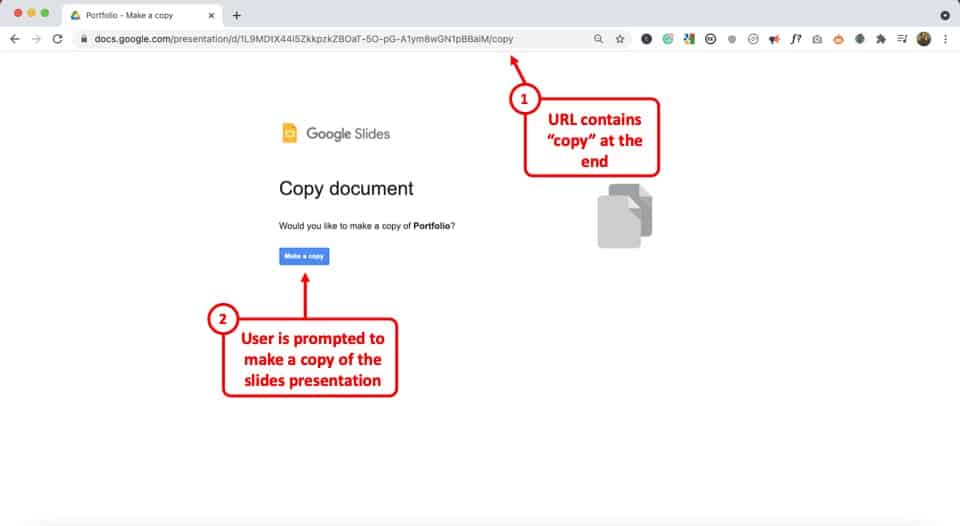
Here’s what the end-user will see on their screen once you have shared the link with them.
Remember – for this method to work, you have to make sure that you have given permission to access the Google Slides presentation .
4. How to Make a Copy of Google Slides in Presentation Mode?
You can also make a copy of your Google Slides presentation to directly open in the “Presentation Mode” when you share it with your audience! This is really helpful because sometimes you don’t want the audience to access the content of the slides, but you also don’t want to share a PDF either in order to retain the animations.
To make a copy of a Google Slides presentation to directly open in the present mode, edit the URL. Highlight everything after the last “/” in the URL of your browser, and instead write “present”. Now, share the edited link with others. This will open your presentation in the present mode by default.
Here are the details of the steps that you need to follow –
Step-1: Remove the “Edit” part from the URL
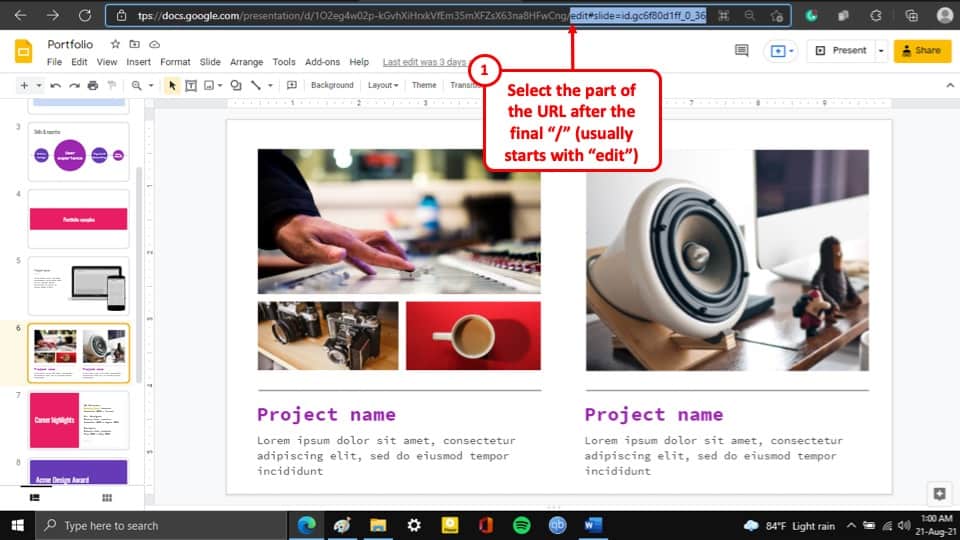
The first step of making a copy of your Google Slides in presentation mode is to remove the last part of the URL of your Google Slides presentation which has the word “ Edit ” on it.
Step-2: Type in the word “Present”

After you have removed the “Edit” part of the URL, simply type in “ Present ” in its place. Now when your share your Google Slides presentation with this link, users will be taken directly to the presentation view.
Before sharing this link with others, make sure you have given permission to access the Google Slides presentation .
5. How to Copy a Presentation to Another Account?
To copy a presentation to another account, you have to share the presentation to the other account using their email address. The whole process is described in 2 easy steps below.
Step-1: Click on the “Share” button
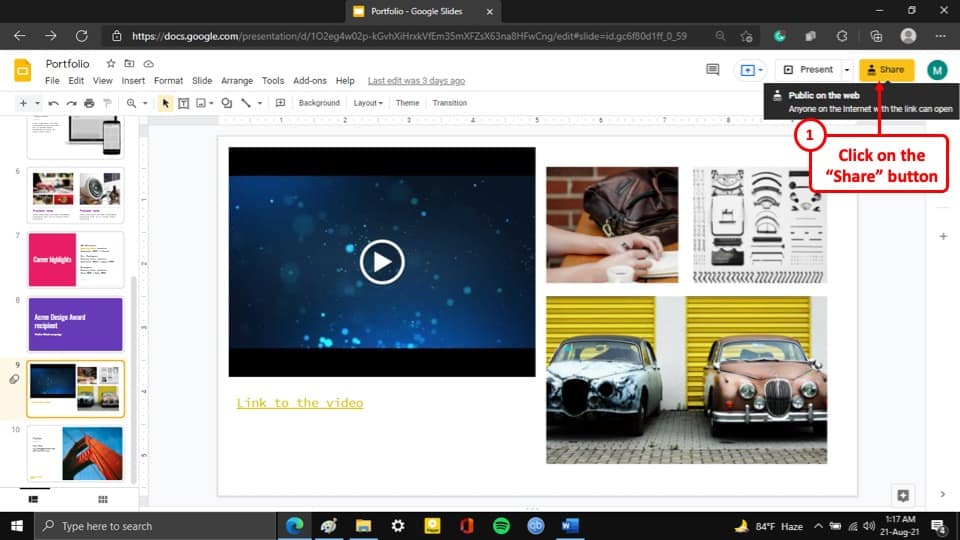
The first step of the process is to click on the “ Share ” button which is located at the top right corner of your Google Slides window. It is an orange button with the icon of a person with a linked chain under them.
Step-2: Type in the Email Address of the recipient
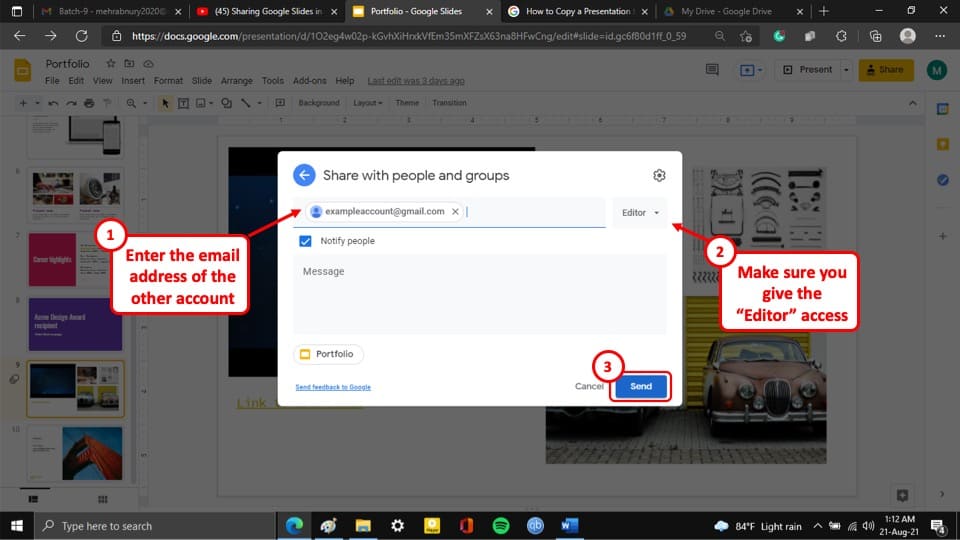
After you have selected the “ Share ” button, a pop-up window will appear on your screen.
Now, type in the email address of the account that you want to copy your Google Slides presentation to, in the recipient box. Also, make sure that you have provided the “ Editor ” access. Otherwise, you won’t be able to edit this presentation file using the other email account.
Lastly, simply click on the blue “ Send ” button at the bottom right corner of the pop-up window and the presentation will be copied to the Google Drive of the recipient account.
6. How to Remove Speaker Notes While Making a Copy of Google Slides?
To remove speaker notes while making a copy of your Google Slides presentation, follow the simple steps described below.
Step-1: Click on the “File” Tab
The first step of the process is to click on the “ File ” tab on the ribbon of your Google Slides presentation. This will open a drop-down menu.
Step-2: Select the “Entire presentation” option
Click on the “ Entire presentation ” option which is located in the “ Make a copy ” option. This will open a pop-up window (as shown in the image in the previous step).
Step-3: Tick mark the “Remove all speaker notes” option

Once you have selected the “ Entire presentation ” option and the pop-up window appears on your screen, checkmark on the “ Remove all speaker notes ” option. This will allow you to make a copy of your Google Slides presentation without including the speaker notes.
Step-4: Click on the “OK” button
The final step of the process is to click on the “ OK ” button. This will create a copy of your Google Slides presentation while removing all the content from the notes.
Credit to KamranAydinov (on Freepik) for the featured image of this article (further edited).
Home Blog Google Slides Tutorials How to Copy a Slide in Google Slides
How to Copy a Slide in Google Slides

Google Slides often requires duplicating slides for templates or reusing an old slide deck. Unlike PowerPoint templates that are often downloaded, Google Slides templates require being copied to create a new version of the template for editing online. Below are a few simple methods that show how to copy google slides.
How to Duplicate a Google Slides Presentation
To make a copy of an entire Google Slides presentation or template, go to File -> Make a Copy -> Entire Presentation .

In the next step, you will be given options to select a folder for saving your presentation in Google Drive, with the option to share it with the same people, remove speaker notes, copy comments, and include resolved comments (if any). Click Make a Copy to create a new copy of the deck.

This will create a complete presentation copy and open it in a new window. The title of the presentation deck will start with the word Copy by default. You can edit the title to suit your needs.

How to Duplicate a Slide in Google Slides
To create a copy of selected slides, pick slides (e.g., by using the CTRL key in Windows or Cmd Key on Mac and picking the slides you need) and go to File -> Make a Copy -> Selected Slides .

In the next step, select a location on Google Drive to save the slide deck. You can remove speaker notes and share the deck with the same people when copying the slides from a presentation deck in Google Slides. Click Make a Copy to create a presentation deck with the selected slides.

The new presentation with your selected slides will be created. In the example below, we selected only three slides from a presentation to create a new one.

How do you Make a Copy of a Google Slide via URL
You can edit the original URL to create a copy of a Google Slides deck using the URL or share a copy only with someone. To do this, remove the text after the final forward slash in the URL and type copy . Press Enter to generate a copy.

You can also share the URL with others to force them to use only a copy of your Google Slides deck since the URL will take them to a screen where the user will be asked to create a copy of the slide deck to proceed further.

How to Play a Copy of a Google Slide in Slideshow Mode
To run the presentation deck in Slideshow Mode, replace the text after the final forward slash with present .

This will run a copy of the presentation in Slideshow mode automatically.

To copy an entire presentation: – Go to File > Make a Copy > Entire Presentation. – Choose a location to save the copy on Google Drive. – Optionally, choose to share it with the same people, remove speaker notes, copy comments, and include resolved comments. – Click Make a Copy.
Yes, to copy selected slides: – Select the slides you want to copy (use the CTRL key on Windows or the CMD key on Mac). – Go to File > Make a Copy > Selected Slides. – Choose a location to save the new presentation on Google Drive. – Optionally, remove speaker notes and share the deck with the same people. – Click Make a Copy.
To duplicate a slide within the same presentation: – Select the slide you want to duplicate. – Right-click on the slide thumbnail. – Select Duplicate slide.
To make a copy using a URL: – Open the Google Slides presentation. – Remove the text after the final forward slash in the URL and replace it with a copy. – Press Enter. This will generate a screen asking to create a copy.
To share a copy via URL: – Edit the URL by removing the text after the final forward slash and replacing it with the copy. – Share the edited URL with others. They will be prompted to create a copy of the presentation.
Yes, to run a copy in Slideshow mode: – Remove the text after the final forward slash in the URL and replace it with the present. – Press Enter. This will run the presentation in Slideshow mode automatically.
To exclude speaker notes when copying: – During the copy process, look for the option to Remove speaker notes. – Check this option before clicking Make a Copy.
To save in a specific folder: – When prompted to select a location during the copy process, navigate to the desired folder in Google Drive. – Select the folder and click Make a Copy.
Yes, you can choose to exclude comments: – During the copy process, uncheck the option to Copy comments before clicking Make a Copy.
Final Words
Now that you know how to make a copy on Google Slides, you can choose a method that best matches your needs. Be it selecting individual slides, making a copy of the entire Google Slides deck, or sharing a URL enabling others to create one automatically. Also, check our tutorial on how to copy a slide in PowerPoint .
Like this article? Please share
Google Slides, Presentation Tips Filed under Google Slides Tutorials
Related Articles

Filed under Google Slides Tutorials • August 20th, 2024
How to Insert an Emoji in Google Slides
Add a creative touch to your slides by learning how to insert an emoji in Google Slides. Step-by-step instructions and third-party extensions list.

Filed under Google Slides Tutorials • August 13th, 2024
How to Curve Text in Google Slides
Despite Google Slides not offering a native tool for this, there are multiple ways to curve text in Google Slides. Check them out here!

Filed under Google Slides Tutorials • August 6th, 2024
How to Use Google Slides Strikethrough Text
Customize your presentation slides by using Google Slides strikethrough and add a factor of humor, emphasize, or track changes in a truly visual method.
Leave a Reply
- Google Slides Training
Duplicate and Copy Slides
How to Duplicate and Copy Slides in Google Slides

Google Slides Training Features:
Interactive bite-sized lessons
Get Certified
Accurate skill assessments
Customizable, LMS-ready content
4.9 out of 5 on G2

Once you create and modify some slides to make them just right, don't reinvent the wheel! Create copies to base your new slides on.
Duplicate a Slide
- Select the slide you want to duplicate.
- Click Slide on the menu bar.
Press Ctrl + D or right-click the slide and select Duplicate Slide .

The slide is duplicated, and inserted right after the initially selected slide.
Copy and Paste a Slide
If you want to insert a duplicate of a slide in another part of the presentation, you can copy and paste entire slides as well
- Select the slide you want to copy.
- Click Edit on the menu bar.

- Click in the thumbnail pane where you want to paste the slide.

A copy of the selected slide is inserted at the selected spot in the presentation.

FREE Quick Reference
Free to distribute with our compliments; we hope you will consider our paid training.
- LinkedIn-ready certificate
- Skill assessments
- Bite-sized, interactive lessons
- Saved progress
All Formats
How to Copy or Duplicate a Google Slide Presentation
Do you need help copying any Google Slide presentation? This article gives you the basic 411 of how to duplicate Google Slide presentations effortlessly.

Download the Free How to Copy or Duplicate a Google Slide Presentation Article in PDF
Step 1: open google slides first.

Step 2: Open a Slideshow and Choose the Slide to Copy

Step 3: Click Duplicate Slide

Step 4: Try Another Shortcut to Copy a Slide

Step 5: Make a Copy of the Selected Slides or the Entire Presentation

Why are you allowed to copy and duplicate slides in Google Slides?
What is the shortcut to creating a new slide, what is the shortcut for slideshow in google slides, where can i get presentation templates that are compatible with google slides, when was google slides invented, more in google.
Construction Notice Template
10+ notice template bundle, social media marketing copyright compliance document template, transport and logistics notice of force majeure template, notice of job opening template, basic notice template, property sold notice template, work notice example template, copyright infringement notice template, copyright notice template.
- How to Make a Dropdown in Google Sheets
- How to Custom Sort in Google Sheets
- How to Delete Cells in Google Sheets
- How to Delete Columns in Google Sheets
- How to Open an XLSX File in Google Sheets
- How to Delete Duplicates in Google Sheets
- How to Pin a Row in Google Sheets
- How to Make a Stacked Bar Chart in Google Sheets
- How to Press Enter in Google Sheets
- How to Pin Columns in Google Sheets
- How to Make a Schedule in Google Sheets
- How to Make a Scatter Plot in Google Sheets
- How to Sum Checkboxes in Google Sheets
- How to Delete Blank Rows in Google Sheets
- How to Open an Excel File in Google Sheets
File Formats
Word templates, google docs templates, excel templates, powerpoint templates, google sheets templates, google slides templates, pdf templates, publisher templates, psd templates, indesign templates, illustrator templates, pages templates, keynote templates, numbers templates, outlook templates.
More options for copying presentations in Google Slides
Quick launch summary .
- Select specific slides to copy instead of the whole deck.
- Remove the speaker notes from the copy.
Getting started
Rollout pace .
- Rapid Release domains : Gradual rollout (up to 15 days for feature visibility) starting on January 8, 2020
- Scheduled Release domains : Gradual rollout (up to 15 days for feature visibility) starting on February19, 2020
Availability
- Available to all G Suite customers
Filter by product
- Accessibility
- Admin console
- Cloud Search
- Directory Sync
- Drive for desktop
- Education Edition
- G Suite for Education
- G Suite for Government
- Google Apps Script
- Google Calendar
- Google Chat
- Google Classroom
- Google Cloud Directory Sync
- Google Docs
- Google Drawings
- Google Drive
- Google Forms
- Google Hangouts
- Google Keep
- Google Maps
- Google Meet
- Google Meet Hardware
- Google Photos
- Google Sheets
- Google Sites
- Google Slides
- Google Tasks
- Google Vault
- Google Voice
- Google Workspace
- Google Workspace Add-ons
- Google Workspace for Education
- Google Workspace Marketplace
- Google Workspace Migrate
- Marketplace
- Microsoft Exchange
- Microsoft Outlook
- Premier Edition
- Rapid Release
- Rapid Releases
- Scheduled Release
- Security and Compliance
- Weekly Recap
- What's New
Filter by date
Subscribe by feed, subscribe by email, localized google workspace updates, useful links, join the official community for google workspace administrators.
In the Google Cloud Community, connect with Googlers and other Google Workspace admins like yourself. Participate in product discussions, check out the Community Articles, and learn tips and tricks that will make your work and life easier. Be the first to know what's happening with Google Workspace.
______________
Learn about more Google Workspace launches
On the “What’s new in Google Workspace?” Help Center page, learn about new products and features launching in Google Workspace, including smaller changes that haven’t been announced on the Google Workspace Updates blog.
How to copy multiple slides in Google Slides
Copying slides in Google slides is easy peasy, here are few simple steps in which you can copy the slides in under a minute along with images…
- Click and drag to select the slides you want to copy. You can hold down the Ctrl (or Cmd) key while clicking to select multiple slides.

- Once the desired slides are selected, right-click on any of the selected slides.
- Choose "Copy" from the context menu.

- Switch to the new presentation where you want to copy the slides.
- Right-click on the slide sorter area.
- Choose "Paste" from the context menu.

Create PPT using AI
Just Enter Topic, Youtube URL, PDF, or Text to get a beautiful PPT in seconds. Use the bulb for AI suggestions.
character count: 0 / 6000 (we can fetch data from google)
upload pdf, docx, .png
less than 2 min
Sanskar Tiwari
Founder at MagicSlides
How to change border color in PowerPoint
24 April 2024
How to print notes in Google slides
2 April 2024
How to group shapes in Google slides
30 April 2024
How to change font color in Google slides
15 March 2024
How to highlight on Google slides
How to make an image a shape in Google slides
12 March 2024
How to make pictures transparent on Google Slides
How to rotate Google slides
1 April 2024
How to change the slide size in Google slides
6 March 2024
Stunning presentations in seconds with AI
Install MagicSlides app now and start creating beautiful presentations. It's free!

Get AI-Generated Presentations Ready in Seconds
Free AI PPT Tools

One Time Code
< Go back to Login
Forgot Password
Please enter your registered email ID. You will receive an email message with instructions on how to reset your password.

How To Copy And Paste A Slide In Google Slides
When working on a presentation using a Google Slides template , you might want to make new slides while maintaining the template’s design. Or, on occasion, you can choose to duplicate a previous slide to reuse its components, including text boxes. You may do other things with slides, like delete, move, or even hide them so they aren’t visible during your presentation. It makes no sense to recreate the same quarterly presentation continually, so why not duplicate those elaborate slides in a new presentation to save time? But to do that, you must learn how to duplicate a slide in Google Slides.
You sometimes create a slide you like a lot and want to copy its layout or design to other slides too. But at first, it may seem difficult to learn how to make a copy of a slide in Google Slides if you have never used this application before. Worry not; we will help you through it all, and by the end of this article, it will be a piece of cake for you.
How To Duplicate A Slide in Google Slides on Windows/Mac?
Below are the following ways on how to duplicate a slide in Google Slides in Mac or Windows :
- Using Right-click option
- Using Toolbar
- Using the Keyboard Shortcut
Method 1:Using Right-click option
You can duplicate a slide in Google Slides using Right-click option by following these steps:
- Go to your browser and visit https://www.docs.google.com/presentation to access Google Slides.
- Open your Google Slides presentation.
- Click on the slide that you want to duplicate and right-click on it.
- You will see a whole menu appear in front of you.
- Click on the “Duplicate Slide” option to see the same slide below the previous one.
- If you wish to duplicate multiple slides, hold down the CTRL/CMD key and select the slides you wish to duplicate.
- Right-click and select the “Duplicate Slides” option.
- You can also copy the slide and paste it anywhere in your presentation. For that, select the slide you want to duplicate, right-click, and select the “Copy” option.
- Select the slide after which you want to paste the copied slide.
- Right-click on that slide and go to the “Paste” option.
Method 2: Using Toolbar
To duplicate a slide in Google Slides, you can also use Toolbar.
- Open your Google Slides presentation from the list of presentations.
- Select the slide that you wish to replicate.
- Go to the “Slide” tab.

Method 3: Using Keyboard Shortcuts
To duplicate a slide in Google Slides using keyboard shortcuts, follow these steps:
- Select the slide you want to duplicate.
- Use the keyboard shortcut: CTRL/CMD+D to duplicate the slide.
- You can duplicate multiple slides at once too. By holding down the CTRL/CMD key, select the slides you want to duplicate. Use CTRL/CMD + D to duplicate them.
- If you wish to copy the slide and paste it elsewhere in your presentation, you can select the slide you wish to copy with the shortcut – CTRL/CMD+C and copy the slide in Google Slides.
- Go to the slide after which you want to paste the slide. Press CRTL/CMD + V to paste the slide.
READ MORE: How To Move A Slide In Google Slides
How To Duplicate Slide In Google Slides App On Android?
You can duplicate a slide in Google Slides on the Android app with the steps below:
- On your Android device, go to the Google Slides app and open your presentation.
- At the bottom, you will find the slides of your presentation.
- Touch and hold the slide you wish to duplicate.
- You will see the “Copy” option in the top-right corner of your screen.
- Touch and hold down the slide, after which you want to paste the slide.
- Go to the three dots on the top-right corner of your screen and click on “Paste”.
- If you wish to copy multiple slides, just select all the slides you wish to copy and repeat the above steps.
How Do You Duplicate A Slide In Google Slides on iPhone/iPad?
Below are the steps on how to copy and paste a slide in Google Slides on iPhone/iPad:
- Open the Google Slides app on your iPhone or iPad.
- Browse your presentation from the list of presentations.
- From the bottom, touch and hold down the slide you wish to duplicate/copy.
- Tap the “Copy” option from the top.
- Go to the slide after which you want to paste the copied slide.
- Touch and hold down the slide, and from the three dots at the top, go to the “Paste” option.
Since you now know how to copy a slide in g+Google Slides, you can duplicate any slide and paste it anywhere in your presentation. The duplicate option is one of the most helpful options in Google Slides whether you are creating a presentation for school, college or work, and it makes the job easy and quick. Following the above methods, you can duplicate a slide effortlessly and maintain consistency throughout the presentation.
You will find all the information required to duplicate a slide on PC, Android, or iPhone/iPad in the article above. And to get more such shortcuts and tips and tricks regarding the Google Slides function, keep reading our articles!
How To Copy A Slide In Google Slides Using Keyboard Shortcuts?
How to copy and paste a slide into google slides, can we move the slide anywhere else after duplicating it, how to copy more than one slide in google slides on android.
People Are Also Reading:
- How To Import Google Slides Themes
- How To Add A Video To Google Slides
- How To Save A Google Slide As An Image
- Learn To Make Google Slides Vertical
- How To Convert Presentations From Google Slides To PowerPoint
Table Of Content
Related posts from the same category.

16 May, 2023 | SlideUpLift
How To Add A New Slide In Google Slides
Google Slides is an easy way to create group projects and presentations. Many people can work together at a time on a project to make a great presentation. Moreover, you

17 May, 2023 | SlideUpLift
How To Move A Slide In Google Slides?
Are you someone who loves to deliver professional-looking pitches or presentations? Then you must know that sometimes you may need to change your slides to a different position in your

23 May, 2023 | SlideUpLift
How To Hide And Unhide A Slide In Google Slides
How To Hide A Slide In Google Slides On A Computer? There are a couple of ways to hide a slide in Google Slides on a computer: Using Right Click

9 Jun, 2023 | SlideUpLift
How To Delete A Slide In Google Slides?
Google Slides is a great place to make fantastic presentations for school, college, or work. But keeping your presentation minimal and decluttered is very vital. It is necessary not to

22 May, 2023 | SlideUpLift
How To Copy And Paste a Slide In PowerPoint
When making presentations, you can save time and effort by simply copying and pasting a slide into PowerPoint. The duplicate slide option in PowerPoint is useful to eliminate the two-step

17 Apr, 2024 | SlideUpLift
How To Change Slide Size In Google Slides? [Easy Guide]
Don’t let a mismatched canvas be the obstacle to your dreams! Learn how to change slide size in Google Slides to make space for your innovation and creativity. Let the

24 Jan, 2023 | SlideUpLift
How to Link Slides in Google Slides?
Do you find yourself struggling to move through your presentations quickly and effectively? Are you looking for ways to make your slides more interactive? If the answer is yes, you’ve

6 Jan, 2023 | SlideUpLift
How to Add Header and Footer in Google Slides?
Google Slides is a powerful presentation tool allowing users to create professional-looking presentations easily. One important aspect of any presentation is the header and footer, which can provide context and

18 Nov, 2023 | SlideUpLift
How to Select Multiple Slides in Google Slides Presentations?
The feature to select multiple slides in Google Slides is a game-changer for anyone looking to boost efficiency in presentation creation. It enables you to make bulk edits, apply consistent

29 Dec, 2023 | SlideUpLift
How to Make Checkboxes in Google Slides?
Google Slides is one of the most widely used presentation tools today. It is used for creating simple text and picture presentations and complex presentations. You can create surveys and
Forgot Password?
Privacy Overview
Necessary cookies are absolutely essential for the website to function properly. This category only includes cookies that ensures basic functionalities and security features of the website. These cookies do not store any personal information
Any cookies that may not be particularly necessary for the website to function and is used specifically to collect user personal data via ads, other embedded contents are termed as non-necessary cookies. It is mandatory to procure user consent prior to running these cookies on your website.
How to Copy and Paste Multiple Slides in Google Slides: A Simple Guide
Copying and pasting multiple slides in Google Slides can save you a lot of time, especially when dealing with lengthy presentations. Simply select the slides you want to duplicate, right-click, copy, and paste them where you need. This process is straightforward and efficient.
How to Copy and Paste Multiple Slides in Google Slides
Learning how to copy and paste multiple slides in Google Slides can streamline your workflow, letting you replicate slide groups quickly. Follow these steps to master the technique.
Step 1: Open Your Presentation
First, open the Google Slides presentation where you want to copy and paste slides.
This ensures you are working in the correct file and can easily access the slides you need.
Step 2: Select Multiple Slides
Click the slide thumbnail you want to start with, then hold down the Shift key and click the last slide in your selection.
This allows you to select a range of slides all at once, making it quicker to copy multiple slides.
Step 3: Copy the Slides
Right-click on any of the selected slides and choose "Copy" from the context menu, or press Ctrl+C (Cmd+C on Mac).
This action copies all the selected slides to your clipboard, ready to be pasted.
Step 4: Navigate to the Destination
Go to the slide where you want to paste your copied slides. Click on the slide thumbnail in your presentation.
Making sure you’re at the correct insertion point is crucial for maintaining the flow of your presentation.
Step 5: Paste the Slides
Right-click in the slide thumbnail area and select "Paste," or press Ctrl+V (Cmd+V on Mac).
Your copied slides will appear in the order you selected them, keeping your presentation organized.
After completing these steps, you’ll see the duplicated slides in the new location within your presentation. You can now edit and customize these slides as needed.
Tips for Copying and Pasting Multiple Slides in Google Slides
- Use Keyboard Shortcuts : Speed up the process by using Ctrl+C and Ctrl+V (Cmd+C and Cmd+V on Mac) for copy and paste.
- Select Non-Contiguous Slides : Hold down the Ctrl key (Cmd on Mac) while clicking to select individual slides that aren’t next to each other.
- Duplicate for Efficiency : Use the "Duplicate Slide" option if you only need to copy one slide multiple times.
- Check Formatting : Ensure that the formatting remains consistent after pasting, as sometimes styles can change.
- Rename Slides : After pasting, rename your slides to avoid any confusion during your presentation.
Frequently Asked Questions
Can i copy and paste slides between different google slides presentations.
Yes, you can copy slides from one presentation and paste them into another. Open both presentations in separate tabs and follow the same copy-paste steps.
How do I maintain the original formatting when pasting slides?
When pasting, you can choose to match the destination style or keep the original formatting. Right-click and select your preferred option from the context menu.
Can I copy and paste slides in Google Slides on a mobile device?
Yes, you can. The process is similar, but instead of right-clicking, you’ll use the mobile interface’s copy and paste options.
What if I want to copy slides but skip animations?
You’ll need to manually adjust the animations after pasting the slides, as copying them keeps all slide elements intact, including animations.
Is there a limit to how many slides I can copy at once?
While there isn’t a strict limit, copying a large number of slides at once can sometimes slow down the process or cause errors. It’s best to copy in smaller batches if you encounter issues.
- Open your presentation.
- Select multiple slides.
- Copy the slides.
- Navigate to the destination.
- Paste the slides.
Mastering how to copy and paste multiple slides in Google Slides is a skill that can significantly boost your productivity. Whether you’re creating a new presentation or modifying an existing one, being able to quickly duplicate slides saves you time and effort. Remember, practice makes perfect. The more you use this feature, the more intuitive it will become.
For those looking to delve deeper into Google Slides’ capabilities, consider exploring other features like slide master views, linking slides, and embedding multimedia. These additional tools can enhance your presentations even further. Now that you’ve learned how to efficiently copy and paste multiple slides, you’re well on your way to creating polished and professional presentations with ease. Happy presenting!

Kermit Matthews is a freelance writer based in Philadelphia, Pennsylvania with more than a decade of experience writing technology guides. He has a Bachelor’s and Master’s degree in Computer Science and has spent much of his professional career in IT management.
He specializes in writing content about iPhones, Android devices, Microsoft Office, and many other popular applications and devices.
Read his full bio here .
Share this:
- Click to share on Twitter (Opens in new window)
- Click to share on Facebook (Opens in new window)
- Click to email a link to a friend (Opens in new window)
- Click to share on LinkedIn (Opens in new window)
- Click to share on Reddit (Opens in new window)
- Click to share on Pinterest (Opens in new window)
- Click to share on Tumblr (Opens in new window)
Related posts:
- How to Duplicate a Slide on Google Slides
- How to Hide a Slide in Google Slides
- How to Change Slide Dimensions in Google Slides
- How to Delete a Slide on Google Slides
- How to Delete Multiple Slides in Google Slides
- How to Put Canva Slides into Google Slides: A Step-by-Step Guide
- How to Number Slides in Google Slides
- How to Make Columns in Google Slides
- How to Import Slides in Google Slides: A Step-by-Step Guide
- How to Put YouTube Videos in Google Slides
- How to Copy Image from Google Slides
- How to Copy and Paste on Google Sheets: A Step-by-Step Guide
- How to Make Google Slides Play Automatically: A Step-by-Step Guide
- Importing Keynote Presentations to Google Slides: A Step-by-Step Guide
- How to Insert Google Drawing into Slides: A Step-by-Step Guide
- How to Share Google Slides in Presentation Mode Like a Pro
- How to Get Google Slides to Play Automatically: A Step-by-Step Guide
- How to Change Font on Google Slides Text Box
- How to Embed a Vimeo Video in Google Slides: A Step-by-Step Guide
How to Copy a Slide in Google Slides

Copying slides in Google Slides is a great way to reuse content and save time when creating presentations. Whether you want to duplicate a single slide or copy multiple slides across presentations, Google Slides makes it easy.
Introduction
Copying slides allows you to:
Step 1: Duplicate a Single Slide
Duplicating a single slide is useful when you want an exact copy to reuse within the same presentation.
You can also use the keyboard shortcut CTRL+D (Windows) or CMD+D (Mac) to quickly duplicate the selected slide.
Step 2: Copy and Paste Slides
This allows you to copy one or more slides and paste them in any order within the same presentation.
Step 3: Import Slides from Another Presentation
The selected slides will be inserted into your presentation while retaining the original formatting.
Step 4: Use Linked Slides
Now when the original slide is updated, the copied slide also updates.
Step 5: Make a Copy of the Entire Presentation
A duplicate presentation will open in a new tab retaining all formatting and content.
Learning how to copy Google slides gives you a handy way to repurpose decks for new presentations.
Whether duplicating a single slide, copying several slides within or across presentations, or making a complete copy – Google Slides offers flexible options to reuse slides efficiently.
Implement these 5 easy methods for copying slides next time instead of creating content from scratch! Your presentations will come together faster, saving time and effort.
About The Author
Vegaslide staff, related posts, how to insert video in google slides, simple method to add voiceover to google slides, how to start a q&a session in google slides, how to use the google slides presenter toolbar.
- Best Video Converters
- The Best Video Downloaders for Windows

“Downloading Do Not Turn OFF The Target!” Error In Samsung
- The Best Network Monitoring Tools
- The Best TVs for Xbox Series X

‘IP address conflict’ – How To Manage & Fix
- Best Laptops Under $300
- Best Laptops Under $500

10 Alternatives to Trapcall
- Social Media
- Cut the Cord
TechJunkie is a BOX20 Media Company
Home Mobile Android How to Duplicate a Slide in Google Slides
How to Duplicate a Slide in Google Slides

How to Duplicate a Slide in Google Slides on the Web
1. from the toolbar.
Did you know you can use the Toolbar to duplicate a slide in Google Slides? For that, follow the steps given below –
- Open Google Slides.
- Go to the presentation where you want to duplicate a slide.
- Select the slide from the left bar where you can see all the slides that you want to duplicate.
- Click on the Slide menu from the top menu.

Be aware that when you duplicate a post, it also duplicates the speaker note you have added to the Google Slide.
2. Using Keyboard Shortcuts
Another way to duplicate a slide in Google Slides is to use the keyboard shortcut.
- Open Google Slides presentation.
- Select the slide that needs duplication.
- Now, press the CTRL +D or CMD+D keys at the same time. It will duplicate the slide.
- If you want to duplicate more than one slide at a time, hold the CTRL or CMD key and choose the slides you want to copy. After that, press CTRL+ D or CMD + D for duplication.
You can draw on your Google Slides and even animate the drawing to make the presentation more interactive.
3. Using Context Menu or Right-Click
The third method uses a context menu or the right-click option to duplicate a slide in Google Slides.
- Select the slide that needs duplication and right-click.
- When you see the menu, select the Duplicate Slide option.
- If you want to duplicate more than one slide, hold the CTRL or CMD key and choose the slides you want to copy,

4. Copy & Paste Slide
It is probably the easiest way to duplicate a slide, but you need to paste it in the right place. If done for multiple slides and done incorrectly, you will have to move them manually.
- Another way is to copy and paste the slide. For that, choose the slide you want to copy and right-click on it.
- Now, choose the Copy option.
- Go to the slide after which you want to paste the copied slide.
- Right-click and click on the Paste option from the context menu.
How to Duplicate Slides in Google Slides on Android or iPhone
Thankfully, the Google Slides mobile app also offers the functionality to duplicate a slide, so you won’t have to use the web version for this simple task.
- Open the Google Slides app.
- Go to the presentation where you want to duplicate a slide.
- Tap on any slide once, and you will see options.

- Locate the slides at the bottom part.
- Press and hold the slide you want to duplicate.
- Select the Copy option from the top part of the screen.
- Now, press and hold the slide after which you want the copied slide to be pasted.

You follow the same process for duplication of multiple slides.
Google Slides Makes Presenting Easier
Do you feel better knowing how to duplicate a slide in Google Slides? The process is simple and can be completed within a few minutes. If you use Google Slides a lot, this could help you save a lot of time by ensuring you don’t miss out on including essential elements in your slide while creating a presentation.
Now that you know how to duplicate slides, check out how to add Google Sheets to Google Slides to enrich your presentation further.
A: To Show or hide filmstrip in Google Slides, open Google Slides. Go to the presentation where you want to show or hide the filmstrip. Select View from the Toolbar. From the drop-down menu, click on Show Filmstrip. If there is a tick mark, it means the film strip is visible. You can press on it again to hide the filmstrip.
A: To skip a slide in Google Slides, open Google Slides. Choose the slide you want to skip and right-click on it. Choose the Skip Slide option.
How to Measure Distance in Google Maps
Leave a Reply Cancel reply
Your email address will not be published. Required fields are marked *

Ashish Mohta
Nov 5, 2023
Ashish, Computer Engineer by profession, has been writing about tech for 16 years, with a primary focus on Windows and Smartphones. He has a keen interest in writing about Social Media, as it constantly evolves, introducing new features to explore.
165 Articles Published
You May Like

How To Text Someone from a Different Phone Number (Not Your Own)

Ronil Thakkar
Mar 13, 2024
How to Unsubscribe From all YouTube Channels
Mar 11, 2024

How to Fix the Waiting for This Message Error on WhatsApp
Mar 10, 2024

Signal: How To Create a Username to Hide Your Number
Mar 4, 2024

How To Fake Your Location on Life360

Robert Hayes
Feb 29, 2024

How to Hide From Someone Without Blocking Them on Messenger
Jun 4, 2024

How to Change Emoji Set in Telegram
May 29, 2024

How to Share Collaborative Collection on Instagram With Multiple People
May 27, 2024

How to Change Your Name in Zoom

May 31, 2021

How To Filter By Color in Google Sheets
Jan 15, 2020
Copyright @2024 TechJunkie
Unsupported browser
This site was designed for modern browsers and tested with Internet Explorer version 10 and later.
It may not look or work correctly on your browser.
- Presentations
How to Copy and Paste (Images & Text) on Google Slides
- Bahasa Indonesia
Copy and paste is an easy trick to save time when building your Google Slides presentation. If you need to use text, images, or graphics more than once, there’s no need to go through the trouble of reinserting over and over again. Instead, just copy the original object and paste it into a different spot. You can also copy a slide on Google Slides.
As you’ll soon see, Google Slides lets you copy almost any object quickly for use anywhere within your presentation. Let’s learn how to copy and paste on Google Slides.
Get Your Free Copy of Our Helpful Presentations eBook
In this tutorial, you're learning how to copy a slide on Google Slides as well as other ways to use copy and paste, but there's so much more to know about making a good presentation. You can go beyond learning about the tool to focusing on the presentation itself. Our free eBook will teach you all about the presentation process.

Note : In this tutorial we use the professionally-designed Marco Google Slides template . You can find more great Google Slides templates on Envato Elements or GraphicRiver .
How to Copy and Paste on Google Slides

Note : Watch this short tutorial screencast or follow the quick steps below, that complement this video.
1. Copy Individual Text
If you want to copy individual lines of text, start off by clicking and dragging to select it. Then, on your keyboard, copy the text by using Control-C on Windows, or Command-C on Mac. When you select the text, your screen should look something like this:

Find the area you want to paste into, and press Control-V on Windows, or Command-V on Mac to paste. Your text will reappear:

2. Copy Text Boxes, Images, and Other Objects
If you want to copy any other kind of object—a text box, an image, a shape, or a chart—the process is very similar. Simply click on the object you want to copy, and then repeat the same key commands— Control-C on Windows, or Command-C on Mac. Here's a slide with some objects selected:

You can paste objects onto the same slide, between different slides, or even into other apps on your computer. Again, press Control-V on Windows, or Command-V on Mac to paste. The object will instantly reappear.
3. Copy and Paste Slides
You can also copy and paste full slides, individually or in groups. Click to select a slide in the sidebar over on the left side, then use the same key commands to copy and paste. Here's an example:

You can click between any two slides while pasting, and your slide will paste into that position. Of course, you can click and drag to reorder later. And remember, any change you make can be easily undone by clicking the Undo arrow in the top left corner of the Google Slides menu.

Finishing Up
Take reinvention out of your creative process by using copy and paste in Google Slides. As you can see, it’s easy to duplicate virtually any kind of object—even a full slide! Use these techniques today to streamline your presentation-building process.
Learn More About Google Slides
You've just learned how to copy and paste on Google Slides, but that's just the start of you could learn. We've got a great selection of Google Slides tutorials on Envato Tuts+. Study one, or all, to improve your skills. Here are some helpful tutorials to study:

One way to give your presentation a professional edge is to use Google Slides templates. You can also find some great templates in this article:

Take Your Presentation to the Next Level With Our Free Presentation eBook
Now that you know how to use copy and paste in Google Slides, you're ready to learn more about how to make your presentation the best it can be. We've got the perfect resource to help you with that. Learn how to write, design, and present a powerful presentation with our presentation eBook.

Download our new eBook: The Complete Guide to Making Great Presentations . Get it for free with a subscription to the Tuts+ Business Newsletter.

How-To Geek
How to convert a powerpoint to google slides.

Your changes have been saved
Email is sent
Email has already been sent
Please verify your email address.
You’ve reached your account maximum for followed topics.
A Great Linux Feature Is Coming to ChromeOS Flex
The internet is not forever, so it's time to preserve what you can, amazon's prime big deal days return in october, quick links, convert a powerpoint by uploading to google slides, convert powerpoint by importing to google slides, convert powerpoint by uploading to google drive.
Both Microsoft PowerPoint and Google Slides are solid presentation creators. But maybe you prefer Google Slides. If you have a PowerPoint slideshow (a PPTX file) that you want to convert to Google Slides, we'll show you three ways to do it.
You can upload a PowerPoint presentation directly to the Google Slides website. From there, open it in Slides, make your changes, and it will save automatically.
Related: The Beginner's Guide to Google Slides
Visit Google Slides , sign in, and click "Blank" below Start a New Presentation on the main page.

When the Blank presentation opens, click File > Open from the menu.

In the pop-up window, select the Upload tab. Then, either drag your PPTX file onto the window or click "Select a File From Your Device."

You'll see the slideshow open immediately in Google Slides as your active presentation. The name of the slideshow is the PowerPoint file's name. You can change it if you like by clicking that text in the upper left corner.

From there, you're set to edit or present the slideshow . Since all changes save automatically, you do not have to take an extra step to save the presentation as a Google Slides file.

You can visit the Google Slides main page to see your presentation in the list. You can also access your presentation from Google Drive.

Another way to convert your presentation from a PowerPoint to Google Slides is by importing it . The benefit to this method is that you can select the slides you want to convert if you don't want the entire presentation.
Related: How to Import a PowerPoint Presentation into Google Slides
Select "Blank" on the main Google Slides screen. When the untitled presentation opens, click File > Import Slides from the menu.

Select the Upload tab. Either drag your PowerPoint slideshow file onto the window or click "Select a File From Your Device" to browse for, select, and open the file.

When the Import Slides window appears, click each slide that you want to use in Google Slides. If you want to use them all, click "All" next to Select Slides on the top right.

Optionally, check the box on the bottom right to keep the original theme from the presentation. Then, with the slides selected, click "Import Slides."

When the slides you picked open in the blank presentation, click the name on the top left to rename it. By default, the slideshow will be named Untitled Presentation.

Your changes save automatically, and you can access your converted presentation from the main Google Slides page or Google Drive.
Did you know you can also convert PowerPoint presentations to Word files for custom slide printing?
One more way to convert a PowerPoint to Google Slides is by uploading the file to Google Drive. This method might be more convenient if you happen to have Google Drive open already.
On the main Google Drive page, click "New" on the top left and choose "File Upload."

Locate and select your PowerPoint file, then click "Open."

After the file uploads to Google Drive, right-click it and choose Open With > Google Slides.

The presentation will open in Google Slides but remain a PowerPoint file as you can see next to the name on the top left.
Click File > Save as Google Slides from the menu to convert it.

This will open the presentation in a new tab as a Google Slides file. As described above, any changes you make will save automatically, but now as a Google Slides presentation. And, you'll see both files in your Google Drive.

If you want to remove the PowerPoint file from your Google Drive after you convert it, right-click it and pick "Remove."

Interested in doing the exact opposite? Learn how to convert Google Slides to PowerPoint .
- Google Slides
Our Network
- Network World
Google Slides cheat sheet: How to get started
How to use google slides to create, collaborate on, and lead business presentations..

Need to build a slide presentation for a meeting, training, or other event? Google Slides is an easy-to-use web app that comes with the essential tools and more. It stores your presentations in the cloud with Google Drive. Anyone with a Google account can use Slides and Drive for free, and they’re also included with a Google Workspace (formerly G Suite) subscription for business and enterprise customers. There are Google Sheets mobile apps for Android and iOS, too.
This guide will help you become familiar with the Google Slides web interface and show you how to start a new presentation, upload a Microsoft PowerPoint file to edit in Google Slides, collaborate with others on your presentation, and finally, present it to others.
Create or open a presentation
Log in to your Google or Workspace account. Then:
From Google Slides : At the top of the home page, you’ll see a “Start a new presentation” header, with a row of thumbnails underneath. To start a new, blank presentation, click the Blank thumbnail. To start a new presentation in a template, select one of the thumbnails to the right or click Template gallery toward the upper-right corner, then click any thumbnail on the page that appears.

The Google Slides home page. (Click image to enlarge it.)
Below the “Start a new presentation” area you’ll see a list of presentations that are stored in your Google Drive or shared with you. To open a presentation, click it in this list.
The list of your presentations appears in reverse chronological order starting with the presentation you most recently opened. Clicking the “AZ” icon at the upper right of this list changes the sort order to Last modified by me , Last modified , or in alphabetical order by presentation title. You can also browse to a specific folder by clicking the folder icon next to the “AZ” icon.
From Google Drive : Presentations stored in your Google Drive are listed in the main window of the Drive home page. To see a listing of presentations that others are sharing with you, click Shared with me in the left column. From either list, double-click a presentation to open it in Google Slides.
To start a new, blank presentation, click the New button at the upper-left of the screen and then click Google Slides .
If you want to use a template to start a new presentation, click the New button, then move the cursor over the right arrow next to Google Slides and select From a template . The template gallery for Google Slides will open; click a thumbnail to start a new presentation in that template.

Creating a new presentation from Google Drive.
From Google Slides or Drive: You also can use the search box at the top to find presentations in your Google Drive or shared with you. Enter words or numbers that may be in the presentation you’re looking for.
Upload a PowerPoint presentation to Slides
You can edit a Microsoft PowerPoint presentation in Google Slides, but first you must upload it to Google Drive.
From Google Slides: Click the folder icon ( Open file picker ) that’s above and toward the right corner of your presentations list. On the panel that opens, click the Upload tab. Drag-and-drop your PowerPoint file (.ppt or .pptx) onto this panel, or browse your PC’s drive to select it.
From Google Drive: Click the New button, then File upload , and select the PowerPoint file from your PC’s drive and click Open .
Traditionally, when you uploaded PowerPoint files to Google Drive, they were automatically converted to Slides format. That’s still the case when you upload PowerPoint files via the Google Slides home page .
However, Google now supports the ability to edit Microsoft Office files in their native format. By default, any .pptx files that you upload via Google Drive will remain formatted as PowerPoint documents. You can edit and collaborate on a PowerPoint file right in Slides, with all changes made by you or your collaborators saved directly to the PowerPoint file.
On the Google Slides and Drive home pages, native PowerPoint files will be denoted with an orange “P” icon, and when you open a native PowerPoint file in Sheets, you’ll see a “.PPTX” flag to the right of the document title.

Native PowerPoint files show the PowerPoint icon (top) instead of the Google Slides icon (bottom).
If you’d rather have Google convert PowerPoint files to Slides format automatically when you upload them via Google Drive, click the gear icon in the upper-right corner of the Drive home screen and select Settings from the drop-down menu. In the Settings box next to “Convert uploads,” check the checkbox marked Convert uploaded files to Google Docs editor format .
Work in a presentation
When you open a new or existing presentation, its first slide appears in the main window of Google Slides. Here’s a breakdown of the toolbars, menus, panes, and sidebars that appear around your presentation.
The left pane shows thumbnails of all the slides in your presentation. Click a thumbnail, and the slide it represents will appear in the main window, where you can edit it.

The Google Slides editing interface. (Click image to enlarge it.)
Your presentation’s title appears along the top of the screen. To change it, click anywhere inside the title and start typing.
The menu bar below your presentation’s title has a complete set of tools for working with presentations. These are the main submenus to know:
- File has commands for taking action on the whole presentation, including Print, Rename, and Share.
- Edit lists the standard editing commands such as copy, cut, paste, delete, duplicate, and find and replace.
- View lists several ways that you can view your slides as you design and edit them. This includes arranging them into a grid, previewing them as a slideshow, or zooming in on them. You can also watch the transition effect that takes place between slides when they’re played in a slideshow.
- Insert lets you add several objects to your slides, including charts, diagrams, pictures, tables, and text. You can also add links to YouTube videos or sound or video files that are stored in your Google Drive.
- Format lets you change the look of your slides. Certain functions on this submenu become clickable depending on whether you’ve selected an image or text on a slide, or selected the slide itself.
- Slide is where you can add, delete, or duplicate a slide that you’ve selected. You can also add a preset layout to a slide, change its background or theme color, or add and edit a transition effect that takes place between slides when your presentation is played as a slideshow.
- Arrange lists tools that let you group or reorder objects on a slide in relation to another. For example, you can place an image behind another image or group an image and a block of text together to make them easier to move at once.
- Tools leads to several miscellaneous functions. These include letting you record a voice clip to go with a slide, running a spell checker, and showing you a list of objects in your presentation that are linked to other files.
The toolbar directly above your presentation puts commonly used commands in easy reach. From this toolbar, you can click buttons to add to a slide or change its background, comments, layout, objects (images, lines, shapes, text), text style, theme colors for the whole presentation, transition effects during a slideshow, and more. The buttons on the toolbar change depending on whether you’ve selected image or text on a slide or the slide itself.
Notice that there’s no Save button in the toolbar — or anywhere in Google Slides. That’s because Slides automatically saves any changes you make to your presentation.
Speaker notes: Along the bottom of each slide you’ll see an area marked Click to add speaker notes . Here you can type in brief notes to remind yourself what to do or say when the slide is being shown. Only you will see these notes when you show your presentation to an audience.
Themes sidebar: When you start a new blank presentation, the Themes sidebar opens on the right side of the screen. (You can also open this sidebar at any time by clicking Theme on the toolbar above your presentation.) Themes apply the same fonts, colors, and other design elements to all the slides in a presentation, giving it a consistent look and feel. Click a thumbnail in this sidebar to change your presentation to that theme.
Create and manage slides
Here are the basic things to know about working with slides in a presentation.
Add a new, blank slide to your presentation: Click the + button at the left end of the toolbar above your presentation. Alternatively, if you click the down arrow next to the +, you can choose a layout to use as the basis for a new slide.

Click the down arrow next to the + button in the toolbar to choose a layout for a new slide.
Apply or change a slide’s background: Select the slide’s thumbnail in the left sidebar and click Background on the toolbar above your presentation. On the panel that opens, you can change the slide’s background color or use an image file from your Google Drive, Google Photos account, or PC as the background.
Apply or change a slide’s layout: Select the slide’s thumbnail in the left pane, then click Layout on the toolbar above your presentation. On the panel that opens, select the layout you want to apply to this slide.
Apply or change a slide’s transition: Select the slide’s thumbnail in the left sidebar and click Transition on the toolbar above your presentation. In the Motion sidebar that opens along the right side of the screen, you can apply or change the animated transition effect that is played before this slide.

Choosing a transition style in the Motion pane.
Move a slide to a different spot in the slideshow sequence: Click and hold its thumbnail in the left sidebar, drag it up or down to another place in the sequence, and release it.
Delete a slide: Right-click its thumbnail in the left sidebar and select Delete from the pop-up menu. Alternatively, select its thumbnail and select Edit > Delete from the menu bar or just press the Delete key.
Share and collaborate on a presentation
Presentations are often a group effort, with several team members contributing to and polishing a presentation. In Slides, it’s easy for multiple collaborators to work on a presentation together.
First, you need to share the presentation. When you’re viewing your presentation in Google Slides, click the Share button at the upper-right. Or, from your Google Drive homepage, click to highlight the presentation that you want to share. Then, in the toolbar toward the upper right, click the Share icon (a head-and-shoulders silhouette with a +).
Either way, the “Share” panel will open.

Setting permissions for a file being shared privately.
Share a presentation privately
In the entry box, enter the email addresses (or names of your Google Contacts) of the people with whom you want to share. By default, the people you invite to your presentation can edit it and reshare it with others.
To change access permissions for invitees: Click Editor to the right of the entry box and choose another option from the drop-down menu. Commenter means they can view your spreadsheet and add comments but can’t change it. Viewer means they can view your presentation but can’t edit it or add comments.
To prevent your presentation from being reshared, downloaded, or printed: Click the gear icon at the upper-right of this panel. On the smaller panel that opens, uncheck the boxes by Editors can change permissions and share and Viewers and commenters can see the option to download, print, and copy .
When you’re done setting permissions (and, optionally, typing in a message to your invitees), click Send , and everyone you’ve added will receive an email with a link they can click to access the document.
The shared presentation icon.
A presentation you’ve shared (or that others have shared with you) will have an icon of two silhouetted heads next to it in the presentations list on your Google Sheets and Google Drive home pages.
To limit or change a person’s access to your presentation: With the presentation open in Google Slides, click the Share button at the upper-right. Or, from Google Drive, highlight the presentation and click the Share icon.
The Share panel reopens showing a list of all the people you’ve invited, along with their permission status. Click the down arrow to the right of a person’s name, change their permission level or remove their access entirely, and click Save .

You can change permissions for people you’ve shared a presentation with on an individual basis.
If you have a Google Workspace subscription, another option is to select Give temporary access and, next to Access expires , select a date within one year of the current date. If you set an expiration date for a person that you’ve assigned as Editor, their access will be downgraded to Commenter on the expiration date.
Share a presentation publicly
Most business users will want to share presentations privately with select colleagues or clients, but you do have the option to share a presentation publicly. At the bottom of the Share panel is a “General access” area where you can copy a link to the document. By default, this link is restricted to those you invite to the document. To change it to a public link, click Restricted and select Anyone with the link from the menu that appears.
Click Copy link and the link to your presentation will be copied to your PC’s clipboard. You can share this link by pasting it into a chat message, document, email, forum post, or most other means of online written communication. Anyone who clicks this link will be able to view your presentation online. (Be aware that anyone can copy and reshare this link.)
To allow anyone in the public to comment on or edit your presentation: At the bottom right of the Share panel, click Viewer and select Commenter or Editor from the drop-down menu. Then click the Done button. Now the web link to your presentation will let anyone who clicks it add a comment or edit it.

Sharing a spreadsheet publicly.
To turn off public sharing for your presentation: Bring up the Share panel again. Near the bottom, click Anyone with the link and select Restricted from the menu, then click the Done button.
Note: You can apply both public and private sharing methods to your presentation. For example, you could allow the public to only view your presentation, but allow specific people that you’ve invited to comment on or edit it.
Collaborate on a presentation
The people you’ve shared a spreadsheet with can view or work on it at the same time as you or at other times. Remember that people who have Editor privileges to your presentation can change all aspects of it. Having multiple people making changes to a presentation can get confusing. In most cases, setting everyone to Commenter is the best way to collaborate in Slides: People can attach comments to a slide or to objects in a slide, but their comments won’t alter your presentation’s information or design.
To add a comment to a slide: Right-click its thumbnail in the left sidebar and select Comment from the menu that opens. Alternatively, you can select its thumbnail and select Insert > Comment from the menu bar or click the Add comment button (a speech balloon with a + sign).
A blank comment card with your name on it opens to the right of the slide in the main window. On this card’s entry line, type a brief comment, and when you’re finished, click the Comment button.

Typing in a new comment.
To add a comment to an object on a slide: Right-click the object (a block of text, chart, image, picture, etc.) and select Comment from the menu that opens. Alternatively, you can select the object and select Insert > Comment from the menu bar.
To draw someone’s attention to a comment: As you’re composing the comment, type the @ symbol and begin typing their name, then select the person from the list of suggested Google contacts that appears. They’ll receive an email notifying them of the comment and linking to it.
To read, reply to, or remove a comment: A slide that contains a comment is denoted in the left sidebar with a speech balloon by its thumbnail. Click the slide’s thumbnail to make the slide appear in the main window, and you’ll see all its comment cards on the right.
To reply to a comment, click its card. The card will expand to reveal an entry line where you can add a comment in response.

Replying to a comment.
Clicking the checkmark at the upper right marks the comment card as “resolved” and removes the card from the presentation. Clicking the card’s three-dot icon opens a menu that lets you edit or delete your comment.
To see a list of all comments: Click the Open comment history icon (the speech balloon) to the left of the Slideshow button. A sidebar will open along the right side of the screen; it lists all the comment cards in your presentation. When you click a comment on this list, the view of your presentation in the main window will jump to the cell where the comment is located and open its comment card.

The Comments pane lets you quickly review all comments and jump to specific ones.
For more details about collaborating on your presentation, including what it’s like to collaborate in real time, see “ How to collaborate on a document ” in our Google Drive guide. You can also collaborate on a presentation in Google Chat; that’s covered later in this story.
Recover older versions of a presentation
It’s easy to go too far when making tweaks to a presentation. Fortunately, it’s also easy to roll back to an earlier version of the presentation. Click File > Version history > See version history . This opens a panel on the right that shows a list of older versions of your presentation.

Using Version history to view an earlier version of a presentation. (Click image to enlarge it.)
To view an earlier version of your presentation: Click the date for it in the list. That version of the presentation will then appear in the main window.
To restore an earlier version so it replaces your current presentation: With the version you want to restore showing in the main window, click the yellow Restore this version button at the top of the screen. The restored version will then appear at the top of the version history list.
To give an older version a unique name: Click on its date. You’ll be prompted to type in words to replace the date. (The date and time will then appear in smaller size underneath the new name.)
Give a presentation
When it’s time to play your presentation to an audience, Google Slides has two modes: Slideshow and Presenter view. Slideshow mode essentially shows what your audience will see. Presenter view mode provides additional tools for your eyes only that run alongside Slideshow mode.
Slideshow mode: Click the Slideshow button at the upper-right corner of the screen. Google Slides will expand to full-screen view and show the slide that’s currently in the main window. (If you want to start the slideshow from the first slide in your presentation, click the down arrow to the right of the Slideshow button and select Start from beginning .)

The control bar in Slideshow mode lets you click through the slides, turn on auto-play, use a laser pointer effect, and more. (Click image to enlarge it.)
When you move the on-screen pointer to the lower-left corner of your presentation, a control bar appears. You use this to click forward and back through the slides. Clicking the three-dot icon on the control bar opens a menu with other controls, such as starting auto-play and adjusting how quickly it moves from slide to slide.
On this menu, Turn on the laser pointer turns the mouse pointer into a simulated red laser dot. Captions preferences — available only if you’re using a Chrome browser or Chromebook — lets you turn on real-time, automatic transcribing of your words as you say them (English only) and shows them to your audience as on-screen captions. Open speaker notes takes your presentation out of full screen and opens a separate “Presenter view” window, as described below.
Presenter view mode: Click the down arrow to the right of the Slideshow button and select Presenter view . This shows the presentation in your browser window and launches a separate window that assists you while you’re giving your presentation.

Presenter view lets you (but not your audience) see your speaker notes while presenting. (Click image to enlarge it.)
From the Presenter view window, you can jump to any slide in your presentation, read the speaker notes you wrote for a slide, and control the Q&A feature. There’s also a timer that you can set to remind yourself how much time you’re spending showing a slide — or the entire presentation — to your audience.
Click the AUDIENCE TOOLS tab to use the Q&A feature, which lets you take questions from your audience. To open questions for a slideshow, click the Start new button. A web link appears at the top of your presentation. An audience member watching your presentation on their computer, phone, or tablet can click/tap that link, which will take them to a page where they can type a question for you. You’ll see the question in your Presenter view window, and you can choose whether to show their question to the rest of your audience during the presentation. To close questions for a presentation, turn the switch from ON to OFF .

Audience members can submit questions from their devices, and the presenter can decide whether to display them as part of the slideshow. (Click image to enlarge it.)
Present in Google Meet
Need to give a presentation during a Google Meet video meeting? As long as you’re using a Chromium-based browser (Chrome, Microsoft Edge, Opera, etc.), it’s easy: Toward the upper right of the Google Slides page, click the Google Meet icon. From the panel that opens, select a meeting that’s scheduled on your Google calendar today, start a new meeting, or type/paste in the web link or code that you have for another meeting.

Click the Meet icon to get started presenting to a video meeting.
If you start a new meeting, a sidebar for the meeting will open on the right. At the bottom of the sidebar, click the Present now icon (a box with an up arrow). On the panel that appears, select your presentation and click the Share button, and you’ll be presenting to the meeting.

Choose which tab or window you want to share and click the Share button. (Click image to enlarge it.)
If you join a scheduled meeting, you have two choices: “Join the call” and “Just present this tab.” If you click Join the call , a sidebar for the meeting will open on the right. Follow the same steps as above to present to the meeting. If you click Just present this tab , you’ll go directly to the panel where you select your presentation and click Share , but you won’t have a sidebar where you can follow the main meeting.
To stop sharing your presentation to the meeting, click the Stop sharing button at the top left of your browser window.
For more details about using Google Meet, see our Google Meet cheat sheet .
Download and export a presentation
Google Slides lets you download presentations for use offline. On the top menu, select File > Download and choose a file format. You can save your presentation to your PC as a PowerPoint (.pptx) file or in other formats such as PDF, or as JPG or PNG for an individual slide.
5 tips for working with Google Slides
Now that you’re comfortable working in Google Slides, try these intermediate tips.
Use the Google Slides mobile app
With the exception of the “Version history” tool, the Google Slides app for Android , iPhone , and iPad has many of the same features described in this guide.
When you have a slideshow open, the toolbar at the top of the screen lets you take a variety of actions:
- To present your slides on your phone or tablet, on a Chromecast device, or in a Google Meet meeting, tap the triangle icon.
- To share your presentation with other people, the headshot silhouette. (See “How to share from the Google Drive, Docs, Sheets, and Slides mobile apps” in our Google Drive cheat sheet .)
- To view all the comments in the presentation, tap the Comments icon (a chat balloon) if you see it in the toolbar, or tap the three-dot icon and select View comments from the menu that appears.
- The three-dot menu also lets you see the presentation’s Q&A history, export it, make it available offline, and more.

The Google Slides Android app.
To edit or comment on a slide: Tap the slide, and a menu will appear that lets you add or view comments for that slide or edit it. Tap an element on a slide, such as text or an image, and tools to edit that element will appear.
Any changes you make to your presentation in the mobile app are automatically saved and will appear the next time you open it in the Google Slides web app.
Get suggested slide layouts and content
Click the Explore icon at the lower-right corner of the screen. The Explore sidebar will open along the right side. In most cases, you’ll be presented with thumbnails of suggested layouts that Google Slides has automatically customized for the slide that’s open in the main window. Click the one you want, and it will be applied to the slide.

Use the Explore tool to get suggested layouts (left) and search for images (right).
At the top of the Explore sidebar is a search box. You can type in a word or phrase to find related content on the web or in your Google Drive. Search results appear on separate Web, Images, and Drive tabs in the sidebar. Click a web or Drive result to open it in a new browser tab. On the Images tab, click the + icon on the upper-right corner of an image to insert it onto your slide.
Create custom slide layouts to use as templates
You can design your own slide layouts to use as templates in any future presentation. First, open a new, blank presentation as described above. Then:
- On the menu bar over the blank presentation, select View > Theme builder .
- The main window switches to a layout editor. Toward the left you’ll see a column with the heading THEME on top and LAYOUTS just below that. Click the thumbnail of any layout in the LAYOUTS list. It will appear in the main window.
- You can remove objects that are already in any layout. For example, click on a block of text. A frame appears around the text. Without selecting the text itself, move the pointer to ward an edge of the frame, right-click, and select Delete from the menu that opens.

Creating a custom slide layout. (Click image to enlarge it.)
- Using the formatting toolbar above the slide, you can add new objects to the slide, including images, image placeholders, shapes, lines, and blocks for text. (Tip: enter placeholder words inside the text blocks.) When you click on any object, a frame appears around it. Drag and drop the frame to relocate it on the slide, or drag its edges to change its shape or size. You can also add or change the border and background colors for any object on the slide and/or change the background color for the whole slide.
- When you’re finished designing your layout, click the Rename button above the slide and give the layout a unique name.
- If you want to create another custom layout, click on the thumbnail of another layout under the column LAYOUTS and repeat the above steps starting from #3.
- When you are finished custom-designing all your layouts, click the X toward the upper-right of the slide layout in the main window.
- Along the top of the screen, click anywhere inside Untitled presentation and start typing. Tip: Use a name that indicates this is a template (e.g., “Annual Budget Presentation – Template”).
In the future, you can make new presentations starting from this template, and your custom slide layouts will be available.
- Open the template presentation you created in the steps above. On the menu bar, click File > Make a copy > Entire presentation . On the panel that opens, type in a name for the new presentation you want to create and click the Make a copy button. Google Slides will open this new presentation in a new browser tab.
- On the toolbar above the first slide of your new presentation, click Layout . From the panel of thumbnails that opens, select one of the layouts that you created. It will then be applied to the slide in the main window.
Collaborate on a presentation in Google Chat
An alternative way to collaborate on a presentation is to share it in Google Chat. Other people in your chat can add comments and help make changes to your presentation.
Start in Google Chat . To the left of the box where you type in your chat messages, click the + icon and select Drive file from the menu that opens. A panel will open over the screen listing the files in your Google Drive. Find and click your presentation to highlight it, then click INSERT on the lower-right corner.
You’ll be taken back to the chat message box. Click the blue right-pointing arrow to the right of the box, and a panel will open over the screen designating permissions for the shared presentation. By default, permissions are set to Comment. To change this, click Comment and select View or Edit . You can also allow the people in the chat to share a web link to your presentation with others outside of the chat by selecting Turn link sharing on .

You can share a presentation to individual or group chats in Google Chats. (Click image to enlarge it.)
After you’ve set the permissions, click SEND , and your message will appear in the chat stream with a large thumbnail of your presentation. To open a presentation in the chat, click the thumbnail. The presentation will open inside a large window that’s laid out alongside the right of the chat stream.
This is actually Google Slides running inside the chat window with your presentation loaded in it. Thus, most of the Slides commenting and editing tools are available for you and others in the chat to use on your presentation (if you granted them permission to comment or edit). The user interface is the same, except there’s no menu bar.

Collaborating on a presentation from within a Google Chat. (Click image to enlarge it.)
Use keyboard shortcuts
Save time in Slides by using keyboard shortcuts for common tasks. Below are some of the most useful to know. For more, select Help > Keyboard shortcuts from the top menu when you have a spreadsheet open or press Ctrl + / (Windows, Chrome OS) or ⌘ + / (macOS).
Handy Google Slides keyboard shortcuts
This story was originally published in September 2019 and updated in August 2022.
Related content
Uk ends apple and google app store scrutiny, but not for long, how to bring google's pixel 9 call notes feature to any android device, 9 hidden google pixel features for smarter calling, google documents filed in antitrust case show efforts to push data collection limits, from our editors straight to your inbox.
Howard Wen ( www.howardwen.com ) is a longtime contributor to Computerworld . He specializes in explainer guides, how-tos, and reviews of office applications and productivity tools.
More from this author
Microsoft loop cheat sheet, microsoft copilot can boost your writing in word, outlook, and onenote — here’s how, the best new slack features for business, make slack’s design update work for you, microsoft onedrive cheat sheet: using onedrive for web, google spaces cheat sheet: how to get started, microsoft onedrive cheat sheet: using onedrive in windows, google sheets power tips: how to use dropdown lists, most popular authors.

- Elizabeth Montalbano
Show me more
Download our remote it support tools enterprise buyer’s guide.

Microsoft to release AI feature Recall in October for Windows Insiders

Generative AI is sliding into the ‘trough of disillusionment’

Podcast: End users need to switch their data security strategy

Podcast: Is the gold rush for AI talent slowing down?

Podcast: Google loses antitrust, and the world yawns

Why the AI money spigot is slowing down

Tech news roundup: The hackers are winning, it's time to switch security strategy

Is there still a gold rush for AI talent?

- Help Center
- Google Docs Editors
- Privacy Policy
- Terms of Service
- Submit feedback
What are you looking for?
Suggested Searches
NO SUGGESTIONS
Search History
Related Searches
Matched Contents
Control PowerPoint presentations with your Samsung smart watch

Control the slides

That's right, you can use your watch to transition between slides instead of your computer. From the watch, navigate to your apps, and tap PPT Controller . Tap Computer , and then tap Connect . Allow your watch to be shown to other Bluetooth devices so you can connect it to your PC. Next, navigate to the Bluetooth settings on your computer and add the watch as a Bluetooth device.
Now that you are connected, you can control your slides. Open a PowerPoint presentation on your computer, and then from the watch, tap the SLIDESHOW play icon. Control the slides by tapping the right arrow. If you need to go back a slide, swipe up from the bottom of your watch screen, and then tap the left arrow .
You can also control your mouse from the watch by tapping Touchpad . This feature is not just limited to PowerPoint - you can literally use your watch as a mouse.
Set presentation alerts

If you're not great with timing while you're presenting, you can set Wrap-up alerts or Interval alerts, so you know when to move things along.
On the watch, navigate to and tap PPT Controller . Tap the Settings icon, and then select Wrap-up alert or Interval alerts .
- Wrap-up alert : Create an alert for the end time of the presentation.
- Interval alerts : Set alerts in 5-minute increments.

We would love your feedback!
What information are you looking for?
Anything else you would like us to know? (Optional)
Please tell us how we can help you? (Required)
Thank you for your feedback! Your comment has been submitted.
Contact Samsung Support
- Mobile 8 AM - 12 AM EST 7 days a week
- Home Electronics & Appliance 8 AM - 12 AM EST 7 days a week
- IT/Computing 8 AM - 12 AM EST 7 days a week
- Text Support 24 hours a day 7 days a week
You Are About To Be Redirected To Investor Relations Information for U.S.
Redirect notification.
- * For Samsung Supplies information go to: www.hp.com/go/samsungsupplies
- * For S.T.A.R. Program cartridge return & recycling go to: www.hp.com/go/suppliesrecycling
- * For Samsung printer support or service go to: www.hp.com/support/samsung
Select CONTINUE to visit HP's website.
IMAGES
COMMENTS
Learn how to copy and paste an entire slideshow in Google Slides with simple steps and tips from other users.
Step-1: Click on the "File" tab. After you have selected the slides, you want to make a copy of, click on the " File " tab which will open a drop-down menu. Step-2: Select the "Selected slides" option. Next, select the " Selected slides " option from the drop-down menu as shown in the image in the previous step.
Yes, to copy selected slides: - Select the slides you want to copy (use the CTRL key on Windows or the CMD key on Mac). - Go to File > Make a Copy > Selected Slides. - Choose a location to save the new presentation on Google Drive. - Optionally, remove speaker notes and share the deck with the same people. - Click Make a Copy.
Select the slide you want to copy. Click Edit on the menu bar. Select Copy. Click in the thumbnail pane where you want to paste the slide. Click Edit on the menu bar. Select Paste. A copy of the selected slide is inserted at the selected spot in the presentation. How to Duplicate and Copy Slides in Google Slides.
Step 3: Click Duplicate Slide. Now that you have chosen a specific slide to copy, hit "Slide" found at the top menu of your screen. Then, tap "Duplicate slide" to create a copy of a slide. You will immediately see a copy of the slide. Repeat the process if you want to duplicate and copy slides further.
When creating a copy of an existing Google Slides presentation, you'll now be able to: Select specific slides to copy instead of the whole deck. Remove the speaker notes from the copy. This feature makes it easier to parse out and share the most relevant content with your team, audience, or other stakeholders. Getting started
Visit Google Slides and open the presentation you're creating. You do not have to open the slideshow from where you want to import the slides. Go to File > Import Slides from the menu. When the Import Slides window appears, you'll see recent Google Slides slideshows on the Presentations tab. Use the search box to find a particular one, or the ...
Step 1: Open the Presentation: Open the presentation that contains the slides you want to copy and the new presentation where you want to copy the slides to. Click and drag to select the slides you want to copy. You can hold down the Ctrl (or Cmd) key while clicking to select multiple slides. Once the desired slides are selected, right-click on ...
The copy command is useful if you want to transfer a slide to another file. The d... This video will show you how to copy and duplicate slides in Google Slides.
By holding down the CTRL/CMD key, select the slides you want to duplicate. Use CTRL/CMD + D to duplicate them. If you wish to copy the slide and paste it elsewhere in your presentation, you can select the slide you wish to copy with the shortcut - CTRL/CMD+C and copy the slide in Google Slides. Go to the slide after which you want to paste ...
Tips for Copying and Pasting Multiple Slides in Google Slides. Use Keyboard Shortcuts: Speed up the process by using Ctrl+C and Ctrl+V (Cmd+C and Cmd+V on Mac) for copy and paste. Select Non-Contiguous Slides: Hold down the Ctrl key (Cmd on Mac) while clicking to select individual slides that aren't next to each other.
To copy and paste slides: Select the slide (s) you want to copy. Click Edit > Copy (or use the keyboard shortcut CTRL+C / CMD+C) Click on the slide after which you want to paste. Click Edit > Paste (or use CTRL+V / CMD+V) This allows you to copy one or more slides and paste them in any order within the same presentation.
If you want to duplicate more than one slide at a time, hold the CTRL or CMD key and choose the slides you want to copy. After that, press CTRL+ D or CMD + D for duplication. You can draw on your Google Slides and even animate the drawing to make the presentation more interactive. 3. Using Context Menu or Right-Click.
Introducing our comprehensive tutorial titled "How To Copy And Paste A Slide In Google Slides", an essential resource for individuals seeking to unlock endle...
In this video, Timmy shows you how to duplicate a slide in your Google Slides presentation so that you can easily create an additional slide with the same st...
3. Copy and Paste Slides. You can also copy and paste full slides, individually or in groups. Click to select a slide in the sidebar over on the left side, then use the same key commands to copy and paste. Here's an example: Click a slide in the sidebar and press Control or Command+C to copy the entire slide.
This help content & information General Help Center experience. Search. Clear search
Locate and select your PowerPoint file, then click "Open." After the file uploads to Google Drive, right-click it and choose Open With > Google Slides. The presentation will open in Google Slides but remain a PowerPoint file as you can see next to the name on the top left. Click File > Save as Google Slides from the menu to convert it.
Create stunning presentations with Google Slides. Discover slide templates for every use case, use AI to generate unique visualizations, and more. ... You can convert Microsoft PowerPoint presentations into Google Slides format, or you can directly edit PowerPoint presentations, without having to make a copy. The original file will remain intact.
Open the template presentation you created in the steps above. On the menu bar, click File > Make a copy > Entire presentation. On the panel that opens, type in a name for the new presentation you ...
To download a Google Slides theme, click the "Google Slides" button below the presentation preview, sign in to your Google account, and select "Make a copy". Alternatively, click the Canva button, click "Share", select "More", search for "Google Drive", and click the GDrive icon to save the design as a Google Slide in your ...
This help content & information General Help Center experience. Search. Clear search
This video will show you how to copy one slide from one Google Slides presentation to another Google Slides presentation.
Copy a slide by selecting it and pressing Ctrl + C. Press Ctrl + V to paste (Cmd + C and Cmd + V on a Mac). Make your Google Slides presentations stand out with these tips
Suitable for PowerPoint and Google Slides Download your presentation as a PowerPoint template or use it online as a Google Slides theme. 100% free, no registration or download limits. Content
Take your data presentations to the next level with a data model PowerPoint template. Whether you're a data analyst, business manager, or student, these templates will help you communicate complex information in a clear and visually engaging way. With a range of customizable slides, you can easily organize and present your data models with ease.
I f you're looking to create a compelling presentation to showcase a new idea or persuade others, Google Slides may be the first option that comes to mind. But with few built-in templates, basic ...
Now that you are connected, you can control your slides. Open a PowerPoint presentation on your computer, and then from the watch, tap the SLIDESHOW play icon. Control the slides by tapping the right arrow. If you need to go back a slide, swipe up from the bottom of your watch screen, and then tap the left arrow.
Ideal for business professionals, this colorful and straightforward presentation template is your go-to for illustrating complex data strategies. Whether you're mapping out a long-term plan or showcasing key data points, this PowerPoint and Google Slides template makes it easy to communicate your ideas clearly and effectively.