How-To Geek
How to unlock read-only powerpoint presentations.

Your changes have been saved
Email is sent
Email has already been sent
Please verify your email address.
You’ve reached your account maximum for followed topics.

This Overlooked Linux Distro Will Give Your Old Laptop a New Life
Playstation 2 emulation on the ps5 is disappointing, use pcsx2 instead, how i made the mac menu bar useful with these 5 free apps, quick links, unlock a read-only presentation, why make a powerpoint read-only, how to make a powerpoint read-only.
If you want unrestricted editorial rights to a read-only PowerPoint presentation, then you have to unlock it. The good news is that you can open it in a few simple clicks. Here’s how.
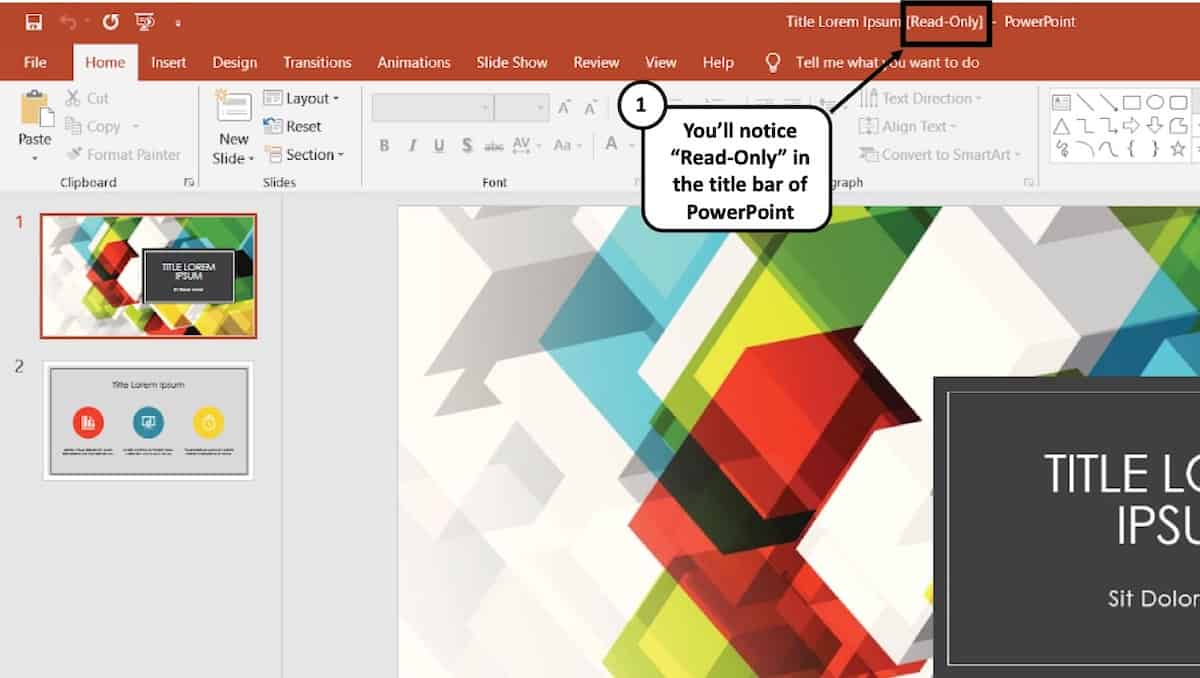
There are two ways to tell if a presentation is a read-only file. The first is if you see the words “Read-Only” after the title of the presentation. The second is if you see a yellow message bar across the top of a presentation with a message letting you know the document has limited access.
Next to the yellow banner message will be a button that reads “Edit Anyway." Click that button to unlock the PowerPoint.

The yellow bar should disappear along with the “Read-Only” text that appeared after the presentation title. Your PowerPoint will now be editable.

As the saying goes, there's more than one way to cook an egg. The same applies to unlocking a presentation. Although this method involves a few extra steps, we wouldn't be real geeks if we didn't show you how.
First, open the read-only presentation and select the “File” tab.

You’ll be moved in the “Info” menu. Here, you’ll see the “Protect Presentation” option is marked in yellow and has a message displayed next to it---the presentation has been marked as final to discourage any editing. Go ahead and select “Protect Presentation."

From the submenu, select “Mark as Final." Clicking this will undo the lock.

You’ll now see that the yellow banner and its accompanying message next to the “Protect Presentation” option disappears. The “Read-Only” text next to the presentation title also disappears.

A presentation might be locked for any of several valid reasons. For starters, people use it mainly to discourage edits; they're merely alerting recipients the presentation they've received is the final version provided by the original author. Read-only status can also prevent accidental edits caused by human error.
Making a presentation read-only is more polite than asking people not to edit it than it is an actual protective measure of your content. However, taking the extra steps to let people know you don't want your content to be edited is a good thing to do.
Now that we know how to unlock a PowerPoint presentation and why it was likely locked in the first place, here's how to re-enable read-only.
Open the presentation you want to make read-only and select the "File" tab.

You'll then be in the "Info" menu. Select "Protect Presentation" to open a drop-down menu. Click "Mark as Final."

A dialogue box will then appear, letting you know the presentation will be marked as final and saved. Click "OK."

Now, when you send out the presentation, it will display the "Marked as Final" message bar, alerting the recipients that the presentation is read-only.
- Microsoft Office
- Microsoft PowerPoint
- office 2019
Is Your PowerPoint Read-Only? Here’s How to Edit and Save it!
By: Author Shrot Katewa

Are you trying to open a PowerPoint presentation that sadly opens up as a read-only file? If the answer is yes, then you are not alone! This isn’t a pleasant situation for anyone, however, there are many complications and reasons behind why this happens. On a larger note, the solution to this problem is fairly simple.
To edit your PowerPoint read-only file, simply click on the “Edit Anyway” button on the horizontal yellow bar under the ribbon. You can also click on the “File” tab. Then, click on “Info”. Next, locate and click on “Protect Presentation”, and finally click on “Mark as Final”.
Interestingly, one of the reasons why your presentation shows as read-only is because of an in-built feature within PowerPoint! (We’ll get to the details of that in a bit). So, this is not something that you need to fear. We just need to be a bit more informed on how to fix it!
So, in this article, I will be sharing with you the details of why a PowerPoint file shows “Read-only”, and what can you do to save the file and make it editable. Let’s get started!
A Quick Note Before We Begin – if you want to make jaw-dropping presentations, I would recommend using one of these Presentation Designs . The best part is – it is only $16.5 a month, but you get to download and use as many presentation designs as you like! I personally use it from time-to-time, and it makes my task of making beautiful presentations really quick and easy!
Why is My PowerPoint Read-Only?
One of the most common reasons for PowerPoint to become a read-only file as when it has been done so intentionally. Why would anyone want to do this intentionally?
1. “Mark as Final” Feature is Enabled
Well, it turns out, PowerPoint actually provides a built-in feature known as “Mark as Final”. This feature turns the PowerPoint file into “Read-Only” mode . The “Mark as Final” feature of PowerPoint is designed to let the readers know that the version of the presentation that they are viewing is the final version and no changes are to be made to that version!
Thus, even though such a presentation can be opened by viewers, they will see a “Read-Only” prompt both at the top of the PowerPoint application where the title appears (otherwise known as the title bar), and a yellow strip just below the ribbons with a button that says “Edit Anyway”.
Obviously, there are other ways to prevent your viewers from editing your PowerPoint file which is more fool-proof. More on that later in the article.
2. PowerPoint has just Recovered from a Crash
Another common reason for PowerPoint to get into “Read-Only” mode is when your PowerPoint may have recovered from a crash . Irrespective of whether the PowerPoint application was abruptly closed intentionally or unintentionally when a presentation file was open, PowerPoint may open the file in “Read-Only” mode when restarted.
PowerPoint automatically marks the previous saved version as the final version of the file and opens it up in the read-only mode.
3. Same PPT file is Opened Twice at the Same time!
Lastly, PowerPoint may also convert a presentation into “Read-Only” mode when two presentations that have the same name are opened at the same time. Alternatively, the file may also become read-only when the same file has been opened twice by mistake.
This can happen especially when PowerPoint takes some time to respond to the user’s first request to open a presentation file leading to the user double-clicking on the same file twice. Although there are checks and balances in place to avoid this issue, nevertheless, such issues can still take place.
Furthermore, if you have perhaps saved a presentation file that has the same name in two different locations on your computer, and you open both of them together, PowerPoint can sometimes open the file that has been opened later in read-only mode.
How to Unlock Read-Only in PowerPoint?
As annoying as it may seem, it is quite easy to unlock the read-only mode from PowerPoint!
Here’s how to exit from the “Read-Only” mode in PowerPoint –
- Open the “Read-Only” PowerPoint (PPT) file.
- At the top part just below the ribbon options, you’ll see a long yellow banner.
- Hover your mouse towards the banner and click on the option “Edit Anyway”.
You will now be able to edit the PowerPoint file as you usually would.
Furthermore, make sure that you haven’t opened the same file twice by chance. If so, try to close one or both the files and re-open the presentation once again.
Why Does Read-Only Keep Coming Back in PowerPoint?
One of the key reasons why your PowerPoint file may become read-only every time you open it is because the “Mark as Final” feature has been enabled in the settings. As long as this feature has been enabled, your PowerPoint file may keep reopening as a read-only file from time to time.
Let us understand how to turn off read-only mode in PowerPoint so that you don’t have to deal with this issue.
How to Turn Off Read-Only Mode in PowerPoint?
Even though clicking on “Edit Anyway” as described above will fix the issue, however, if the presentation has been marked as final by the original author, it may continue to show the read-only mode sometimes.
In order to fix that issue, you will need to take a slightly longer route. Here’s a step-by-step process to turn off read-only mode in PowerPoint.
1. Start by opening your “read-only” PowerPoint presentation.
2. Hover to the top menu and then click on the tab named ‘File’. Then click on Info.
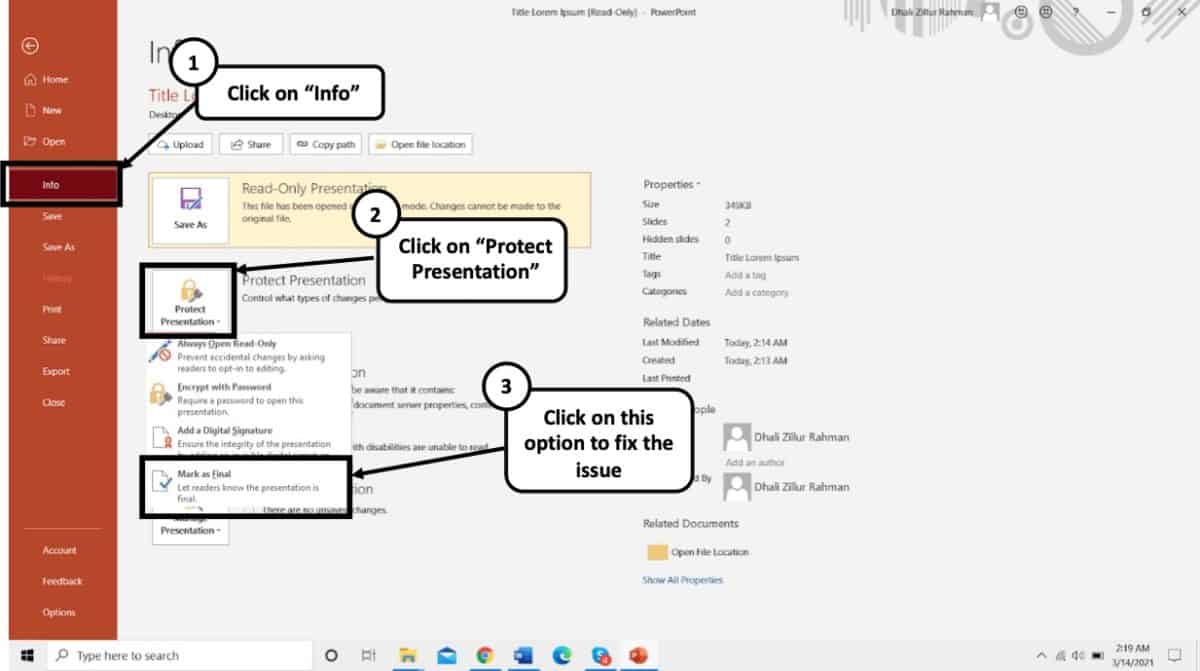
3. There will be a ‘Protect Presentation’ option in clear yellow.
4. You might come across a dialog box telling you “The presentation has been marked as final to discourage any editing.”
5. To undo this feature, simply click on Protect Presentation. A menu will appear, click on the ‘Mark as Final’ to fully unlock the desired presentation.
After doing this you will see that the Read-Only suffix from your PPT file’s name will be gone and you would be able to freely edit further.
How to Edit a Read-Only PowerPoint File?
After you have done removing the read-only feature from your PowerPoint, you can simply edit texts, add animations, images and use features with absolute free will. Just getting through the read-only barrier is the only thing that you need to know to get started with editing.
Interestingly, you can also get out of the read-only mode in PowerPoint by saving the file with a different name. This will not only allow you to get rid of the read-only mode but also allow you to save a copy of the edits that you may have made while the file was in the read-only mode.
Let’s learn how to save a read-only presentation file.
How to Save a Read-Only PowerPoint File?
Saving a PowerPoint file that is in a read-only mode is rather quite simple. Although you don’t need to enable “Edit Anyway”, doing so would be recommended. The next step is really saving a file in a different location on your computer with either the same name or under a different name.
Here’s how you can save a read-only PowerPoint presentation –
- Click on the “File” tab.
- Click on “Save As” from the option provided on the left part of your screen.
- Navigate to a folder location where you want to save the file. Feel free to change the name of the file if needed.
- Click “Save”.
- Lastly, browse to the specific folder where you saved the PowerPoint file. Open it and check to see if the “Read-Only” mode has been removed.
Why Does Every PowerPoint File Open in Read-Only Mode?
As we have learned so far, one of the key reasons for PowerPoint to open a presentation file in read-only mode is when it has been “Marked as Final” by the author of the file. By now, you’ve also learned how to get rid of this problem.
However, the “Mark as Final” feature should only restrict the specific file shared by a particular author . It typically shouldn’t make all your PowerPoint files “Read-Only”.
If this is the case for you, the problem may be slightly different. Let’s understand this a bit further.
Sometimes, t he file or the folder in which the PowerPoint presentation has been saved itself becomes read-only due to a glitch in the operating system . There are several reasons why this could happen. I won’t go into details of each of those reasons. However, it is important for us to understand how to make this file or folder editable.
Here’s what you could do to remove the read-only from a particular presentation file –
- Navigate to the folder in which the file has been saved, and locate the file.
- Right-click on the file and select “Properties” from the window the just opens up.
- A new window will open up. Click on the “General” tab. Next, clear the check-box from the “Read-Only” attribute option.
- Finally, click “OK” and save your changes.
This should solve the problem. If it still doesn’t fix the issue, you may want to check whether the folder in which the PowerPoint file has been saved has the editable rights to it and is not marked as read-only.
If the folder is also being marked as read-only, you will need to remove the “Read-Only” attributes from the folder first. Here’s an article that can help you remove the read-only attribute from a folder in Windows.
How to Prevent PowerPoint from Being Edited?
There are quite a few different ways in which you can lock a PowerPoint file or prevent it from being edited. Here are some of the options that you can choose from –
- Save a PowerPoint File as Read-Only
- Password protect your PowerPoint file.
- Convert a PowerPoint file into a PowerPoint Show File (PPSX)
- Convert a PowerPoint file into a PDF file
- Convert a PowerPoint file into a Video
Let’s look at some of these methods in detail –
Method 1 – Save a PowerPoint File as Read-Only
To get this done, simply do the opposite of turning off the read-only mode. Here’s a step-by-step process to save a PowerPoint file as Read-Only:
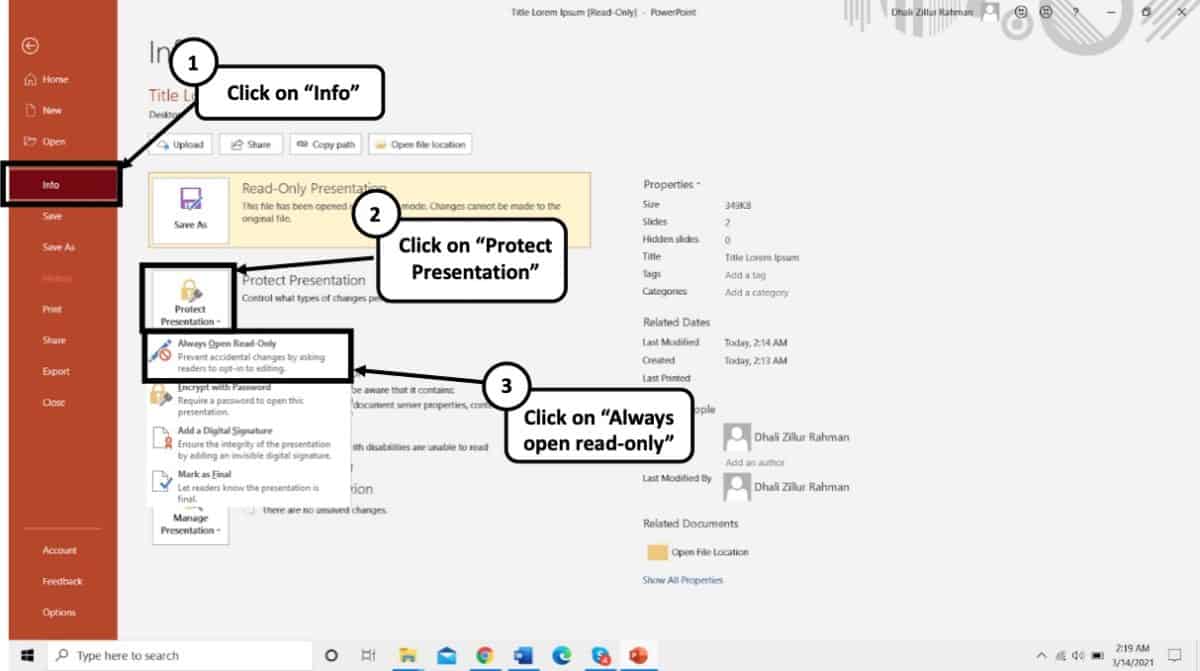
- Open the desired PowerPoint presentation, and click on the “ File ” tab.
- Next, click on the “ Info ” tab from the options presented on the left part of the screen.
- Select the “ Protect Presentation ” option.
- From the dropdown, select “ Always Open Read-Only “.
- Finally, save the file by pressing Ctrl+S.
Your presentation file will now be opened as a read-only file.
Method 2 – Password Protect your PowerPoint presentation
If your colleagues or students haven’t been very familiar with your polite way of discouraging any edits on your final PowerPoint file, then the best option for you is to simply encrypt your presentation file using a password protection feature.
Here’s what you need to do to password protect your PowerPoint presentation –
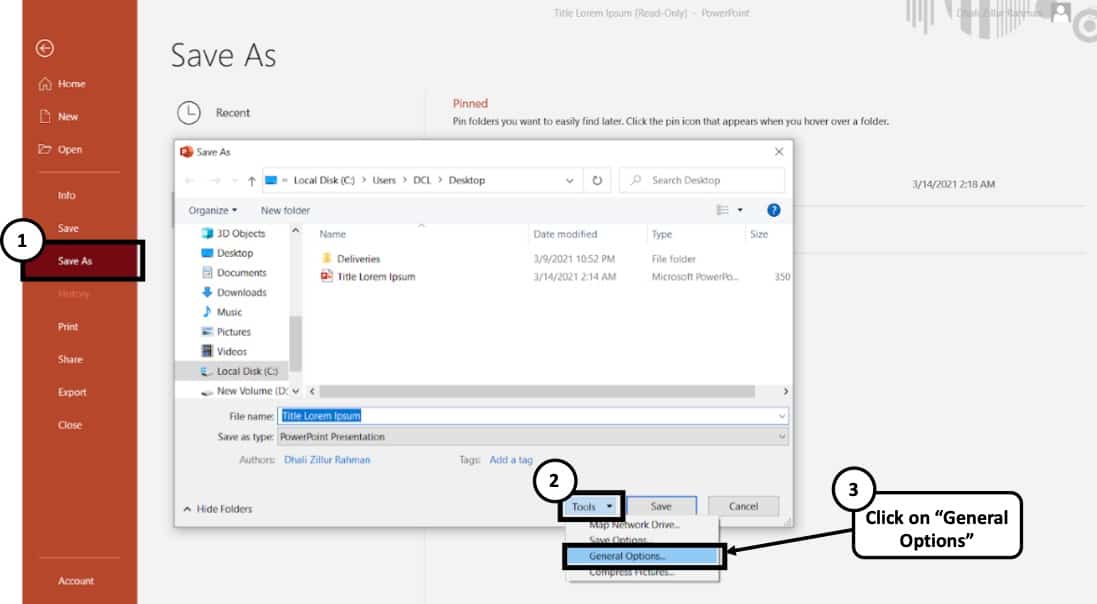
- Open your desired presentation and select the File tab and then click on “ Save As ”.
- At the bottom of the “Save As” dialogue box, a “ Tools ” option will appear.
- Click on “ General Options ”.
- The box marked as “ Password to Modify ” can be used to type in the desired password you wish to set.
- After setting up your password and re-entering it for further verification, simply click “ OK ”
Similarly, you can also enable password protection from the “ Info ” tab. To do that, click on the “ File ” tab first. Then, click the “ Info ” tab. Next, click on “ Protect Presentation “, and finally from the dropdown, click on “ Encrypt with Password “. You will then be asked to set a password. Simply re-enter the same password and click “ OK “.
While encrypting the PowerPoint file with a password, you will be presented with 2 options – either to restrict access to the PowerPoint file or to restrict modifying the presentation file. Choose the latter as this will allow your audience to at least view the presentation file without editing it.
Method 3 – Convert PowerPoint presentation as a PPSX file
Another method of preventing a PowerPoint presentation from being editing is to convert it into a PowerPoint show file or a PPSX file format. Doing so will directly open the presentation file in a PowerPoint Slide Show mode thereby restricting the editing capabilities of an individual for such a file.
Here’s how to convert a PowerPoint presentation to a PowerPoint Show file (PPSX file)
- Click on the “ File ” tab.
- Then, click on “ Save As ” from the panel on the left part of your screen.
- On the new window that pops-up, click on the “ Save As Type ” option.
- From the dropdown, scroll down and locate the “ PowerPoint Show ” file type option.
- Navigate to the desired location and rename the file if needed.
- Click on “ Save “.
Method 4 – Convert PowerPoint Presentation into a PDF File
Another alternative method is to share a PDF version of the presentation instead of the PPT file. All you need to do is convert the file to the PDF file format. To do that, you can follow the below steps –
- Then, click on “ Export ” from the panel on the left part of your screen.
- On the new window that pops-up, click on the “ Create PDF ” option.
You will now notice that there is a PDF file added to the folder in which you saved the file. Make sure that you share this PDF file instead of the PPT presentation.
Method 5 – Convert PowerPoint File into a Video
Last, but not the least, you can also convert your presentation into a video. Although the use of this method is more suited for creating videos using PowerPoint, however, you can also use this method to ensure that you are able to prevent your viewers from editing it.
Here’s how to convert a PowerPoint file into a video –
- On the new window that pops-up, click on the “ MPEG/MP4 ” option.
How to Remove Restricted Access in PowerPoint?
PowerPoint also provides you with an option to remove access restrictions that the original author may have put in place.
To remove the restricted access setting in your file, simply follow the below steps:
- Next, click on the “Info” tab.
- Then, click on “Protect Presentation” and change the permissions which have been applied.
Unselecting the previous options will remove the existing restrictions.
It is important to note that if the file is password-protected, you will need the password to change the permissions of the file. Without the original password, you won’t be able to unlock the permission protections.
More Related Topics
- Change the Style of Your Bullet Points and Stand-out from the Crowd!
- 7 EASY Tips to Always Make your Presentations Attractive! (Even if You are a Beginner)
- How to Reduce the Size of Your PowerPoint File? The Perfect Method!
- Auto Create Your PowerPoint Slides using Design Ideas Feature!
- Main Features of PowerPoint! [I bet You DIDN’T Know These]
Credit to Cookie_Studio for the featured image of this article.
How to make PowerPoint Read-only and uneditable
How to make powerpoint read-only, 1] open the presentation you want to make read-only, 2] find and click on info, 3] protect your presentation, 4] select always open read-only, vamienmckalin@twc.

Make a presentation read-only in PowerPoint for the web
When you want to share your presentation with others but you don’t want them to change it, you can make it read-only. Here’s how using OneDrive and OneDrive for work or school:
Using OneDrive

Under Share , click Get a link .

Under View only , click Create .

Tip: Click Shorten to decrease the length of the URL that you share with others.
Right-click the URL and click Copy .

Under Share , click Send email .
Enter the email address in the To box.
Paste the URL in the message box, and click Share .
Click Close .
Using OneDrive for work or school
Under Invite People , type the names or email addresses of the people you want to view the presentation, and type a message.
Click the down arrow next to Can edit , and click Can view .

Click Share .
Note: The people you share the presentation with will receive an email invitation to view it.

Need more help?
Want more options.
Explore subscription benefits, browse training courses, learn how to secure your device, and more.

Microsoft 365 subscription benefits

Microsoft 365 training

Microsoft security

Accessibility center
Communities help you ask and answer questions, give feedback, and hear from experts with rich knowledge.

Ask the Microsoft Community

Microsoft Tech Community

Windows Insiders
Microsoft 365 Insiders
Was this information helpful?
Thank you for your feedback.
How to Make a Microsoft PowerPoint Presentation Read-only

Making your Microsoft PowerPoint presentation read-only adds a layer of security, but it doesn’t keep anyone from editing the file.
Microsoft PowerPoint presentations take a lot of time to create, and it makes sense to make it harder for someone else to make changes. Making your PowerPoint presentation read-only is an option you can use to make it less likely changes are made. It’s not a perfect solution, but it can serve as a deterrent.
Making a PowerPoint Presentation Read-Only
With read-only turned-on in Microsoft PowerPoint, you can no longer edit the presentation. Therefore, you shouldn’t make this change until you’re finished with the presentation. To make a PowerPoint Presentation read-only:
- Open your Powerpoint presentation .
- Choose File at the top left.
- Select Info on the bar on the left.
- Click Protect Presentation .
In the pull-down menu, you’ll see four options:
- When selected, Always Open Read-Only tells readers the file is read-only and shouldn’t be edited.
- Mark as Final lets readers know this is the finished copy of this file.
- Encrypt with Password lets you assign a password a reader needs to input to edit the file.
- When activated, Add a Digital Signature adds an invisible signature to ensure the integrity of the presentation.
Only two of the options make your PowerPoint presentation read-only: Always Open Read-Only and Mark as Final.
When Always Open Read-Only is selected, anyone who opens the presentation will receive the message, “To prevent accidental changes, the author has set this file to open as read-only.” Conversely, files with Mark as Final will see, “An author has marked this presentation as final to discourage editing” at the top of the file.

The Problem and a Better Solution
Unfortunately, neither of these choices keeps a reader from editing the presentation. To do so, they only have to click “Edit Anyway” to make changes that you can save.
If you really don’t want anyone to change your presentation, your best bet is to select “Encrypt with Password” under the Protect Presentation options. As you have probably already guessed, however, this option means no one without the password can even read the file, let alone edit it. And yet, this must be the best solution if you’re goal is to protect your document.
More on PowerPoint
Microsoft PowerPoint is the most popular presentation software packages on the planet with good reason. It offers amazing presentation tools include many that are less known. For example, were you aware converting presentations to videos was possible or that PDFs and Word documents can be changed to PowerPoint files? Did you know you can create a mind map with PowerPoint?
You can find Microsoft PowerPoint inside the Microsoft 365 suite. For home use, the Microsoft 365 suite is currently available in three varieties, including a Family, Personal, and Home & Student plan. The first is $100 per year (or $10/month) and includes Word, Excel, PowerPoint, OneNote, and Outlook for Mac, and is useful for up to six users. The Personal version is for one person and is $70/year or $6.99 per month. The student plan is a one-time purchase of $150 and includes Word, Excel, and PowerPoint.
Business users can select from Basic, Standard, and Premium plans, starting at $5 per user/month.
August 13, 2021 at 12:16 am
Helpful Tips. Thanks
Your email address will not be published. Required fields are marked *
Save my name and email and send me emails as new comments are made to this post.
Recommended for you

Byte Bite Bit
How to Make PowerPoint Read Only: A Step-by-Step Guide
Setting your PowerPoint presentation to read-only is a breeze once you know how. By configuring your presentation to read-only, you safeguard it against any unwanted edits while sharing it with others. Whether you’re preparing a final version of a pitch, a lecture, or just about any critical presentation, keeping its content intact is essential.

When I first needed to make my PowerPoint uneditable, I was concerned it might be a complicated process. Surprisingly, it’s straightforward! You simply open your presentation, go to the “File” tab, select “Info,” and then click “Protect Presentation.” From there, choose “Always Open Read-Only” and save your file. This ensures that when others open your presentation, they can view it but not alter it.
For those using PowerPoint for the web, there’s a slightly different but equally easy method. Under the “Share” tab, you can create a link tailored for viewing only. This way, you control who sees your presentation without risking unintentional changes. It’s a nifty trick, especially if you’re sending it around via email or sharing it in a virtual meeting!
- 1.1 Using Read-Only to Prevent Accidental Edits
- 1.2 Marking Presentations as Final Version
- 2.1 Restricting Access to PowerPoint Files
- 2.2 Implementing Password Protection
- 2.3 Sharing With Viewers and Editors
- 3.1 Leveraging PowerPoint for Impactful Presentations
- 4.1 Using Digital Signatures and Encryption
- 4.2 Exploring PowerPoint Subscription Benefits
- 4.3 Effective Use of Training and Communities
Securing Your Presentation
To ensure your PowerPoint presentations remain unaltered, you can use read-only settings and mark your presentations as the final version. This helps maintain the document’s integrity, prevents accidental edits, and strengthens security.
Using Read-Only to Prevent Accidental Edits
When setting your presentation to read-only , start by opening the PowerPoint file. Go to the File tab and select Info . In the Protect Presentation menu, choose Always Open Read-Only . This setting ensures that anyone opening the file sees a prompt indicating the document is read-only. This deters unintentional changes but allows viewers to make edits if necessary by choosing not to open in read-only mode.
Choosing Encrypt with Password in the same menu can add an extra layer of security. Enter a strong password incorporating uppercase, lowercase letters, numbers, and special characters. This method restricts access further and protects your content rigorously.
Marking Presentations as Final Version
Another step to secure your presentation is to mark it as the Final Version . This action flags the document, indicating that it should not be edited further. Open your PowerPoint presentation, go to the File tab, and select Info . In the Protect Presentation menu, choose Mark as Final . When activated, viewers receive a notification that the document is final and read-only.
Marking as final is an excellent deterrent against accidental edits, signaling to others that the content is set and should not be altered. Although this method shows a strong recommendation to avoid edits, it doesn’t prevent them entirely. This feature is handy for documents that need to be distributed widely without unintended modifications.
Managing Access and Permissions
Accessing a PowerPoint presentation isn’t always straightforward when it comes to permissions. Let’s explore different methods to enable read-only mode , implement password protection , and share presentations with specific access levels.
Restricting Access to PowerPoint Files
Limiting access involves a few key steps. First, open the presentation and click the File tab. Navigate to Info and select Protect Presentation . Then, choose Restrict Access to limit permissions.
You can assign users to Can View or Can Edit categories:
- Can View: Users can see the presentation but can’t edit or print it.
- Can Edit: Users gain access to make changes.
It’s efficient to quickly set user roles, ensuring sensitive data stays secure.
Implementing Password Protection
Creating a password adds a security layer. To set it up, click the File tab and go to Info . Select Protect Presentation and choose Encrypt with Password .
A dialog box will appear to enter a password. Confirm it and save.
This process ensures unauthorized users can’t access or modify the presentation. Remember to choose a strong password and store it securely.
Tip: Use a mix of letters, numbers, and special characters for the password.
Sharing With Viewers and Editors
When sharing presentations, consider the access level you grant. Open the Share tab and type the email addresses of recipients. Choose Can View or Can Edit based on the access you want to provide.
For read-only mode, select Always Open Read-Only under Protect Presentation .
It’s vital to periodically review and adjust permissions as needed:
- Ensure only the right individuals have editing rights.
- Regularly update passwords to maintain strong security.
By managing access and permissions effectively, you can keep your presentations safe and under control.
| Can View | Users can only view the presentation. |
| Can Edit | Users can view and edit the presentation. |
Enhancing the Presentation Experience
In this section, I want to explore the tips and tricks that can make your PowerPoint presentations more engaging and effective. By leveraging specific features and tools within Microsoft PowerPoint, you can create a stronger impact on your audience.
Leveraging PowerPoint for Impactful Presentations
Creating an engaging PowerPoint presentation involves more than adding text and images. I always start by utilizing animations and transitions wisely. Animations can highlight key points, while smooth transitions keep viewers’ interest. It’s important not to overdo them, though.
Incorporating videos within the presentation can also be powerful. I often embed short, relevant clips to illustrate points more vividly. This not only captures attention but reinforces the content.
Interactive elements , like clickable hyperlinks or action buttons, make the presentation more dynamic. These features guide viewers through additional resources or related topics, offering a deeper dive into the material without overwhelming slides. Enhanced visual aids , like charts and graphs, help in breaking down complex information.
Switching your presentation to PDF format after it’s perfected ensures that the formatting remains intact when viewed on different devices. This step is crucial for consistency and professionalism.
Advanced PowerPoint Features and Tips
Let’s explore some advanced PowerPoint features that can enhance your presentations, including the use of digital signatures, subscription benefits, and training resources. Mastering these will make your presentations more secure and impactful.
Using Digital Signatures and Encryption
Securing your PowerPoint files is crucial. Digital signatures offer a way to authenticate your presentations. You can add an invisible digital signature to ensure that the content remains unchanged. Simply go to the File Tab , select Info , and choose Protect Presentation to add your signature.
Encryption is another powerful tool. By setting a password, you can restrict who can access or modify your file. Under the File Tab , select Password Protect to lock your presentation. These two tools together provide robust security, ensuring your final version stays intact.
Exploring PowerPoint Subscription Benefits
Subscribing to Microsoft 365 unlocks features not available in the standard PowerPoint. Subscriptions offer OneDrive integration , allowing seamless collaboration. Multiple people can work on the same presentation in real-time through the web .
You also get premium templates and additional design tools . These include advanced animations and higher-quality stock images. The subscription also provides regular updates, ensuring you have the latest and greatest tools at your disposal.
Effective Use of Training and Communities
Engage with training courses and communities to fully leverage PowerPoint’s features. Microsoft offers numerous online tutorials and videos . These range from beginner tips to expert hacks, ensuring there’s something for everyone.
Communities and forums are excellent for gathering feedback and asking questions . Engaging with other users can provide valuable insights and solutions to your problems. You can connect with experts and share your knowledge, enhancing your PowerPoint skills over time.
Using Digital Signatures and encryption can safeguard your presentations, while subscription benefits and community engagement elevate your PowerPoint experience to new heights.
Related posts:
- How to Save PowerPoint as Video: Step-by-Step Guide for Beginners
- How to Add Notes to PowerPoint: A Step-by-Step Guide for Enhanced Presentations
- How to Edit Background Graphics in PowerPoint: Step-by-Step Guide for Effective Presentations
- How to Track Changes in PowerPoint: A Step-by-Step Guide
- How to Create Master Slides in PowerPoint: Easy Guide for Professionals
- How to Compress Media in PowerPoint: Enhancing Performance and Quality
- How to Make a Shape Transparent in PowerPoint: Step-by-Step Guide
- How to Change Footer in PowerPoint: A Step-by-Step Guide
- How to Add Multiple Animations to One Object in PowerPoint: Step-by-Step Guide
- What Is Microsoft PowerPoint Used For? Discover Its Essential Applications
- How to Lock Aspect Ratio in PowerPoint: A Step-by-Step Guide
- What is an ODP File PowerPoint: Understanding OpenDocument Presentation
Leave a Comment Cancel reply
Save my name, email, and website in this browser for the next time I comment.
- PRO Courses Guides New Tech Help Pro Expert Videos About wikiHow Pro Upgrade Sign In
- EDIT Edit this Article
- EXPLORE Tech Help Pro About Us Random Article Quizzes Request a New Article Community Dashboard This Or That Game Happiness Hub Popular Categories Arts and Entertainment Artwork Books Movies Computers and Electronics Computers Phone Skills Technology Hacks Health Men's Health Mental Health Women's Health Relationships Dating Love Relationship Issues Hobbies and Crafts Crafts Drawing Games Education & Communication Communication Skills Personal Development Studying Personal Care and Style Fashion Hair Care Personal Hygiene Youth Personal Care School Stuff Dating All Categories Arts and Entertainment Finance and Business Home and Garden Relationship Quizzes Cars & Other Vehicles Food and Entertaining Personal Care and Style Sports and Fitness Computers and Electronics Health Pets and Animals Travel Education & Communication Hobbies and Crafts Philosophy and Religion Work World Family Life Holidays and Traditions Relationships Youth
- Browse Articles
- Learn Something New
- Quizzes Hot
- Happiness Hub
- This Or That Game
- Train Your Brain
- Explore More
- Support wikiHow
- About wikiHow
- Log in / Sign up
- Computers and Electronics
- Presentation Software
- PowerPoint Presentations
How to Unlock a Read Only PowerPoint Presentation (in 4 Steps)
Last Updated: December 29, 2021
This article was co-authored by wikiHow staff writer, Darlene Antonelli, MA . Darlene Antonelli is a Technology Writer and Editor for wikiHow. Darlene has experience teaching college courses, writing technology-related articles, and working hands-on in the technology field. She earned an MA in Writing from Rowan University in 2012 and wrote her thesis on online communities and the personalities curated in such communities. This article has been viewed 21,673 times. Learn more...
If you see text in a banner that warns you the file is read-only, the original author marked it as final and discourages editing. This wikiHow will teach you how to unlock a read-only PowerPoint manually. Otherwise, you can click Edit Anyway within the banner.

- A menu will drop down from the lock icon.

- The "Read-Only" text is gone from the title and the yellow banner will disappear, which means you can edit the PowerPoint. [1] X Research source
- To return the file to read-only, repeat the process to select "Mark as Final."
Expert Q&A
You might also like.

- ↑ https://www.howtogeek.com/437502/how-to-unlock-read-only-powerpoint-presentations/
About This Article

1. Open the PowerPoint project. 2. Click the File tab. 3. Click Protect Presentation. 4. Click Mark as Final . Did this summary help you? Yes No
- Send fan mail to authors
Is this article up to date?

Featured Articles

Trending Articles

Watch Articles

- Terms of Use
- Privacy Policy
- Do Not Sell or Share My Info
- Not Selling Info
wikiHow Tech Help Pro:
Level up your tech skills and stay ahead of the curve
How to Make a Microsoft PowerPoint Presentation Read-only

Sharing a PowerPoint presentation with others is common practice in business settings. However, you may not want recipients to edit or change your carefully crafted presentation. Making a PowerPoint presentation read-only prevents unauthorized changes while still allowing viewers to see the content.
Mark the Presentation as Final in PowerPoint
The easiest way to make a PowerPoint presentation read-only is to mark it as final right within PowerPoint. Here are the steps:
There is also an option to select “Always Open Read-Only” which prompts users to actively choose to edit the presentation rather than opening it in editing mode by default.
Set File Permissions in SharePoint or OneDrive
With editing rights revoked at the platform level, users will only be able to view or download the presentation in SharePoint or OneDrive. To enable co-authoring abilities again, you can restore edit access.
Save as PDF
If you want recipients to still be able to view the PowerPoint and its animations/transitions, you can also save it as a PowerPoint Show (.ppsx) from the “Save As” menu. This format runs the slideshow without the editing interface.
Set a Read-Only File Attribute
Now Windows will treat the file as read-only system-wide, blocking any program from opening it in an editable mode. You can repeat these steps to remove the read-only status later on.
Use DRM Software
If you need to share presentations with highly sensitive information, consider using digital rights management (DRM) software. DRM tools like Microsoft Azure Rights Management let you encrypt files, set detailed usage permissions, and revoke access remotely.
Preventing unintended modifications to a PowerPoint presentation ensures your original version remains intact. The techniques covered in this article, from marking as final to adjusting file attributes, make it simple to keep your presentation read-only and guarded from unwanted changes.
Choose the read-only method that aligns with your use case, whether it’s quick sharing inside your organization or distributing sensitive materials with partners. Just remember edits can still happen if recipients override some read-only settings within PowerPoint itself. For true restrictions, rely on platform permissions, file formats like PDF, or robust DRM systems.
About The Author
Vegaslide staff, related posts, how to add music to a powerpoint, how to add live web pages to a powerpoint slide, how to set up widescreen in powerpoint.

A Cool PowerPoint Transition Trick
How to Make a PowerPoint Read Only
Last updated on June 4th, 2024
Read-only PowerPoint presentations are a vital tool for professionals who want to ensure their presentations remain unaltered and secure. It is a way to protect your prized presentation from unauthorized changes. Whether you’re sharing sensitive information or simply want to maintain the integrity of your slides when sharing it online, understanding how to use and leverage read-only PowerPoint can make a significant difference.
What is a Read-Only PowerPoint Presentation?
A read-only PowerPoint presentation is a PowerPoint file that has been set to prevent any edits. It is a copy of the PowerPoint presentation that is being protected for unauthorized changes.
The read-only mode in PowerPoint ensures that the content remains exactly as intended by the creator, preventing any unauthorized modifications.
Unlike editable PowerPoint files, read-only presentations maintain the integrity of the original slides, providing a consistent and secure way to share information.
Why Use Read-Only PowerPoint Presentations?
The primary reason to configure PowerPoint as a read-only presentation is to protect the content’s integrity.
This is crucial in situations where the information is sensitive or where consistency in messaging is critical.
By making a presentation read-only, you ensure that the message you intend to convey is delivered exactly as you created it, without any risk of alterations.
How to configure a PowerPoint Presentation as Read-only? (Step by Step Guide)
Creating a read-only PowerPoint is straightforward. Here’s how you can do it:
- Open your PowerPoint presentation.
- Click on the “File” tab in the top-left corner.
- Select “Info” from the sidebar.
- Click on “Protect Presentation.”
- Choose “Mark as Final.” This will make the presentation read-only and inform viewers that the file is final.
- Save your presentation.

When you mark a presentation as final, a popup will appear informing the user that the presentation was marked as final to discourage changes. As we can see later, PowerPoint will show a message to the user saying the document has been marked as final to indicate that editing is complete and that it is the final version of the PowerPoint presentation.
When a document is marked as final, the status property is set to Final, and typing, editing commands, and proofreading marks are turned off.

Also, a yellow notice will appear.

Alternatively, you can protect your PowerPoint presentation by setting it to Always Open Read-Only by default or encrypt your slides with a password .

Common Mistakes to Avoid when setting a PowerPoint presentation as Read-Only
While setting up a read-only PowerPoint is simple, there are a few common mistakes to watch out for:
- Compatibility Issues: Ensure that your read-only settings are compatible across different versions of PowerPoint.
- Overlooking Permissions: Make sure to check that all necessary permissions are correctly set to avoid accidental edits.
How Read-Only Presentations in PowerPoint are used in Various Industries?
Corporate Sector
In the corporate world, protecting confidential business strategies and ensuring uniform presentations across teams is crucial. Read-only PowerPoint presentations help maintain control over the content, ensuring that the information remains consistent and secure across all departments.
In educational settings, maintaining the integrity of the curriculum is essential. Read-only presentations prevent unauthorized edits by students, ensuring that the material presented remains as intended by the educator. This is especially important for standardized tests and other critical educational content.
In the healthcare industry, securing sensitive patient information is paramount. Read-only PowerPoint presentations ensure compliance with industry regulations by preventing unauthorized changes to the content. While protecting a .PPT might not be compliant with HIPAA, this is particularly important for presentations that include patient data or other sensitive information.
Overcoming Challenges
Dealing with unauthorized edits.
Even with read-only settings, there may be instances where unauthorized edits occur in your PowerPoint presentations. Here’s how to deal with them:
- Spotting Unauthorized Changes: Regularly review your presentations to identify any unexpected modifications.
- Rectifying Edits: Use version history or track changes in PowerPoint to revert to the original presentation if unauthorized changes are detected.
Balancing Accessibility and Security
Ensuring that your read-only presentation is both accessible and secure can be challenging. Here are some tips:
- Improving Readability: Use clear fonts and high-contrast colors to make your presentation easy to read.
- Enhancing Security: Utilize password protection alongside read-only settings to add an extra layer of security.
Leveraging Read-Only feature in PowerPoint
Using read-only mode can enhance your presentation delivery by ensuring that your slides are presented exactly as intended. Here are some case studies of successful implementations:
- Case Study 1: A multinational corporation used read-only PowerPoint presentations for their annual general meeting, ensuring that all stakeholders received the same information without any risk of tampering.
- Case Study 2: An educational institution used read-only presentations for their online courses, maintaining the integrity of the curriculum and preventing unauthorized edits by students.
What are other alternatives to PowerPoint Read-only?
Some presenters claim Read-only feature in PowerPoint is not secure enough, and that’s true. Even if you create a password protected presentation in PowerPoint, there are tools to hack this.
As an alternative, some presenters opt for exporting the PowerPoint presentation as a read-only PDF presentation. Of course, in this case you will lose some features available in PowerPoint, like Morph animations or transitions, but you can still present the PDF presentation to an audience or distribute it online with stakeholders. PDF format can be a good alternative to protect your slides.
Another option could be exporting the PowerPoint presentation as a video. You can export a PowerPoint presentation to video format and then share a playable link. You can upload the video to YouTube, Vimeo, or just a cloud platform like Dropbox and then share a link with your audience to play the video.
Other Useful Tips for Effective Usage of Read-only PowerPoint
To create engaging read-only presentations in PowerPoint, consider these best practices:
- Keep it Simple: Focus on clear and concise messaging.
- Engage Your Audience: Use visuals and interactive elements to keep your audience engaged.
- Review and Revise: Regularly review your presentations to ensure they remain up-to-date and relevant.
Key Takeaways
- Summary of Benefits: Read-only PowerPoint presentations protect content integrity, ensure consistent messaging, and enhance security.
- Quick Tips for Implementation: Enable read-only mode, use password protection, and regularly review your presentations.
- Importance: Maintaining presentation integrity is crucial for delivering accurate and consistent information in professional settings.
Read-only feature in PowerPoint is a powerful feature for professionals across various industries. By understanding how to configure your presentations in read-only mode, you can ensure that your presentations remain unaltered.
Leave a Comment Cancel reply
Your email address will not be published. Required fields are marked *
Save my name, email, and website in this browser for the next time I comment.
Sign up to our newsletter
We will send you our curated collections to your email weekly. No spam, promise!
IMAGES
COMMENTS
If you want to discourage others from making edits to your Microsoft PowerPoint presentation or let them know the file you sent is the final version, you can do so by making it read-only. Here's how it's done.
If you want unrestricted editorial rights to a read-only PowerPoint presentation, then you have to unlock it. The good news is that you can open it in a few simple clicks. Here’s how.
Are you trying to open a PowerPoint presentation that sadly opens up as a read-only file? If the answer is yes, then you are not alone! This isn’t a pleasant situation for anyone, however, there are many complications and reasons behind why this happens.
Learn how to make a PowerPoint presentation Read-only and uneditable. Using the same method you can unlock & remove Read-only in PPT.
When you want to share your presentation with others but you don’t want them to change it, you can make it read-only. Here’s how using OneDrive and OneDrive for work or school: Using OneDrive. In PowerPoint for the web, click the Share tab.
To make a PowerPoint Presentation read-only: Open your Powerpoint presentation. Choose File at the top left. Select Info on the bar on the left. Click Protect Presentation. In the pull-down...
To ensure your PowerPoint presentations remain unaltered, you can use read-only settings and mark your presentations as the final version. This helps maintain the document’s integrity, prevents accidental edits, and strengthens security.
How to Unlock a Read Only PowerPoint Presentation (in 4 Steps) If you see text in a banner that warns you the file is read-only, the original author marked it as final and discourages editing. This wikiHow will teach you how to unlock a read-only PowerPoint manually.
The easiest way to make a PowerPoint presentation read-only is to mark it as final right within PowerPoint. Here are the steps: Open the PowerPoint presentation you want to make read-only. Click on the “File” tab. Select “Info” on the left side of the menu. Click on “Protect Presentation” and choose “Mark as Final” from the drop-down menu.
(Step by Step Guide) Creating a read-only PowerPoint is straightforward. Here’s how you can do it: Open your PowerPoint presentation. Click on the “File” tab in the top-left corner. Select “Info” from the sidebar. Click on “Protect Presentation.” Choose “Mark as Final.”