

What is a mBot Robot: Components and Functioning Explained
Finding a robotic kit today is easy. You will get a lot of options at different prices, configurations, and features. Picking the right one is tricky but learning about the best options will help you to make the right pick. We are going to talk about the popular Makeblock mBot in this blog post. Let us give you a better and clearer idea about what is a mBot robot and its capabilities.

Table of Contents
Introduction t0 makeblock mbot.
- WHAT’S INSIDE THE MBOT ROBOT KIT
- MAIN COMPONENTS OF MBOT
- STEPS TO BUILD A ROBOT
mBot is an educational robot that encourages you to use your imagination by exploring various tasks while integrating mBot with drag-and-drop programming.
mBot is primarily an educational toy for kids, it is a member of the Makeblock line of exquisitely crafted robotics kits and accessories for enthusiasts. One will be able to progress to other robotics items in the Makeblock series and construct projects like a 3D printer, draw bot, a robot arm, or a robot of their very own!

mBot kits use mBlock, a programming language based on scratch, which enables users to easily control the movements of their robots through the use of programming software composed of pre-loaded, drag-and-drop graphical blocks.
Programming the mBot is simple and does not require text-based complicated code. If you are interested in knowing more interesting robot facts, you can check our blog ‘ 10 interesting facts about robots ‘.
2. WHAT’S INSIDE THE MBOT ROBOT KIT?

3. MAIN COMPONENTS OF MBOT
Like how muscles help us to move, mBot comes with components that enable it to move. The basic component required is the motor. The motor is the device that allows physical movement. The motor used in Makeblock mBot is the DC motor.

Ultrasonic Sensor:
Humans use their eyes to see objects and know the distance of objects (like it’s near or far). Likewise, mBot uses an ultrasonic sensor to see objects/find the distance of an object. The ultrasonic sensor is a device that measures the distance of an object or obstacle using sound waves.

Line-Follower Sensor:
The Line-follower sensor detects the colors such as black and white and moves accordingly. The line follower sensor works on the principle of absorption and reflection of light.

Control System (Mainboard/Motherboard):
Like how the human body has a brain, the brain of the mBot robot is the mainboard/motherboard.

The bluetooth device helps us in exchanging information over a short distance. The purpose of using the Bluetooth module in the mBot is to facilitate communication with the android/iOS phone.

4. STEPS TO BUILD A SIMPLE BOT
Three steps to building a simple bot.
- Write a program

Do you want your child to be introduced to this wonderful platform but unsure where to begin?
This is for you then. Here, at Guruface academy we’ll provide you with complete guidance in learning mBot and take you through various stages. If you have a good Mentor and Resource, learning is a quick and enjoyable experience.
Don’t worry if you’ve never programmed before. With Makeblock mBot’s play and programming apps, you’ll quickly develop your programming and driving skills. You can also discover more amazing robotics and electronics courses on the Guruface Academy Learning Platform . Take a look and see what more you can learn. Have a great rest of the day!

Marini is the Senior Robotics Trainer at Guruface Academy. She holds a Master's Degree (MS) in Electronics and is an experienced Instructor with a demonstrated history of Training students across the Globe in Various Robotics platforms. Marini is also a Professional Stem Educator with sound knowledge of Electronics, Coding, Robotics, Artificial Intelligence, etc.

Meet mBot – Construct, Control and Code
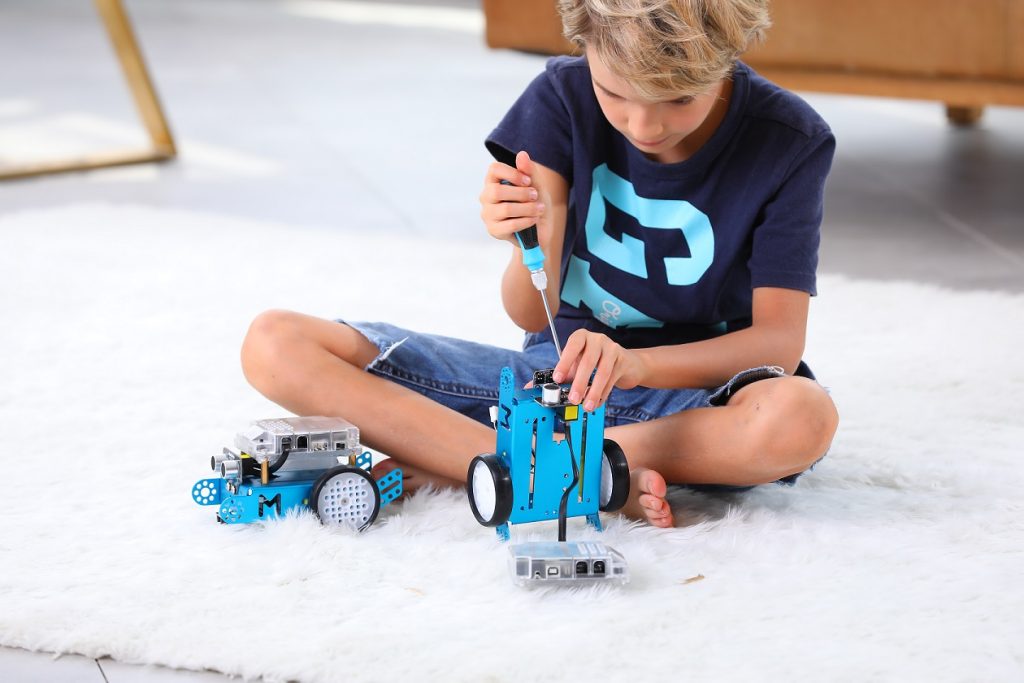
mBot is a STEAM education robot for beginners, that makes teaching and learning robot programming simple and fun. With just a screwdriver, step-by-step instructions, and a study schedule, children can build a robot from scratch and experience the joys of hands-on creation. As they go, they will learn about a variety of robotic machinery and electronic parts, get to grips with the fundamentals of block-based programming, and develop their logical thinking and design skills.
You can direct and control mBot in many ways. You can use an Android device, an Apple device, a computer, or even the Makeblock Bluetooth Remote Controller ! For more information, head on to our Getting Started with mBot page .
Powerful, Educational and Fun: This is mBot
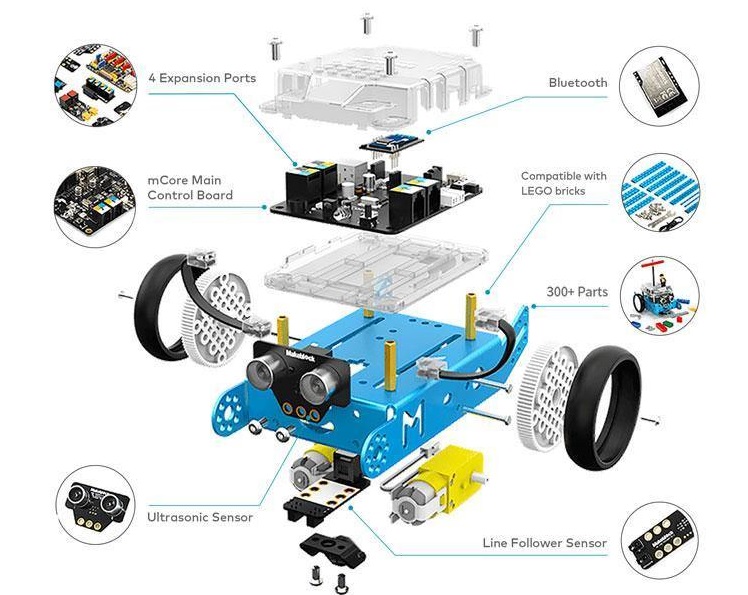
mBot comes equipped with 4 connection interfaces and 7 electronic modules and, together with add-on packs and their own code, let children turn their robot into a dancing cat, a smart lamp, and other creative projects. mBot is also compatible with LEGO blocks for even sensibility.
Let’s get started.
mBot: empowering individuals and classrooms to be innovative and creative while having fun!
For Educators
Use mBot in the Classroom
Makeblock’s comprehensive curricular resources enable Grade 3 to Grade 8 educators to help students learn about programming while they play and create with mBot. It is an affordable, STEM robot designed to inspire young engineers as they design, learn, and play. From sensors used to follow complex line formations and avoiding obstacles to multi-faceted remote controls, mBot is the perfect addition to any classroom environment – easily teaching students the power of coding and programming.
During this training session, educators will be exposed to the mBot, the Arduino at heart module robot. The hardware and software, benefits of use in the classroom, the lesson development process, and integrating curriculum.
Take a look at our Classroom Bundles

mBot Classroom Pack

- Easy Building: mBot is an easy to assemble robot that can be installed with just one screwdriver. Color coded modules make connecting the sensors and actuators child’s play.
- Reliable : Industrial quality materials ensure practice with close to real-world applications and durability.
- Develop Logical Thinking Skills in Kids: Through hands-on and coding experience, kids are able to understand the connection between coding and the real world. They can learn to think logically, observe dedicatedly and try to solve their problems independently.
- Most Beginner-friendly Coding Designs for Kids: Block-based coding utilizes a drag-and-drop color block for programming, this is super kid-friendly since they don’t have to type the code themselves. It lowers the threshold of coding and simplifies the procedures which allow children to learn programming easily and happily.
- Expand the Fun with Add-on Packs : mBot comes equipped with 4 connection interfaces and 7 electronic modules and, together with add-on packs and their own code, let children turn their robot into a dancing cat, a smart lamp, and other creative projects. mBot is also compatible with LEGO blocks for even sensibility.
- Endless invention: Compatible with 500+ Makeblock mechanical parts, 100+ electronic parts, Lego bricks, Arduino and Raspberry Pi, mBot will bring kids lots of fun through endless invention.
- Wireless Programming by Bluetooth Dongle : The Bluetooth dongle will offer mBot a smooth, stable, and effective wireless experience. This dongle can help you avoid messy wires hassle and improve the efficiency of teaching and presentation, especially in classrooms and competitions.
mBot’s Accessories

Bluetooth Dongle

mBot Add-on Pack Interactive Light & Sound

mBot Add-on Pack – Six-legged Robot

mBot Add-on Pack – Servo Pack
Specs and Comparison with mBot 2.0
| Control board | mCore | CyberPi |
| Processor | ATmage328 / P | ESP32-WROVER-B |
| SPI Flash memory | / | 8MB |
| Store multiple programs simultaneously | / | 8 |
| Support multi-threading | / | yes |
| Wireless communication | Either Bluetooth or 2.4G (depends on the version), IR | Bluetooth, Wi-Fi, and Wi-Fi LAN |
| Inputs and onboard sensors | Button Reset button Light sensor | 5-way joystick Button x2 Reset button Light sensor Microphone Gyroscope-accelerometer |
| Outputs | Buzzer RGB LED x2 | 1.44″ full-color display Speaker RGB LED x5 |
| Expandable electronic modules | RJ25 ports x4, one component per port | mBuild port x1, connect 10+ components in series |
| Additional interfaces | / | 2-pin interface x2 3-pin interface x4 |
- pied de page
Présentation de mBot
Il s'agit d'un robot mBot du commerce.Il est doté d'une carte électronique programmable. Celle-ci peut être programmée ou télé-opérée grâce à un ordinateur soit par fil (port USB), soit par Wifi.On utilisera le logiciel « mBlock» pour créer nos programmes. Le langage graphique utilisé est Scratch.

MBot est livré démonté dans sa boite avec tous les éléments nécessaires à l'assemblage.
Il faut compter 15 min pour assembler le robot.

Le montage de robot MBot est très simple et très rapide. Le fabriquant propose un shéma de montage qui décrit les étapes du montage.
Pour monter votre robot un petit tournevis vous est fourni dans la boîte qui contient le kit.
Les robots mis à disposition dans votre atelier est déjà assemblé et prêt à l'emploi avec une batterie rechargeable.
Une fois le kit assemblé, vous obtenez un ensemble :
- Télécommande,
- Clé Wifi pour communiquer avec l'ordinateur.

Ce robot se programme avec un logiciel spécifique "MBlock" qui ressemble tout à fait à Scratch.

La carte électronique
Il s'agit d'une carte type "Arduino" modifiée.
Il existe 2 versions :
- Version Bluetooth
- Version Wifi (celle que nous vous proposons)

Cette carte est composée de, en autre :
1- Bouton poussoir
2- Capteur infrarouge pour recevoir les informations de la télécommande
3- Capteur de luminosité
5- LED (Diode électroluminescentes) changeant de couleur en fonction du programme
6- Interrupteur ON/OFF pour allumer et éteindre le robot.

Les ports et boutons
Sur le côté droit :
1- un accès au bouton "Reset" pour réinitialiser le robot
2- Le Port USB pour charger la batterie et téléverser le programme
3- 2 ports RJ25 (n°3, utilisé par le capteur à ultra son et n°4 disponible pour des modules supplémentaires)

Sur le côté gauche :
1- Bouton pour changer de mode
2- 2 ports RJ25 (n°1 disponible pour un autre module et le n°2, utilisé pour le capteur suiveur de ligne)
3- 2 connecteurs pour les moto-réducteurs présents sous le châssis
4- interrupteur On/Off

Complément :
Les couleurs présentes sur le dessus des ports RJ25 permettent d'identifier les modules possibles à connecter.
Ces modules sont disponibles sur le site : http://learn.makeblock.com/en/electronics/
Les capteurs
Les photo-transistors sont placés sous le robot pour permettre la fonction "suiveur de ligne".

Un capteur à ultra-son pour détecter les obstacles.

L'alimentation
Dans notre cas, une batterie est fixée sous la carte électronique par un système de ruban auto-agrippant.
Elle se recharge avec le câble USB fourni avec le robot.

Benslimane Mohamed, Bargache Rita, Amouri Mamoun, Hatrouhou Salma 3432
1- INTRODUCTION
2- DE QUOI SE COMPOSE-T-IL ?
3- QUELLES SONT LES DIFFÉRENTES CARACTÉRISTIQUES ?
4- QUELS SONT LES DIFFÉRENTS PÉRIPHÉRIQUES ?
5- QUELS SONT LES CAPTEURS DE BASE ?
7- QUELS SONT LES ACTIONNEURS DE BASE?
8- COMMENT LE PROGRAMMER ?
INTRODUCTION
QU’EST CE QU’UN ROBOT MBOT ?
Mbot est une petite voiture robot dont le trajet et le comportement sont programmables. Le robot Mbot de Makeblock dispose de plusieurs capteurs et détecteur qui seront utilisés pour la programmation de la voiture.
Que peut-o n faire avec Mbot ?
Cette petite voiture robot est une révolution dans le monde des jouets, en effet les enfants peuvent eux même comprendre, prévoir et choisir par la programmation le fonctionnement de leur robot jouet.Il existe déjà sur le marché des robot jouets des voitures qui intègrent la fonction d’évitement d’obstacle. Mais cette fonction n’est pas programmable, ce jouet n’est pas évolutif dans dans sa programmation.
DE QUOI SE COMPOSE- T- IL ?
- Le châssis : Structures mécaniques en aluminium anodisé de couleur bleu.
- Deux moteurs à courant continu avec leurs encodeurs optique, ceux-ci permettent de contrôler de manière précise la vitesse et l'avancée du moteur.
- Module de détection ultrason capable de détecter un obstacle se trouvant à une distance de 3 à 4 cm.
- Roues à pneus gomme : 2 roues plastiques 90T, 125 dents
- Roue folle : injecter d’une seule pièce avec bille en métal, hauteur ajustable a 10 ou 16 mm, boîtier en plastique, poids 20g.
- Carte de pilotage : bouton M/A, bouton-poussoir, deux LED RGB, LED emission IR, buzzer, capteur de lumière, capteur IR, deux connecteurs Rj45 libres.
QUELLES SONT LES DIFFÉRENTES CARACTÉRISTIQUES?
Caractéristiques techniques
- Micro-contrôleur : Basé sur Arduino
- Entrées : Lumière, infrarouges, ultrasons, présence, bouton
- Sorties : Moteurs, Buzzer, LED RVB, infrarouge, ports
- Communication : 2.4GHz
- Modes de programmation : Scratch, Ardublock, Arduino
- Alimentation : Batterie 3,7V lithium ou 4 piles AA / LR6 (non fournies)
- Dimensions : 17x13x9cm
- Poids : 400g
QUELS SONT LES DIFFÉRENTS PÉRIPHÉRIQUES ?
Le robot Mbot est composé essentiellement des éléments suivant :
- Entrées : capteur de lumière , boutons, récepteur infrarouge, capteur ultrasonique, suiveur de ligne.
- Sorties : avertisseur sonore, DEL RVB, emission infrarouge, deux ports moteurs.
- Microcontrôleurs : basés sur Arduino Uno .
- Alimentation : batterie CC de 3,7 V au lithium, ou quatres piles AA de 1,5 V.
- communication sans fils : série sans fil à 2,4 GHZ, connexion grâce au système bluetooth.
QUELS SONT LES CAPTEURS DE BASE?
Le robot mBot interagit avec son environnement en fonction du programme qu'on lui implante. Pour cela, il est capable de collecter des informations grâce à ses capteurs et de réaliser des actions grâce à ses actionneurs.
Boutons et capteurs : Pour interagir avec son environnement et y recueillir des informations, on retrouve sur le robot : - un module Wifi qui permet de recevoir les ordres émis par l'ordinateur. - un capteur de luminosité qui le renseigne sur la luminosité ambiante. - un module à ultrasons qui lui permet de « voir » les obstacles à l'avant et d'en connaître la distance. - un module de suivi de ligne au sol à infrarouge. - un bouton paramétrable. - un bouton de mise sous tension. -d'autres capteurs peuvent être branchés en option ( humidité, flamme, fumée,gyroscope...)
QUELS SONT LES ACTIONNEURS DE BASE ?
Boutons et capteurs : Pour interagir avec son environnement et y recueillir des informations, on retrouve sur le robot : - un module Wifi qui permet de recevoir les ordres émis par l'ordinateur. - un capteur de luminosité qui le renseigne sur la luminosité ambiante. - un module à ultrasons qui lui permet de « voir » les obstacles à l'avant et d'en connaître la distance. - un module de suivi de ligne au sol à infrarouge. - un bouton paramétrable. - un bouton de mise sous tension. -d'autres capteurs peuvent être branchés en option ( humidité, flamme, fumée, gyroscope...)
COMMENT LE PROGRAMMER ?
Il faut tout d’abord télécharger le logiciel de programmation « Mblock » et après avoir installé le driver de la carte Arduino. Il faudra choisir le port série correspondant pour ensuite pouvoir commencer à programmer. Si jamais vous n’avez pas réussi à programmer par vous-même et vous voulez utiliser les fonctions préprogrammées, vous cliquez « Connecteur » puis, “Réinitialiser le programme par défaut”
Pour la zone 1 : Tant que l’on appuie sur le bouton de la carte « mCore », le robot va être en fonctionnement.
Pour la zone 2 : Le robot répète deux fois les codes suivants.
Pour la zone 3 : Pendant le premier fonctionnement, le robot avance tout droit à la vitesse de 100mm/s, et après la musique, il passe au deuxième fonctionnement.
Pour la zone 4 :Cette fois-ci le robot va reculer à la vitesse de 100mm/s, et après la musique, toutes les LEDs vont s’éteindre.
Pour la zone 5 : Le programme de la musique et les effets des LEDs.
Pour la zone 6 : Le robot s’arrête.
CHAÎNE D'ÉNERGIE ET CHAÎNE D’INFORMATION
DU ROBOT M-BOT
Récepteur infrarouge
POUR VOTRE ATTENTION !
BENSLIMANE Mohamed
BARGACHE Rita
HATROUHOU Salma
AMOURI Mamoun
- International
- Education Jobs
- Schools directory
- Resources Education Jobs Schools directory News Search

MBOT Block Coding with MakeBlock Software (24 slides with challenges included)
Subject: Computing
Age range: 14-16
Resource type: Lesson (complete)
Last updated
8 August 2023
- Share through email
- Share through twitter
- Share through linkedin
- Share through facebook
- Share through pinterest
This is a set of 24 slides for teaching the MBOT program to junior and middle school (ages 9 to 15) who are learning block coding and want to learn programming using blocks based programming to program a Robot. MBOTS can be easily bought for around $100 and is a great program for any school to embark on. This set of 24 slides will cover a 4 to 6 hours of lessons from basic to using light sensors using if/else coding.
Tes paid licence How can I reuse this?
Your rating is required to reflect your happiness.
It's good to leave some feedback.
Something went wrong, please try again later.
This resource hasn't been reviewed yet
To ensure quality for our reviews, only customers who have purchased this resource can review it
Report this resource to let us know if it violates our terms and conditions. Our customer service team will review your report and will be in touch.
Not quite what you were looking for? Search by keyword to find the right resource:
mBot Explorer Kit
SKU: P1050015/P1010045
mBot is a STEAM education robot for beginners, that makes teaching and learning robot programming simple and fun. With just a screwdriver, the step by step instructions, and a study schedule, children can build a robot from scratch and experience the joys of hands-on creation. As they go, they will learn about a variety of robotic machinery and electronic parts, get to grips with the fundamentals of block-based programming, and develop their logical thinking and design skills.
This package includes a 4AA Battery Holder ( SKU: 14002 ), but not include rechargeable Lithium Battery ( SKU: P3090003 ) due to logistics reasons , nor the Bluetooth dongle ( SKU: P5010002 ), but they can be acquired separately.
Key Features

Easy-to-use
The robot science kit is based on mBot, an easy to assemble robot that can be installed with just one screwdriver.

Color-coded
Color coded modules make connecting the sensors and actuators child’s play.

Industrial quality materials ensure practice with close to real-world applications and durability.

Educational
Packed with an educational storage by Gratnells; The rich add-on parts help students to explorer further with electronics and mechanics.
Teaching Resources
| Control board | mCore |
| Processor | ATmage328 / P |
| SPI Flash memory | / |
| Store multiple programs simultaneously | / |
| Support multi threading | / |
| Wireless communication | Either Bluetooth or 2.4G (depends on the version) IR |
| Inputs and onboard sensors | Button Reset button Light sensor |
| Outputs | Buzzer RGB LED x2 |
| Expandable electronic modules | RJ25 ports x4, one component per port |
| Additional interfaces | / |
Extend the Learning

Tech Specification
| Main Control Board | ATmega328 | |
| Connectivity | USB-Cable | |
| Compatibility | Makeblock Wireless Dongle | |
| Power Supply | 3.7V Lithium Battery | |
| Dimensions | 170 × 130 × 90 mm (L × W × H) assembled | |
| Weight | 500g |
Arthur Dezemery
Created on November 6, 2023
More creations to inspire you
C2c volunteer orientation.
Presentation
TALK ABOUT DYS WITH TEACHER
Cirque du soleil, layout organization, talk about dys teacher-teacher, product management in movies & tv shows, essential oils presentation.
Discover more incredible creations here
Le robot Mbot
Un robot pédagogiquepour découvrir la robotique
Pour le programmer, faire des exercices et se familiariser avec les principes fondamentaux de la programmation simple.
Au professeur de technologie et aux élèves de 3ème
Concours mBot
Comment battre un mBot adverse lors d'un combat Sumo ?
Compétences travaillées
Piloter un système connecté localement ou à distance, participer à l’organisation et au déroulement de projets, traduire, à l’aide d’outils de représentation numérique, des choix de solutions sous forme de croquis, de dessins ou de schémas., réaliser, de manière collaborative, le prototype de tout ou partie d’un objet pour valider une solution, imaginer, concevoir et programmer des applications informatiques nomades.

Situation de départ
ETAPES A SUIVRE
1. Prendre connaissance du règlement - Organisation du calendrier - Tirage au sort des équipes.
2. Imaginer, puis faire des croquis des pièces à ajouter au robot.
3. Répartition des tâches :
Modélisation du robot équipé avec SketchUp
Programmation du mBot
Fabrication des pièces
4. Personnaliser le mBot (Nom, slogan etc.)
Qualifications
ATTENTION : La propreté du poste de travail en fin de séance entre dans la note d'investissement.

CONNAISSANCES
Importer un objet dans SketchUp :
________________________________________________________________________________
Blocs du programme :

- Microbot Medical-stock
- News for Microbot Medical
MBOT Stock Earnings: Microbot Medical Meets EPS for Q2 2024
InvestorPlace - Stock Market News, Stock Advice & Trading Tips
Microbot Medical (NASDAQ: MBOT ) just reported results for the second quarter of 2024.
- Microbot Medical reported earnings per share of -17 cents. This met the analyst estimate for EPS of -17 cents.
- The company did not report any revenue for the quarter.
InvestorPlace Earnings is a project that leverages data from TradeSmith to automate coverage of quarterly earnings reports. InvestorPlace Earnings distills key takeaways including earnings per share and revenue, as well as how a company stacks up to analyst estimates. These articles are published without human intervention, allowing us to inform our readers of the latest figures as quickly as possible. To report any concerns or inaccuracies, please contact us at [email protected].
More From InvestorPlace
- Legendary Investor Predicts: “Forget AI... THIS Technology Is the Future”
The post MBOT Stock Earnings: Microbot Medical Meets EPS for Q2 2024 appeared first on InvestorPlace .
Microbot Medical News MORE
Related Stocks
IMAGES
COMMENTS
Mbot est un robot programmable. Il peut se déplacer en avant, en arrière et tourner à droite ou à gauche. Il peut émettre des sons et des signaux lumineux. I...
March 14, 2021 18:59. mBot is an award-winning programming robot developed by Makeblock. It has taken the heart of over 4,500,000 children around the world. Not only do children adore mBot's lovely appearance, but they also love playing with it. With a screwdriver and step-by-step instructions, children can build their own robot from scratch ...
mBot is an educational robot that encourages you to use your imagination by exploring various tasks while integrating mBot with drag-and-drop programming. mBot is primarily an educational toy for kids, it is a member of the Makeblock line of exquisitely crafted robotics kits and accessories for enthusiasts. One will be able to progress to other ...
mBot Mega is a programmable metal-structured robot. It has automatic gesture recognition, line following, and obstacle avoidance functions and supports block-based programming on mBlock, programming in Arduino IDE, and the Raspberry Pi interface. mBot Mega is equipped with four Mecanum wheels. Compared to regular wheels, the Mecanum wheels ...
We commit ourselves to making creation easier for more people. mBot Neo is a programmable robot developed for children. After assembling mBot Neo, a child can control it by programming it. With mBot Neo, you can work with your children to analyze, identify, and abstract the important points of complicated problems, and find out the general ...
The mBot2 Getting Started Activities are developed for students between 11 to 14 years old and their educators. Overall, the lessons are designed to be accessible, despite having different and increasing complexity levels. Each lesson introduces a different and exciting feature from the mBot2, along with some basic concepts of programming.
Meet mBot - Construct, Control and Code. mBot is a STEAM education robot for beginners, that makes teaching and learning robot programming simple and fun. With just a screwdriver, step-by-step instructions, and a study schedule, children can build a robot from scratch and experience the joys of hands-on creation.
The mBot robot is useful when teaching math, science, and coding concepts. Once the robot is assembled we begin with the fundamentals. These fundamentals include coding the robot's microcontroller to activate the motors so mBot begins to move around. Once the robot is moving we begin to learn about motion, velocity, and acceleration.
Présentation de mBot. Il s'agit d'un robot mBot du commerce.Il est doté d'une carte électronique programmable. Celle-ci peut être programmée ou télé-opérée grâce à un ordinateur soit par fil (port USB), soit par Wifi.On utilisera le logiciel « mBlock» pour créer nos programmes. Le langage graphique utilisé est Scratch.
Le robot Mbot est composé essentiellement des éléments suivant : Entrées : capteur de lumière, boutons, récepteur infrarouge, capteur ultrasonique, suiveur de ligne. Sorties : avertisseur sonore, DEL RVB, emission infrarouge, deux ports moteurs. Microcontrôleurs : basés sur Arduino Uno. Alimentation : batterie CC de 3,7 V au lithium, ou ...
pptx, 5.31 MB. This is a set of 24 slides for teaching the MBOT program to junior and middle school (ages 9 to 15) who are learning block coding and want to learn programming using blocks based programming to program a Robot. MBOTS can be easily bought for around $100 and is a great program for any school to embark on.
The networkable Robotfor Computer Science and STEAM EducationSKU: P1010132. mBot2 is a next-generation educational robot designed with extended capabilities, starting as an entry-level solution in lower secondary education and going all the way to upper secondary and beyond. mBot2 is powered by CyberPi, an educational microcontroller enhanced ...
SKU: P1050015/P1010045. mBot is a STEAM education robot for beginners, that makes teaching and learning robot programming simple and fun. With just a screwdriver, the step by step instructions, and a study schedule, children can build a robot from scratch and experience the joys of hands-on creation. As they go, they will learn about a variety ...
PRÉSENTATION DU ROBOT MBOT. Mbot est un robot développé par la société MakeBloc et destiné à s'initier …à la robotique. Il est doté d'une carte électronique programmable sur une base Arduino. Celle-ci peut être programmée grâce à un ordinateur soit par fil ( port USB ), soit par Wifi. On utilisera le logiciel « Mblock ...
Presentation. View. GROWTH MINDSET. Presentation. Discover more incredible creations here. Transcript . Le robot Mbot. Un robot pédagogiquepour découvrir la robotique. Pour le programmer, faire des exercices et se familiariser avec les principes fondamentaux de la programmation simple. Robot Mbot.
En ouvrant le coffret de mBot vous trouverez un robot, une télécommande et un câble USB. Regardons plus en détail le robot afin de voir de quoi il est consti...
1 Programmer le robot mBot 1/ Présentation de mBot : Il s'agit d'un robot mBot du commerce. Il est doté d'une carte électronique programmable. Celle-ci peut être programmée ou télé-opérée grâce à un ordinateur soit par fil (port USB), soit par Wifi. On utilisera le logiciel « mblock » pour créer nos programmes.
1. Prendre connaissance du règlement - Organisation du calendrier - Tirage au sort des équipes. 2. Imaginer, puis faire des croquis des pièces à ajouter au robot. 3. Répartition des tâches : Modélisation du robot équipé avec SketchUp. Programmation du mBot. Fabrication des pièces.
ALIMENTER Le robot Mbot est alimenté par : - 4 piles d' 1.5V ou - Une batterie DISTRIBUER L'énergie électrique disponible va être utilisée ou non selon : - La batterie ou les piles soient branchées position de l'interrupteur ON-OFF, - Selon les ordres envoyés par la fonctiion
Microbot Medical (NASDAQ: MBOT) just reported results for the second quarter of 2024. Microbot Medical reported earnings per share of -17 cents. This met the analyst estimate for EPS of -17 cents.