- Customer Help
- X (Twitter)

How to Create a Stunning Photo Slideshow in PowerPoint
A photo slideshow can bring your PowerPoint presentation to life. In this article, you’ll learn step-by-step how to make a compelling photo slideshow in Microsoft PowerPoint. We’ll cover choosing your photos, arranging them, adding transitions, music, and text – everything you need to create a dynamic slideshow your audience will love. Whether you’re a PowerPoint beginner or experienced user, you’ll find tips to take your next slideshow from ordinary to extraordinary.
Getting Started Create Slideshow in PowerPoint

Now you can customize this template slide for your photo slideshow. Change the title, subtitle, and text box colors and fonts to match your brand or theme. You’ll also want to delete any placeholder images and ensure the slide layout works for photos. The title and text boxes should not cover up the main photo area.
Add Photos to Your PowerPoint Slideshow
Step 1: Inserting a Single Photo

- Choose the desired image and confirm to insert it onto your slide. This method is ideal when you’re aiming for a different and selective approach in your presentation.
Step 2: Adding Multiple Photos Simultaneously

- Simply drag the slides from the folder and drop them directly onto the PowerPoint slide. This batch insertion saves time and ensures consistency in your slideshow.
Step 3: Adjusting and Refining Your Photos

Step 4: Ensuring Harmony Between Photos and Slide Elements
- Review each slide to make sure photos don’t overlap with titles, bullet points or short text boxes.
- Adjust the position or size of photos if they obstruct any slide elements. This ensures your slides in PowerPoint are both visually appealing and easy to understand.
Step 5: Exploring Additional Features (Optional)
- For users on a Mac, familiarize yourself with any interface differences.

- For a continuous presentation loop, select the “loop continuously” option in the slideshow settings.
- Dive into the “Slide Layout” or “Picture Layout” options to experiment with different visual arrangements for your content.
Make a Custom Title Slide
Step 2: Inputting Your Title and Subtitle

- Below the title, there’s a space for a subtitle. Use this to provide additional context or a secondary message related to your main theme.
Step 3: Enhancing Text Aesthetics

Step 4: Dabbling in Color Choices
- With your title or subtitle text highlighted, click on the text color option in the “Home” tab. Select a color that complements your presentation’s theme.

Step 5: Embedding a Relevant Image
- To further enhance your title slide, consider adding an image that ties in with your presentation’s theme.

- Once inserted, adjust the image’s size and position it behind your title and subtitle. Ensure the image doesn’t overpower the text but complements it.
How to Add Music into Your Microsoft PowerPoint Presentation
Step 1: Initiating the Audio Addition
- Navigate to the slide where you want the music to start playing.
- Head over to the “Insert” tab located at the top of the interface.

Step 2: Modulating the Audio Volume

- Use this slider to adjust the audio volume. If you’re aiming for background music that doesn’t overpower your presentation’s content, set the volume to a lower level.
Step 3: Selecting the Right Tune for Emotion
- The music you choose plays a pivotal role in setting the mood for your slideshow on PowerPoint.
- Reflect on the emotion or message you want to convey with your slides. Whether it’s nostalgia, excitement, or inspiration, pick a track that heightens this emotion.
- Remember, the right song or instrumental piece can amplify the impact of visual transitions, making slide transitions to your slide more dynamic and engaging.

How to Add Engaging Transitions to Your Presentation Slide Show
Step 1: Exploring the Transition Palette

Step 2: Fine-Tuning the Transition Speed

- By default, the transition duration is set to 1 second. However, if you’re aiming for a more relaxed and deliberate pace, especially for photo slideshows, adjust this to 2-3 seconds. This ensures each photo or slide lingers a bit longer, allowing viewers to fully absorb the content.
Step 3: Maintaining a Uniform Transition Style
- Consistency is key to a professional-looking presentation. Instead of mixing and matching various transitions, which can be jarring, opt for a uniform slide motion effects style.
Step 4: Taking a Sneak Peek of Your Transitions
- Before finalizing your presentation, it’s always a good idea to preview your slide motion effects.
How to Elevate the Visual Appeal of Photos in Your PowerPoint Presentation
Step 1: Fine-Tuning Brightness and Contrast
- Launch Microsoft PowerPoint and navigate to the slide containing the photo you wish to enhance.

- Within this tab, locate the brightness and contrast sliders. Adjusting these can significantly improve the clarity and visibility of your image, ensuring it looks its best on the big screen.
Step 2: Amplifying Color Vibrancy
- Still within the “Picture Format” tab, look for an option labeled “Color Saturation.”
- Boosting this will make the colors in your photo more vivid and pronounced, allowing your images to truly make a photo slideshow stand out and captivate your audience.
Step 3: Thoughtful Application of Filters
- In the same “Picture Format” tab, you’ll find an option labeled “Color.” Clicking on this will reveal a dropdown with various filter effects, such as black & white, sepia, or vintage.
- While these filters can add a unique touch, it’s crucial to use them sparingly. Over-filtered images can appear unprofessional or distract from the content.
Step 4: Incorporating Delicate Visual Effects
- Beyond color adjustments, PowerPoint offers a range of subtle effects to enhance your photos further.

Step 5: Individual Photo Refinement
- As you progress through your slide show in PowerPoint, take the time to enhance each photo individually. This attention to detail ensures a consistent and high-quality visual experience throughout your presentation.
- However, always use restraint. Not every image may need adjustments, especially if they’re already of high quality.
How to Efficiently Save and Distribute Your PPT Presentation
Step 1: Initial Saving of Your Slideshow
- After finalizing your presentation in Microsoft PowerPoint, it’s essential to save it in its native type.

Step 2: Transforming Your Slideshow into a Video
- If you’re looking to share your slideshow in a more dynamic format, Power Point offers the option to export it as a video.
- Click on the “File” menu again and navigate to “Export.”
- Here, you’ll find an option labeled “Create a Video.” Select this and choose the desired video quality, typically MP4 file. This makes your slideshow more accessible and playable on various devices.
Step 3: Broadening Your Audience Reach
- With your slideshow now in video type, you can upload it to popular platforms like YouTube, Vimeo, or even Google Drive.
- Uploading to these platforms allows for wider sharing, making it accessible to colleagues in the workplace, friends, or the general public.
Step 4: Converting to a Portable Format
- Under the “File” menu, find the “Export” option again and select “Create PDF/XPS Document.” This format is perfect for sharing via email, embedding on your website, or posting on social media platforms.
Step 5: Universal Sharing
- With your presentation now available in multiple formats, you’re equipped to share it virtually anywhere! Whether it’s a video link, a downloadable PDF, or the original PowerPoint file, you can distribute your engaging slideshow to a diverse audience across various platforms.
Creating a compelling photo slideshow in PowerPoint just takes a few simple steps. In this guide, we covered choosing an eye-catching template, importing photos, adding animation and music, customizing the title slide, and enhancing image quality.
With the right combination of great visuals, audio, animation, and text, you can make an engaging slideshow. Use these tips to take your PowerPoints photos from bland to brilliant.
Now you have all the tools to make your own dynamic photo slideshow presentation in PowerPoint. Bring your photos to life and impress any audience. Just follow this guide’s step-by-step instructions. Soon you’ll be a PowerPoint slideshow pro!
You must be logged in to post a comment.
- Business articles (22)
- Google Slides (57)
- Keynote (27)
- PowerPoint (83)
- Support (2)

How to Make a Photo Slideshow on PowerPoint
PowerPoint is a powerful tool for presentations, but also for Photo Slideshows. Think of it like the live-still photo frames in Harry Potter . Indeed, they used PowerPoint as the software for that mystical moving frame.
This tutorial will walk you through How to Make A Photo Slideshow .
Go to the tools ribbon and click Insert . From the options under Insert, select Photo Album . Once clicked, a pop-up window displays all the settings for adjusting your Photo Album.

To insert our pictures, click the button in the upper left corner labeled File/Disk . Select the photos you want to use from your computer. Once selected, the photos will all be displayed on this box labeled Pictures in Album.
The pictures are all numbered according to the order in the presentation. They also have boxes placed before them which you can select to adjust using specific settings, such as moving up or down, rotating the image, and changing its brightness and saturation.

For example, I want to move image number two to the first slide. I tick the box and click on the up button. If I want to rotate the image, I can easily use these rotate buttons on the side, and if I want to change the brightness, I also have some tools here for that. Under Album Layout , there are three tools you can use to adjust your slides and images. It has this Picture Layout option, allowing us to place more than one image on a slide as we see fit.
For example, if I want two images on each slide, I click on this button next to Picture Layout, which will give us a drop-down of options. From there, select the one that says two pictures, and it will automatically arrange the album to have two photos on each slide.

Under Picture, Layout is an option to change the Frame Shape . Clicking on the small V-shaped button shows us a drop-down of the frame options you can choose to reshape your images. I chose a rounded rectangle for this presentation.
We also have the option to select the theme for our slides. Once clicked, it will open a window showing a folder with all the themes we can use. For simplicity’s sake, we will use the default one.
For our final presentation , I wanted our slides to only have one picture on each slide, so I went back to Picture Layout and selected 1 Picture . Now that it’s back to this format give each image a caption below.
Go to Picture Options and click on the box that says Captions Below All Pictures . The images will be captioned with their default image names, but you can edit them once you have created the Photo Album.
Other options on this window include Insert text, with a button labeled New Text Box . It adds a textbox with a box you can check on to move up and down the order of slides and other adjustments.
We also have this box that says All Pictures Black and White , which, as its name suggests, will turn all the pictures black and white.

Now that I have adjusted my Picture Album, click Create, and voila!
First, we are greeted by our initial slide, which has a default title of Photo Album and a subtitle that cites the author, which by default is the name of your computer.

We can easily edit this by clicking on the text box and typing in the title and name of your choice.

A text box displaying their default names is found beneath each picture for the image slides. You can also easily change these by clicking on the text box and editing the name to your liking.
If you are not satisfied with the format of your slides, you can go back to the Insert tab and click Photo Album, where you can choose the Edit Photo Album button to reopen the pop-up window and readjust your presentation . Once satisfied, click Update, and you’re all set.
Now that you have the basics of your Photo Album, you can add some animations , transitions, and other cosmetics to make your presentation awesome.
I made this Photo Album as simple as possible to show you the basics. Now it’s time to check out what our Photo Album looks like as a slide show presentation.
This is how the presentation would look if we chose the two pictures in one slide option under Picture Layout.

For more spectacular tips on utilizing PowerPoint, follow us on YouTube or read about How to Use Slide Master and How to Add Pop-Up Text to your presentations.
Get A Free Sample of Our Award-Winning PowerPoint Templates + University
Join our mailing list to receive the latest news and updates from our team. Don't worry, your information will not be shared.
We hate SPAM. We will never sell your information, for any reason.
Try 100+ Slides & 5 University Lectures for FREE.
Recent Posts

Try 100+ Slides & 5 University Lectures for FREE.
Get access to 100+ Templates & 5 University Lectures. Just enter your email below.

Join Our Free Trial
Get started today before this once in a lifetime opportunity expires.
- Everything to Know About iPhone 16
- The Rundown: The iPhone 16 Launch Event
How to Make a Slideshow on PowerPoint
Whether for work or private, use slideshows to get your message across
:max_bytes(150000):strip_icc():format(webp)/ColettaTeske-af57404a91b342578a97252b7dbd720f.jpg "photo presentation in powerpoint")
- Central Washington University
Before You Begin
- Step-by-Step: Make a Slideshow on PowerPoint
- Play Music During the Slideshow
- Set up the Slideshow
- Add Timings to Each Slide
- Edit Timings on a Slide
- Create a Video Slideshow
- Save a Slideshow to a CD or Other Removeable Media
When you're ready to present your PowerPoint slides to others, look no further than PowerPoint's slideshow feature. Use this tool for all kinds of slides, but those containing photos work best for most viewers.
Instructions in this article apply to PowerPoint for Microsoft 365 , PowerPoint 2019, PowerPoint 2016, PowerPoint 2013, PowerPoint 2010, and PowerPoint for Mac.
Before you create slides for your slideshow presentation, decide how long to make the slideshow, how it should flow, and the pictures you’ll use.
- Length : A slideshow can be as long or as short as you need. The length of the slideshow should be appropriate for the topic and for your audience’s attention span.
- Outline : It’s always smart to start with an outline; it helps you visualize your slideshow. An outline can be as simple as the list of topics you want to cover.
- Pictures : Choose photos that are clear and tell a story.
With PowerPoint's Photo Album , select the pictures and PowerPoint creates the basic slideshow. Fill your slides with informative text and harmonizing background music, then turn your collection of slides into a self-running photo slideshow with music that can play as a video or be stored on a CD.
When you’re ready to make a photo slideshow with music, PowerPoint gets you up and running quickly. To get started, select Insert > Photo Album > New Photo Album .
Here’s how to add and format pictures for the slideshow using the Photo Album:
Add pictures
Select File/Disk and select the images you want in the picture slideshow.
Enhance photos
Place a checkmark next to the picture you want to enhance and change the orientation, contrast, and brightness. You’ll see the changes in the Preview window.
Add text boxes
To add a slide for text, select the image in the album list you want the text to follow and select New Text Box .
Rearrange slides
Place a checkmark next to the picture you want to move and select the Move Up or Move Down arrows.
Choose a picture layout
Select the Picture layout down arrow and choose how you want the pictures to appear in the slideshow.
Frame the pictures
Select the Frame shape down arrow and choose a frame style. You’ll see a preview in the Album Layout area. This option will not be selectable if the picture layout Fit to slide is enabled.
Select Create when you’re finished.
Your photo slideshow is created in a new file. Add text to the slides and change the look of each slide.
How to Play Music During the Slideshow
Play music in the background during your slideshow to offer an audio counterpoint to all the visuals. The background music starts automatically with the slideshow and plays during all the slides.
To add background music to your presentation, select Insert > Audio > Audio on My PC , choose a music file, then select OK .
The audio icon appears in the middle of the current slide. To move it, drag it to a different place on the slide. When the audio icon is selected, the Playback tab appears. Select Play in Background and make changes to the audio file . Here are some suggestions.
- Preview the music : Select Play to hear what the music will sound like during your slideshow.
- Shorten the duration : Select Trim Audio to remove parts of the beginning and end of the music file.
- Adjust the volume : Select Volume to make the background music louder or softer.
How to Set up the Slideshow
Once your slides are finished, it’s time to set up the slideshow. Start by deciding whether to show the slideshow in a window or full screen.
To set up the slideshow, select Slide Show > Set Up Slide Show and choose one of the following:
- Browsed by an individual (window) : Run the slideshow automatically and inside a window. This option works best when you save the slideshow to a CD.
- Browsed at a kiosk (full screen) : Run the slideshow automatically and at full-screen size. This option works best when you convert the slideshow to a video.
Select OK when you’re finished.
How to Add Timings to Each Slide in the Slideshow
Now it’s time to decide how long each slide will appear in the slideshow. To begin, select Slide Show > Rehearse Timings . The slideshow displays in full screen with a Recording toolbar and a timer.
While timing your presentation, use the Recording toolbar to advance through the presentation.
Select Next (arrow pointing to the right) to go to the next slide when the desired timing has been reached.
Select Pause to start and stop the timing.
Select Repeat to restart recording the time for the selected slide.
When you’re finished and have set the time for the last slide, close the Recording toolbar.
Select Yes to keep the recorded slide timings.
How to Edit Timings on a Slide
If you need to increase or decrease the time for your slideshow, change how long slides appear during the slideshow.
To change the timing for a slide:
Select View > Slide Sorter .
Select Transitions .
Select a slide.
In the Advance Slide After text box, enter how long the slide should appear in the slideshow before proceeding to the next slide, then press Enter .
The new timing applies to the slide.
How to Create a PowerPoint Video Slideshow
The easiest way to distribute and play your slideshow is in video format. This way, anyone can view your slideshow no matter what computer or device they use.
To convert a slideshow into a video:
Save the file.
Select File > Export .
Select Create a Video .
To force a smaller file size, select the Full HD drop-down list and choose a lower quality.
Select Create Video .
Select the destination folder and give the video a descriptive file name.
Select Save . It may take a few minutes to process the file and create the video.
How to Save a Slideshow to a CD or Other Removeable Media
To create a presentation that can be watched on any computer and can be stored on a CD or other removable media:
Select Package Presentation for CD > Package for CD .
Type a name for the CD.
Select Copy to Folder or Copy to CD and follow the on-screen directions.
When you’re finished, select Close .
Get the Latest Tech News Delivered Every Day
- Loop a PowerPoint Slide Show
- How to Use Portrait and Landscape Slides in the Same Presentation
- Tips for Memorial PowerPoint Presentations
- How to Insert PDF Files Into PowerPoint Presentations
- How to Do a Voiceover on PowerPoint
- How to Use Speaker Notes in PowerPoint
- How to Hide and Unhide a Slide in PowerPoint
- 10 Best Places for Free PowerPoint Templates
- 9 PowerPoint Presentation Tips for Students
- The 10 Most Common PowerPoint Terms
- How to Make a Shape Transparent in PowerPoint
- How to Draw Freehand in PowerPoint
- Place Text Over Video to Zest up Your PowerPoint Slides
- What Is Microsoft PowerPoint and How Do I Use It?
- Change a PowerPoint Show File to a Work File
- Troubleshooting Audio Problems With PowerPoint

Create a photo slideshow in PowerPoint

Bryan Jones
- eLearning Development , Posts , PowerPoint

I recently created a photo slideshow (using PowerPoint) of my dad’s life-sized chess set sculpture that’s at Facebook (Go Dad!).
I found that PowerPoint was a surprisingly powerful slideshow creation tool.
And once I learned the basics, I was able to create my next slideshow in under 1 minute!
Below is what I learned, as well as some bonus lessons such as adding music, creating a custom title slide, saving the slideshow as YouTube video, and more.
Let’s go ahead and get started!
Video Tutorial
Here is a video that shows the entire process:
And if you want to watch the published version of the slideshow, you can watch it here:
Sculptures are by my dad, Hardy Jones , and sculpture photos in the source files are courtesy of my good friend Erin Bibeau .
Screenshot and Text Tutorial
The screenshot version of the lessons are below and are organized into these sections:
- Create slideshow in under 1 minute
- Create a custom title slide
- Set slide transitions
- Improve image quality
- Scale images to the edge of the slides
- Add pan and zoom “Ken Burns” effect
- Create scrolling credits
- Save the PowerPoint slideshow as a video that you can upload to YouTube
Create a PowerPoint Slideshow in Under 1 Minute
To watch this section as a YouTube video, click here .
0. Start with a new presentation open in MS Powerpoint.
Note: I’m working in PowerPoint 2016, but the steps are similar for 2013 and 2011.
1. Insert a photo album to your presentation
Go to “insert” → “photo album” → “new photo album”., click on “file disk”., select the photos from your computer.
Note: You can hold down Ctrl while clicking several photos to select them individually
Click “Insert”
Click “create”, 2. add transitions to your slideshow.
Next you want to add transitions to your new photo album.
Click the first slide, then hold Shift while clicking the last slide to select the whole range of slides.
Go to “transitions” → click on the arrow to open up more choices., click on “random”., 3. set the slides to advance automatically, from the “transitions” tab, check the “advance slide” “after” box., set it to 2 seconds (or whatever you want)., 4. set the slideshow to loop continuously, go to “slide show” → “set up show”., turn on “loop continuously until ‘esc’”, then click “ok”., 5. that’s it boom done in under 1 minute.
You’ve created a photo slideshow in PowerPoint in under 1 minute!
You can preview your slideshow with the preview button.
Advanced PowerPoint photo slideshow tips
The lesson above shows you how easy it is to create a photo slideshow in PowerPoint in under a minute.
But if you want to take it to the next level, you should continue reading below.
Advanced Tip 1: Create Custom Title Slide
The default title slide for a slideshow in PowerPoint is just a black slide with a text box.
I’d rather delete it than use the default view.
Or better yet, why not use an image from the slideshow with a text overlay? That’s what I’ll show you how to do below!
To watch this part of the lesson as a YouTube video, click here .
0. Start with the slideshow you created previously.
1. copy and paste a the template slide.
Note: You can download our free template here
The click the slide and using Ctrl + C to copy.
Then go to your own slide show, click on where you want to insert it, and hit Ctrl + V.
2. Click on the new slide to select it and customize it.
You can change the text as you please.
You can also change the image by right-clicking on the image → “Change Picture”.
Click on “Work offline”.
Then select a photo and click “Open”.
Click on the eye icons next to “text” in the “Selection” pane to hide the text.
Click on the box to select it → right-click → “Format Shape”.
Adjust the transparency depending on how bright or dark your background photo is.
Click on the eye icons for “text” again to show the text and see the effect.
Advanced Tip 2: Add Music
0. start with the slideshow you created in ms powerpoint., 1. insert the music.
Go to “Insert” → “Audio” → “Audio on My PC”.
Select a music file and click “Insert”.
2. Adjust the playback settings
Go to “Playback” → select “Automatically” for “Start” so that the music plays on its own.
Check the box for “Play Across Slides”.
To hide the audio icon on the slide during the show, click on it to select it, then go to “Playback” → “Hide During Show”.
You can loop the music if you want by checking the box for “Loop until Stopped”. This is optional.
3. Preview what it sounds like by clicking the preview button.
Advanced tip 3: transitions.
To watch the part of the tutorial as a YouTube video, click here.
0. Start with the slide show you created in MS Powerpoint.
1. select a slide to control the transition to it (from the slide before it)..
Go to “Transitions” → click the arrow for more choices.
Click on the transition style you want (this also previews them so you can see what they look like).
Advanced Tip 4: Image Quality
To watch this part of the tutorial as a YouTube video, click here.
1. Turn off the compression of images
Go to “File” → “Options”.
Then click on the “Advanced” tab and check the box for “Do not compress images in file”. (Directly beneath it, leave the “Default resolution” at “High fidelity” for good quality.) Turning off image compression helps a lot with zoom transitions of photos and when you enlarge photos, so that they don’t look pixelated.
Advanced Tip 5: Scaling Images
To watch this part of the tutorial as a YouTube video, click here .
Scaling photos will allow you to get rid of the empty spaces to the sides, like in the photo beneath.
1. Increase the size of the image to fill the workspace
Drag the image to the left (hold down left click on it) and align its left side with the edge.
Note: You may want to zoom out a little to make the next step easier.
Hold down shift and drag the lower right corner to resize it until it completely covers the empty space on the right. (Holding down shift keeps the image in proportion when resizing it.)
Click on the image and drag it up a bit to position it as you like.
Note: I like to use the thumbnails on the left pane to see what the positioning looks like.
If you’re a perfectionist, you can optionally also crop the overhanging part of the image if you wish by going to “Format” → “Crop”. It’s not really necessary, though.
2. Consider adding multiple photos for portrait oriented images
The image scaling method above is best suited to landscape pictures. If you have a portrait picture, you might wish to try using 2 or more pictures instead to cover up the empty spaces.
Advanced Tip 6: Add “Ken Burns” Pan Zoom Effect
A “Ken Burns” effect is adding some motion to the photos in a storytelling slide show. It’s an in-slide effect, unlike a transition. In this example, the slide starts zoomed in, then zooms out.
1. Create both a “grow/shrink” and a motion path effect to the image
Go to “Animations” → “Animation Pane”
In the Animation Pane, there are 2 things that need to be set up: a grow-shrink animation and a motion path. You then start them at the same time so they both move and grow. (See video linked in show notes on how to do this in detail as this takes some tweaking.)
The image will actually need to be much larger than the viewable area.
To compare the image size to viewable area, go to the Selection Pane and click the eye icon for the picture. This hides it.
You can now see the viewable area, which is quite small in comparison.
Advanced Tip 7: Add Scrolling Credits
Scrolling credits are the credits you list at the end of the video, auto-scrolling up.
1. Add a background color and a text box
Draw a black rectangle (or any color you wish) using the “Insert”->”Shape”->”Rectangle”
Create a text box with a contrasting color and insert your credits using “Insert”-> “Shape” -> “Textbox”
Move the text box below the entire slide
3. Add a line motion path animation to the text box
Note: Powerpoint actually has its own functionality for setting up credits, but it tends to stop in the middle if the credits are long. So it’s more reliable just using a the line motion path described below.
Click on the text box to select it. Then go to “Animations” → click on the arrow to expand the selection of animations.
Select “Lines” under “Motion Paths”.
3. Adjust the animation settings
The line will appear as a small vertical line with a green dot (where it starts) and red dot (where it ends).
You want it to travel up off the screen (scrolling up), so click on the red dot and drag it up above the slide.
Set the duration by going to “Animations” → “Duration”. The duration will depend on how long your credits are.
Remove the “smooth start” and “smooth end” by going to “Animations” → “Animation Pane”.
In the Animation Pane, click on the arrow for the text box → “Effect Options”.
Set “Smooth start” and “Smooth end” to 0 seconds. Click OK.
Advanced Tip 8: Save Slideshow As Video
One of the hidden features of PowerPoint is that you can save it out as a video. In my case, I wanted to save it as a video and upload it to YouTube. But you can also use it for other purposes as well.
1. Save your Powerpoint slideshow as a video
Go to “File” → “Save As” → “Browse”.
Under “Save as type”, change it from the default “PowerPoint Presentation” to “MPEG-4 Video”. (MP4 is a video format that’s compatible with Youtube.) Click “Save”.
You can track the progress for video conversion at the bottom. It usually takes a few minutes, but can take longer depending on the length of your video and the speed of your computer.
Once your video is complete, navigate back to the folder where you saved it.
Bonus Templates and Files
If you’ve made it this far, you’re a rockstar and you deserve something special. 🙂

Get 3 free slideshow templates:
Get your free download.
10 Free PowerPoint Templates to Present Your Photos With Style

Your changes have been saved
Email is sent
Email has already been sent
Please verify your email address.
You’ve reached your account maximum for followed topics.
I'm Absolutely Buying This New Ultra-Slim MagSafe Charger
Think you could never fall victim to cybercrime think again, google sheets tables are the handy feature i didn’t know i needed.
You might think Photoshop is the best tool for putting together a photo collage, but actually PowerPoint offers plenty of free templates for you to use instead. Here's how to use a template in PowerPoint along with all the best PowerPoint photo collage templates you have to choose from.
Why Use PowerPoint Photo Collage Templates?
Share your photos: For our most popular preoccupation with photos—sharing.
Show off photos with style: A professional photo collage template can add gravity and enhance your photos.
Save time: Microsoft PowerPoint templates for photos are molds for standard layouts. Why reinvent the wheel? Save time with pre-made photography templates so you can focus on other things instead.
Showcase creativity: Turn a long-term photography project into a creative PowerPoint photo album presented as a slideshow.
How to Search for Free PowerPoint Photo Collage Templates
The most common use of Microsoft PowerPoint with photos is to use it as a photo album. PowerPoint ships with some default photo templates, but you can also use free templates in the Office Online Template & Themes gallery.
Follow these steps in Office 365. It should be similar for other versions of Microsoft Office as well.

- You can tweak your slides further by applying Themes from the Design tab with just a click. A theme is a predefined combination of colors, fonts, and effects. Different themes are suitable for different slide layouts.
Tip: You can pin your favorite templates to the New screen.
The 10 Best PowerPoint Photo Templates
Good presenters know not only what to present but also how to present. These 10 professional photo collage templates do some of the handholding for you.
1. Stay Minimal With the Classic Photo Album

The Classic Photo Album PowerPoint template is a minimal theme suitable for black and white street photography. Use this to create a personal portfolio. Limited to two colors, it doesn't distract from the photos you use the template for.
If you want to go with color, customize the default theme background, colors, number of images, alignment of thumbnails, and more by using the Ribbon.
2. Make a Baby Photo Collage

This PowerPoint photo slideshow template presents your cute baby pictures in a vertical style. You can use a different number of photos in the slides and write down memories associated with the photos.
3. A PowerPoint Collage for Wedding Photos

The elegant Wedding Photo Album is a compilation of 17 slides in different layouts. You will find other wedding album templates in the gallery, but this is an understated photo collage. You can add up to five wedding photos to create a collage. For more choices, search with a "wedding photo album" keyword.
4. Birthday Photo Album Template for Any Age

A common use of collages is to put together a birthday photo album. This PowerPoint template for birthday photos is easy to adapt to your needs. The 15 deck template also comes with editing instructions if you are a beginner on PowerPoint and need some help.
5. A Stylish Biography Template for Class

Studying the biographies of achievers is required reading in many grade levels. This is not for your photos but for profiling the life of famous men and women in the class. The Biography Presentation template is a well-designed template with space for photos and biographical information. Use each slide to focus on a single aspect of the achiever's life.
6. Escape With a Road Trip Photo Album Template

Just looking at the collage of placeholders for your road trip photos might make you want to take one. This beautiful PowerPoint template has eight slides, so you might need more of them if you bring back lots of memories.
7. Have Fun With a Party Photo Album Template

A fun party can throw up a lot of little moments. Capture them all in a slideshow with this 21-slide PowerPoint template. This photo collage template is colorful to match any fun theme for your party.
8. Remember Someone With a Memorial Album

Use the Floral memorial album template to pay tribute with a PowerPoint slideshow. The eight slides in the template are designed for different photos and one of the slides can even hold eight photos. This presentation design is somber but stylish at the same time.
9. Send a Reunion Reminder With a Family Photo Album

Present a few loving family photos to inspire everyone to start preparing for Thanksgiving and Christmas. The theme of these PowerPoint slides is simple, and you can easily add a few more slides to the default five this deck comes with.
10. Create a Stunning Photo Book

You might feel overwhelmed if someone asked you to put together a quick photo book. But use this subtle yet stylish PowerPoint photo book template to get the job done in no time. The name and the placeholder images might suggest a fashion theme, but you can easily repurpose it for any photos.
Let's Not Forget Office Online
You might not use PowerPoint Online for crafting that killer presentation, but it's still a free alternative to Microsoft Office with plenty of templates.
While most of the online photo templates are crossovers from the Office suite gallery, there are still some exceptions. For example, the Animated picture collection template.
You can always download a template from the online gallery to your desktop. And you can save your presentation to a web location just as easily with OneDrive, then access it from there with Office 365.
Other Sources of Free PowerPoint Templates
There also lots of non-Microsoft sources of free Microsoft PowerPoint templates and backgrounds. Search with a keyword like "photos" or "photo album" to find them. Here are a few suggestions:
- SlideHunter
- PPTtemplate.net
- PresenterMedia
- Powered Template
- Graphic River (paid)
Templates can help you take shortcuts through the time-consuming task of designing a presentation. That way you can save more time for perfecting the look of your presentation with a few profession design tips.
- Productivity
- Photo Sharing
- Presentations
Unsupported browser
This site was designed for modern browsers and tested with Internet Explorer version 10 and later.
It may not look or work correctly on your browser.
25 Stunning Photography Presentation Templates for New PPT Slideshows 2024
Are you in the photography business? Does your boss want you to develop a photo PowerPoint template? Maybe a client wants to see a PowerPoint photo presentation with your portfolio.
With one of our stunning photo presentation templates , you're sure to impress.

Photo presentation templates save you time. All you've got to do is add the information and images for your presentation. Voila! You've got a professional PowerPoint presentation that's ready to present. There's no wasted time trying to come up with a theme or design.
Envato Elements offers premium photography presentation PPTs. These PowerPoint photography templates are more professional than any free template. There are hundreds of photography PowerPoint templates and cool photography PPT templates.
25 Top Envato Elements Photography PowerPoint Templates for 2024
Envato Elements offers premium picture PowerPoint templates with everything you need to put together a great photography portfolio. Here's a list of some of the best picture PowerPoint templates on Envato Elements:
1. Focus - Photography PowerPoint Presentation Template

Focus Photography PowerPoint Template is a clean and minimalist photography presentation PPT. Create stunning compositions with your images for your photo presentation . This photography template includes:
- 60+ unique slides
- PPT, PPTX, and PDF files
- 16:9 and widescreen sizes
- animated slides
- print ready
- mockup devices
2. Flopy - Modern Minimalist Photography Presentation

Flopy is a modern photography presentation for PPT with a beautiful minimalist design. This photography PowerPoint template has:
- over 34 unique slides
- 16:9 screen ratio
- transitions and animations
- lookbook and magazine style
3. Bright - Fashion Photography PowerPoint Presentation

Are you looking for nice presentation photo ideas? The Bright photography PPT template has a beautiful pastel color theme. It's perfect for anyone who loves colors. See why this template PowerPoint for photography is the right one for you:
- 30 different slides
- 150 total slides
- five color variations
Start creating the most amazing photo presentation with this template!
4. Splash - Modern Photography PowerPoint Template

Splash photography PowerPoint is a multipurpose photographer presentation. This modern photography template includes:
- 30 unique slide
- five color schemes
- fully and easily editable
- vector-based
- total 150 slides
Splash can save you time and give you the professional look you want.
5. Xolea - Business Profile and Photo Presentation Template

Xolea is one of the PowerPoint templates for photography that delights with color. This photography PPT template comes with:
- 100 presentation slides
- 50 unique slide designs
- two color theme variations
- drag and drop image to screen mockups
- vector shape illustrations
It's a high-quality photo presentation template you can use for a variety of purposes, like business presentations.
6. Portio - Clever Photography PowerPoint Template

The modern Portio photography presentation template is designed with your portfolio in mind. Download this photography template and you'll get :
- 40+ unique slides
- PDF documentation
- professionally designed slides
- mockup devices, portfolio slides, vector-based icons
You can create a top photo presentation about photography in no-time. Start working with this photography slides template!
7. Altara - Fashion Photography Slides Template

If you're a fashion photographer, this photography PowerPoint presentation can match with your portfolio. Here's what you get with it:
- 12 PPTX and PPT files
- premade color themes
- dark and light versions
- widescreen and standard sizes
- documentation
This makes the photography slides template a perfect choice for showcasing a portfolio of your work.
8. Pastel Photography PowerPoint Presentation Template

This is a pared-back canvas for your photography PowerPoint presentation ideas. The color scheme is minimal and draws attention to your images. Make your photo portfolio professional with:
- 30 unique slides
- help guide file
- animations and transitions
9. Mbiring Manggis Photography - Picture Presentation Template

Looking for a profesional photography slides template? Use this picture presentation template as a starting point to design your portfolio. Its unique layout to showcase your photos is easy to edit thanks to image placeholders.
Download this template and find:
- widescreen aspect ratio
- master page layouts
- PPT and PPTX files
- easily editable elements
- free font used
Just drag and drop your content to make a photographer presentation.
10. Forloe – Creative Photography PowerPoint Template

Forloe is a modern, clean and minimalist photography PowerPoint template that can be used for any variety of purposes, like a creative agency, company profile, photography portfolio, pitch deck, and more.
This photo presentation template comes with:
- PPTX, PPT and documentation files
- 36 unique multipurpose slides
- resizeable and editable graphics
- 16:9 widescreen ratio
Explore this template PowerPoint for photography and share all of your picture presentation ideas.
11. Krama - BW Photography PowerPoint Template

Krama is an elegant, black and white, contemporary photography presentation template. It's perfect for a presentation about photography. Check it out:
- easy and fully editable in Powerpoint software
- HD widescreen
- handcrafted design
This photography PowerPoint template allows you to create your photographer presentation with ease.
12. Kalisya - Wedding Photography PowerPoint Template

Here's a modern PowerPoint photo slideshow template for photographers. It's perfect for wedding photography. It will help you show the delicate touch of your wedding photos with:
- 40+ professionally designed slides
- focus on typography and usability
- based on master slides
- editable charts
- unique mockup devices and portfolio slides
- free support
Kalisya is the perfect template PPT for photography for showcasing a portfolio of your work.
13. Minimal Fashion Catalog & PowerPoint Template for Photography

This PowerPoint template for photography file is multipurpose with a modern design. It's cool, fun, and a bit quirky to make your presentation on photography more attention-grabbing. Here's what you'll get:
- 135+ unique slides
- custom professional design
- editable layout
- unlimited color options
- PDF preview
14. Lusa - Engaging Photography PowerPoint Template

Do you like creative picture presentation ideas? This is a modern photography presentation template for PPT with a bright design, and it has:
- three Premade colors schemes
- easily editable
Plus, the design of this PowerPoint photo slideshow template draws the eye of the audience.
15. Shuter – Elegant Photography PowerPoint Template

This photography PPT template will impress your audience and leave them wanting more. It's an awesome choice if you've been searching for PowerPoint templates for photography thanks to its features:
- PPTX, PPT, PDF files
- 36 multipurpose slides
- free web fonts
- 16:9 Widescreen ratio
- drag and drop editing
You can truly make this template PPT for photography your own and present your body of work.
16. Vibes - Unique Photography PowerPoint Template

Show the love and harmonious vibes of your work with this photo presentation template. Be visually appealing to your audience with help from these specs:
- over 64 unique slides
- 11 color schemes (and you can make your own palette!)
- light and dark backgrounds
- handmade infographics
- fully customizable
- section break slides
Take full advantage of everything this photography slides template has to offer.
17. Camrol - Edgy Photography PowerPoint Template

Looking for a PowerPoint photo slideshow template? For a vibrant, modern, and energetic design, this PowerPoint photo slideshow template. It's an excellent choice if you're making a commanding business presentation about photography. Let's see why:
- more than 45 unique slides
- PPTX, PPT files
- versatile, professional design
- detail oriented
- vector based icons
Not only that, but you can download this picture presentation template and get it ready in just a few clicks!
18. PRONTO - Energetic Photo Presentation Template

Express your personality in a photographer presentation confidently. Work with the Pronto template PPT for photography. You can edit it to represent your brand and customize it to your liking. Plus, see more about what it has to offer:
With these specs, this template PPT for photography will become your best friend to showcase your picture presentation ideas.
19. Aresa - Drone Photography PowerPoint Template

Elevate and make your work fly! Here's a beautiful photography PPT template to put your work front and center. Easily edit this photography PowerPoint template to suit your picture presentation ideas and share your work your own way. Here's how:
- 30 different, handcrafted slides
Elevate your work with a photo presentation template like this one. You won't find a similar picture presentation template elsewhere.
20. Sevana - Beautiful Photography PowerPoint Template

Let your passion, creativity and craft shine through with this photo presentation template. Find all you need in this high-quality PowerPoint photo slideshow template. Add your images for presentation and you're all set. This download includes:
- 16:9 HD widescreen
- fully editable elements
Give your work a boost with a photography PowerPoint template like this one.
21. Drontix - Drone Aerial Template PowerPoint for Photography

Photography from a bird's eye view creates stunning images that delight audiences. Capture this spirit with this photographer presentation template. It's got a clean PowerPoint template for photography shot from drones. Add your images for presentation to this template! This download includes:
- fully customizable graphics
- based on Master Slides
This photo presentation template is sure to make your pictures fly.
22. Crapy - Minimalist Template PowerPoint for Photography

With spots of color, this is a wonderfully creative photography PowerPoint template. The vibrant backdrop serves to frame your images and text content across each slide. Here are some of the features in this template PowerPoint for photography :
- 30 multipurpose slides
- plenty of color options
- 16:9 aspect ratio
- handmade infographic
You can accurately present who you are with this PowerPoint photo slideshow template. Easily edit this PowerPoint template for photography.
23. ELLE-GHAN - Sophisticated Photography PowerPoint Template

Elle-ghan is elegant. Portray your work and let it speak for itself with this impressive photography slides template. Aside from a gorgeous professional design, you'll get:
- 30 types of slides
- PPTX and PPT files
- editable graphics
Grab the attention of your audience with this top photography presentation template.
24. Porcelain - Balanced Photo Presentation Template

Bring color and life into your portfolio with this photography PPT template. The Porcelain photo presentation template is delicate but throws a punch. It strikes the right balance so you can show the type of photography you do and let others know of your picture presentation ideas. Here are some of its features:
- 30 total slides
- 1920×1080 px
- links to free fonts
You'll stand out from the crowd with this balanced and creative photography PPT template.
25. Putih - Clean PowerPoint Photography Presentation Template

This is the ultimate clean, minimalist, ethereal template PPT for photography. We end the list with one of the best photography PowerPoint template for portfolios. Also works for fashion businesses, magazines, and other related areas.
Download this PowerPoint photo slideshow template to get:
- PPT and PPTX file types
- easily customizable design
- 16:9 ratio and 1920×1080 px
You'll get the tools to create a stunning portfolio with this photography PPT template.
5 Free Premium Presentation Templates from Envato Elements
Envato Elements has a selection of free premium items for you! Choose from these five amazing free templates for you to download:
1. Bezella - Photography Portfolio Template

Bezzella is a versatile Photo PowerPoint template that combines clean spreads and a minimal design. This premium presentation photo template includes:
- 38 unique slides
- Resizable and editable graphics
- Drag and drop image place holders
- 100% free fonts
2. The Arsislide - Photography Portfolio Template

Worked on an amazing architecture photoshoot? Try Arsislide. This premium photography portfolio template. It comes packed with features like:
- 55 unique slide designs
- Image placeholders
- Master Slides
- Full HD (16:9)
3. Deep - Photography Portfolio Template

Deep is a high contrast photo PowerPoint template that will make your work pop. It comes with different layouts to arrange your photographs, and other features like:
- 150 unique slides
- 15+ different layouts
- 700+ Editable icons
- Free and Fast support 24/7
4. Cassava - Photo PowerPoint Template

Cassava is a premium photography portfolio template created with photos in mind. Use the beautiful spreads and layouts to showcase your best work. Select your images for a presentation and you're good to go. It features:
- 35 slide designs
- Easy to edit and customize
- Drag and drop ready
- Includes PPT and PPTX files
5. LIABLE - Multipurpose PowerPoint Template

LIABLE is an easy to edit picture PowerPoint template ready to set up. This presentation photo template works for both photo studios and freelance photographers. Take advantage of features like:
- Based on master slides
- Drag and drop
- High-res 19020x1080 pixel
How to Make Great Photography Presentations With PPT Templates
It’s time to customize your chosen PowerPoint template for photography. Follow the steps below to make a great photography presentation with a PPT template.
For the purposes of this tutorial, I’m using the Contrast template from Envato Elements. It's got a clean design and three premade color schemes.

1. Choose Your Slides
Choose which slides you’re going to use in your presentation about photography. To do this, go to View > Slide Sorter and delete all the slides you don’t want to keep by right-clicking and deleting them.

2. Add Your Content
Here's where you can add your picture presentation ideas. Switch back to the Normal view and then go back to the Home tab. Now, double-click on any slide you want to edit.
Select all the text and replace it with your own as seen in the screenshot of slide #2.

3. Insert Your Images
Adding your own images is easy when you’re working with image placeholders. Click the picture icon on the placeholder.
Locate the image on your computer and add it to the PowerPoint photo presentation as I’ve done on slide #13.

4. Customize Colors
To change the color of the text, all you've got to do is select the text and then choose a color from the text color menu.

To change the color of the grey background, click on View > Slide Master . Then, select the grey background layer, right-click and select Format Shape .
Choose your preferred color under Solid Color Fill .

5. Customize Fonts
Customize the fonts by highlighting the text you want to customize.
Then choose a different font from the drop-down menu as I've done on slide #13.

5 PowerPoint Photography Presentation Ideas for 2024
You've chosen the right photography presentation template for your needs. Now, are you wondering how to put your presentation about photography together? Here are five photography presentation ideas to get you started:
1. Tell a Story
Stories make your PowerPoint photo presentation more impactful. Put your images together to form a narrative throughout your slideshow.

2. Experiment With Color
One way to experiment with color is to use all black and white images in your presentation.
Another way to experiment is to have different-colored sections in your presentation. There could be a black and white image section and a colorful images section. Most PowerPoint photography templates let you customize color schemes. Try this out for yourself.
3. Create a Timeline
To tell a story with your images or show how your images techniques changed over time. It'll be less confusing for the audience if you use a timeline with your images. A timeline can help you tell your story in a succinct manner.

4. Minimize Text
Let your photos do most of the talking and cut the amount of text you’re using on the slides. Use text as headlines or on section break slides and leave the rest of the slides for your photos.
5. Experiment With Layouts
Don’t forget to experiment with different layouts. You don’t have to use a standard grid. Instead, use a masonry layout or combine images of different lengths and widths. This creates a unique presentation for your photos.

Discover More Great PowerPoint Photography Templates
Didn't find what you're looking for?
Here are great multi-purpose templates that you could use for your photography presentation:

5 Photography Presentation Design Trends for 2024
We've just shown you a selection of our best photo presentation templates and how to use them. Now let me share some of the coolest design trends for 2024:
1. Go for Bold Imagery
Are you looking for picture presentation ideas for 2024? This is a big trend this year. It's especially great to showcase photographs. The best photography presentation PPTs focus on bold imagery to capture attention.
The key is the location of the pictures in your slides. A well-placed image will balance text-heavy slides beautifully. Like in this PowerPoint presentation template for photography:

2. Don't Be Afraid of Using Animations
Animation effects are a big trend for this year. Don't be afraid to include them in your presentation on photography.
They help you pace your speech and enhance your presentations. You can use them to:
- add transitions between slides
- reveal elements like bullet points
But animations are easy to overdo. That's why we included a detailed guide to help you in the process:

3. Add Audio to Your Presentation
Did you know you can add audio and music to your photography PPT presentation? This little-known feature can really transform your pitch.
A sound effect or background music can set the tone for your presentation. Are sending your photographer presentation potential clients? The audio will create a nice background for your viewers.
.jpg)
4. Include Interactive Maps
Perhaps you're a photographer that wants to display all the places where you've shot. If so, you'll like one of the latest trends for presentations this year.
Learn how to make an interactive map using a pre-built PowerPoint map template in our guide:
5. Don't Forget Your Contact Details
Keep your contact details in mind when you do your next presentation. This is useful for professionals who are looking to connect with potential clients.
The last photography presentation PPT slide should include the contact information. So, the audience can follow-up and start conversations.
Benefits of Using Professionally Designed PowerPoint Photography Templates (from Envato Elements)
You've found good options for your PowerPoint presentation about photography from Envato Elements. But why should you spend money on a premium PPT photography template? Before you make a decision, it's important to know the benefits of using this service. And here are just a few of them:
- You'll seem more professional. People will take you and your work more seriously when they see your portfolio, thanks to the quality of the photos and the professional design of the photo presentation template.
- You'll have the backup of a high-quality design. A professional PowerPoint template for photography can also influence how you see yourself. Knowing you have the backup of a high-quality design will give you a confidence boost.
- You can portray your work accurately. You put a lot of care and passion into what you do. A premium photography PPT template can help you portray that effectively.
- It will save you time and money. You have no time or money to waste. A top photography slides template is ready to go at a moment's notice, saving you valuable resources.
- You'll exercise your creativity. Finally, a premium PowerPoint template for photography will allow you to modify and tweak it to show your creativity, brand, and style without much fuss.
Common PowerPoint Questions Answered (FAQ)
It's great you've found a template PPT for your next photography presentation. But if you have questions about PowerPoint, that can slow you down. That's why I've gathered some answers to the most frequently asked questions about the presentation software we all know:
1. What's the Difference Between Free and Premium Photography PowerPoint Presentation Templates?
Sure enough, there are plenty of photography PowerPoint presentations for free out there. But the best advantages that we offer with our premium templates are:
- Professional, top-notch designs. You'll get the best photography PowerPoint templates designed by our experienced designers. So, your presentation is sure to stand out thanks to its professional design.
- Slide variety. Chances are, you've seen and use all the themes included in PPT. And your audience will recognize them too. In our libraries, you'll get a wide variety of templates. Each of them comes with many slide designs that'll serve your needs. And won't bore your audience.
2. Is PowerPoint Free to Use?
There are a few different ways in which you can license Microsoft Office. And yes, one of them can be for free:
- Office 365. This is the subscription-based model for using Office apps, with a monthly or annual package. You'll always have access to the latest version of the Office apps as long as you continue paying for Office 365.
- Office Home . The "Home" edition is a one-time purchase of Office with no subscription attached. But your app won't stay up to date as Microsoft releases new versions and features.
- Office Online. Run PowerPoint in a web browser. Regardless of which version of PowerPoint you use, you can pair it with the browser-based version of the app for free.

3. How Can I Make an Attractive Presentation About Myself?
Are you a professional photographer looking to attract new clients? It'll be necessary to make a presentation to introduce yourself.
If this looks daunting to you, don't worry. The first steps are:
- decide which information you'll include
- create an appealing introduction
- learn to sell yourself
Here are useful recommendations:

4. How Can I Track Changes in a PPT Presentation?
PowerPoint has a very useful feature that comes in handy if you're working with more people in the same presentation.
Tracking changes in PowerPoint is possible, and only takes a few steps! The result makes it easy to compare your original version with a collaborator's copy. Learn how here:

5. Can I Use PowerPoint to Create Printed Products?
Yes, and this is very useful for photographers. You can use brochure templates for PowerPoint. They'll give you the blueprint for a great printed product.
We give you all the details here:

Learn More About Using PowerPoint
PowerPoint is a powerful program. If you plan on making a lot of presentations, you should learn more about using PowerPoint so you can create standout presentations. Here are some tutorials that'll help you make the most out of PowerPoint:

Best Photography PowerPoint Templates on Envato Elements (With Unlimited Use)
You'll find hundreds of the best photography PowerPoint presentation templates on Envato Elements. And there's a great offer. Download as many as you want for one low price.
These premium photography PowerPoint presentation templates are for photography presentations.
Photo PPT Templates

You might be tempted by photography PowerPoint presentations you find for free. But you won't get the same quality.
With a professional photography presentation PPT you'll find:
- easy-to-use slide layouts designed to take advantage of the latest trends
- rich image placeholders to show off photos and videos
- customizable layouts to make every theme your own
Plus, now Envato Elements has introduced an AI-powered search feature ! This new tool allows you to input a description of your project to effortlessly locate the finest human-crafted resources.

Why not choose an Envato Elements template for your next photography PowerPoint presentation?
Download a Photography PowerPoint Presentation Template Today!
You've seen top-rated photography PowerPoint presentation templates from Envato Elements. We've also shared some presentation ideas to help you with your next photography presentation.
A professionally designed photo presentation template will save you time. And it's better than a photography PowerPoint presentation for free. You'll work with a high-quality design. These PowerPoint photography templates are much better than any free photography PowerPoint presentation.
So, why not download a Photography PowerPoint template today? Save time and make a powerful impression with your PowerPoint photo presentation.
Editorial Note: This post has been updated with contributions from Lex Soto , Brenda Barron , Maria Villanueva , Nathan Umoh , and Dacia Egurrola . Brenda and Nathan are freelance instructors for Envato Tuts+. Maria is an Associate Editor for Envato Tuts+ Design & Illustration. Dacia is a staff writer with Envato Tuts+. Lex is a staff writer for Envato Tuts+.

- PRO Courses Guides New Tech Help Pro Expert Videos About wikiHow Pro Upgrade Sign In
- EDIT Edit this Article
- EXPLORE Tech Help Pro About Us Random Article Quizzes Request a New Article Community Dashboard This Or That Game Happiness Hub Popular Categories Arts and Entertainment Artwork Books Movies Computers and Electronics Computers Phone Skills Technology Hacks Health Men's Health Mental Health Women's Health Relationships Dating Love Relationship Issues Hobbies and Crafts Crafts Drawing Games Education & Communication Communication Skills Personal Development Studying Personal Care and Style Fashion Hair Care Personal Hygiene Youth Personal Care School Stuff Dating All Categories Arts and Entertainment Finance and Business Home and Garden Relationship Quizzes Cars & Other Vehicles Food and Entertaining Personal Care and Style Sports and Fitness Computers and Electronics Health Pets and Animals Travel Education & Communication Hobbies and Crafts Philosophy and Religion Work World Family Life Holidays and Traditions Relationships Youth
- Browse Articles
- Learn Something New
- Quizzes Hot
- Happiness Hub
- This Or That Game
- Train Your Brain
- Explore More
- Support wikiHow
- About wikiHow
- Log in / Sign up
- Computers and Electronics
- Presentation Software
- PowerPoint Presentations
How to Add Images to a PowerPoint Presentation
Last Updated: June 5, 2023
Inserting Saved Images
Inserting copied images, inserting clip art.
wikiHow is a “wiki,” similar to Wikipedia, which means that many of our articles are co-written by multiple authors. To create this article, 13 people, some anonymous, worked to edit and improve it over time. This article has been viewed 140,236 times. Learn more...
Even if you've never used PowerPoint before, adding images to PowerPoint is fairly straightforward with a little explanation. Whether you have your image saved to your computer or you need to search the Internet for the perfect picture for a presentation, have no fear. Soon, you'll be a master when it comes to adding images to your PowerPoint slides.
Things You Should Know
- Insert a saved image into your PowerPoint by clicking "Pictures" within the "Insert" tab atop your screen.
- You can also find an image online to copy and paste it into a PowerPoint presentation.
- Also look for the "Clip Art" or "Online Pictures" section within the "Insert" tab.

- Many times, due to formatting issues, this method can be unreliable. Don't give up; there are other options available.

- You can also double click your image from the "Insert Picture" directory to insert it.

- Mac users can perform the same function by holding ⌘ Command while clicking.
- Content that you've selected with your cursor can also usually be copied by pressing Ctrl + C or, for Apple users, ⌘ Command + C . [1] X Research source [2] X Trustworthy Source Microsoft Support Technical support and product information from Microsoft. Go to source

- You can also paste items from your clipboard by pressing Ctrl + V

Community Q&A
You Might Also Like

- ↑ https://support.apple.com/en-us/HT201236
- ↑ https://support.microsoft.com/en-us/kb/126449
About This Article
To insert an image on a PowerPoint slide, start by clicking the slide in the left panel of PowerPoint. Next, click the ""Insert"" tab at the top of PowerPoint. If the picture you want to insert is on your computer, click ""Pictures"" in the toolbar and then select ""This Device."" Select the image you want to insert and click ""Insert"" to place it on the slide. You can then drag it anywhere on the slide. To resize the image without warping it, click and drag the circles at any of the corners (not the edges) inward or outward. As long as the picture is selected, you can use the tools on the Format tab to add artistic effects, color filters, lighting corrections, borders, and more. If you'd rather insert a picture from the web, return to the ""Insert"" tab—if you see the option for ""Online Pictures,"" click it—if not, click the ""Pictures"" icon first and then select ""Online Pictures"" from the menu. You can then choose a photo from your OneDrive or search for one using Bing Image Search. After inserting an online picture, you can edit it using the tools on the format tab. Did this summary help you? Yes No
- Send fan mail to authors
Reader Success Stories
Viman Haraen
Nov 19, 2016
Is this article up to date?
Dec 2, 2016

Featured Articles

Trending Articles

Watch Articles

- Terms of Use
- Privacy Policy
- Do Not Sell or Share My Info
- Not Selling Info
wikiHow Tech Help Pro:
Level up your tech skills and stay ahead of the curve
Your current User-Agent string appears to be from an automated process, if this is incorrect, please click this link:
How To Insert Picture In PowerPoint [A Comprehensive Guide]
By: Author Shrot Katewa
![How To Insert Picture In PowerPoint [A Comprehensive Guide]](https://artofpresentations.com/wp-content/uploads/2022/11/Featured-Image-How-to-Insert-Picture-in-Powerpoint.webp "photo presentation in powerpoint")
When I am in a conference hall, and the speaker is presenting a PowerPoint to the audience, the first thing that catches my eye is the pictures in the presentation. Pictures are a wonderful way of representing information in an engaging and creative manner. They bring life to an otherwise dull text-heavy presentation.
But, how do you insert pictures in PowerPoint?
To insert a picture into a presentation, first go to the slide where the picture will be added. Then select the “Insert tab”, click on “Pictures”, and “Source of the picture”. Choose the picture you want, either from the Internet, Stock images, or from the computer. Finally, click Open (or OK), and the picture will be inserted.
There are many other ways to add in a picture into your presentation. In this article, we shall cover all the different ways to insert a picture in PowerPoint. Plus, I’ll also share a few pro-tips to help you add text with the picture to your slide.
So, let’s get started!
1. How to Add Pictures in PowerPoint?
In Microsoft PowerPoint, you can add pictures and any other object using the “Insert” tab. The “Insert” tab includes features that allow you to insert a picture from different sources like your device, a camera, a cloud drive, the internet, etc.
1.1 How to Insert Picture from Computer in PowerPoint?
To insert a picture into a PowerPoint slide, you have to use the “This Device” option in the “Insert Picture From” list. You can also use the keyboard shortcuts to quickly add a picture to a PowerPoint presentation.
1.1a Method 1 – Using the Insert Tab
The “Insert” tab is the third tab in the menu ribbon in Microsoft PowerPoint. To add a picture to a slide using the “Insert” tab, follow the 3 simple steps.
Step-1: Click on the “Insert” tab
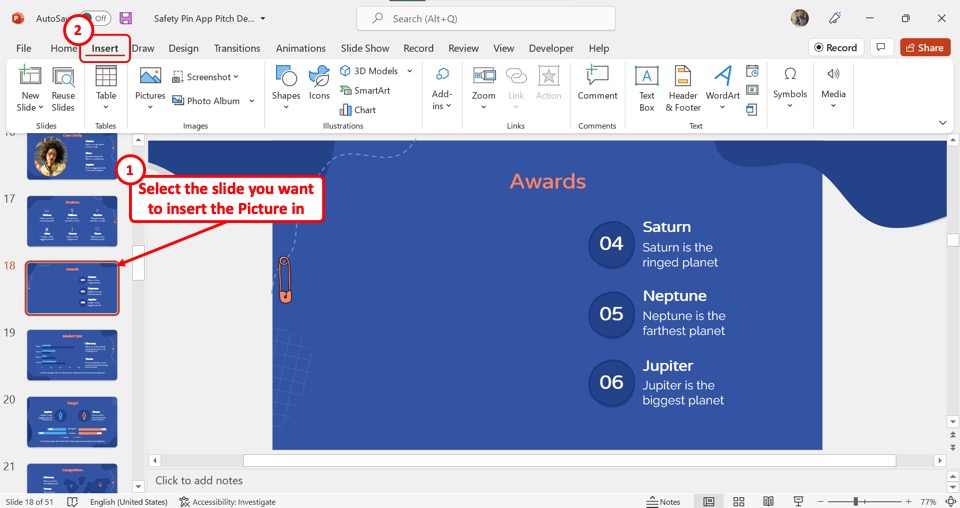
The first step is to open the slide where you want to add the picture. Then click on the “Insert” tab in the menu ribbon located at the top of the screen.
Step-2: Click on the “Pictures” option
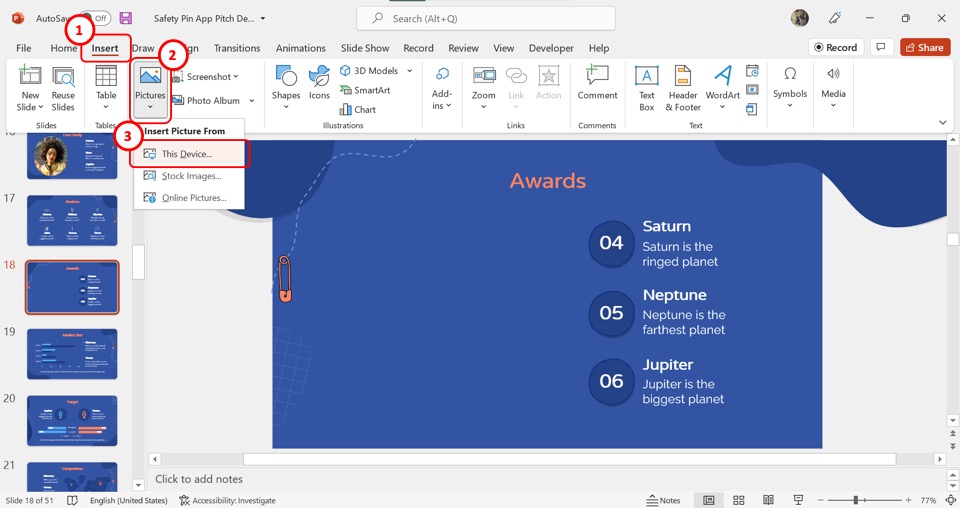
The next step is to click on the “Pictures” option in the “Images” group of the “Insert” menu. Then click on the “This Device” option from the dropdown menu under the “Pictures” option.
Step-3: Click on the “Open” button
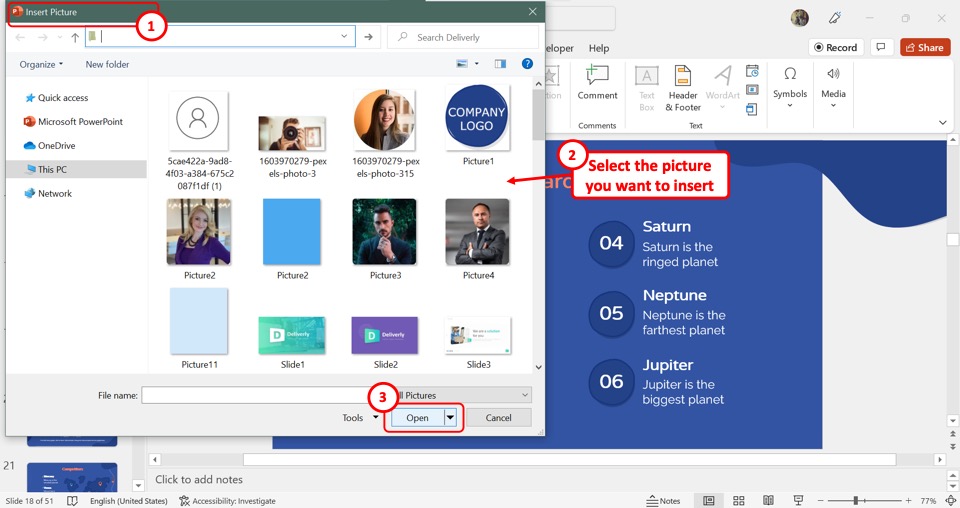
In the “Insert Picture” dialog, browse for the picture on your computer. Then select the picture and click on the “Open” button at the bottom of the dialog box to insert the picture into the open slide.
1.1b Method 2 – Using Drag and Drop
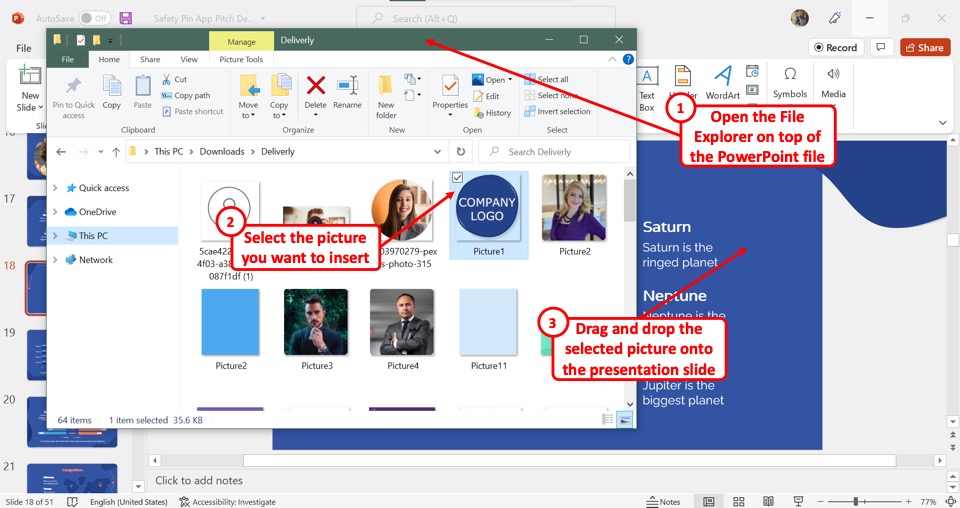
To use the “Drag and Drop” method, you have to open the “File Explorer” window over the PowerPoint file. In the window, look for the picture that you want to insert into the presentation slide. Then all you have to do is click on the picture in the “File Explorer” window and drag it to the presentation slide and drop it there.
1.2 Shortcut to Insert Picture in PowerPoint?
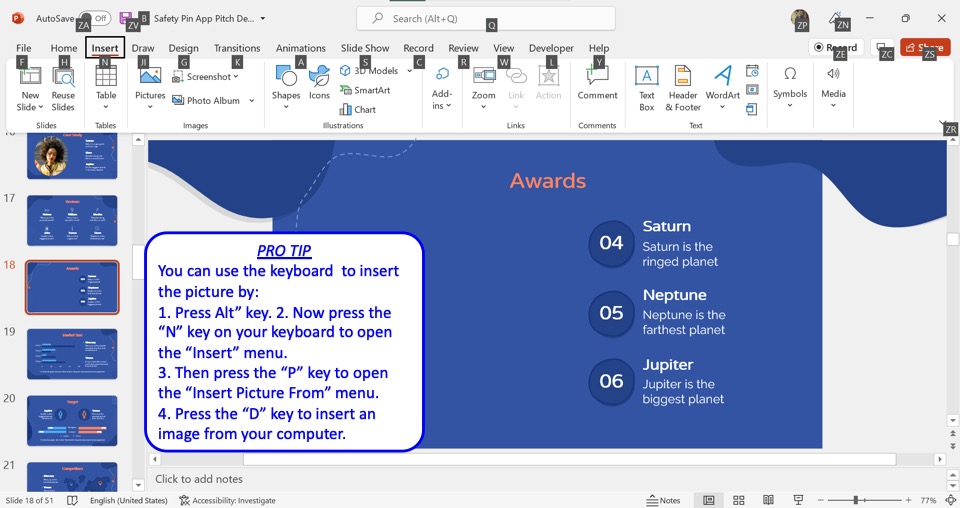
Microsoft PowerPoint allows you to insert a picture into your slide using only the keyboard. To use the keyboard shortcuts, you have to first press the “Alt” key.
The keyboard shortcut for each option in the menu ribbon will now be visible on the screen. Now press the “N” key on your keyboard to open the “Insert” menu. In the “Insert” menu, press the “P” key to open the “Insert Picture From” dropdown menu.
Press the “D” key to insert an image from your computer. You can also press the “S” key for stock images and the “O” key for online pictures.
1.3 How to Insert Online Pictures in PowerPoint?
The “Online Pictures” option in PowerPoint allows you to insert a picture from the internet into your slide using the Bing search engine. To add a picture from the web to PowerPoint, follow the 5 easy steps.
You have to first open the “Insert” menu. To do so, click on the “Insert” tab in the menu ribbon located at the top of the screen.
Step-2: Click on the “Online Pictures” option
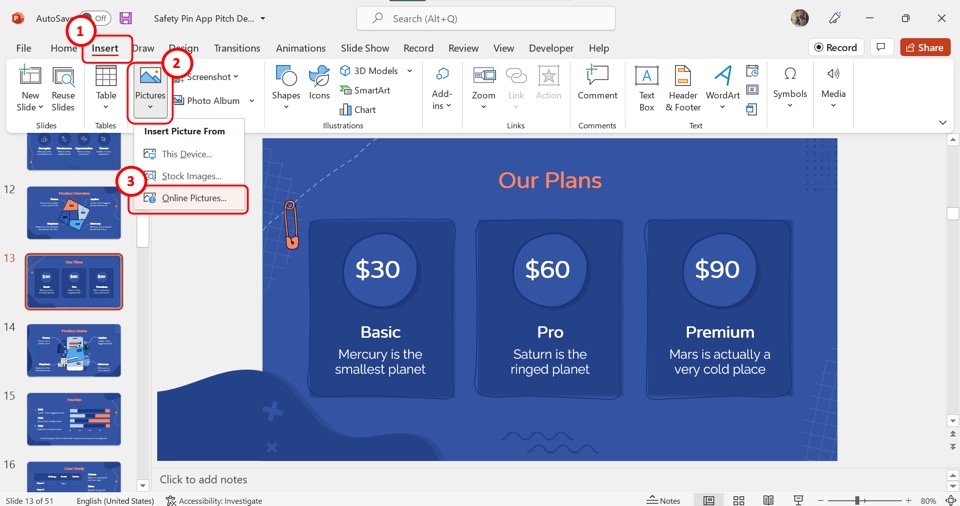
In the “Images” group of the “Insert” menu, click on the “Pictures” button. Then click on the “Online Pictures” option from the dropdown menu under the “Pictures” option.
Step-3: Click on the search bar

Now you have to click on the search bar at the top of the “Online Pictures” dialog box and type in what you are looking for. You can also select a preferred category from the dialog box.
Step-4: Click on the “Filter” option
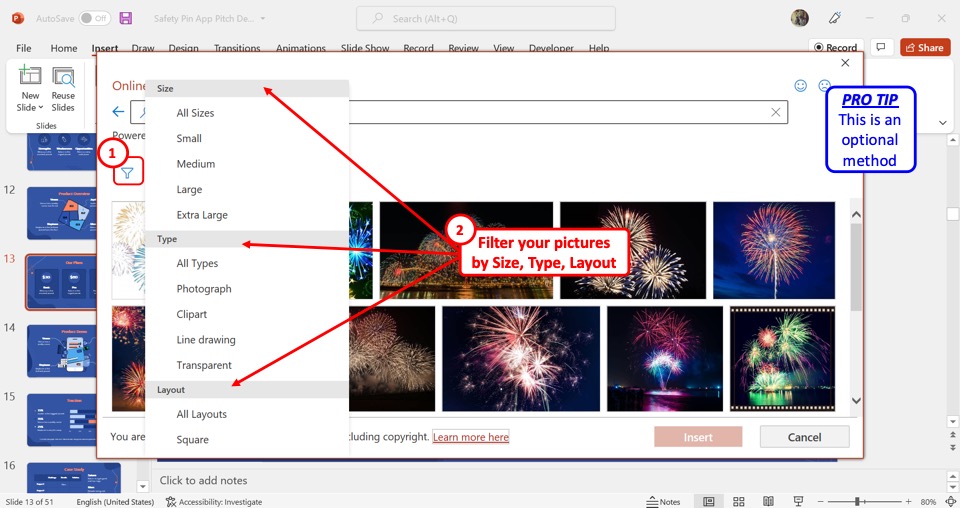
The next step is optional. You can click on the “Filter” icon which looks like a funnel under the search bar. In the “Filter” dropdown menu, you can select the size, type, and layout of the online picture.
Step-5: Click on the “Insert” button
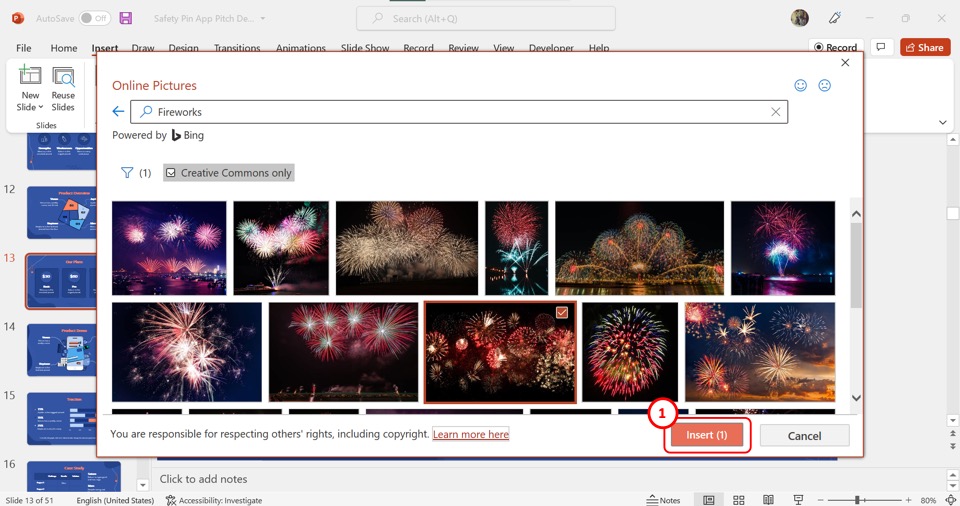
Finally, you have to click on one or more pictures that you want to add to the slide. Then click on the “Insert” button at the bottom of the dialog box.
1.4 How to Insert Image Using Photo Browser in PowerPoint?
The “Photo Browser” option in Office helps you browse through the photos on your Mac device. This option is only available in Microsoft PowerPoint for Mac. To insert an image from iPhoto or Photo Booth using the “Photo Browser” , follow the 2 quick steps.
Step-1: Click on the “Photo Browser” option
The first step is to open the slide where you want to add the picture. Then click on the “Picture” option in the “Insert” menu and select the “Photo Browser” option under the “Picture” option.
Step-2: Select your preferred image
In the dialog box, you have to now browse to the picture that you want to add to the PowerPoint slide. Then all you have to do is drag the picture onto the slide.
1.5 How to Add Image From Your Phone to Your PowerPoint Presentation?
When you take a photo on your iPhone, you can add it to your PowerPoint presentation using the PowerPoint for Mac. You have to first save the picture to iCloud Drive. Then follow the 2 simple steps.
Step-1: Click on the “Picture From File” option
The first step is to open the slide where you want to insert the image. In the “Insert” menu, hover your pointer over the “Picture” option. Then click on “Picture From File” .
Step-2: Click on the “Insert” button
In the dialog box, look for the picture in your iCloud that you want to insert and click on it. Then all you have to do is click on the “Insert” button to add it to the open PowerPoint slide.
1.6 How to Add Stock Images in PowerPoint?
Stock images are a gallery of free images available in PowerPoint. To insert a stock image into a PowerPoint slide, follow the 5 quick steps.
In the PowerPoint presentation, open the slide where you want to add the stock image. Then click on the “Insert” tab which is the third tab in the menu ribbon.
Step-2: Click on the “Stock Images” option
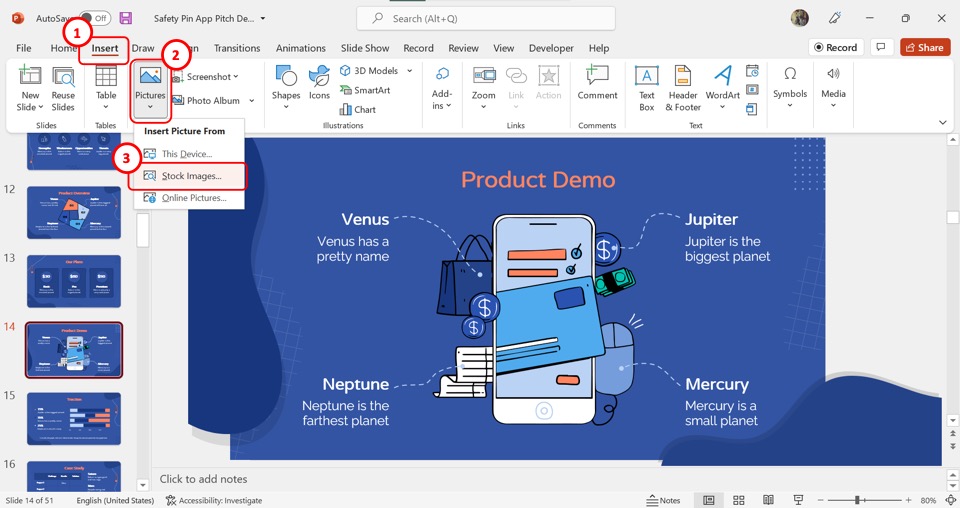
Now you have to click on the “Pictures” option in the “Images” group of the “Insert” menu. Then click on the “Stock Images” option from the dropdown menu. This will prompt a dialog box.
Step-3: Select your preferred category
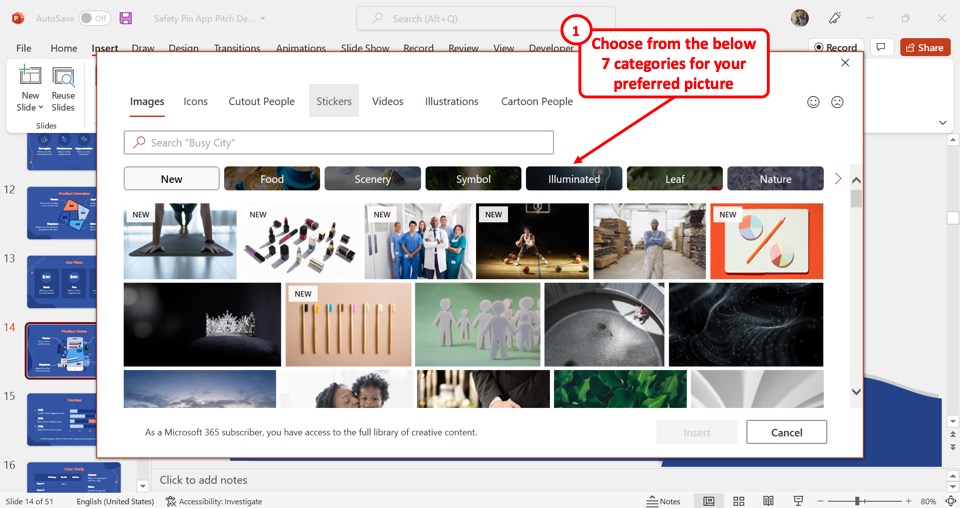
At the top of the dialog box, click on one of the seven categories of stock images available in PowerPoint.
Step-4: Click on the search bar
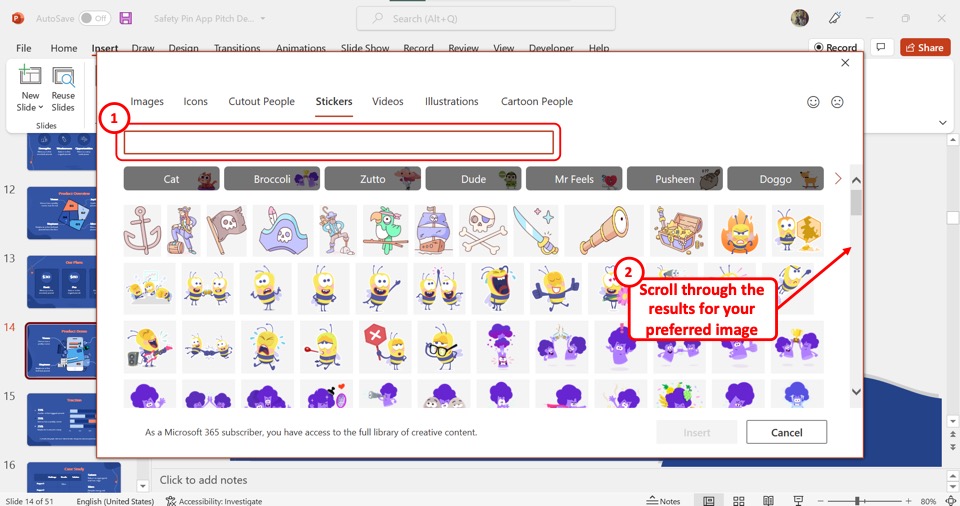
The next step is to click on the search bar and type in the keywords to search for a stock image. Then scroll through the images to select your preferred image.
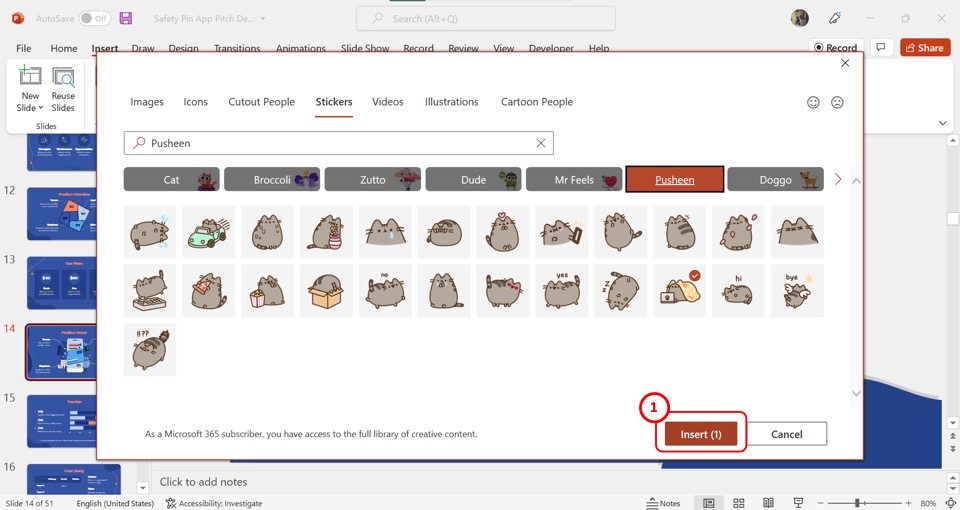
Now all you have to do is click on the “Insert” button at the bottom of the dialog box to add the selected stock image to the open slide.
1.7 How to Insert Picture in PowerPoint on Mobile?
In the PowerPoint app for Android devices, you can insert a picture directly from the camera on your mobile phone. All you have to do is follow the 3 easy steps.
Step-1: Tap on the “Insert” tab
You have to first open the slide where you want to add the picture. Then tap on the “Insert” tab in the floating ribbon on the bottom of the screen.
Step-2: Tap on the “Camera” option
In the “Insert” menu, tap on the “Pictures” option. Then tap on the “Camera” option under the “Pictures” option. This will open the camera app on your phone.
Step-3: Tap on the “Done” button
Now all you have to do is take a picture. If you are satisfied, tap the “Done” button at the bottom of the screen to insert the picture into the PowerPoint slide.
2. How to Insert Pictures On All Slides in PowerPoint?
Using the “Slide Master” feature in PowerPoint, you can insert a picture into all the slides of the presentation at once. To do so, follow the 5 simple steps.
Step-1: Click on the “Slide Master” option
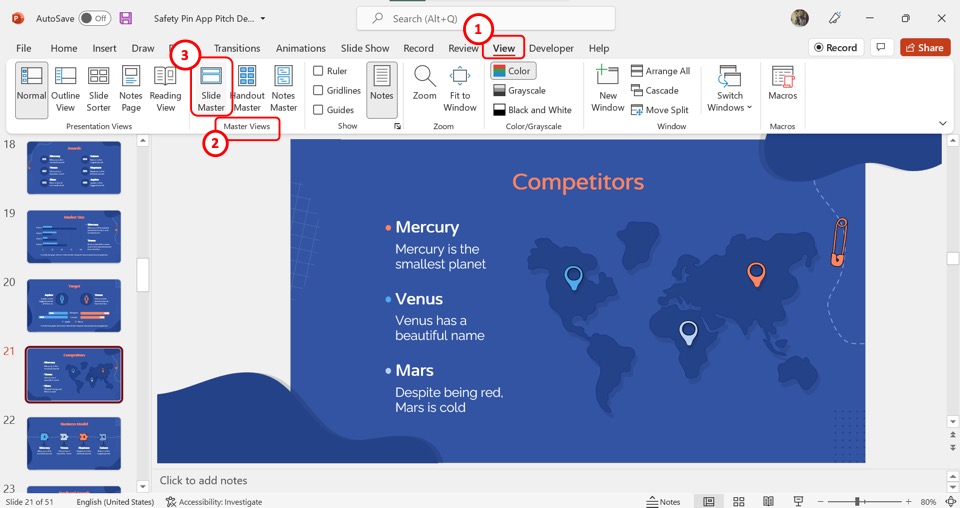
In the menu ribbon located at the top of the screen, click on the “View” tab. Then click on the “Slide Master” option in the “Master Views” group of the “View” menu.
Step-2: Click on the master slide
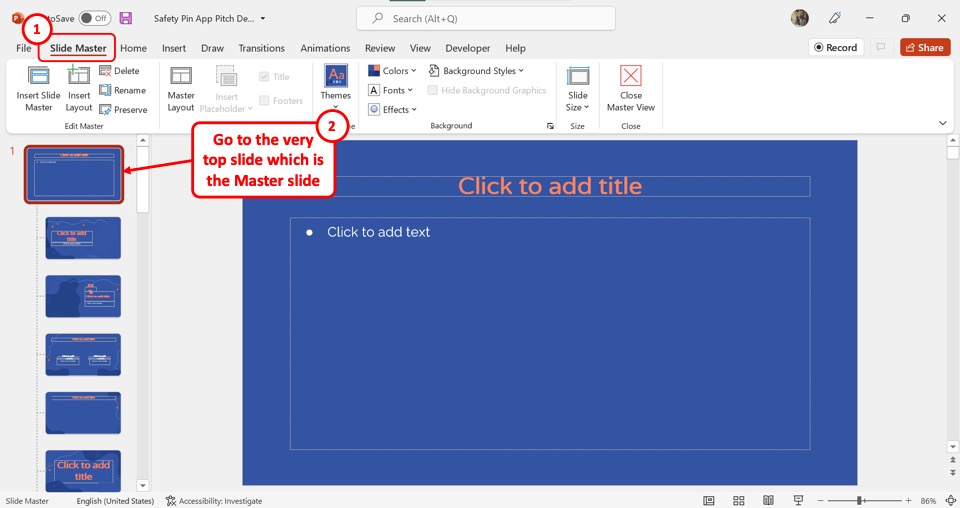
In the “Slide Master” view, you have to open the master slide. Scroll up in the slide layout pane on the left side of the screen and click on the slide at the very top. This is the master slide.
Step-3: Click on the “Pictures” option
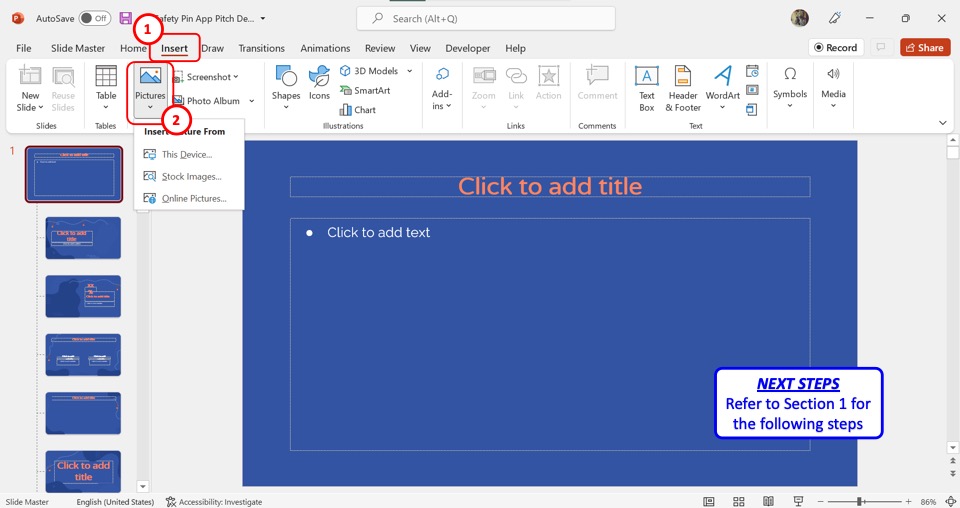
The next step is to insert the picture. Click on the “Insert” tab in the menu ribbon, and then click on the “Pictures” option in the “Insert” menu. Refer to section 1 for detailed steps on inserting images from different sources.
Step-4: Click on the “Picture Format” tab
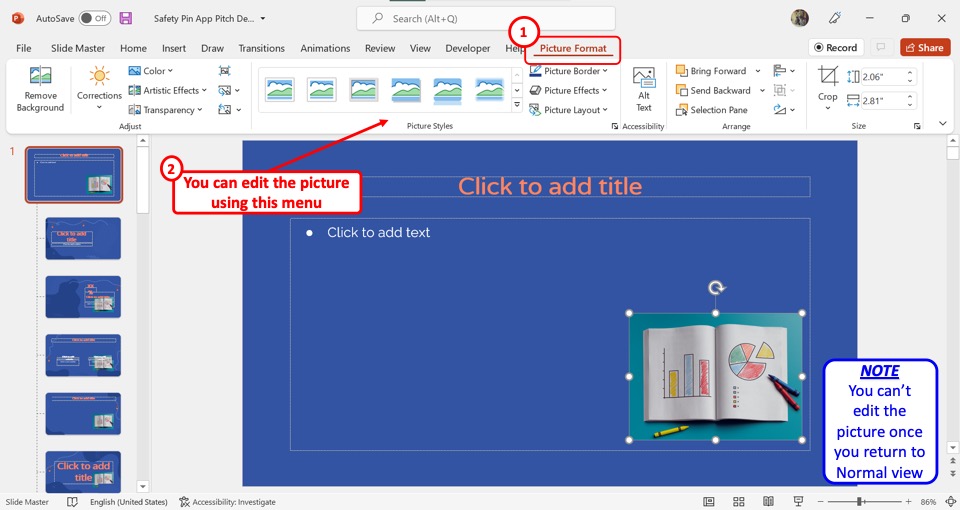
In the menu ribbon, you have to now click on the “Picture Format” tab. In the “Picture Format” menu, you can now edit, adjust, resize, and reposition the inserted picture. You cannot edit the picture in the master slide once you return to the “Normal” view.
Step-5: Click on the “Close Master View” button
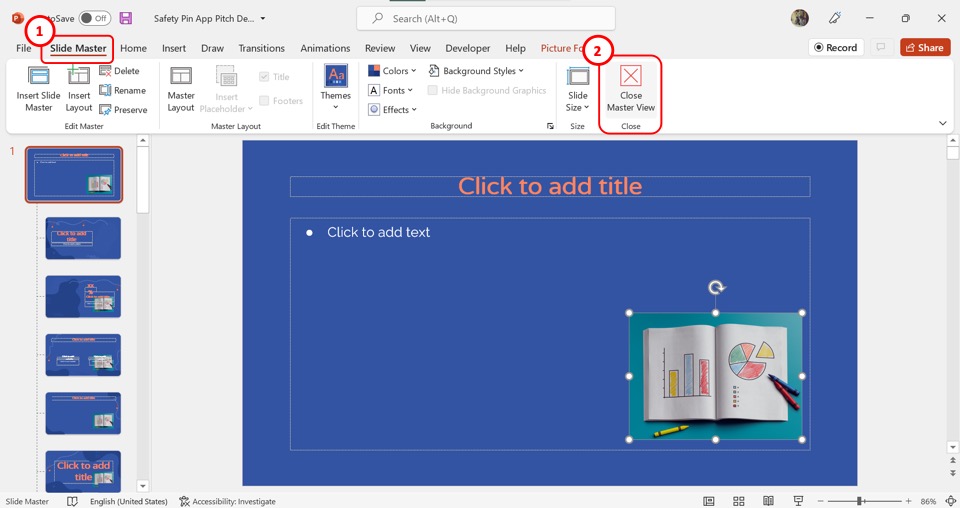
Once you have inserted and edited the picture, you can now return to the “Normal” view. All you have to do is click on the “Slide Master” tab. Then click on “Close Master View” in the “Slide Master” tab.
3. How to Insert Picture as Slide Background in PowerPoint?
In Microsoft PowerPoint, you can insert a picture into a slide as a background. All you have to do is follow the 4 easy steps.
Step-1: Click on the “Format Background” option
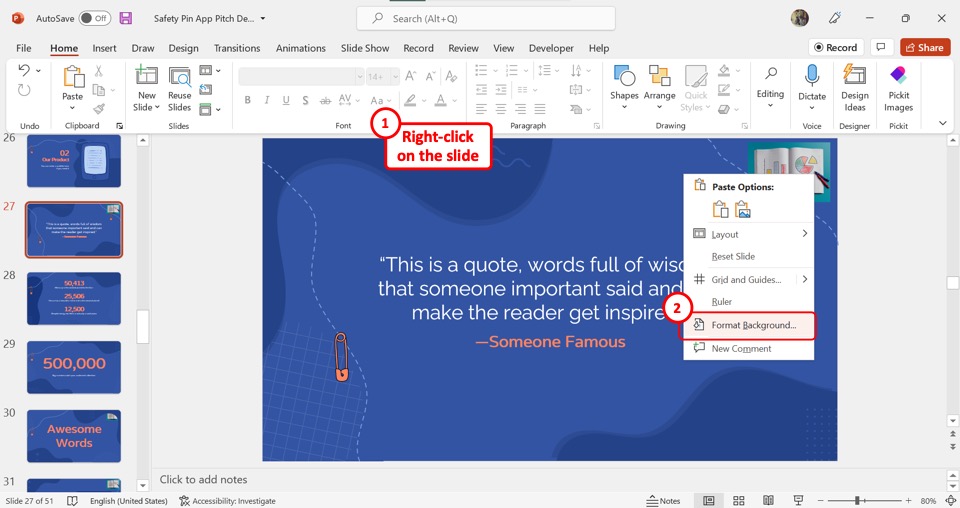
“Right Click” anywhere on the open slide. Then click on the “Format Background” option from the right-click menu.
Step-2: Click on the “Picture or texture fill” option

In the “Format Background” sidebar, click on the “Fill” option. Then click on the “Picture or texture fill” option under the “Fill” section.
Step-3: Click on the “Insert” button
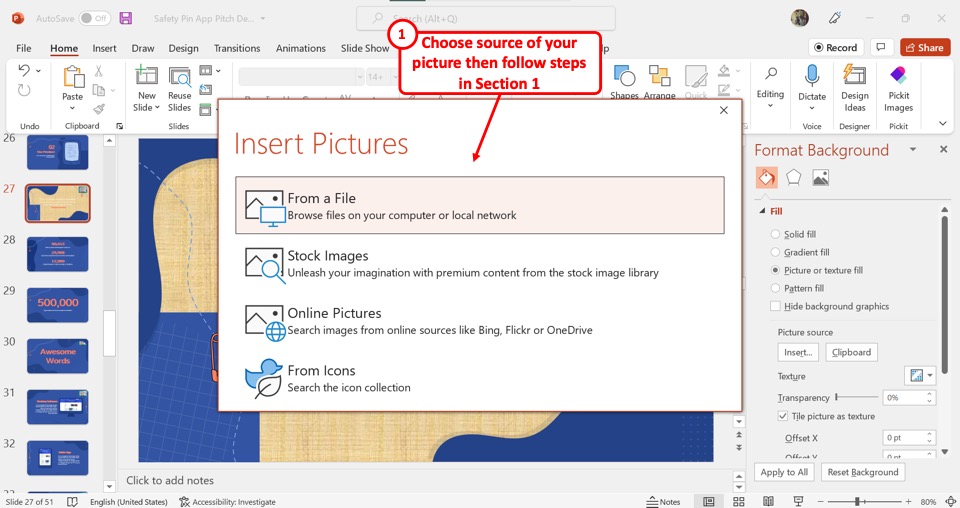
The next step is to click on the “Insert” button under the “Picture Source” option in the “Format Background” sidebar as shown in the previous picture. This will open the “Insert Pictures” dialog box.
Step-4: Insert a picture
In the “Insert Pictures” dialog box, click on the source of the background picture. You can see the detailed steps for adding pictures from each source in section 1 .
4. How to Insert Image Placeholder in PowerPoint?
A picture placeholder in PowerPoint is a predesigned spot in a slide layout where you can add a picture. Check out my other article to learn more about placeholders in PowerPoint .
To insert an image placeholder, follow the 4 quick steps.

The first step is to click on the “View” tab in the menu ribbon. In the “View” menu, click on the “Slide Master” option.
Step-2: Click on the “Insert Placeholder” button
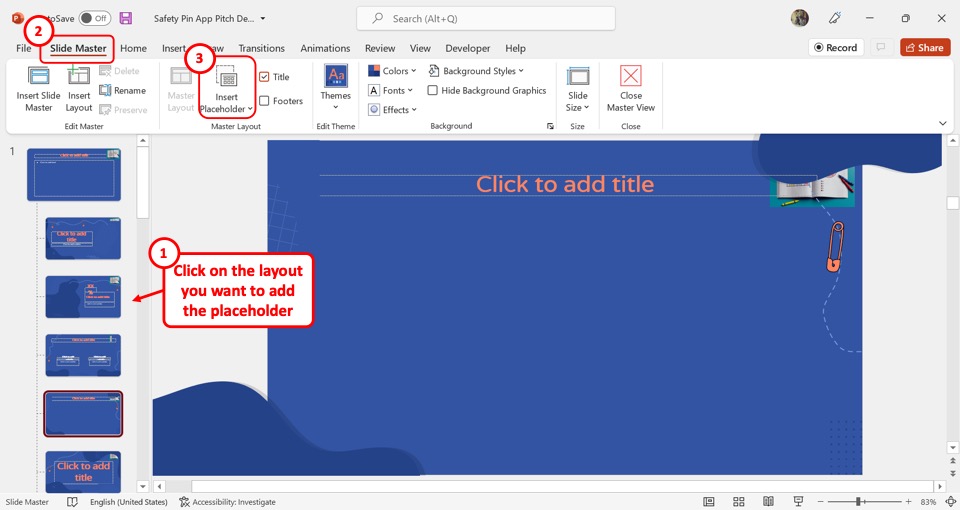
In the slide layout pane on the left side of the “Slide Master” screen, click on the layout where you want to add the placeholder. Then click on the “Insert Placeholder” option under the “Slide Master” tab.
Step-3: Click on the “Picture” option
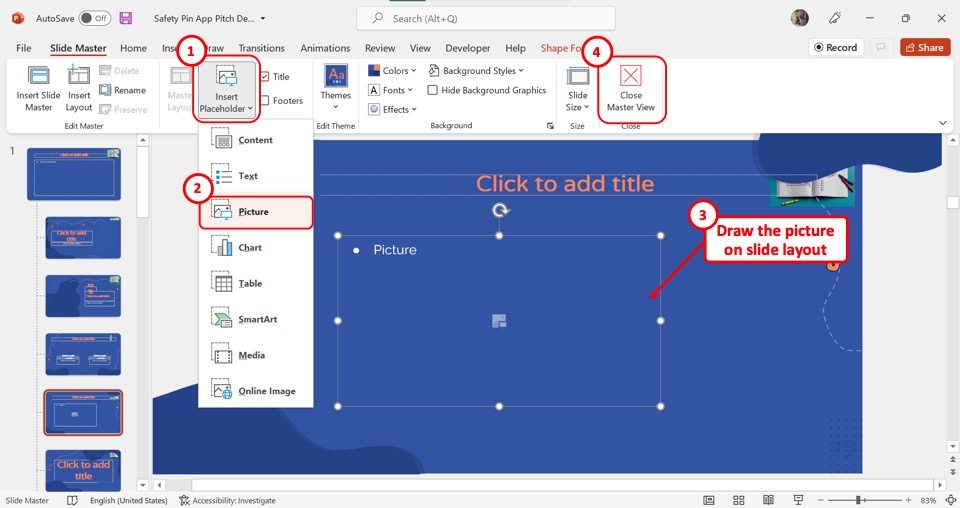
In the dropdown menu under the “Insert Placeholder” option, click on the “Picture” option. Then draw the picture placeholder on the slide layout
Step-4: Click on “Close Master View”
Finally, all you have to do is click on the “Close Master View” option to save the picture placeholder in the slide layout (as shown above).
5. How to Insert Picture in PowerPoint Without White Background?
When inserting a picture into a PowerPoint slide, you may want to remove the unnecessary white background in your picture. To learn about all the tools you can use to remove the background, you can read my article here . To remove the white background using the “Set Transparent Color” feature, follow the 4 simple steps.
Step-1: Insert a picture
The first step is to insert the picture with white background into the PowerPoint slide. Refer to section 1 for the detailed steps on inserting images from all sources.
Step-2: Click on the “Picture Format” tab
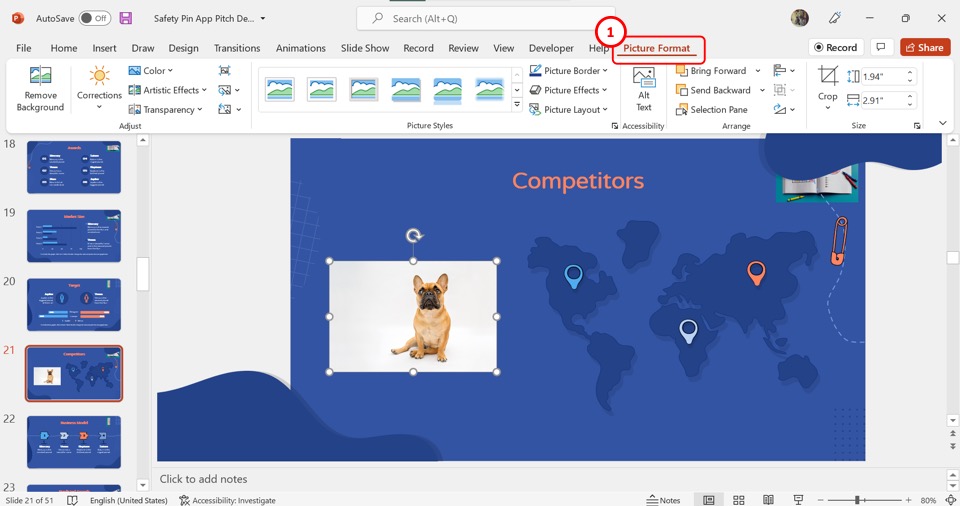
The next step is to click on the “Picture Format” tab in the menu ribbon located at the top of the screen.
Step-3: Click on the “Set Transparent Color” option
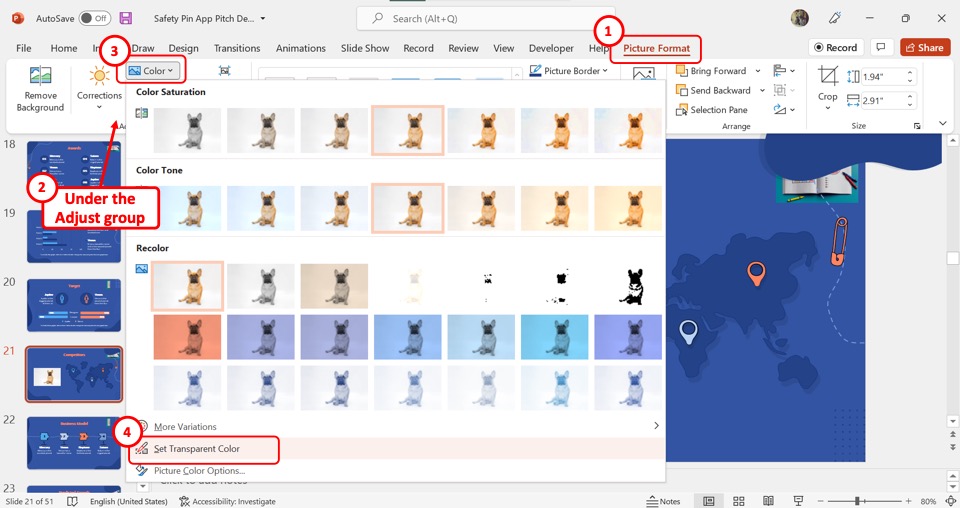
In the “Adjust” group of the “Picture Format” tab, click on the “Color” option. Then click on the “Set Transparent Color” option at the bottom of the dialog box under the “Color” option.
Step-4: Click on the white background
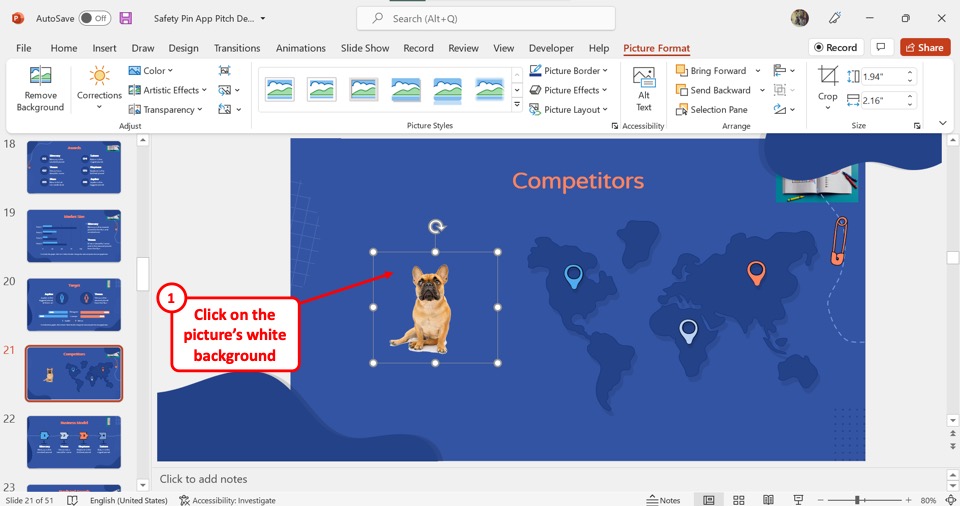
Now all you have to do is click on the white part of the selected image on the slide to remove the white background.
6. How to Insert Picture With Text in PowerPoint?
Once you have inserted a picture in PowerPoint, you can add text on top of it. To add text to an inserted picture, follow the 4 simple steps.
Step-1: Click on the “Text Box” option
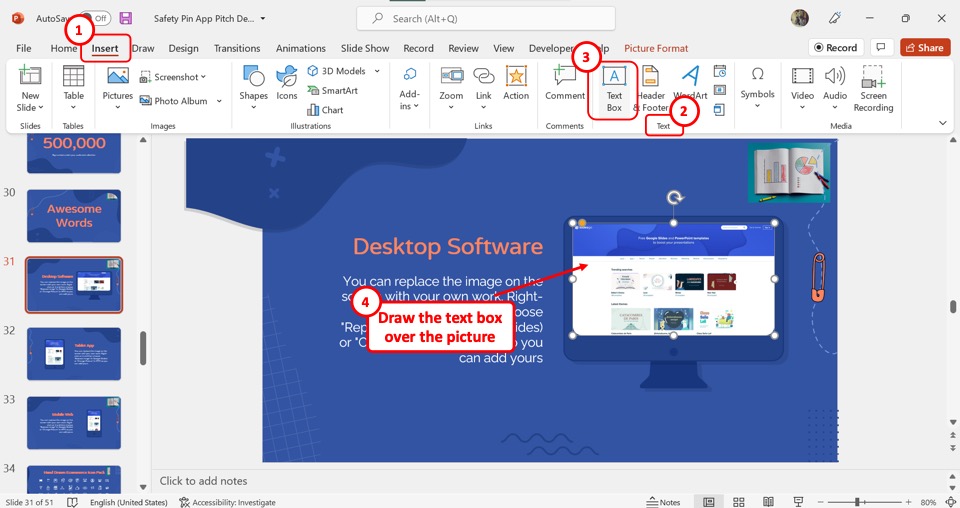
In the menu ribbon, click on the “Insert” tab. Then click on the “Text Box” option in the “Text” group of the “Insert” menu. Now you have to draw the text box over the inserted picture in the slide.
Step-2: Type in the text box
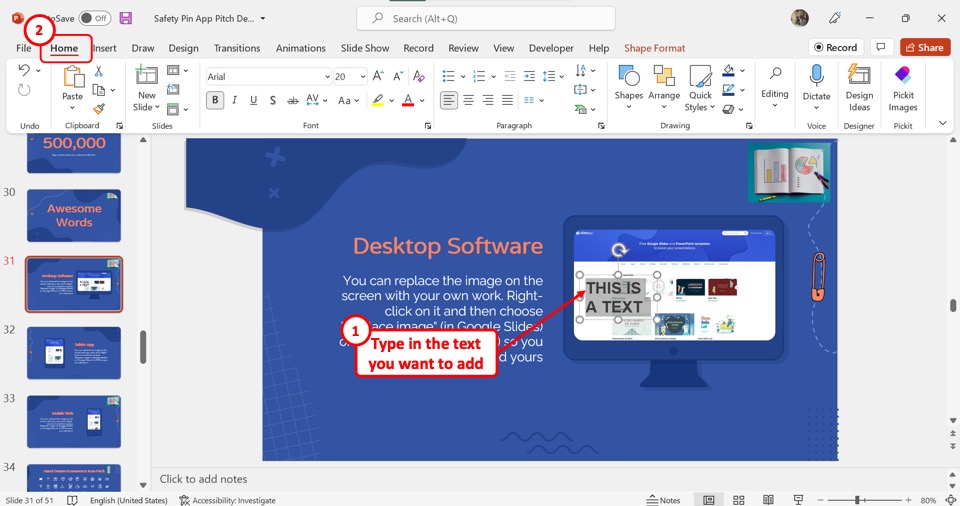
In the text box, you can now type in the text that you want to add to the picture. You can also edit the appearance of the text using the features available in the “Home” menu.
Step-3: Select the text box and the picture together
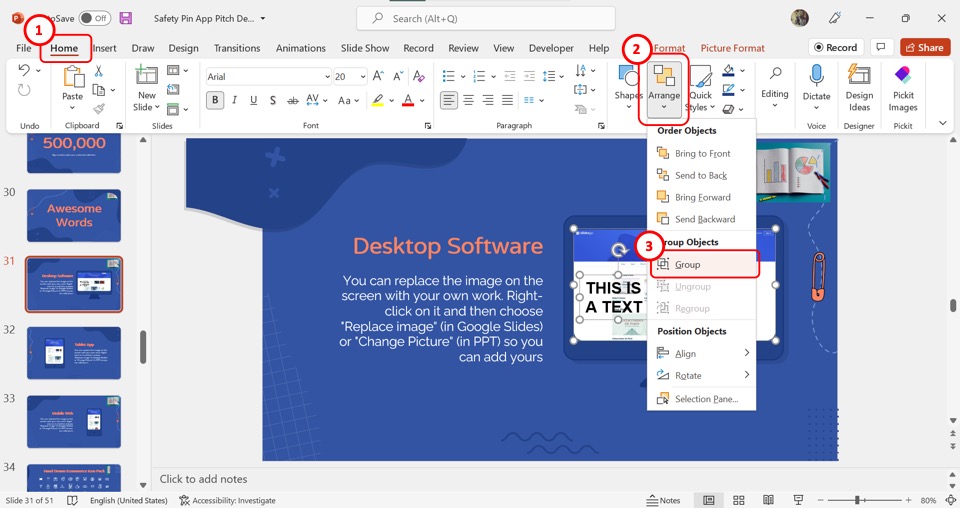
Now you have to select the text box and the picture together to group them. Press and hold the “Ctrl” key on your keyboard and click on the text box and then the picture to select them both.
Step-4: Click on the “Group” option
In the “Drawing” section of the “Home” tab, click on the “Arrange” button. Then click on the “Group” option in the dropdown menu to group the text with the inserted picture on the slide (as shown above).
7. How to Insert Picture in PowerPoint Notes?
In PowerPoint, you can add a picture to your speaker notes. All you have to do is follow the 3 quick steps.
Step-1: Click on the “Notes Page” option
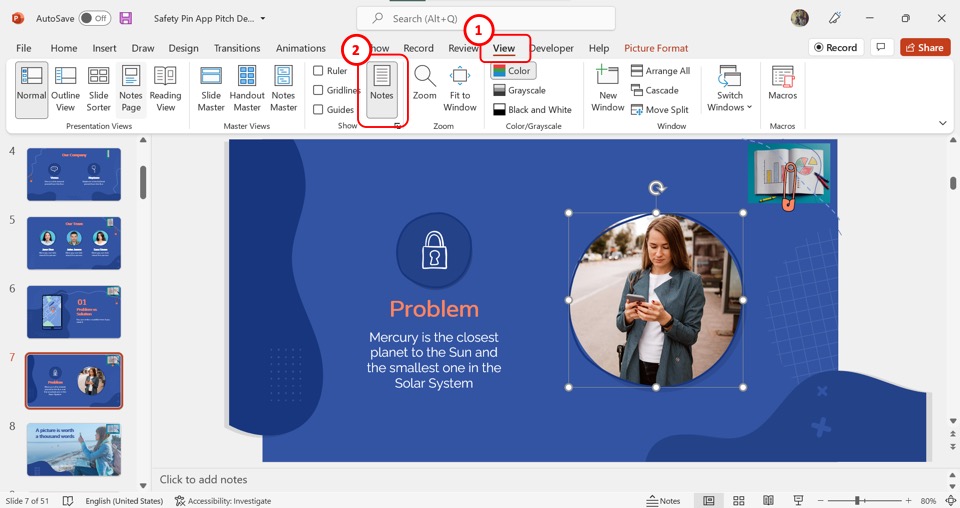
The first step is to click on the “View” tab in the menu ribbon. In the “View” menu, click on the “Notes Pages” option.
Step-2: Click on the “Insert” tab
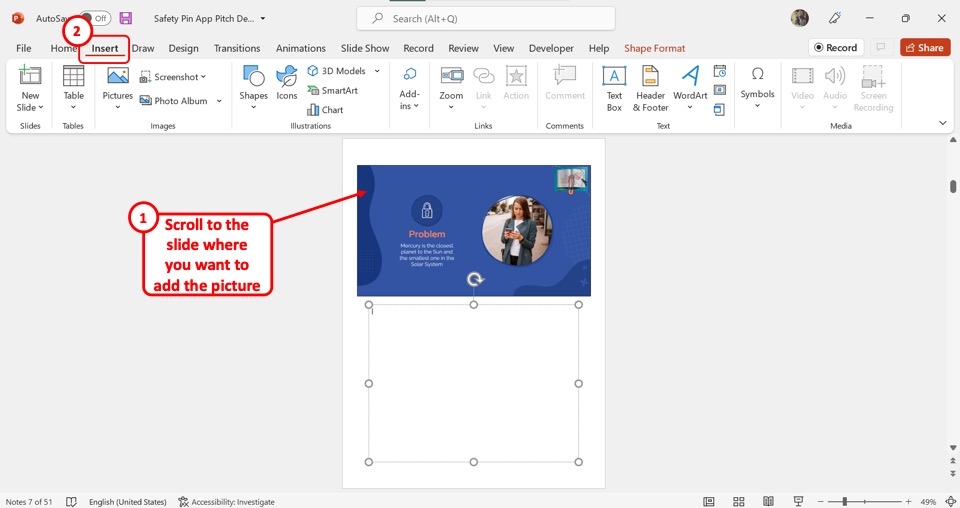
In the “Notes Page” view, scroll through to open the slide note where you want to insert a picture. Then click on the “Insert” tab in the menu ribbon.
Step-3: Click on the “Pictures” option
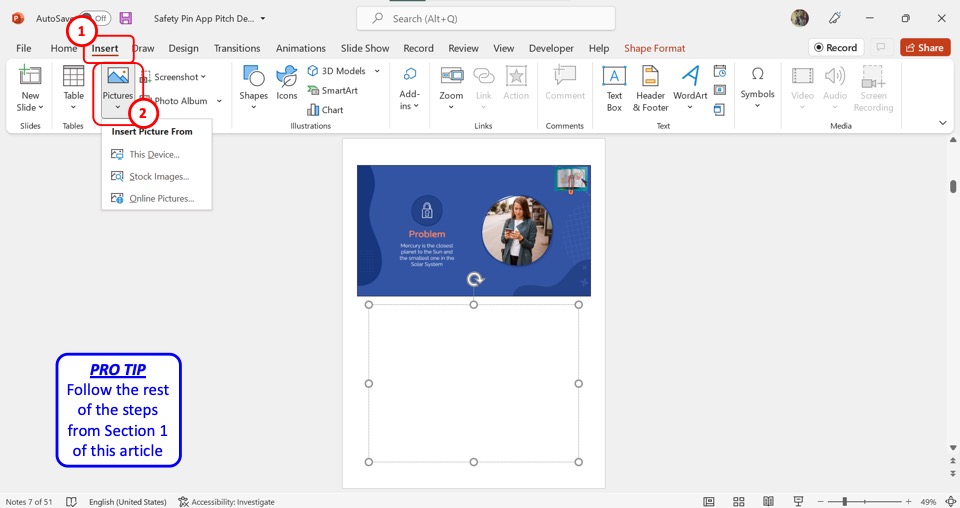
In the “Images” section of the “Insert” tab, click on the “Pictures” option. Then select the picture source from the dropdown menu. You can find the detailed steps for inserting an image in section 1 .
8. How to Insert Clip Art in PowerPoint? [Link to Existing Article]
The clipart in PowerPoint is a collection of free images that you can use in your presentation slides. You can read about the detailed steps on inserting clipart in any version of PowerPoint in my article here.
To insert a clipart in PowerPoint using the “Online Pictures” option, follow the 5 simple steps.
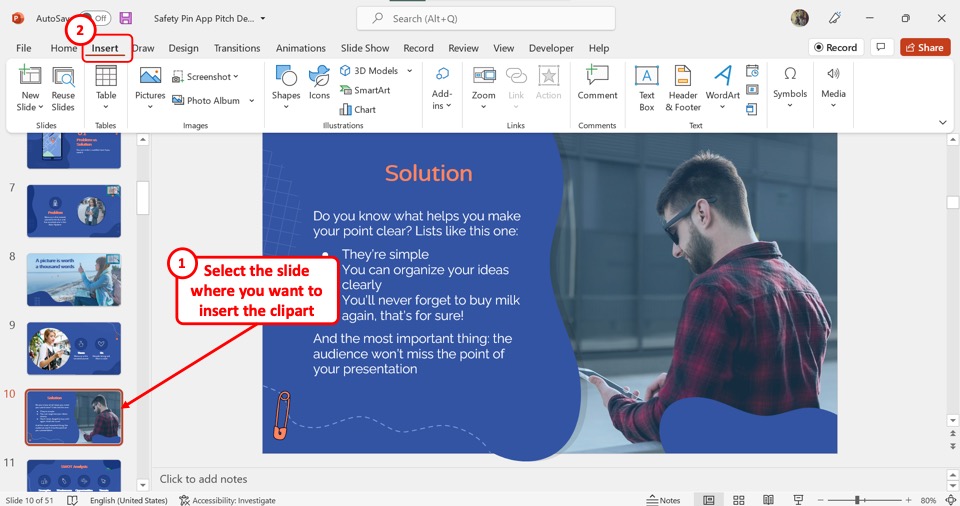
The first step is to open the slide where you want to insert the clipart. Then click on the “Insert” tab in the menu ribbon located at the top of the screen.
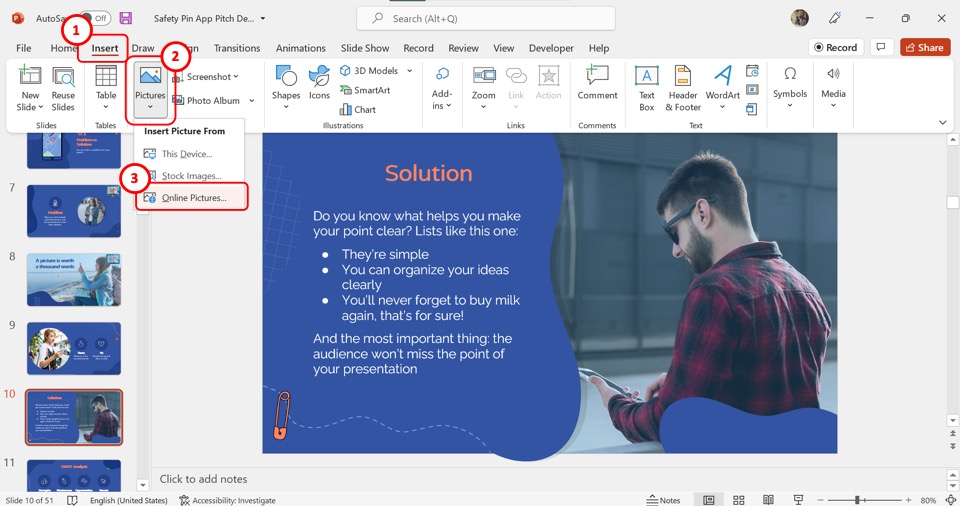
In the “Images” group of the “Insert” tab, click on the “Pictures” option. In the dropdown menu under the “Pictures” option, click on the “Online Pictures” option.
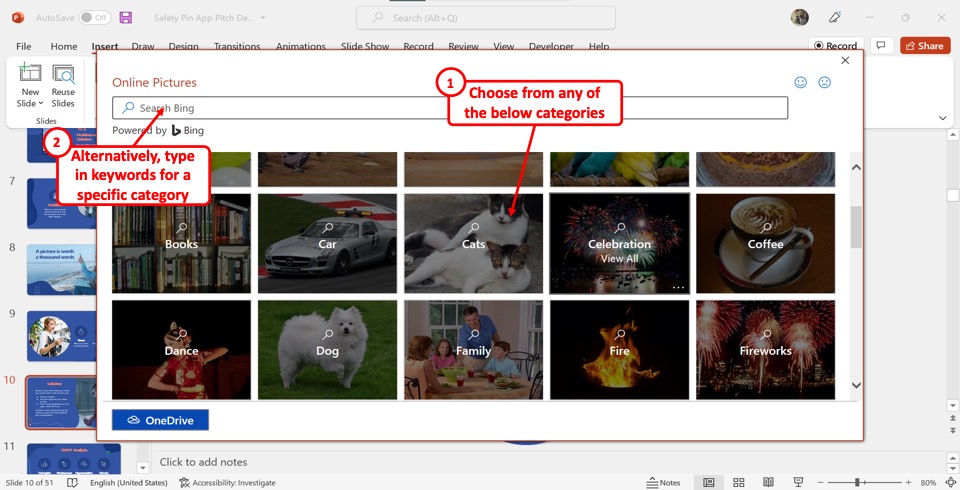
In the “Online Pictures” dialog box, you can now click on any of the available categories of the pictures. You can also click on the search bar at the top of the dialog box to search for a specific category.
Step-4: Click on the “Clipart” option
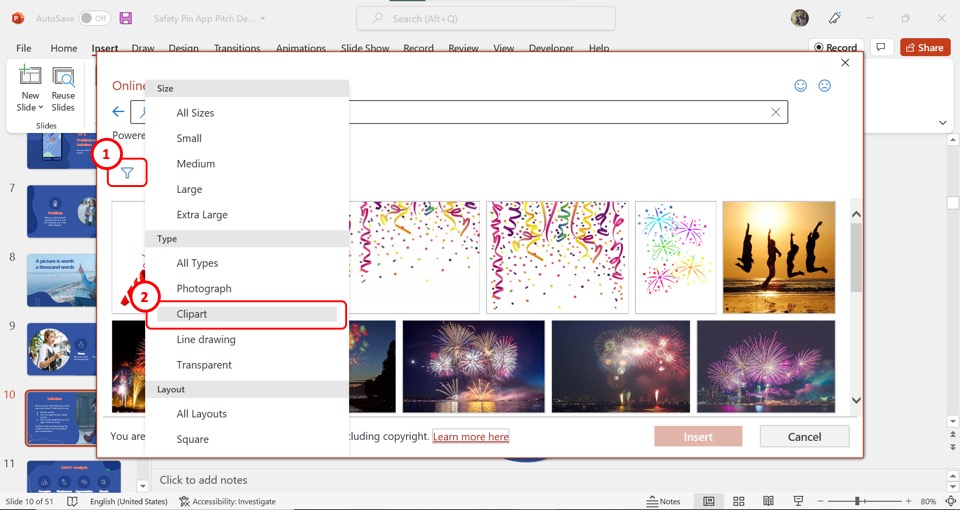
Now you have to click on the “Filter” option, which is the funnel icon under the search bar. In the “Filter” pop-up menu, click on the “Clipart” option under the “Types” section.
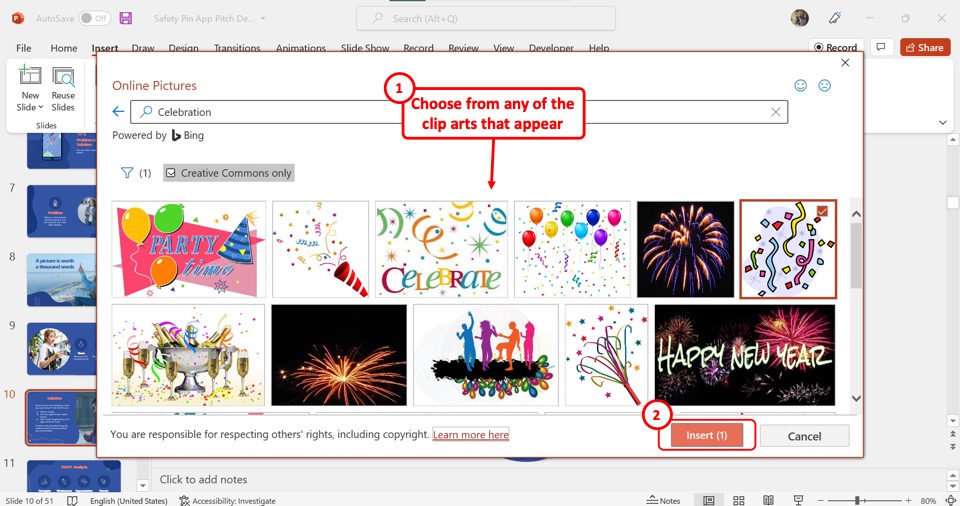
The final step is to select one or more cliparts from the “Online Pictures” dialog box to insert into the slide. Then all you have to do is click on the “Insert” button at the bottom of the dialog box.
9. How to Add Picture to a Shape in PowerPoint? [Link to Existing Article]
Microsoft PowerPoint allows you to add a picture to an existing shape inside a slide. You can read about the different methods for adding pictures to a shape in my other article. To insert a picture into a shape using the “Shape Fill” feature, follow the 3 easy steps.
Step-1: Click on the “Fill” option
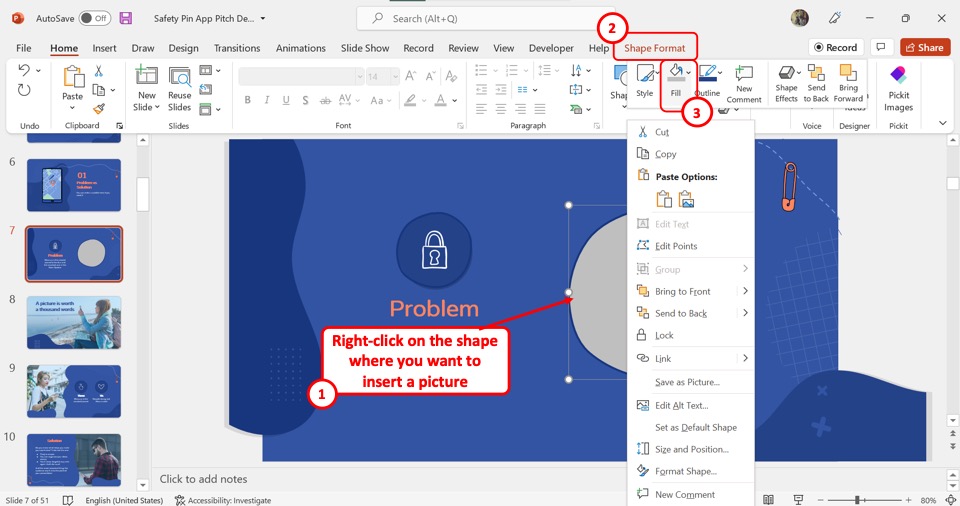
The first step is to “Right Click” on the shape where you want to insert the picture. From the Shape Format tab, in the pop-up menu, click on the “Fill” option.
Step-2: Click on the “Picture” option
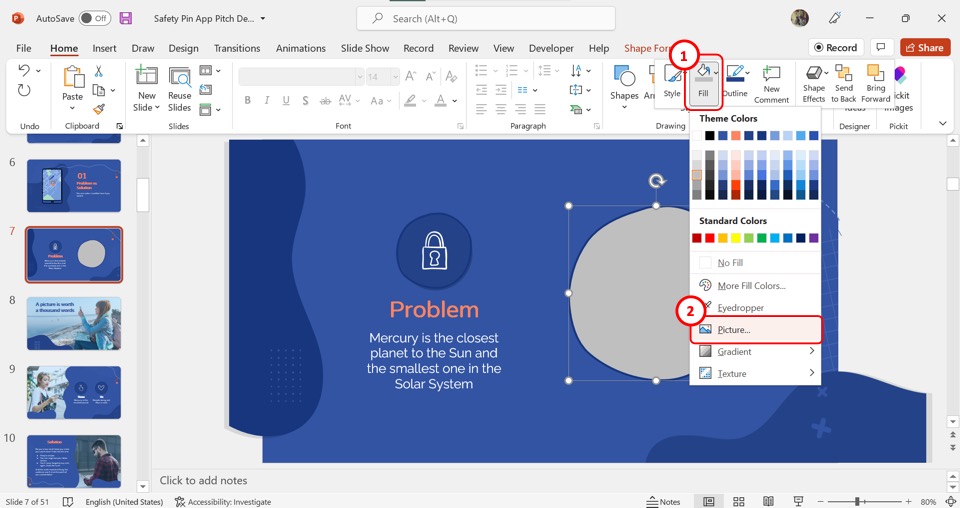
In the dropdown menu under the “Fill” option, click on the “Pictures” option. This will open the “Insert Pictures” dialog box.
Step-3: Insert a picture
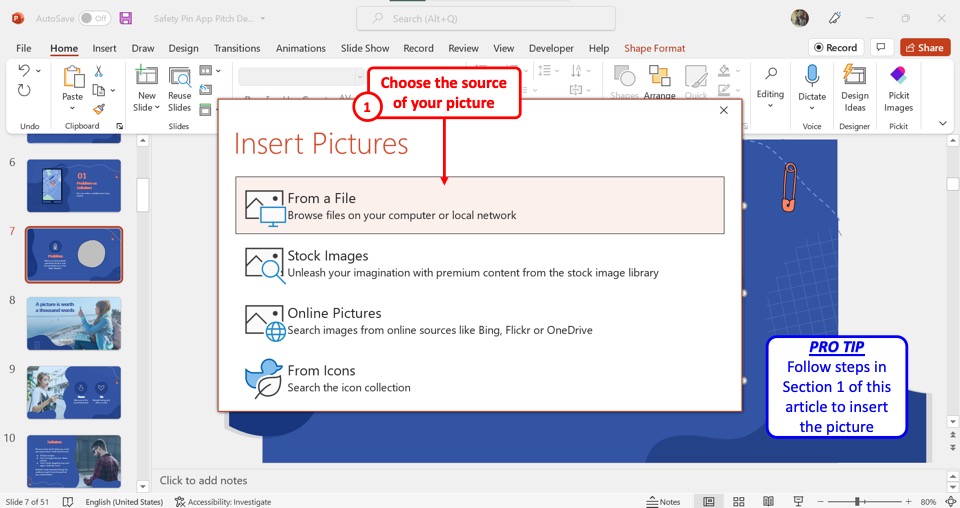
Now all you have to do is insert the picture into the selected shape. In the “Insert Pictures” dialog box, choose where you want to add the picture from. For the detailed steps for inserting pictures from any source, refer to section 1 .
10. How to Insert Round Picture in PowerPoint?
In Microsoft PowerPoint, you can add any shape to a picture. To insert a round picture, you have to first insert a picture following the steps detailed in section 1 . Then follow the 3 simple steps.
Step-1: Click on the “Picture Format” tab

Click on the picture that you want to add a round shape to. Then click on the “Picture Format” tab from the menu ribbon located at the top of the screen.
Step-2: Click on the “Crop to Shape” option
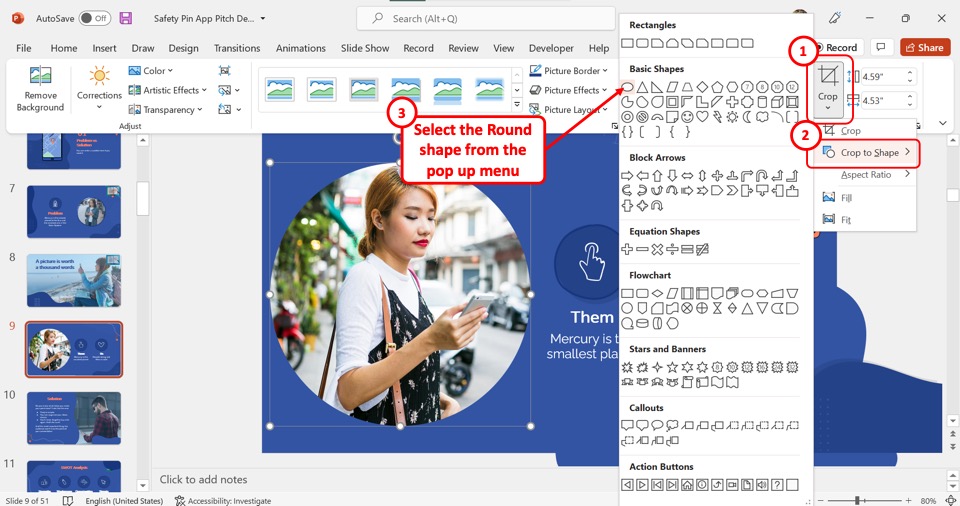
In the “Size” group of the “Picture Format” tab, click on the “Crop” option. In the dropdown menu under the “Crop” option, click on “Crop to Shape” . This will open a secondary menu containing a list of all the available shapes.
Step-3: Select the round shape
Finally, all you have to do is click on the round shape from the dropdown list to insert the picture into the round shape as shown in the image above.
11. How to Insert a Linked Picture in PowerPoint?
Microsoft PowerPoint offers the feature to insert a linked picture so that the inserted picture in the presentation can update automatically when it is edited outside the PowerPoint file. To insert a linked picture, follow the 3 easy steps.
Step-1: Click on the “Insert” tab
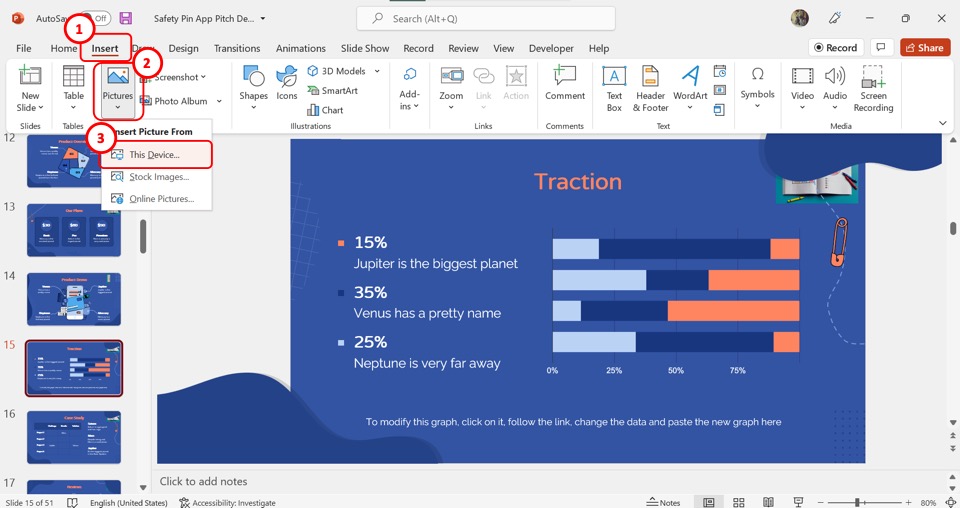
In the menu ribbon located at the top of the screen, click on the “Insert” tab.
Step-2: Click on the “This Device” option
In the “Insert” menu, click on the “Pictures” option. Then click on the “This Device” option from the dropdown menu. You can insert a linked picture only from this option. (shown in the image above)
Step-3: Click on the “Insert and Link” option
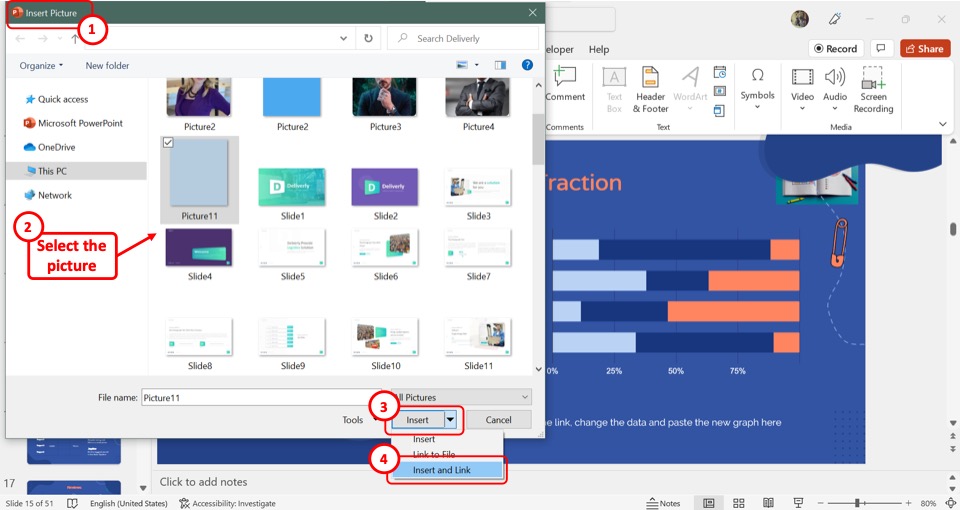
In the “Insert Picture” dialog, click on the picture that you want to add. Then click on the down arrow by the “Insert” button at the bottom of the dialog box. Click on the “Insert and Link” option from the dropdown list to insert the linked picture.
12. How to Insert a Screenshot in PowerPoint? [Link to Existing Article]
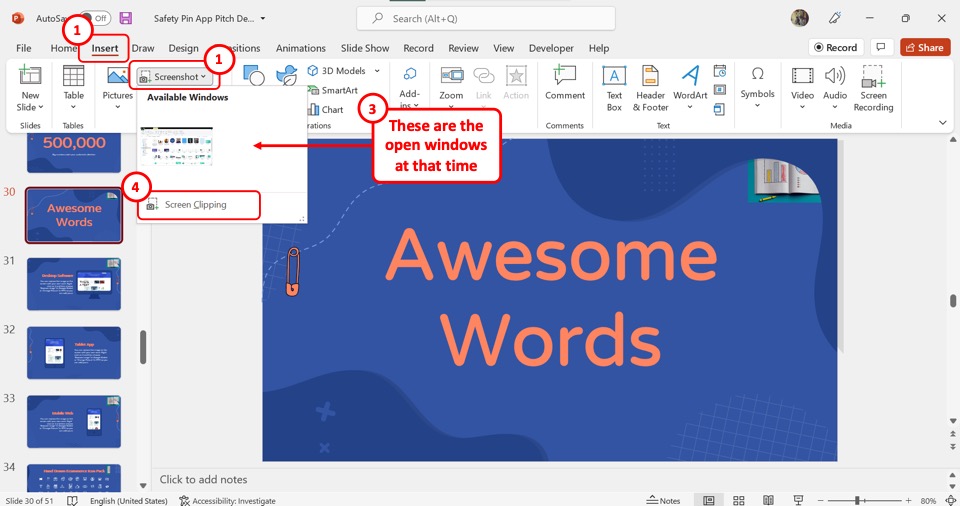
In PowerPoint, you can directly take and add a screenshot to a slide. To do so, you have to first click on the “Insert” tab in the menu ribbon. In the “Images” group of the “Insert” tab, click on the “Screenshot” option.
The “Available Windows” option allows you to take a screenshot of any of the open windows. You can use the “Screen Clipping” option to take a screenshot of the current screen. Read my article here to learn more about the “Screenshot” feature in PowerPoint.
13. Insert Image in a Table in PowerPoint
In Microsoft PowerPoint, you can insert an image inside a table. All you have to do is follow the 2 quick steps.
Step-1: Click inside a cell
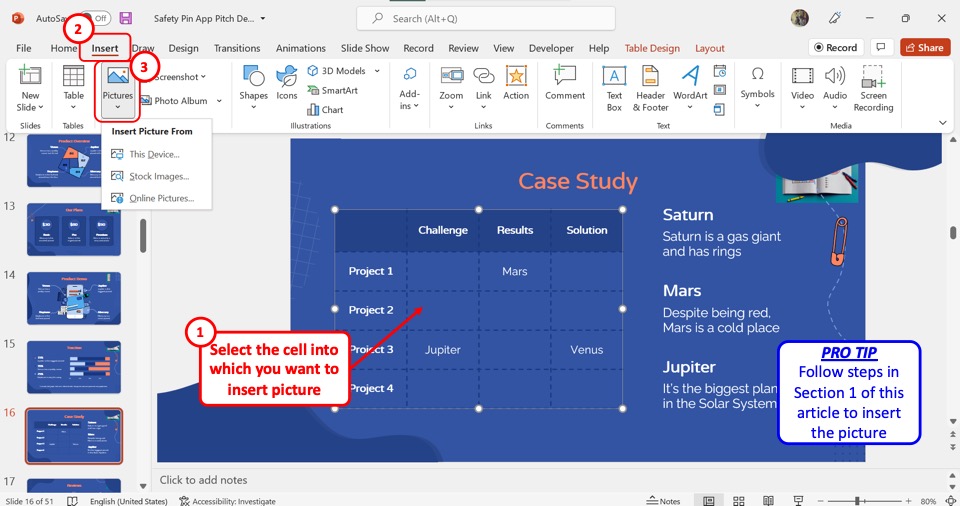
You have to insert the picture inside a single cell in a table. So the first step is to click on the cell where you want to insert the picture. Then click on the “Insert” tab in the menu ribbon.
Step-2: Click on the “Pictures” option
In the “Insert” menu, click on the “Pictures” option. Refer to section 1 for the detailed steps on inserting images from different sources into PowerPoint. (shown in the image above)
14. Unable to Insert Image in PowerPoint Error
If PowerPoint shows an error message when inserting an image into a slide, you can embed the picture into the slide instead. To do so, follow the 4 simple steps.
Step-1: Click on the “Object” option
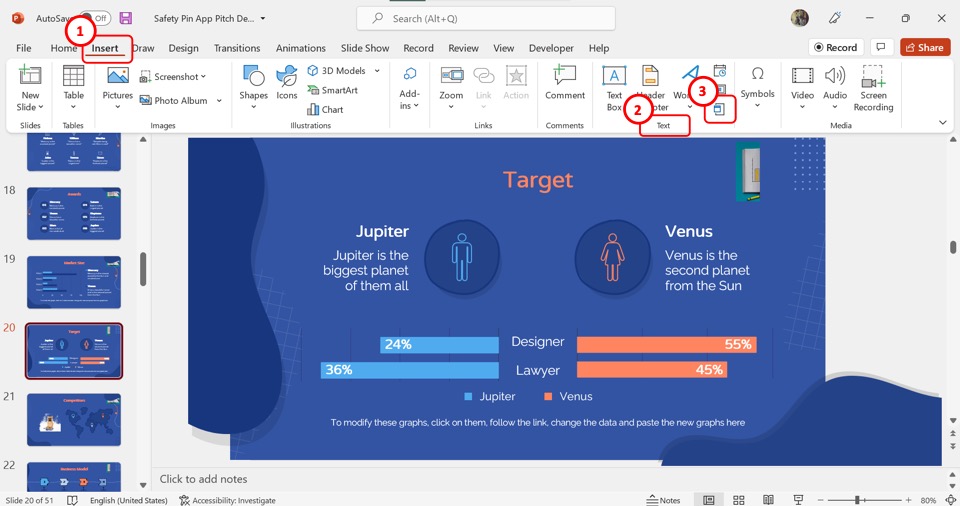
In the menu ribbon located at the top of the screen, click on the “Insert” tab. Then click on the “Object” option which is the last icon in the “Text” group of the “Insert” tab.
Step-2: Click on the “Browse” option
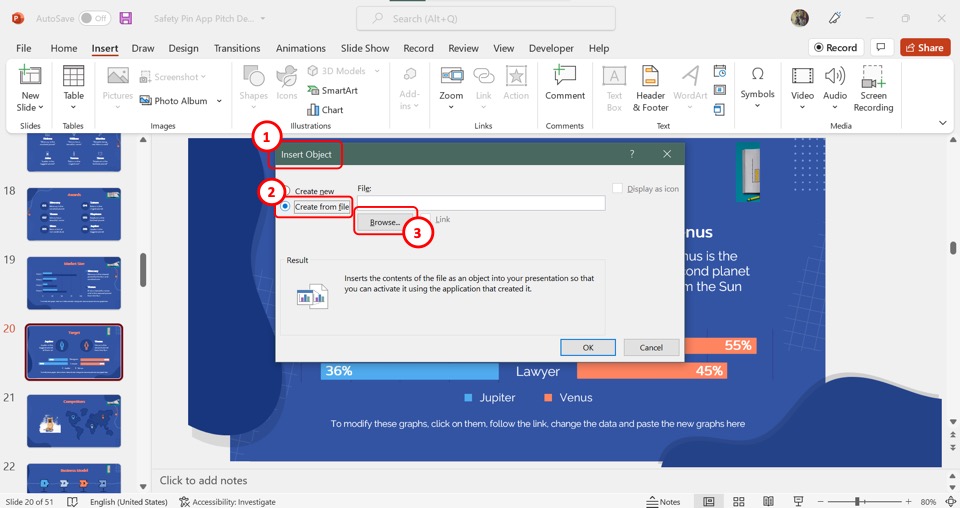
In the left column of the “Insert Object” dialog box, click on the “Create from file” option. Then click on the “Browse” button at the center of the dialog box.
Step-3: Click on the “OK” button
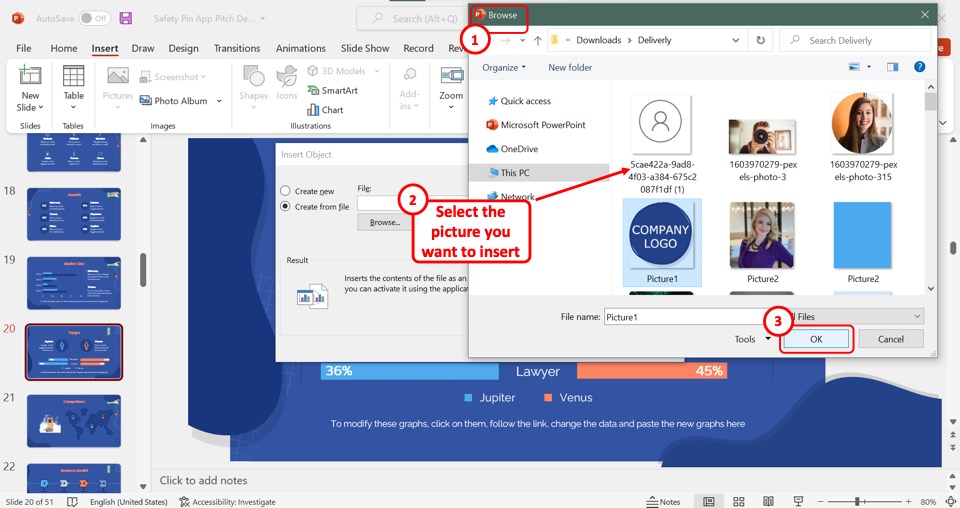
In the “Browse” window, select the picture that you want to insert into the slide. Then click on the “OK” button at the bottom.
Step-4: Click on the “OK” option
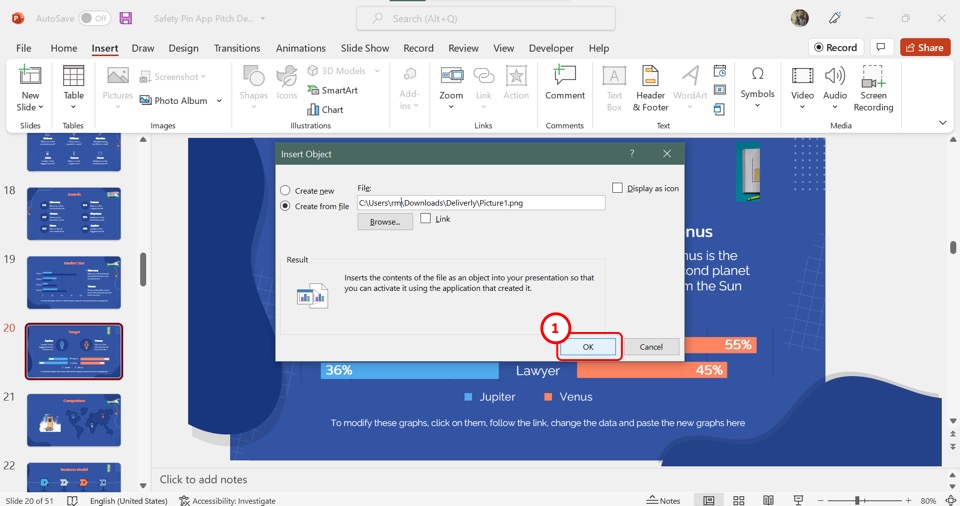
Finally, all you have to do is click on the “OK” button at the bottom of the “Insert Object” dialog box to embed the selected picture into the PowerPoint slide.
Credit to wayhomestudio (on Freepik) for the featured image of this article (further edited).
- Pop Culture
- Family Feud
Picture Powerpoint Templates and Google Slides Themes
Discover a collection of beautifully designed presentation templates that will captivate your audience and elevate your next presentation to new heights.
- Minimalist (16)
Explore Free Picture Presentation Templates

Simple World War 1 and 2 Slides
Black Education History

Dark Vietnam War Slides
History Leadership Modern

Funny Spotify Wrapped Meme Slides
Colorful Cute Emotions

Funny Confused Meme Slides
Fun Illustrated Meme

Simple Funny Handshake Meme Slides

Funny End of Presentation Meme
Animals Background Bold

Professional Nature Background Slides
Background Colorful Landscape

Simple Relaxing Pictures Of Nature Slideshow
Aesthetic Background Colorful

Simple Nature Water Background Slides
Animated Background Colorful

Minimal Disco Ball Decor Newsletter
Black Education Fun

Simple Music-themed Slides
Education Illustrated Modern

Illustrated Music Backgrounds
Background Beige Black

Funny Music Meme
Basic Black Children

Photo-Centric Community Nursing Center
Community Corporate Doctor

Collage Adolf Hitler Biography Slides
Beige Biography Collage

Modern Geography Lesson Plan with Morph Transition for Teachers
Animated Background Blue
Minimal Landscape Morph Pictures Slides
Background Blue Business

Photo-Centric PR Consulting Slides
About Me + About Us Business Campaign

Planets in the Solar System Poster Slides
Astronomy Black Education

Illustrated Functions of the Skeletal System Poster Slides

Pink Y2K Retro Editorial Design Portfolio Slides
Creative Fashion Gen Z
Professional designs for your presentations
SlidesCarnival templates have all the elements you need to effectively communicate your message and impress your audience.
Suitable for PowerPoint and Google Slides
Download your presentation as a PowerPoint template or use it online as a Google Slides theme. 100% free, no registration or download limits.
- Google Slides
- Editor’s Choice
- All Templates
- Frequently Asked Questions
- Google Slides Help
- PowerPoint help
- Who makes SlidesCarnival?
Buy Me a Coffee
- Share this article

- Posted in in How To PowerPoint
How to Insert Picture in PowerPoint
In most cases, we use pictures or images to make our PowerPoint slides more visually appealing and engaging for the audience. Adding pictures to PowerPoint is an easy task. In this article, we will discuss the different methods that you can use to insert pictures in your PowerPoint presentation slide, as well as some best practices to follow. Additionally, we will share some resource links where you can find high-quality images to use in your presentation.
Methods of Inserting Pictures in PowerPoint:
There are two ways to insert pictures in PowerPoint: manually through Insert > Picture or by copying & pasting or dragging & dropping onto a slide.
Method 01: Copy & paste images
One of the easiest ways to insert a picture is by copying it by using CTRL+C (for Windows) or ⌘ + C (for Mac) and then pasting it with CTRL+V or ⌘ + V onto the slide. Alternatively, you can also drag and drop the pictures into the PowerPoint slide as well.
Method 02: From insert pictures
To insert pictures in PowerPoint, you can navigate to the ‘Insert’ tab and click on the ‘Pictures’ option. A dropdown list will appear with three options to choose from: ‘From this device’ , ‘Stock images’ , and ‘Online pictures’ . Simply select the option that suits you best and insert the picture into your presentation.

From this device: This option allows you to select images or pictures from your computer’s internal or external storage by browsing through them.

From Stock Images: If you select the stock images option, you will see a collection of available stock images. Most of these images come with a Microsoft Office 365 subscription.
From Online Pictures: You can also get access to Bing images.
Sample Slide After Inserting Pictures:
Let’s take a look at our sample slide that contains four different pictures alongside text boxes. It is just to give you a rough idea of how you can insert and organize pictures in a PowerPoint slide.

Recommended Websites for Free Pictures:
Our sample slide features images from Unsplash , a website that offers high-quality free photos. You can also check out Pexels and Pixabay for more free image options.
How to Crop Inserted Pictures in PowerPoint:
Cropping a picture in PowerPoint is useful to exclude unwanted areas. Pictures can be cropped manually or to prebuilt/custom shapes as well. When done correctly, it can enhance the visual appearance. To crop a picture, first select it, then from the picture format tab click on the crop option. However, we have covered how to crop a picture in PowerPoint in another article that you may check as well.
Get a Printable PDF of this Article
Similar to our other PowerPoint how-to articles, you have the option to download a printable PDF of this step-by-step guide on how to insert a picture in PowerPoint.
Frequently Asked Questions
Here we have tried to answer some of your questions about how to insert pictures in PowerPoint slides.
How to insert a video inside a PowerPoint slide?
You can copy and paste or simply drag and drop the video file onto the PowerPoint slide, similar to how we inserted pictures. Alternatively, you can go to the Insert tab, click on Video , and select the video from your device.
Can I save my PowerPoint slide as an Image?
Yes, you can your PowerPoint slide as an image. The process is straightforward. Use the “Save As” option and select either JPG or PNG file format from the dropdown menu. Once you click on “OK” , you will be prompted to save either the current slide or all slides . If you want to save only the current slide as a picture, select the “just this slide” option.
Become a Sponsor and Support Our Creative Journey.
Hey there! This is Team PowerPoint School. You can support our work by sending us a cup of coffee and get access to all our premium templates.
More Reading
Post navigation.

How to Insert Hyperlink in PowerPoint

How to Crop Picture in PowerPoint
Leave a comment, leave a reply.
Your email address will not be published. Required fields are marked *
You might also like
Stay a while and check more templates like this
Subscribe to our newsletter
How to Insert a Picture in PowerPoint
Make them a bit more visually appealing
One of the ways to make your presentations visually appealing is by adding images to them. You can use Microsoft PowerPoint’s built-in options to add pictures to your slides from multiple sources. You can also use an image as the background for your slides. We’ll show you how.
You can add photos from your Windows or Mac machine, Microsoft’s stock images repository, or the internet. You can then reposition and resize your images, so they fit your slides.

Add a Picture From Your Local Storage to PowerPoint
If you’ve already saved an image to your Windows or Mac machine’s local storage, it’s easy to load this picture into your presentation . PowerPoint supports nearly all image formats, so your photo can be in any popular file format.
- Open your presentation with PowerPoint on your PC.
- Choose the slide you want to add an image to.
- Access the Insert tab in PowerPoint’s ribbon at the top.
- Select Pictures > This Device in the Images section.

- Navigate to the folder that has your image and double-click the image to load it in PowerPoint. You can select multiple images by holding down the Ctrl key.

- Your image is now added to your slide.
You can now drag your image to reposition it on your slide. You can resize the image by selecting the handlers around it and dragging them.
Insert a Stock Image in PowerPoint
Microsoft Office 365 subscribers can choose from thousands of royalty-free stock images to add to their PowerPoint slides. If you’re subscribed to this plan, here’s how to find and add the image of your choice to your slides.
- Launch your presentation with PowerPoint .
- Select the Insert tab and choose Pictures > Stock Images .
- Select the picture type you’d like to add to your slide from the tab list at the top.
- Access the Search box and enter the name of the image you’re looking for.

- Select your image on the list and choose Insert at the bottom.

- You can add multiple images by selecting them on the list and choosing Insert at the bottom of the window.
When you add a stock photo, PowerPoint will download it from the internet. This can take anywhere from a few seconds to minutes, depending on the number of images you’ve selected and the speed of your internet connection.
Add a Photo From the Internet or OneDrive to PowerPoint
PowerPoint includes the Bing image search functionality, allowing you to perform a quick image search and add the chosen images to your presentation. You can also load images from your OneDrive account if you want.
- Open your presentation with PowerPoint .
- Go to the Insert tab at the top and choose Pictures > Online Pictures .
- Select the Search Bing box at the top and type the name of the picture you’re looking for.
- Select your image in the search results and choose Insert at the bottom. You can select multiple images if you want.

- If you’d like to add images from OneDrive, select OneDrive in the window’s bottom-left corner.
- Access your OneDrive folder, choose the image to add, and select Insert at the bottom.

Capture and Add a Screenshot to PowerPoint
PowerPoint includes a screen capture tool that allows you to take a screenshot and add that image to your slides. This way, you don’t need a third-party app to grab screen captures and then load them into the app.
- Open the window that you want to take a screenshot of.
- Access your presentation in PowerPoint and select the slide where you want to add your screenshot.
- Go to PowerPoint’s Insert tab at the top and choose Screenshot in the Images section.
- Select the window you want to capture an image of. The app will add the screenshot to your current slide.

Use an Image as a Slide’s Background in PowerPoint
You can use a picture from your computer, stock images repository, or the internet as your slide’s background. This puts your photo in the background and your other slide content in the foreground.
You can achieve this by changing your chosen slide’s background formatting as follows:
- Right-click the slide where you want to use a picture as the background and choose Format Background from the menu.
- Enable the Picture or texture fill option on the right.
- Select Insert in the Picture source section.

- Choose your picture’s source. We’ll go for From a File .

- Open your picture’s folder and double-click the photo to make it your slide’s background.
You can customize your slide’s background using various options available in the right sidebar of PowerPoint.
Add an Image to PowerPoint on Mac
PowerPoint’s Mac version also makes it easy to add pictures to your presentations. You can find and add images from both your local storage as well as the internet.
- Launch your presentation in PowerPoint for Mac.
- Select the slide you want to add a picture to.
- Choose Insert > Picture > Picture From File .
- Select the photo to add to your slide and choose Insert .
- You can select multiple photos by holding down Shift and clicking your images.
Insert Pictures in PowerPoint’s Web Version
PowerPoint’s web version offers nearly as many features as its desktop app. You can add images from various sources to your presentations on the app’s web client.
- Launch your preferred web browser and access PowerPoint . Sign in to your account if you haven’t already done so.
- Choose the presentation and then the slide you want to add a picture to.
- Select Insert > Pictures from the ribbon at the top. Then, select your image’s source followed by the actual image to add it to your chosen slide.

You can remove unwanted images from your slides by choosing your images and pressing the Backspace key.
Add Photos to Make Your PowerPoint Presentations Aesthetically Pleasing
Your presentations don’t have to be boring. Luckily, PowerPoint offers various options to help you turn your slides into something your audience will enjoy watching . One of these options is to add photos to your slides, and you can choose your pictures from various sources.
Once you’ve added your images, you can customize their appearance so they blend well with your presentation’s existing content. Happy presenting!

Mahesh has been obsessed with technology since he got his first gadget a decade or so ago. Over the last few years, he's written a number of tech articles on various online publications including but not limited to MakeTechEasier and Android AppStorm. Read Mahesh's Full Bio
Read More Posts:

Leave a Reply
Your email address will not be published. Required fields are marked *
- Insert a picture in PowerPoint Article
- Edit pictures Article
- Add SmartArt to a slide Article
- Put a background picture on your slides Article
- Add a background picture to slides Article
- Use charts and graphs in your presentation Article
- Insert icons in PowerPoint Article

Add a background picture to slides
You can use a picture as the background for a slide or slides.
You can adjust the picture's transparency after you add it to the slide.

Insert a background picture on a slide
Right-click the margin of the slide and then select Format Background .
In the Format Background pane, choose Picture or texture fill .
Under Insert picture from , choose where to get the picture from:
| Option | Use it to |
|---|---|
|
| Insert a picture from your computer or network drive |
|
| Insert a copied picture (This option is unavailable if you haven't Copied a picture.) |
|
| Search the web for an image |
To adjust the picture's relative lightness, slide the Transparency bar to the right.

To apply the background picture to all slides in your presentation, choose Apply to All . Otherwise, simply close the Format Background pane.
Remove a background picture
In Normal view, select a slide that has the background pattern or picture you want to remove.
On the Design tab of the toolbar ribbon, in the Customize group at the far right end, select Format Background .

In the Format Background pane, under Fill , select Solid Fill .

Select the down arrow next to the Color button. A gallery of colors appears. Select the white color.
Your current background is removed, and the background of the slide is now white.
If you want to make the same change to the other slides in the presentation, choose Apply to All at the bottom of the Format Background pane.
Add a video to the background of your slides

Need more help?
Want more options.
Explore subscription benefits, browse training courses, learn how to secure your device, and more.

Microsoft 365 subscription benefits

Microsoft 365 training

Microsoft security

Accessibility center
Communities help you ask and answer questions, give feedback, and hear from experts with rich knowledge.

Ask the Microsoft Community

Microsoft Tech Community

Windows Insiders
Microsoft 365 Insiders
Was this information helpful?
Thank you for your feedback.
Top searches
Trending searches

135 templates

suicide prevention
9 templates

35 templates

13 templates

hispanic heritage month
21 templates

mid autumn festival
18 templates
Create engaging presentations, faster
Free templates for google slides, powerpoint and canva, or kick off your next project with ai presentation maker.

Inside Out Disney
11 templates

256 templates

Slidesclass
400 templates

Editor’s Choice
3684 templates

9522 templates

3189 templates

Presentation Maker
1738 templates

91 templates

1240 templates

Mental Health
413 templates

Social Media
702 templates
Latest themes

It seems that you like this template!

Register for free and start downloading now
Casual & vintage watercolor collage minitheme.
Are you good with handicrafts? Those who are skilled with scissors and glue know how to create true masterful compositions that mix photographs, textures, layouts and other elements to create collages that convey all kinds of ideas. Of course, there's no need to get your fingers dirty with glue to...

Modern Doodle Minitheme
Download the Modern Doodle Minitheme presentation for PowerPoint or Google Slides and start impressing your audience with a creative and original design. Slidesgo templates like this one here offer the possibility to convey a concept, idea or topic in a clear, concise and visual way, by using different graphic resources....

Funny Looking Cartoon Characters Minitheme
If you are looking for an eye-catching presentation that will instantly grab your audience's attention, this may be a great option for you. With its grid background and cartoon style characters, it gives a fun and playful touch to any topic you want to talk about. But that's not all....

Premium template
Unlock this template and gain unlimited access
Elementary Geography Lesson Infographics
Download the Elementary Geography Lesson Infographics presentation for PowerPoint or Google Slides and easily edit it to fit your own lesson plan! Designed specifically for elementary school education, this eye-catching design features engaging graphics, and age-appropriate fonts; elements that capture the students' attention and make the learning experience more enjoyable...

Creative Leafy Backgrounds Minitheme
Who said elegance and creativity are at odds? Take a look at this floral style template to prove it. On the striking red background we have added illustrations of leaves in different colors, such as blue, green and pink, bringing dynamism and joy. All this, added to the wide variety...

Third Grade Infographics
Download the Third Grade Infographics template for PowerPoint or Google Slides and discover this set of editable infographics for education presentations. These resources, from graphs to tables, can be combined with other presentations or used independently. The most important thing is what you will achieve: transmit information in an orderly...
Popular themes

Minimalist Business Slides
Minimalism is an art style that frees the canvas and that lets the content stand out for itself. It’s a way of conveying modernism, simplicity and elegance and can be your best ally in your next presentation. With this new design from Slidesgo, your business presentations will be as professional...

Chalkboard Background Theme for Elementary
Download the Chalkboard Background Theme for Elementary presentation for PowerPoint or Google Slides and easily edit it to fit your own lesson plan! Designed specifically for elementary school education, this eye-catching design features engaging graphics and age-appropriate fonts; elements that capture the students' attention and make the learning experience more...

Papyrus History Lesson
History lessons tend to be boring for students, since they need to remember dates and a bunch of information. Make it entertaining by editing our free presentation template, whose backgrounds based on ancient papyrus rolls take it to the next level.

Steps for Studying a Text
Reading a book is good practice. Books are a source of knowledge! However, the complexity of the text you're reading affects the time you'll spend understanding it and memorizing it. That can be a problem when studying, so here's a template with some tips on how to face difficult texts...

Fall Cottagecore Theme
Ah yes, the temperature drops two degrees at the end of summer and your mind automatically switches on fall mode: warm brown and green tones, you start wearing your jacket, drink the coffee hotter, watch (again) that show inspired by fall... We understand that desire for the best time of...

Colorful Theme
Download the Colorful Theme presentation for PowerPoint or Google Slides and start impressing your audience with a creative and original design. Slidesgo templates like this one here offer the possibility to convey a concept, idea or topic in a clear, concise and visual way, by using different graphic resources. You...
Infographics

Fresh Lemon Pattern Newsletter Infographics
Download the Fresh Lemon Pattern Newsletter Infographics template for PowerPoint or Google Slides and discover the power of infographics. An infographic resource gives you the ability to showcase your content in a more visual way, which will make it easier for your audience to understand your topic. Slidesgo infographics like...

College Lessons with Cycle Diagrams
Download the College Lessons with Cycle Diagrams presentation for PowerPoint or Google Slides. As university curricula increasingly incorporate digital tools and platforms, this template has been designed to integrate with presentation software, online learning management systems, or referencing software, enhancing the overall efficiency and effectiveness of student work. Edit this...

Elegant Blue Benchmarking Strategies Infographics
Download the Elegant Blue Benchmarking Strategies Infographics template for PowerPoint or Google Slides to get the most out of infographics. Whether you want to organize your business budget in a table or schematically analyze your sales over the past year, this set of infographic resources will be of great help....
Education presentation templates

926 templates

590 templates

123 templates

815 templates

1055 templates

3617 templates

Thesis Defense
1013 templates

Teacher Toolkit
121 templates

426 templates
848 templates

59 templates
Editable in Canva

Judaism: Culture and Traditions Workshop
Download the Judaism: Culture and Traditions Workshop presentation for PowerPoint or Google Slides. If you are planning your next workshop and looking for ways to make it memorable for your audience, don’t go anywhere. Because this creative template is just what you need! With its visually stunning design, you can...
What's new on Slidesgo
See the latest website updates, new features and tools and make the most of your Slidesgo experience.
Make presentations with AI

Make school fun from day one with Disney and Pixar templates

Free printable coloring pages in PDF for back to school
Browse by tags.
- Kids 2151 templates
- Food 959 templates
- Technology 1076 templates
- Travel 436 templates
- Animal 1137 templates
- Art 848 templates
- Health 3816 templates
- History 1443 templates
- Environment 533 templates
- Galaxy 193 templates
- Fashion 247 templates
- Biology 517 templates
- Summer 234 templates
- Architecture 156 templates
- Music 426 templates
- Research 1662 templates
- Culture 2100 templates
- Background 10111 templates
- Back to School 202 templates
- Coloring Page 352 templates
What do our users say about us?

I just wanted to thank you! I learned more about slides in one day of quarantine than in my whole life
Gabriela Miranda

Your slides are so unique and gorgeous! They really help me with PowerPoint presentations for school and now even my mom uses them for work
Marie Dupuis

I would like to thank to you for these amazing templates. I have never seen such service, especially free! They are very useful for my presentation.
Ali Serdar Çelikezen

Thank you Slidesgo for creating amazing templates for us. It's made my presentation become much better.
Thiên Trang Nguyễn
Create your presentation Create personalized presentation content
Writing tone, number of slides, register for free and start editing online.
PowerPoint Slide or Lecture Note References
This page contains reference examples for PowerPoint slides or lecture notes, including the following:
- PowerPoint slides available online
- PowerPoint slides from a classroom website
Use these formats to cite information obtained directly from slides.
If the slides contain citations to information published elsewhere, and you want to cite that information as well, then it is best to find, read, and cite the original source yourself rather than citing the slides as a secondary source.
Writers creating PowerPoint presentations in APA Style should present information clearly and concisely. Many APA Style guidelines can be applied to presentations (e.g., the guidance for crediting sources, using bias-free language, and writing clearly and concisely).
However, decisions about font size, amount of text on a slide, color scheme, use of animations, and so on are up to writers; these details are not specified as part of APA Style.
1. PowerPoint slides available online
Jones, J. (2016, March 23). Guided reading: Making the most of it [PowerPoint slides]. SlideShare. https://www.slideshare.net/hellojenjones/guided-reading-making-the-most-of-it
- Parenthetical citation : (Jones, 2016)
- Narrative citation : Jones (2016)
- When the slides are available online to anyone, provide the site name on which they are hosted in the source element of the reference, followed by the URL of the slides.
2. PowerPoint slides from a classroom website
Mack, R., & Spake, G. (2018). Citing open source images and formatting references for presentations [PowerPoint slides]. Canvas@FNU. https://fnu.onelogin.com/login
- Parenthetical citation : (Mack & Spake, 2018)
- Narrative citation : Mack and Spake (2018)
- If the slides come from a classroom website, learning management system (e.g., Canvas, Blackboard, Moodle, Sakai), or company intranet and you are writing for an audience with access to that resource, provide the name of the site and its URL (use the login page URL for sites requiring login).
- If the audience for which are you writing does not have access to the slides, cite them as a personal communication .
PowerPoint slide references are covered in the seventh edition APA Style manuals in the Publication Manual Section 10.14 and the Concise Guide Section 10.12
COMMENTS
How to Create a Photo Slideshow with PowerPoint
Learn how to create a photo slideshow in Microsoft PowerPoint in this tutorial video. See step-by-step how to import photos, how to make quick edits to the p...
How to Make a Slide Show | Microsoft 365
Learn how to easily and quickly create a photo slideshow in PowerPoint. #powerpoint #learnpowerpoint ***Consider supporting Technology for Teachers and Stude...
Add Photos to Your PowerPoint Slideshow. Step 1: Inserting a Single Photo. Navigate to the "Insert" tab at the top of the PowerPoint interface. Click on the "Pictures" option. This will allow you to browse your computer and select the photo you want to add.
This tutorial will walk you through How to Make A Photo Slideshow. Go to the tools ribbon and click Insert. From the options under Insert, select Photo Album. Once clicked, a pop-up window displays all the settings for adjusting your Photo Album. To insert our pictures, click the button in the upper left corner labeled File/Disk.
How to Make a Slideshow on PowerPoint
1. Paste Images. It's amazingly easy to paste images in PowerPoint. Begin by copying an image to your clipboard by right-clicking on it and choosing Copy or Copy Image.. Copy an image to your clipboard, then paste it into PPT by right-clicking and choosing Picture from the Paste Options group. (Image in sidebar source: Envato Elements. Then, navigate to the PowerPoint slide where you want to ...
Create a photo slideshow in PowerPoint
How to Make a Photo Collage in PowerPoint Presentations (+ ...
10 Free PowerPoint Templates to Present Your ...
25 Stunning Photography Presentation Templates ...
How to Add Images to a PowerPoint Presentation
Insert a picture in PowerPoint
Free Online Slide Presentation: PowerPoint | Microsoft 365
Create a presentation in PowerPoint
Free Photography Google Slides and PowerPoint templates
Step-1: Click on the "Insert" tab. The first step is to open the slide where you want to add the picture. Then click on the "Insert" tab in the menu ribbon located at the top of the screen. Step-2: Click on the "Pictures" option. The next step is to click on the "Pictures" option in the "Images" group of the "Insert" menu.
Free Picture Slide Templates for an Eye-Catching Slideshow. Capture your audience's attention with a picture PowerPoint template that will bring your presentations to life. Whether you're a photographer, blogger, or presenter, these templates will help you tell your story in a visually captivating way. With a range of customizable slides ...
Method 02: From insert pictures To insert pictures in PowerPoint, you can navigate to the 'Insert' tab and click on the 'Pictures' option. A dropdown list will appear with three options to choose from: 'From this device', 'Stock images', and 'Online pictures'.Simply select the option that suits you best and insert the picture into your presentation.
Open your presentation with PowerPoint on your PC. Choose the slide you want to add an image to. Access the Insert tab in PowerPoint's ribbon at the top. Select Pictures > This Device in the Images section. Navigate to the folder that has your image and double-click the image to load it in PowerPoint.
Add a background picture to slides
Slidesgo: Free Google Slides themes and Powerpoint templates
Many APA Style guidelines can be applied to presentations (e.g., the guidance for crediting sources, using bias-free language, and writing clearly and concisely). However, decisions about font size, amount of text on a slide, color scheme, use of animations, and so on are up to writers; these details are not specified as part of APA Style.
There are various options and slide layouts included within this template that should serve most needs. For questions or help with the template, please email: [email protected] For PowerPoint reviews please email: [email protected] Minimum font size throughout presentation: 14pt Last modified by: Mondragon, Desiree - DEN