

How to Run a PowerPoint Slide Show Automatically (Set Up a Self-Running Presentation)

Easily Create a Self-Running PowerPoint Slide Show
by Avantix Learning Team | Updated November 12, 2021
Applies to: Microsoft ® PowerPoint ® 2013, 2016, 2019 and 365 (Windows)
You can set up self-running PowerPoint slide shows to run automatically at trade shows, conventions, events or as web-based presentations. Prior to setting up a self-running presentation, you'll need to apply your preferred animations to text and objects as well as any slide transitions to be be included in the show (unless specified otherwise in the Set Up Show dialog box). When you create automatic slide shows, you also have the option of including specific slide timings, narrations or voice over and ink annotations.
Recommended article: How to Draw on PowerPoint Slides on the Fly During a Presentation (Using Ink)
Do you want to learn more about PowerPoint? Check out our virtual classroom or in-person PowerPoint courses >
Setting up a self-running presentation
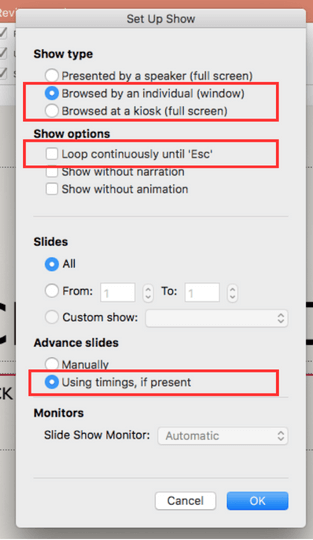
When you set up a self-running presentation, you can choose 3 options in the Set Up Show dialog box depending on your audience:

To set up a PowerPoint presentation to run automatically, but allow those watching the slide show to have control over when they advance slides:
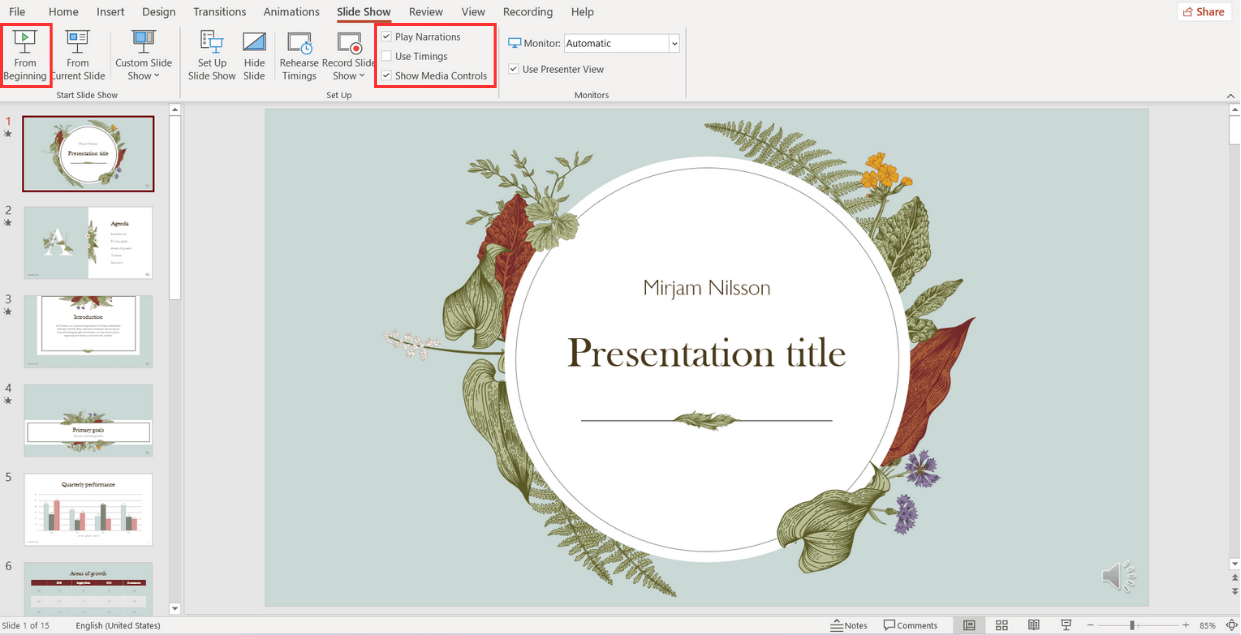
- Click the Slide Show tab in the Ribbon and then click Set Up Slide Show. A dialog box appears.
- Under Show type, select Presented by a speaker (full screen). This is the default setting for slide shows.
To set up a presentation to run automatically, but those watching the slide show do NOT have control over when slides advance:
- Under Show type, select Browsed by an individual (window).
To set up a presentation to run automatically, but those watching the slide show do NOT have control over when slides advance and the presentation repeats until the people watching press Escape (ESC):
- Under Show type, select Browsed at kiosk (full screen).
Setting slide timings manually
You can choose to rehearse slide timings or you can manually set the slide timings for your PowerPoint slides using the Transitions tab in the Ribbon.
To set slide timings manually:
- Click the View tab in the Ribbon and then click Slide Sorter.
- Select the slide for which you want to set timing.
- Click the Transitions tab in the Ribbon.
- In the Timing group, under Advance Slide, select the After check box and then enter the number of seconds indicating how long the slide should appear on the screen. If you want the next slide to appear either when you click the mouse or automatically after the number of seconds that you enter (whichever comes first), select both the On Mouse Click and the After check boxes.
- Repeat the process for each slide for which you want to set timing.
Rehearsing and recording slide timings
If you choose Browsed by an individual (window) or Browsed at a kiosk (full screen) in the Set Up Show dialog box, you can rehearse and record timings for animations, transitions and advancing slides.
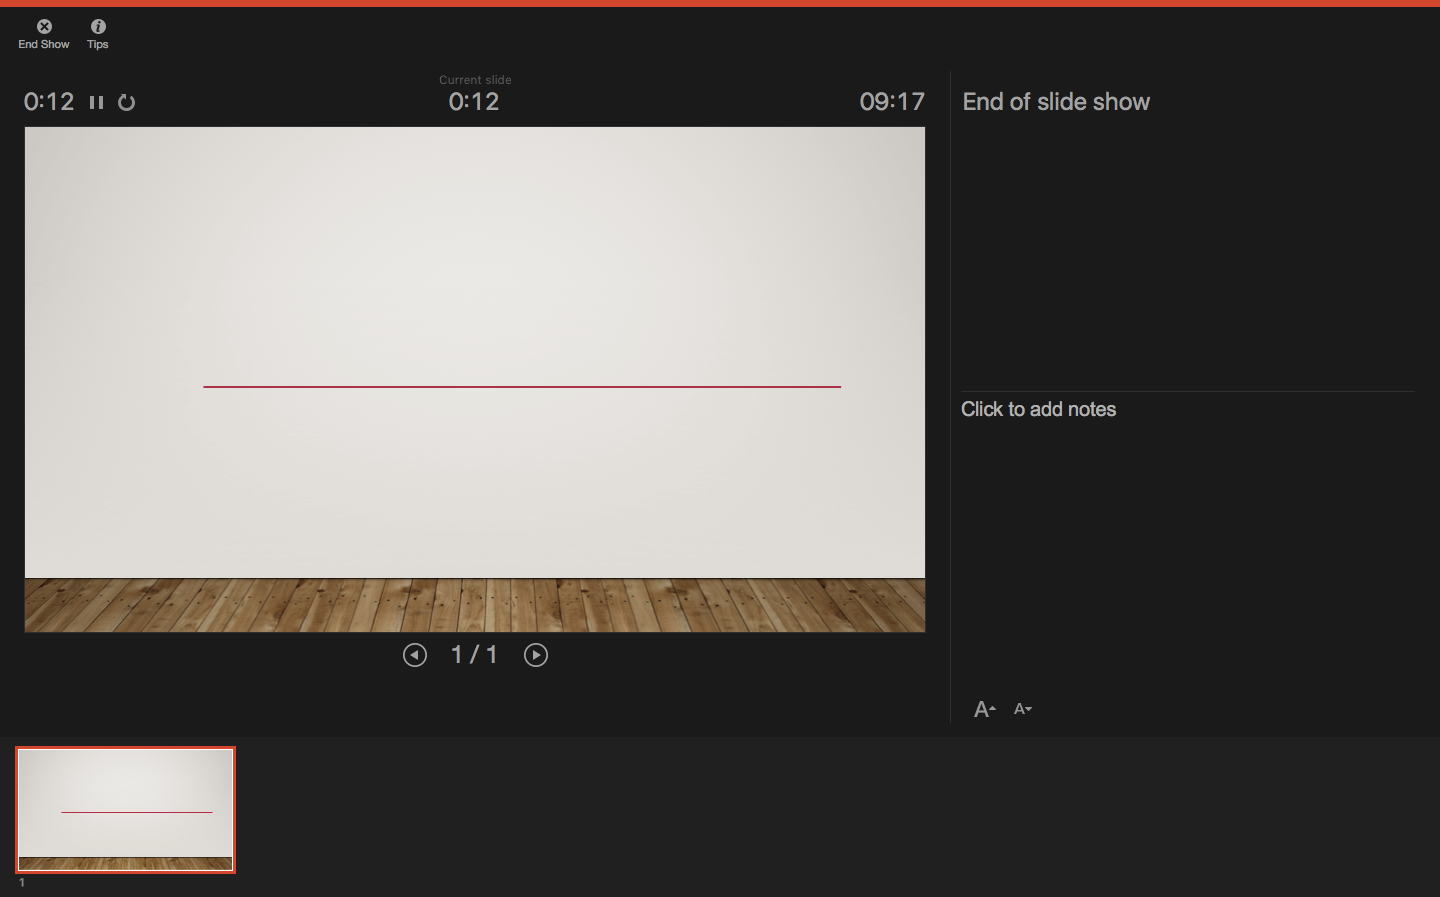
To rehearse timings, you'll use the Rehearsal toolbar shown below:
The toolbar includes the following buttons from left to right:
- Next (advance to next slide)
- Total presentation time
Click the buttons in the Rehearsal toolbar to perform the following actions:
- Click Next to advance to the next slide.
- To temporarily stop recording the time, click Pause.
- To restart recording the time after pausing, click Pause.
- To set an exact length of time for a slide to appear, type the length of time in the Slide Time box.
- To restart recording the time for the current slide, click Repeat.
To rehearse timings:
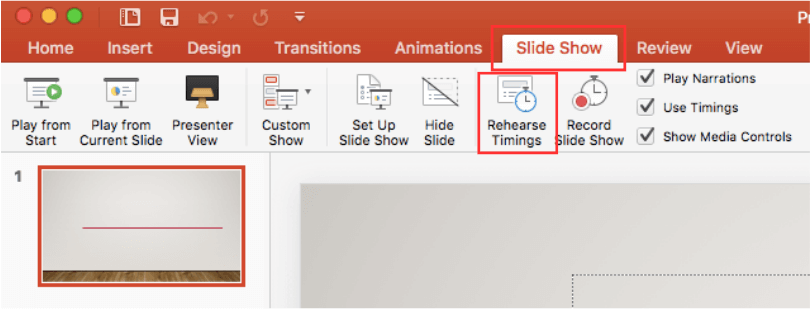
- Click the Slide Show tab in the Ribbon and then click Rehearse Timings. The Rehearsal toolbar appears and the timer begins immediately. The presentation appears in full screen recording mode.
- Click the desired buttons. Click Next to advance to the next slide or press the right arrow on your keyboard. To temporarily stop recording the time, click Pause. To restart recording the time after pausing, click Pause. To set an exact length of time for a slide to appear, type the length of time in the Slide Time box. To restart recording the time for the current slide, click Repeat.
- Continue clicking on the appropriate buttons until you are satisfied with the timings. The total presentation time appears on the top right of the Rehearsal toolbar.
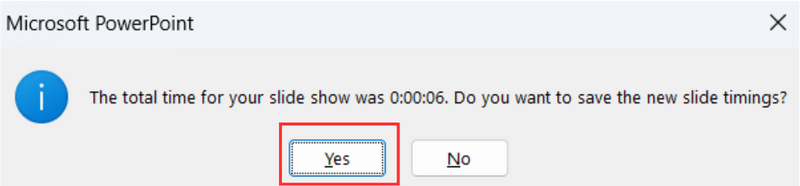
- After you set the time for the last slide, a dialog box displays the total time for the presentation and another dialog box appears.
- To keep the recorded slide timings, click Yes. To discard the recorded slide timings, click No.
The presentation appears. If you view the presentation in Slide Sorter View, the slide timing is displayed below each slide.
Recording a slide show with timings
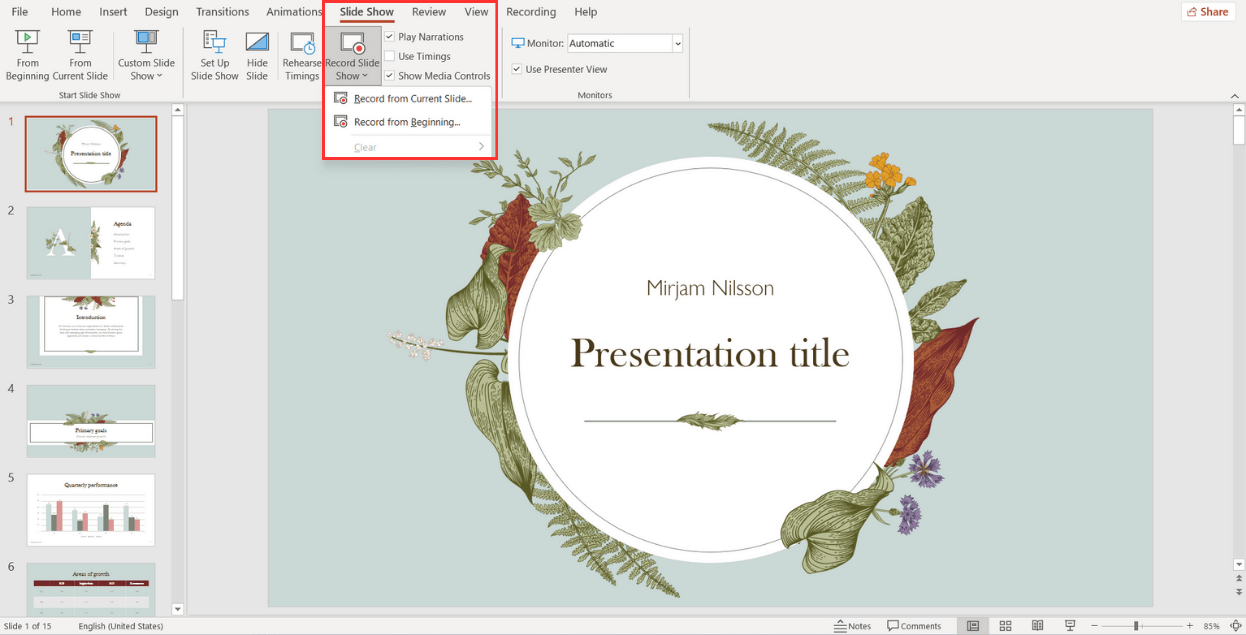
Instead of using the Rehearse Timings button, you can record timings (and narrations or voice over) as you record a show. The Record Slide Show button appears on the Slide Show tab in the Ribbon. When you record a slide show, you can start from the beginning or the current slide:

After you choose to record a slide show, you will have the option of including slide and animation timings as well as narrations, ink, and laser pointer (2010 users will not have the option of recording ink annotations):

If you select Slide and animation timings, PowerPoint automatically records the time you spend on each slide, including animations and triggers on each slide. If you have already rehearsed timings, they will be replaced.
If you use the pen, highlighter, eraser or laser pointer, those will also be recorded. Pen, highlighter, and eraser recording are available only if you have PowerPoint 2013 (and run updates) or a later version of PowerPoint. In earlier versions of PowerPoint, pen and highlighter strokes are saved as ink annotation shapes. To learn more about including ink, check out the article How to Draw on PowerPoint Slides on the Fly During a Presentation (Using Ink) .
To record a slide show and include animations and timings:
- Click the Slide Show tab in the Ribbon and then click the arrow beside Record Slide Show. A drop-down menu appears.
- Select Start Recording from Beginning or Start Recording from Current Slide. A dialog box appears.
- Select the option to include slide and animation timings.
- Click Start Recording. The Rehearsal toolbar appears and the timer begins immediately. The presentation appears in full screen recording mode.
- If you want to record timings, click the desired buttons. Click Next to advance to the next slide or press the right arrow on your keyboard. To temporarily stop recording the time, click Pause. To restart recording the time after pausing, click Pause. To set an exact length of time for a slide to appear, type the length of time in the Slide Time box. To restart recording the time for the current slide, click Repeat.
- To end your recording at any time, right-click on a slide and select End Show from the menu.
The presentation appears. In Slide Sorter view, the slide timing is displayed below each slide.
Recording narrations or voice over
In addition to timings, you may want to add narrations or voice over. You can record narrations before you run a presentation or you can record narrations during a presentation and include audience comments. When you add narrations, PowerPoint automatically records your slide timings. Alternatively, you can set the slide timings first. Be sure to test the microphone first. If you do not want narrations throughout your entire presentation, you can record separate sounds or comments on selected slides or objects.
To record narrations, your computer requires a sound card, microphone, speakers and a webcam (optionally). You will also need a microphone connector if the microphone is not part of your computer.
It's not a bad idea to create a script first in Microsoft Word to improve flow and avoid filler words such as "um". You may also want to practice before recording although you can always re-record narration.
To record a slide show with narrations:
- In the Record Slide Show dialog box, select the check box for Narrations and laser pointer and, if required, select or deselect the Slide and animation timings check box.
- Click Start Recording. A Rehearsal toolbar appears.
- Speak into the microphone to record a narration.
- To pause the narration, in the Rehearsal toolbar, click Pause. To resume the narration, click Resume Recording.
- To end your slide show recording at any rime, right-click on the slide and then select End Show.
The recorded slide show timings and narrations are saved. If you view the presentation in Slide Sorter view, timings appear beneath each slide. A sound icon also appears in the lower-right corner of each slide that has narration.
If you re-record your narration (including audio, ink, and laser pointer), PowerPoint erases your previously recorded narration (including audio, ink, and laser pointer) when you start recording again on the same slide.
To use ink, eraser, or the laser pointer during your recording, right-click on the slide, select Pointer options and choose the laser pointer, pen, highlighter or eraser. Ink is not available for 2010 users. If you want to display a laser pointer while you're recording, press Control and your pointer will appear as a small red circle on your screen.
Previewing narration
If you want to listen to the narration on a slide:
- In Normal View, click the sound icon in the lower-right corner of the slide.
- Click Play.
Running a recorded slide show
To run a recorded slide show in Normal View:
- If necessary, on the Slide Show tab in the Ribbon, click Set Up Slide Show. A dialog box appears.
- Under Show type, select the desired option.
- On the Slide Show tab, click From Beginning or From Current Slide. During playback, your animations, inking actions, laser pointer, audio and video play in sync.
- To end the show, press Escape.
Turning timings or narrations off
You can turn off timings and narrations and then turn them on again at any time.
To turn off recorded slide timings, on the Slide Show tab, deselect the Use Timings check box.
To turn off recorded narrations, ink, and the laser pointer, on the Slide Show tab, deselect the Play Narrations check box.

Deleting timings or narration
You can use the Clear command to permanently delete timings or narration from your slide show recording. You have 4 options:
- Delete timings on the current slide
- Delete timings on all slides
- Delete narration on the current slide
- Delete narration on all slides
To clear timings or narrations:
- On the Slide Show tab, click the arrow below Record Slide Show. A menu appears.
- Select Clear and then the appropriate clear option.
Once you have recorded a presentation, you can later save it as a video if you'd like.
Subscribe to get more articles like this one
Did you find this article helpful? If you would like to receive new articles, join our email list.
More resources
A Beginner's Guide to Video Formats in PowerPoint
How to Hide and Unhide Slides in PowerPoint (with Shortcuts)
How to Insert Video in PowerPoint (from a File on Your PC or a Shared Drive)
PowerPoint Keyboard Shortcuts to Play and Control Video During a Slide Show
How to Add Animation in PowerPoint (Animate Images, Text and Other Objects)
Related courses
Microsoft PowerPoint: Intermediate / Advanced
Microsoft PowerPoint: Design for Non-Designers
Microsoft PowerPoint: Animations Bootcamp
Microsoft Excel: Intermediate / Advanced
VIEW MORE COURSES >
Our instructor-led courses are delivered in virtual classroom format or at our downtown Toronto location at 18 King Street East, Suite 1400, Toronto, Ontario, Canada (some in-person classroom courses may also be delivered at an alternate downtown Toronto location). Contact us at [email protected] if you'd like to arrange custom instructor-led virtual classroom or onsite training on a date that's convenient for you.
Copyright 2024 Avantix ® Learning
You may also like

10 Keyboard Shortcuts in PowerPoint's Outline View
The outline has been an integral part of Microsoft PowerPoint for many years. It is dynamically linked to slide placeholders and is organized in a hierarchical way.

How to Change the Thumbnail for a Video in PowerPoint (using the Poster Frame Tool)
If you have inserted a video on a PowerPoint slide, you can display a custom thumbnail (or Poster Frame) for the video during a slide show. The thumbnail will display when you run a PowerPoint slide show and disappears when you start the video. For most videos, the thumbnail that displays is the first frame of the video clip. You can use the Poster Frame command to display a different frame in the video clip or a picture from another source as a thumbnail. A picture thumbnail could be either an image or an icon.

How to Use the Built-in Laser Pointer in PowerPoint (with Shortcuts)
During a PowerPoint slide show, you can change your mouse into a laser pointer to focus attention on a specific area on your slide. You can show or hide the built-in laser pointer using keyboard shortcuts or by using the context menu.
Microsoft, the Microsoft logo, Microsoft Office and related Microsoft applications and logos are registered trademarks of Microsoft Corporation in Canada, US and other countries. All other trademarks are the property of the registered owners.
Avantix Learning |18 King Street East, Suite 1400, Toronto, Ontario, Canada M5C 1C4 | Contact us at [email protected]

Our Courses
Avantix Learning courses are offered online in virtual classroom format or as in-person classroom training. Our hands-on, instructor-led courses are available both as public scheduled courses or on demand as a custom training solution.
All Avantix Learning courses include a comprehensive course manual including tips, tricks and shortcuts as well as sample and exercise files.
VIEW COURSES >
Contact us at [email protected] for more information about any of our courses or to arrange custom training.
Privacy Overview
Pin it on pinterest.
- Print Friendly
How to Play PowerPoint Slides Automatically

The PowerPoint autoplay feature is an amazing tool for creating slideshows that advance automatically . Self-running PowerPoint presentations are great for leaving in kiosks or publicity booths. You can even show them with recordings or voiceovers to make sure your audience gets the most out of it.
Forget worrying about clicking from slide to slide, today we will teach you how to play PowerPoint slides automatically!

We’ll cover the following topics:
Why should you use the automatic slideshow PowerPoint feature?
- How to Play PowerPoint Slides Automatically without Clicking - Option 1
- How to play slideshow in PowerPoint automatically - Option 2
How to make PowerPoint slides advance automatically with audio
- How to loop slides in PowerPoint
- Check out some experts’ best practices for Automatic slideshows in PowerPoint
How to automatically play PowerPoint presentations across devices
How to play powerpoint slides automatically without clicking on mac, elevate your presentation with professional designs: try 24slides today.
Using the automatic slideshow feature has many benefits . The main one is its practicality; it is a tool you can set up in advance so that you eliminate the need for ongoing attention and your presentation flow is better.
And that’s not all, you can even add voiceovers, recordings, and even laser pointer gestures to make sure your audience gets the most out of your presentation.
It becomes particularly beneficial in the following scenarios:
- Business presentations: An automatically progressing presentation can help you focus on your content without worrying about going slide by slide, which can often be distracting and disrupt your rhythm.
- Publicity: Self-running presentations can be great if you use them for publicity. For example, if you have a kiosk or booth, a self-running PowerPoint slideshow can help you reach more people without them having to speak one-on-one with a salesperson.
- E-Learning: In e-learning modules or training presentations, autoplay can help learners progress through the material while listening to your lecture. However, they can also pause and rewind to go to the specific section they wish to revisit.
- Photo or Video Slideshows: Autoplay is commonly used in photo or video slideshows for events such as weddings or birthdays. It can serve as a background loop, or you can present it at a special moment along with music or narration to enhance the experience.
How to Play PowerPoint Slides Automatically without Clicking: Option 1
There are a couple of different ways to make your slides run automatically, and we'll go over both options. This first option is for when you need a really customized presentation: personalized timing for each slide, voiceovers, or laser pointer gestures .
If this is your case, go ahead with this section, but if you’d like something a bit simpler, proceed to Option 2.
- The first step is to go to the Slide Show Tab. On the Set Up group, you’ll find the Set Up Slide Show option to start customizing your self-running presentation.

- Once the Set Up Show Window opens, deselect the Presented by a speaker option, as it refers to manually advancing your slides, either by clicking or using keys. Next, consider several options for the automatic slideshow:
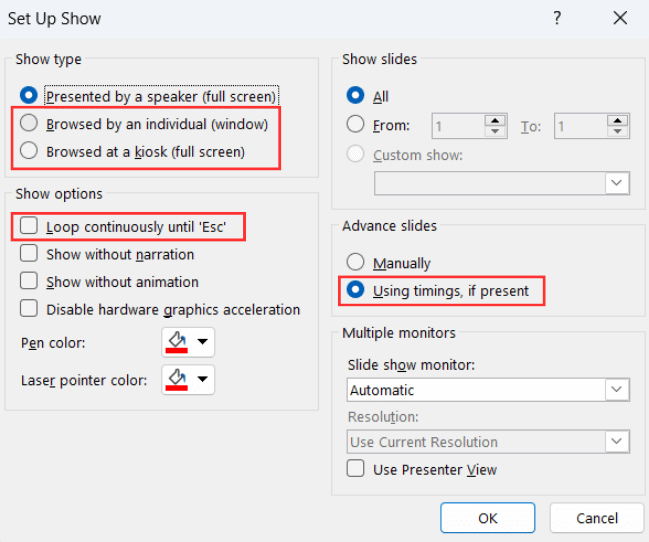
- Browsed by an individual is one choice for creating a self-running PowerPoint presentation. This option permits you to deliver your slides within a window, as opposed to the typical full-screen mode. Ensure that the Use timings, if present option is enabled for this feature to function correctly.
- Another option is the Browsed at a kiosk , which allows you to run a full-screen, continuous slideshow automatically. This option locks in both the looping and timing settings, ensuring that your slideshow will continue until you press the ESC key.
If you’re not sure what option is the best for you, remember you can always select manually the loop and timings option . Try different options with these and try out how your presentation will look like with the different settings.
- The next step is to set your timings. This means defining how much time you want your PowerPoint slideshow to spend on each slide before automatically advancing to the next one.
To set your timings, click on Rehearse Timings , which will allow you to go through your presentation slide by slide, and it’ll record how much time you spend on each one.

After you finish going through all your slides, a message will pop up to save your timings. Click yes so you can save the time spent on each slide.
How to play slideshow in PowerPoint automatically: Option 2
Let’s take a look at a different way of using the PowerPoint autoplay feature. This option is great if you’re looking for something simple and just want your slides to advance automatically at regular intervals.
- First, open the Transitions Tab and locate the Timing Group.

- Go to the After option and manually add how much time you want to spend on each of your slides.

Select the Apply To All option so all your slides have the same timing.
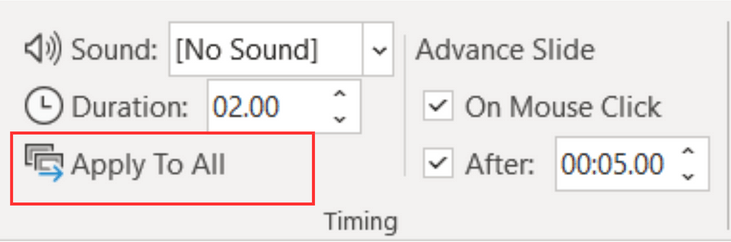
You can also deselect the On Mouse Click option, depending on whether you want to be able to advance your slides by clicking or not.
Adding audio to your automatic PowerPoint is a fantastic feature to enhance your professional image and communicate your content without needing to be present. Let’s take a look at how to do it:
- Go to the Slide Show Tab and select Record Slide Show . Choose Record From Beginning to start with the first slide.
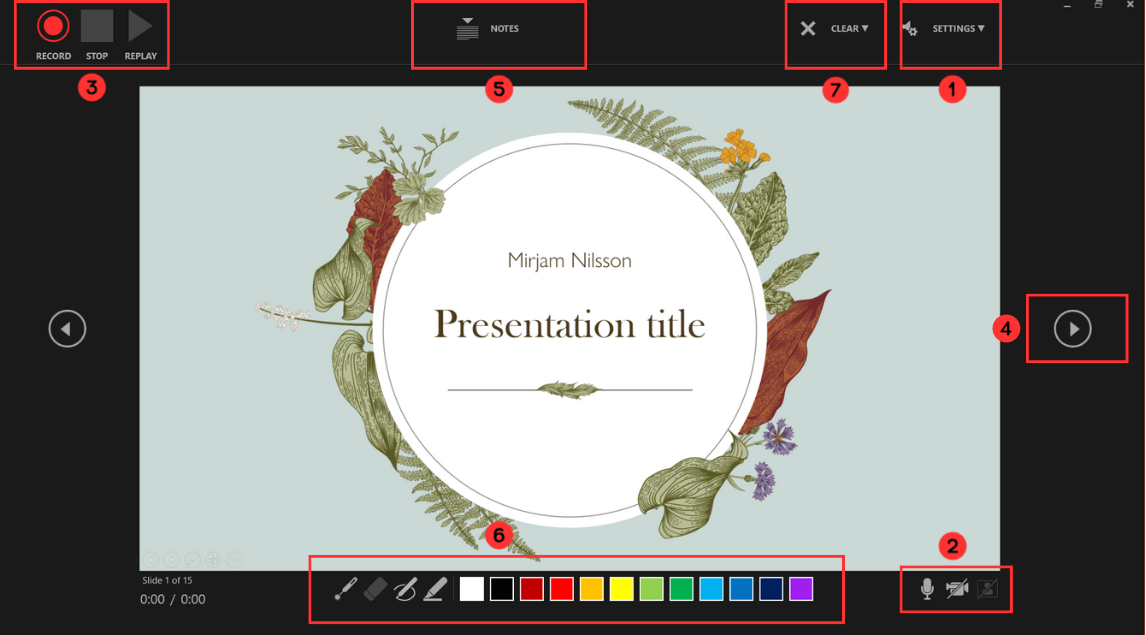
When the fullscreen opens, you will be able to see your first slide along with several options:
- Start in Settings (1) and select the tools you will be using. You have the option to use a microphone, or you can record yourself talking on camera. Choose your microphone and/or camera for recording.
- Next (2) , decide whether you want to have the microphone or camera you selected turned on. You can also choose to have a video preview.
- When you're ready to start recording, go to the top left corner (3) and click Record to start, Stop to pause, and Replay to review how it went.
- Once you finish with a slide, click on the right arrow (4) to move to the next slide.
- If you have Speaker notes in your slides, you can view them in (5) while you record.
- In the Pens and Markers section (6) , you can draw on the screen and make any annotations you want.
- Finally, the Clear option (7) allows you to clear existing recordings on the current slide or on all slides if you are unsatisfied and want to redo your recording.
- Now, to review what you've recorded, go to Set Up and make sure Play Narrations and Use Timings are checked. Then, click on From Beginning to start the presentation.
How to loop slides in PowerPoint
If you want to learn how to loop your slides in PowerPoint, follow these steps:
- Go to the Slide Show tab and select Set Up Slide Show .

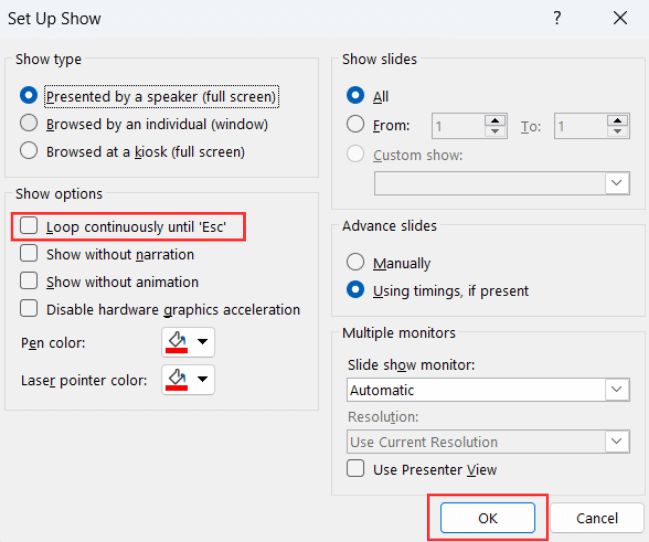
- When the Set Up Show window appears, go to the Show options group and tick the Loop continuously until ‘Esc’ option. Don’t forget to click OK to apply the new setup!
And all done! Now, your presentation will loop until you select ‘Esc’.
Check out some expert best practices for Automatic slideshows in PowerPoint
Now that you've learned how to make a PowerPoint slideshow run automatically, we'll give you the secrets to make your presentation stand out . Let's take a look at some insights from our expert designers .
Avoid too much text
Remember that your time per slide is limited , so it is important not to put too much text since your audience will not have time to read it. Try to express your message in the shortest possible text, and if necessary, revise and rewrite it as many times as necessary to synthesize it.
Limit interactive elements
Limit or avoid interactive elements such as hyperlinks that rely on user interaction since they may not function in PowerPoint autoplay mode.
However, if you want your audience or potential clients to take a specific action, consider using a QR code. Only make sure to leave the slide displayed for enough time for them to use it.
Practice, practice, practice
Keep in mind that your speech needs to fit perfectly with your timings for each slide. So, practicing your presentation multiple times is crucial to ensure a seamless and synchronized delivery.
First, go to the Slide Show Tab and select Set Up Slide Show .
- When the Set Up Show Window opens, deselect the Presented by a speaker option and consider the following options to set up your automatic slideshow:
- Browsed by an individual : With this option, you can show your slides within a window instead of the typical full-screen mode. Make sure that the Use timings, if present option is selected.
- Another option is the Browsed at a kiosk : This option locks in both the looping and timing settings, ensuring that your slideshow will continue until you press the ESC key.
- Next, you need to set your timings. This involves determining the duration for each slide so that it advances automatically to the next one when you have finished presenting it.
To set your timings, go to the Slide Show Tab and click on Rehearse Timings.
A window will open, allowing you to go through your presentation slide by slide, and it will record how much time you spend on each one . As you progress through each slide, it will confirm the time spent, and you can either agree or choose to re-record.
After you finish going through all your slides, a message will pop up to save your timings . Click yes so you can save the time spent on each slide.
If you’re looking to create a presentation that truly wows your audience, you might want to consider professional design assistance for your PowerPoint. Lucky for you, we’re here to help. Check out the fantastic designs 24Slides can help you create today!

You might also like
- How to Add a Timer to Your Powerpoint Presentations
- 11 Time-Saving PowerPoint Hacks For Creating Quick Presentations
- How To Loop a PowerPoint Presentation
- Add a PowerPoint Real-Time Clock to Your Presentations
Create professional presentations online
Other people also read

Tutorial: Save your PowerPoint as a Video
How To Convert Google Slides To PowerPoint and Vice Versa

How To Add Animations To PowerPoint
How to loop a PowerPoint slideshow so that it automatically starts over as soon as it ends
- To loop a PowerPoint slideshow, you'll need to enable looping in the "Set Up Slide Show" menu.
- Once you set your PowerPoint to loop, it'll start over from the beginning automatically after playing the last slide.
- Visit Business Insider's Tech Reference library for more stories .
If you've designed a Microsoft PowerPoint presentation that's meant to be viewed repeatedly, such as on a kiosk or in a museum installation, you can adjust the settings in PowerPoint so that your slideshow "loops" instead of ending after one viewing.
Getting a PowerPoint to loop is easy. Read on to find out how, using PowerPoint for both Mac and PC.
Check out the products mentioned in this article:
Microsoft office (from $149.99 at best buy), apple macbook pro (from $1,299.00 at apple), acer chromebook 15 (from $179.99 at walmart), how to loop a powerpoint presentation.
1. Open the Microsoft PowerPoint presentation that you want to loop.
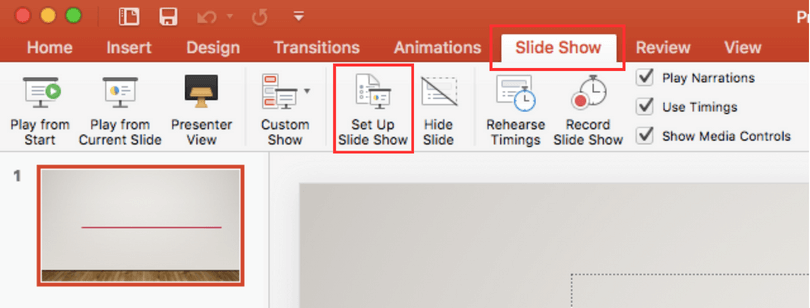
2. With your PowerPoint presentation open, click on the "Slide Show" tab, then click on "Set Up Slide Show."
3. In the pop-up window that appears, click on the box next to "Loop continuously until 'Esc'" so that a small checkmark appears inside the box. Feel free to adjust any other settings in this menu as well. Click "OK" when you're finished.
4. To test whether your PowerPoint can loop successfully, click on the "From Beginning" or "Play From Start" button in the Slide Show tab. Click through the slideshow until you reach the end. When your PowerPoint reaches its final slide, it should start over from the beginning automatically. When you're confident that looping is enabled, and you're ready to close the slide show, press the Esc key.
Related coverage from Tech Reference :
How to add a border to slides in powerpoint, and give your slideshow a sleek design, how to embed a youtube video into your microsoft powerpoint presentations using a mac or pc, how to convert google slides to a powerpoint presentation in 4 easy steps, how to create a custom powerpoint template to use or share with others, how to copy or duplicate a powerpoint slide and put it anywhere in your slideshow.
Insider Inc. receives a commission when you buy through our links.
Watch: We compared the $1,200 MacBook Air with the $500 Surface Go, and the results were a mess
- Main content
PowerPoint: How to Launch a Presentation Automatically as a Slide Show

What is a PowerPoint Show?
By default, PowerPoint saves your slide presentation as a PowerPoint presentation file with the .pptx file extension which, when double-clicked, launches PowerPoint. The presentation opens in whatever view was open when you saved it, such as the Normal view or Slide Sorter view. If you want your slide show to immediately launch in the Slide Show view, however, you need to save your file as a PowerPoint Show. In this article, find out how to create a PowerPoint slide show file and learn 2 bonus tips .
To Save a PowerPoint Presentation as a PowerPoint Show:
- Choose the File tab.
- Select Save As .
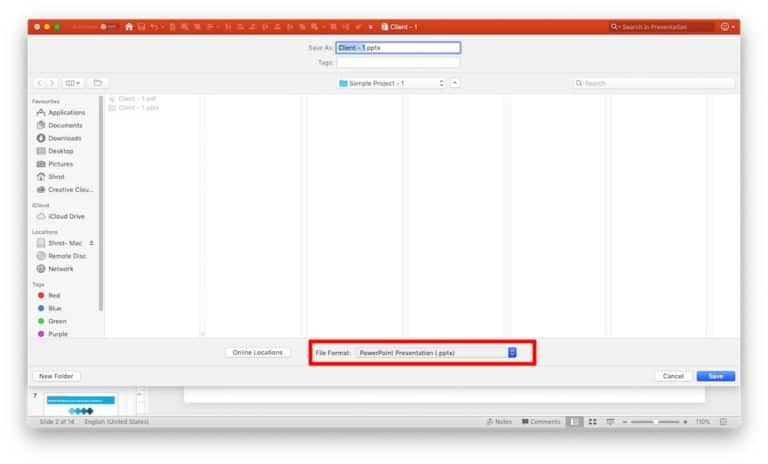
- Pick the Save as type as PowerPoint Show .
- Type a name for your slide show in the File name text box (you can use the same name and location as your .pptx/presentation file) and click Save . Your PowerPoint slide show file is saved with a .ppsx extension.
Now, the next time you or anyone else opens your presentation from outside of PowerPoint, your slide show immediately launches in Slide Show view. When you navigate past the last slide, the file automatically closes. To open the file for editing, launch PowerPoint first and open it as you would a standard presentation. If you have access to the original presentation, you may prefer to open the .pptx file to edit and save it again as a slide show file. Most importantly, make sure to manage your files, so you are working with the most current version.
PowerPoint Presentation Tips
BONUS TIP: When I save my presentations as a PowerPoint Show, I save the file to my desktop for easy access during speaking and training engagements. If needed, I can also quickly close and re-open the file without launching PowerPoint and without showing everyone all of my slides. Working with a PowerPoint Show also saves a number of steps because it automatically launches with a simple double-click of the mouse.
To move to a specific slide in a presentation while in the slide show view (as either a presentation or show format), just type the slide number and press [Enter] . To make these moves easier, print out a handout of your presentation, which includes slide numbers of each slide for quick navigation. Or, create a simple manual cheat sheet to reference when you want to jump to different slides.
BONUS TIP #2: In addition to saving PowerPoint shows to my desktop, I also add a generic slide to the beginning. For instance, a slide with your organization logo or simply a black slide. Although this may not apply to your presentations, I often navigate in and out of my slide show as I am also demonstrating software features and facilitating discussions within my training classes and conference sessions. With a generic or simple slide at the start, I can launch the slide show with a neutral, blank slide and then use the keyboard shortcut to type the slide number and press [Enter] to move to a specific slide within the presentation.
Were these PowerPoint tips helpful? Grab your handout of other quick and easy PowerPoint shortcuts and discover more PowerPoint techniques here .
© Dawn Bjork, MCT, MOSM, CSP®, The Software Pro® Microsoft Certified Trainer, Productivity Speaker, Certified Speaking Professional

Related Posts
PowerPoint Presentations: Engage Your Audience with the PEER Method June 20, 2022
Tips for Creating & Editing Shapes in a PowerPoint Presentation June 8, 2022
3 Time-Saving PowerPoint Shortcuts with the SHIFT Key March 21, 2022
How-To Geek
How to start a powerpoint slideshow.

Your changes have been saved
Email is sent
Email has already been sent
Please verify your email address.
You’ve reached your account maximum for followed topics.
Quick Links
Start a slideshow in powerpoint's desktop app, start a slideshow in powerpoint's web app, start a slideshow in powerpoint's mobile app, key takeaways.
To start a PowerPoint slideshow on your desktop, open your slideshow and click "Start Slide Show" in the "Slide Show" tab. If you're using the web app, select "From Beginning" in the "Slide Show" tab. On mobile, simply tap the Monitor icon at the top of your screen.
There's nothing quite like finishing a presentation after spending hours getting it just right. Now, show off your hard work by starting your Microsoft PowerPoint slideshow on desktop, web, and mobile using the methods below.
Related: How (and Why) to Start Microsoft PowerPoint from the Command Prompt
To play a slideshow in PowerPoint's desktop app, all you have to do is click an option or press a shortcut on your keyboard .
Start the process by opening your presentation with PowerPoint. Then, in the app's ribbon at the top, select the "Slide Show" tab.

In the "Slide Show" tab, from the "Start Slide Show" section, choose "From Beginning" (or press F5). Now your presentation will play from the very first slide.
If you'd like to start the slideshow from your current slide, choose the "From Current Slide" option. Alternatively, press Shift+F5 on your keyboard.

While your presentation is playing, you can perform various tasks, like moving to the next slide or ending the show. You can reveal these options by right-clicking anywhere on the slide.

Alternatively, you can use the following keyboard shortcuts while viewing your slideshow:
- Spacebar or Right Arrow Button: Go to the next slide in the presentation.
- Left Arrow Button: Go to the previous slide in the presentation.
- Esc: End the show.
- W: Hide your current slide and display a white screen. Press the same key again to bring back the slide's content.
- B: Hide your current slide and display a black screen. Revert back to the slide's content by pressing the same button.
- Ctrl+Left Mouse Button: Activate the laser point tool to point at things in your slides.
- Ctrl+P: Launch the pen tool to annotate your slide's content during your show. You can choose if you'd like to keep these annotations when you end the show.
- Ctrl+i: Access the highlighter tool to highlight items in your slides.
If you'd like to jump to a specific slide while presenting, press that slide's number on your keyboard and hit Enter. For example, press 12 and hit Enter to access that slide quickly.
To access the Presenter view, where you can see the upcoming slides and other options, right-click anywhere on your slide and choose "Show Presenter View."

With these options, you can start a slideshow and have it play exactly how you want.
To play a slideshow on the web, launch your preferred web browser and access PowerPoint on the web . Then, open your presentation.
From PowerPoint's ribbon at the top, select the "Slide Show" tab.

In the "Slide Show" tab, start your slideshow from the first slide by clicking the "From Beginning" option. To have your show play from your current slide, choose "From Current Slide."

Your presentation is now playing.
To reveal the options for moving slides, annotating items, and using Presenter Coach , bring your cursor to your screen's bottom-left corner. Then, click the appropriate icon.

Related: How to Practice Your Presentations with PowerPoint's Presenter Coach
To start a slideshow in the PowerPoint mobile app , launch the app on your phone and open your presentation.
On the presentation screen, at the top, tap the Monitor icon to play the slideshow.

Your presentation has now begun.
To move to the next slide, swipe left on your screen. To go to the previous slide, swipe right.

You can reveal PowerPoint's presentation options, like annotation and black screen tools, by tapping at the top of your presentation. Then, choose the option you'd like to use.

And that's it. Happy presenting!
Want to learn a few tips to help you make the best PowerPoint presentations ? If so, check out our guide.
Related: 8 Tips to Make the Best PowerPoint Presentations
- Microsoft Office
- Microsoft PowerPoint
Our Recommendations
- Best Small Business Loans for 2024
- Businessloans.com Review
- Biz2Credit Review
- SBG Funding Review
- Rapid Finance Review
- 26 Great Business Ideas for Entrepreneurs
- Startup Costs: How Much Cash Will You Need?
- How to Get a Bank Loan for Your Small Business
- Articles of Incorporation: What New Business Owners Should Know
- How to Choose the Best Legal Structure for Your Business
Small Business Resources
- Business Ideas
- Business Plans
- Startup Basics
- Startup Funding
- Franchising
- Success Stories
- Entrepreneurs
- The Best Credit Card Processors of 2024
- Clover Credit Card Processing Review
- Merchant One Review
- Stax Review
- How to Conduct a Market Analysis for Your Business
- Local Marketing Strategies for Success
- Tips for Hiring a Marketing Company
- Benefits of CRM Systems
- 10 Employee Recruitment Strategies for Success
- Sales & Marketing
- Social Media
- Best Business Phone Systems of 2024
- The Best PEOs of 2024
- RingCentral Review
- Nextiva Review
- Ooma Review
- Guide to Developing a Training Program for New Employees
- How Does 401(k) Matching Work for Employers?
- Why You Need to Create a Fantastic Workplace Culture
- 16 Cool Job Perks That Keep Employees Happy
- 7 Project Management Styles
- Women in Business
- Personal Growth
- Best Accounting Software and Invoice Generators of 2024
- Best Payroll Services for 2024
- Best POS Systems for 2024
- Best CRM Software of 2024
- Best Call Centers and Answering Services for Busineses for 2024
- Salesforce vs. HubSpot: Which CRM Is Right for Your Business?
- Rippling vs Gusto: An In-Depth Comparison
- RingCentral vs. Ooma Comparison
- Choosing a Business Phone System: A Buyer’s Guide
- Equipment Leasing: A Guide for Business Owners
- HR Solutions
- Financial Solutions
- Marketing Solutions
- Security Solutions
- Retail Solutions
- SMB Solutions
Business News Daily provides resources, advice and product reviews to drive business growth. Our mission is to equip business owners with the knowledge and confidence to make informed decisions. As part of that, we recommend products and services for their success.
We collaborate with business-to-business vendors, connecting them with potential buyers. In some cases, we earn commissions when sales are made through our referrals. These financial relationships support our content but do not dictate our recommendations. Our editorial team independently evaluates products based on thousands of hours of research. We are committed to providing trustworthy advice for businesses. Learn more about our full process and see who our partners are here .
How to Create an Auto-Playing PowerPoint Presentation
Self-running presentations work great at conferences and conventions. Here's how to set one up.

Table of Contents
Creating a self-running PowerPoint, as Microsoft calls it, can be a great addition to your company’s booth at conventions or industry-wide conferences. By featuring photos, infographics and key points in a continuous loop, PowerPoint becomes an effective communication tool to inform others about your company, its goals, and your products or services.
Auto-playing presentations are also great for employee training, meetings where the speaker is absent, and reaching remote clients or customers. Microsoft provides easy steps to turn your PowerPoint into an autoplay presentation.
Setting up the presentation
There are several options for creating a PowerPoint presentation automatically. All of these can be accessed under the Slide Show tab.
Slide Show > Set Up Slide Show
There are three options under this menu:
- Presented by a speaker : This first option requires the viewer to click through each slide. This is the default setting that most PowerPoint presentations are already in and is the mode with which you’re likely most familiar.
- Browsed by an individual : This option will create a slideshow where the viewer cannot control when slides advance. This is an autoplay feature, but the viewer will still have to hit Play to get it started.
- Browsed at a kiosk . Once selected, this option will loop the slide show until a viewer presses the escape button.
If you don’t want your viewers to have access to when the slideshow starts and stops, select the third option. The Loop Continuously option underneath will be automatically selected.
Recording slide timing
Before you begin recording your presentation, it’s important to set the slide time using the rehearsal toolbar. This will give you an idea of how long each slide will run before advancing to the next one. It will also allow you to practice your presentation and understand how long the runtime will be. Like setting up the slide show, this window can be accessed via the Slide Show tab.
Slide Show > Rehearse Timings
The recording window allows users to advance to the next slide, pause the presentation, view the current slide’s time, restart the recording for a slide and view the total runtime of the presentation.
After recording the last slide, PowerPoint will ask whether you want to keep the slide timings or not.
Recording your presentation
Once your slide timings are set, you can record your slide show.
Navigate to Slide Show > Record Slide Show to begin your recording. Click End Show and save your file once you are done recording. After saving, your presentation is ready to be sent to clients, customers or played at your convention or conference booth.
Here are some quick tips to check for before recording your presentation:
- Before beginning your recording, make sure you adjust the Play Narrations and the Use Timings checkboxes.
- If you want all narration and slide transitions included, both boxes should be checked.
- To create a silent sequence of slides, make sure the Play Narrations button is deselected.
What is PowerPoint autoplay?
Autoplay allows you to keep a PowerPoint presentation running. In typical PowerPoint presentations, presenters click from slide to slide manually using a clicker or spacebar on a keyboard.
Luckily, PowerPoint autoplay allows users to set up their slides, so they automatically change. That way, they can focus on their presentation without interruptions. There are options to have slides timed to music or voiceovers and make each slide the same length.
Why is PowerPoint autoplay beneficial?
Autoplay is great for several uses, from delivering announcements throughout a company’s office or a school, to giving speeches and presentations at conventions or work. Presenters can rehearse the timings of the slides and then present without worry. Here are some of the reasons why someone may use PowerPoint’s autoplay features:
- Rehearsal . Practicing your presentation involves timing, and autoplay can be a great tool for learning how to fill time or keeping it short. For example, many teachers and professors require presentations to fill a certain amount of time for class projects. While rehearsing timings, users can determine how much time to spend on each slide. This keeps presenters on track during their presentations, even when they want to speed up due to nerves or pressure.
- Convention booths and exhibits. Trade shows , conventions and networking events are great for companies and salespeople who want to showcase a variety of products and services. People who walk by can look at the presentation and not have to ask employees for information. In addition, a good PowerPoint presentation with eye-catching visuals and information can attract potential customers and clients, which could turn into sales.
- Music videos and tribute presentations. Whether it is a presentation of family vacation photos to the soundtrack of the summer or a lyric video to your favorite song, autoplay allows users to create appealing presentations and videos. These could even be downloaded into MP4 files to share with family and friends.
- Replay and loop at events or other occasions. This is great for offices that have a slideshow of information for their clients or patients. They can show a variety of pictures, information about services, and even the company’s latest news and contact information. Because of this, employees can set up the presentation, walk away and know that their announcements are being made public without even saying a word.

Building Better Businesses
Insights on business strategy and culture, right to your inbox. Part of the business.com network.
Critical PowerPoint Shortcuts – Claim Your FREE Training Module and Get Your Time Back!
How to Present a PowerPoint Slideshow (w/ Shortcuts)
- PowerPoint Tutorials
- Shortcuts & Hacks
- May 11, 2019
There are a variety of ways to start a PowerPoint presention, depending on:
- Where you start your presentation (from beginning or from current)
- Which PowerPoint view you prefer to present in (Slide Show view or Presenter view)
- How comfortable you are with keyboard shortcuts
Why would Microsoft include so many ways to present a presentation? My guess is that everyone learns PowerPoint differently, and has personal presentation styles. The more options you have, the easier your life will be as there will always be a way to start your presentation the way you want to (or jump back into it when you need to).
See all the options below and find the method that works best for you and let the slide show begin !
NOTE: If you are running two presentations side-by-side, each presentation needs to be started as it’s own slide show. To see how to set up two PowerPoint presentations to run side-by-side like this before you start your slide show, read my guide here .
Table of Contents
Start slide show from beginning.

To start a slideshow from the beginning of your presentation using the ribbon, simply.
- Navigate to the Slide Show tab
- Select From Beginning
Selecting From Beginning starts your presentation from the very first non-hidden slide in your presentation, regardless of which slide you are currently inside of your deck.

You can also start your slide from the beginning of your presentation by hitting the Slideshow From Beginning keyboard shortcut, F5 .
Regardless of which method you use, this is the classic way to start your presentation in full screen from your first title slide (regardless of where you are in your slide deck).
Let the slide show begin!
NOTE: To expand your knowledge and learn how to use PowerPoint’s FREE and HIDDEN built-in laser pointer to point things out during your presentation, read my guide here .
Take your PPT skills to the next level
Start slide show from current.

To begin your slide show from the slide you are currently on using the ribbon, simply
- Navigate to the Slide Show tab
- Select From Current Slide
Selecting From Current Slide starts your slide show from whatever slide you are currently on, even if the slide is hidden.

You can also start your slide from the current slide you are on by hitting the Shift+F5 keyboard shortcut.
Because it’s often easiest to catch errors when building your slides in this full screen mode, I highly recommend learning the Shift+F5 shortcut and using it frequently as you build your slides to spot them for errors.

If you don’t want to bother learning the From Current Slide shortcut, you can also start your slideshow by clicking the Slide Show icon at the bottom of your screen.
This is a fantastic way to spot check your slides as you are building them. On top of that, it’s a fast and uncomplicated way to re-start your presentation from where you left off after demoing something on screen.
Start a mini-slide show in PowerPoint
You can also use the following hidden PowerPoint shortcut to run a mini slide show over the top of your current deck.

To run a mini slide show, simply:
- Hold down the Alt key on your keyboard
- With your mouse, click the Slide Show icon
Doing so starts a small slide show of your presentation that you can see below, from the current slide you are on.

Presenter View
The Presenter View is an alternate way to run your presentation in PowerPoint. In this view, your slides are projected on screen, and the details of your presentation are displayed on your computer as pictured below.

The presenter view includes your next (non-hidden) slides that is coming up, your current slide projected on screen, how long you’ve been talking and your speaker notes.

To launch the Presenter View from the beginning of your presentation using your Ribbon, simply:
- Navigate to the Slide Show tab
- Hold down the Alt key on your keyboard
- Click From Beginning
Holding down the Alt key and clicking From Beginning , the Presenter View will launch from the very first (non-hidden) slide in your presentation.

You can also launch the presenter view from the beginning of your presentation at any time by clicking Alt + F5 on your keyboard.
Start Presenter View in PowerPoint From Current Slide

Did you know that you can access different views in PowerPoint by adding keys as you click commands in the PowerPoint ribbon?
To start the Presenter view from your current slide using your Ribbon, simply:
- Hold down the Alt key on your keyboard
- Click From Current Slide
Holding the Alt key and clicking From Current Slide launches the Presenter View from your current slide. So, this is another way you can quickly practice your presentation, see your speaker notes and see what’s coming up next.

You can also launch the Presenter View from the beginning of your presentation at any time by hitting Alt+F5 on your keyboard.
Showing and Hiding Presenter View
Regardless of which view you start your PowerPoint slide show; you can switch between the two different slide show views without exiting presentation.

To switch between the two slideshow views (while giving your presentation), simply:
- Right-click your slide in whichever presentation view you are currently in
- Select either Show Presenter View or Hide Presenter View
When would you use a feature like this during a presentation? One example is if you want to view your notes without leaving the slide show mode.
NOTE: The letter r for both Show Presenter View and Hide Presenter View is underlined. This means that it is a keyboard shortcut. So, if you want to quickly flip between these two presentation views, you can simply right-click your slide and hit the letter r on your keyboard. Doing so automatically switches the view you are in.
Controlling how your presentation runs
Another way to control how your presentation runs (including the default laser pointer and pen color), is the Set Up Slide Show dialog box.

To open the Set Up Slide Show dialog box, simply:
- Select the Set Up Slide Show command
Doing so, opens all your PowerPoint slide show settings and options as pictured below.
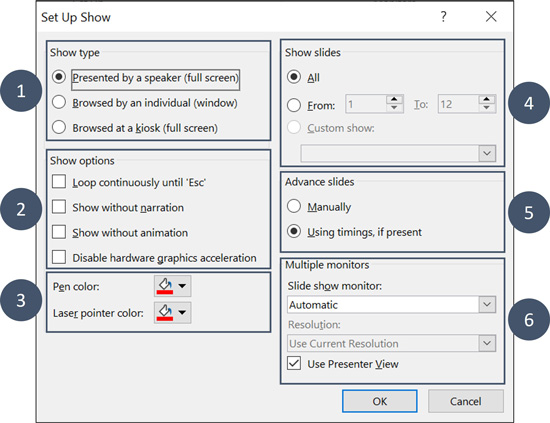
Inside the slide show settings dialog box, you can select:
- How your presentation runs (full screen, window or in kiosk mode).
- Your default pen and laser pointer color options ( see our laser pointer article here ).
- Which slide you want start from, or which slides you want to show. You can also setup a custom show here.
- How your slides progress (manually or using slide timings).
- Which of your computer monitors (or screens) your slide show runs on.
The Set Up Slide Show dialog box is also the secret to running multiple presentations at the same time in PowerPoint. To expand your knowledge and learn how to set this up, read our guide here .
Setup Slide Show SECRET Shortcut

To use the SECRET shortcut to open the Set Up Slide Show dialog box, simply:
- Hold down the Shift key on your keyboard
- With your mouse, click the Reading View icon at the bottom of your screen
This is useful when you need to quickly cycle through lots of PowerPoint presentations and change how those presentations run. Instead of wasting time clicking through the Ribbon, simply hold the Shift key and click the Reading View icon. This is also a friendly conversation starter with a fellow PowerPoint enthusiast at Happy Hour.
NOTE: The color of your Reading View icon might be different than in the picture above, as it is dependent on the Office Theme you selected for PowerPoint.
How to exit a PowerPoint presentation early?

Regardless of how you start your full screen presentation, you can end your presentation at any time by hitting the Esc key on your keyboard.
Hitting Esc immediately takes you out of the PowerPoint presentation mode and back to the normal editing view of your slides, on whatever slide you were last presenting.
Here is how you can use a combination of all the different keyboard shortcuts to spot check and practice your presentation in full screen before you finalize your presentation.
- Hit F5 on your keyboard to start your presentation in full screen from the very first slide in your presentation. You can then use your arrow keys to advance, spot checking your slides for errors.
- When you find an error, simply hit Esc key to return to the normal PowerPoint editing view to fix your slide.
- When you are done, hit Shift + F5 to return the full screen presentation mode from the slide you just updated. You can then continue spot checking your presentation (without having to start over from the beginning).
In this way you can quickly work your way through your slides and practice your presentation, fixing and adjusting your content as you go.
Understanding how to run your presentations is CRITICAL to the success of your presentation. Not only in presenting them live, but also in knowing how to spot check your slides as you build them.
I personally find it easiest to spot check your slides and quickly fix errors by running your presentation in slide show mode (or full screen). The last place you want to discover an error is during your presentation.
Using the commands and shortcuts above, you can quickly start, exit and step back into your slide show. Once you have these commands and features down, you will also look like a whiz during your presentations.
If you enjoyed the depth of this article, you will love our other PowerPoint training courses and free resources. To learn more, visit us here .
🔒 Unlock the PowerPoint Shortcuts Trusted by Industry Leaders KKR, American Express, HSBC, and More!
Join over 114,880 professionals from diverse fields including consulting, investment banking, advertising, marketing, sales, and business development who have supercharged their PowerPoint game with our proven methods.
✅ Customize compelling presentations effortlessly.
✅ Master time-saving techniques for faster deck creation.
✅ Boost your career prospects with top-notch PowerPoint skills.
Get FREE access to the Critical PowerPoint Shortcuts module of our premium training course by entering your name and email below.
DISCLAIMER: PC Users Only!
We respect your privacy and will keep your info safe and confidential.
Related Articles
About the author.

Popular Tutorials
- How to Strikethrough Text (l̶i̶k̶e̶ ̶t̶h̶i̶s̶) in Word, Excel & PowerPoint
- How to Make Animated Fireworks in PowerPoint (Step-by-Step)
- Strikethrough Shortcut (l̶i̶k̶e̶ ̶t̶h̶i̶s̶) for Word, Excel & PowerPoint
- How to Create a Flash Card Memory Game in PowerPoint (Like Jeopardy)
- Keyboard Shortcuts Not Working: Solved
PowerPoint Tutorial Categories
- Strategies & Opinions
- Presentation Design
- Pictures, Icons, Videos, Etc.
- New Features
- Miscellaneous
- Charts & Data Viz
We help busy professionals save hours and gain peace of mind, with corporate workshops, self-paced courses and tutorials for PowerPoint and Word.
Work With Us
- Corporate Training
- Presentation & Template Design
- Courses & Downloads
- PowerPoint Articles
- Word Articles
- Productivity Resources
Find a Tutorial
- Free Training
- For Businesses
We help busy office workers save hours and gain peace of mind, with tips, training and tutorials for Microsoft PowerPoint and Word.
Master Critical PowerPoint Shortcuts – Secure Your FREE Training Module and Save Valuable Time!
⌛ Master time-saving expert techniques.
🔥 Create powerful presentations.
🚀 Propel your career to new heights.
We value your privacy – we keep your info safe.
Discover PowerPoint Hacks Loved by Industry Giants - KKR, AmEx, HSBC!
Over 114,880 professionals in finance, marketing and sales have revolutionized their PPT skills with our proven methods.
Gain FREE access to a full module of our premium PowerPoint training program – Get started today!
We hate spam too and promise to keep your information safe.
You are currently viewing a placeholder content from Facebook . To access the actual content, click the button below. Please note that doing so will share data with third-party providers.
- 541-383-2340 907-375-8324
- [email protected]
- CLIENT LOGIN
SUBSCRIBE TO OUR NEWSLETTER
AutoStart a Presentation in PowerPoint
Sometimes you just need to get down to business in PowerPoint, especially if you’re presenting to a client. You don’t want to have to open up the presentation, click on the slide show, and do all those steps. If you want a presentation to start immediately upon opening it, here’s how you do it.
- First off, you need to create your presentation. You’re on your own here.
- Once you have your presentation how you like it, Select File > Save as (or Save a Copy).

The file is saved as a .ppsx file. When the file is double-clicked, it opens directly to the slide show in full screen view.
Getting Extra Fancy: Say you want to have your presentation run on system startup, as soon as a user is logged in (for simple digital signage machines or similar). That way it will always run after somebody logs in. The easiest way to do that is to add it to the start up folder. To get access to your computer’s start up folder, use your handy dandy run dialog and run either of the following commands:
- If you want to open up the startup folder for all users (so the slide show will start up for anybody who logs in): C:\ProgramData\Microsoft\Windows\Start Menu\Programs\StartUp
- If you want to open up the startup folder for just the current user: shell:startup
No matter which of the commands you run, you’ll end up with a folder that will pop-up. Put a copy of your new PPSX file into that folder, and after you reboot, it will auto start that slide show upon login.
- Mar 31, 2021
- no comments
Leave a Reply Cancel Reply
Your email address will not be published.
- Quick Answers
- Remote Teaching
How do I set a Powerpoint presentation to start automatically when opened?
Once you have completed a presentation in Powerpoint, you can save it as a PowerPoint Show.
This means your audience will see the slide show run when they open the file, rather than seeing the slides in edit mode.

- With your presentation open, click File , Save as .
- Name your presentation, and then click the Save as type dropdown menu underneath.
- Select Powerpoint Show (*ppsx)
You can then share your presentation with others. When the file is double-clicked, it opens as a slide show.
Share this article:
Was this article helpful.
Can I start a PPT or PPSX automatically as a slideshow presentation?
By: Author Shrot Katewa
Ever wonder if you can create a file that directly runs in slide show mode? Today, we are going to learn a few things about how this can be done. Plus, we look at this one simple hack that will save you a ton of trouble if you wish to create non-editable files.
So, in case you are still wondering, can you start a presentation automatically as a slide show? Yes, you can definitely set your PPT file to directly open as a presentation in a slide show mode automatically. This can be done by saving your presentation as a PPSX file.
I know what you must be thinking, “What the heck is this PPSX file? I’ve never heard of it!”. Don’t worry, you are not alone. This is because we usually use a more common file format to save a presentation such as a PPT, PPTX or a PDF format.
What is a PPSX file format?
A PPSX file (also known as PPS file) stands for PowerPoint Show file. It is a type of PowerPoint file that is created to directly run as a presentation or a slide show automatically . A PPSX file format, by design, doesn’t allow for editing as it opens up directly as a slide show.
So, what is the difference between a PPS and a PPSX file format? Both PPS and PPSX file format are meant for a PowerPoint Show file. While PPSX is a more modern format, in case you are using Office 2007 or older, you won’t be able to open a PPSX file. In such a situation, the best way to save a PowerPoint Show file would be to use a PPS format. A point to note here is that a PPS file can be opened using not only the older versions of Microsoft Office, but also in the newer Office versions.
A PowerPoint Show file format is great when you don’t want the end user to make changes to the design or the content when you share the presentation with him or her.
How to Save a presentation in PPSX format?
Any PowerPoint presentation can be saved as a PPSX file. The good part is that this process is very straightforward. So, let’s just dive right in to know how we can save any PPT as a PPSX file.
There seems to be only two possible methods to achieve this desired result. Let’s have a look at it.
Step 1 – Open the PPT

Open the PowerPoint presentation that you want to save in the PPSX file format.
Step 2 – Go to the File option

Click on the “File” option for your PowerPoint. On the dropdown, select “Save as..”
Step 3 – Click on the “File Format” option
Upon clicking the “File Format”, you will notice a dropdown quite a few options to save your presentation.
Step 4 – Choose the PPSX or PPS file format

On the dropdown, scroll all the way until you see an option for “PowerPoint Show” with either PPSX or PPS file format. Select one of the two file formats that you wish to save the file in.
Step 5 – Save the file

You can choose to rename the file. Once that is done, simply click on “Save” as illustrated in the picture above.
Step 6 – Verify
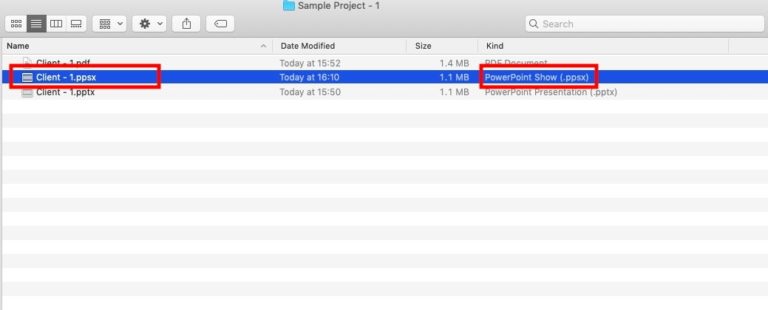
Go back to the folder in which you have saved the file and verify that the file has indeed been saved in a PowerPoint Show file.
Advantages of a PowerPoint Show (PPSX) file format?
While both PPT & PPSX file are a PowerPoint file, there are a few advantages that a PPSX file format has over a PPT file format –
- Retain Animations & Transitions – a PowerPoint Show file functions just like a typical PowerPoint file would when running it in a slideshow mode. This means all your animations and transitions that you have built in your presentation are retained!
- Share a non-editable file – There are times when we simply want to share a presentation with its full bells & whistles. At the same time, we don’t want the intended receiver of a PPT file to be able to access/edit the content of the file. Converting a PPT file in a PowerPoint Show file and then sending it can solve this problem to a great extent.
- Impress your clients – Most clients today receive a partnership proposal or a business presentation in a pdf format. This is done so to lock the design format and , at times, to restrict the client from editing the content. But, a pdf format removes all animations and transitions. Thus, sending a PowerPoint Show file can make you stand out from the crowd. We have seen many of our clients completely impressed and perplexed when they receive a file that not just contains slide transitions but also restricts them from editing the file!
Can I open a PPSX file without Microsoft PowerPoint?
A PPSX file is still a PowerPoint file. Thus, in order to open a PPSX file, you definitely need to have a presentation software installed on the computer of the recipient. However, it is not necessary to have PowerPoint installed. Nevertheless, in order to best retain all the effects and to open it directly in a slide show mode, Microsoft PowerPoint is the most suited presentation software to open a PPSX file .
There are quite a few options available in case you wish to open the PPSX file using another software. Open Source Softwares such as OpenOffice and LibreOffice are great alternative options. If you are using a MacBook, Apple’s default presentation software i.e. Keynote can be used to open a PowerPoint Show file. All these options are completely free and can easily be downloaded for the official website of these softwares.
To open a PowerPoint Show file using any one of these above softwares, simply select the file, right click on it, click on “Open with” from the menu that pops up and choose the software (choose LibreOffice or Keynote based on what you have installed).
A few things to keep in mind when opening a PowerPoint Show file using another software –
- You may lose animations and transitions – this is not because of the PPSX file format but because of the compatibility issues with some of the PowerPoint features with other OpenSource softwares.
- Files may become editable – Opening a PowerPoint Show file using a software apart from Microsoft PowerPoint can mean that the recipient will be able to access the slides and its content. Thus, the PPSX file may no longer be non-editable.
What if I want to open a PowerPoint Show (PPSX) file in edit mode?
Okay, so a PPSX file by default comes as a non-editable file as it directly opens up in a slideshow mode. At the end of the presentation, when you press “Esc” or the escape button, the presentation closes. Thus, you may think that you cannot access the slides and it’s content for editing purposes.
However, there is a way to open a PowerPoint Show file in edit mode. To be able to do that, simply follow the steps mentioned below –
- Step 0 – DO NOT double click on the PPSX file directly. This will open the file.
- Step 1 – Open Microsoft PowerPoint on your computer.
- Step 2 – Click on “File”, and then select “Open”.
- Step 3 – PowerPoint will ask you to choose the destination of the PPSX file. Simply navigate to the folder in which the file has been saved.
- Step 4 – Select the file and click “Open” at the bottom of the window.
The above steps will open a PPS file in edit mode. You can now make the required changes and edit the file. You can also now save the file as a PPT. To do that, simply navigate to the “File” tab, click on “Save as”, select the “PPT” file format and click “Save” (similar to the process described above, however, choose PPT file instead of PPS file).
COOL HACK to truly create a non-editable PowerPoint file
So here’s a cool little ninja trick that you can follow if you truly want your presentation to be in a non-editable file format. There are multiple ways you can do this, but THE MOST SIMPLE and quickest way would be to convert your PPSX or PPT file into a MP4 video format.
Now, you might be wondering “can I really convert a PPSX file to an MP4 video format?”. The short answer is – Yes, you can definitely convert a PPSX file to an MP4 video format in a few quick steps. To do that, we will first need to open the PowerPoint Show file in the edit mode and then save it as an MP4 file format.
First, simply open the PowerPoint Show file in edit mode using the steps defined in the point above. Next, once we have managed to open the PowerPoint Show file in edit mode, all we have to do is save it as a video file format.
To do that, navigate to the “File” tab, click on “Save as”, select the “MP4” file format from the dropdown and click “Save”. Now, PowerPoint will automatically convert the presentation into a video format.
For Mac users, the process is slightly different. Follow the steps mentioned below –

First, open the PowerPoint Show file in the edit mode as described earlier in the post. Next, navigate to the “File” tab, click on “Export”. In the window that opens up, click on the dropdown next to “File Format”, and choose the “MP4” option. Next, simply click “Export”
To sum it up, PPSX files have a great WOW factor and can be very helpful if we want to start a presentation directly in a slide show mode. However, contrary to what most people may believe, PowerPoint Show files can be opened in an edit mode to access and change the content of the presentation. Thus, a cool little hack to create a completely non-editable presentation would to convert your PPT to a MP4 video.
I hope the tips mentioned in the article were helpful to you, and that it saves you time in the future as well to create effective presentations going forward.
Our goal on this blog is to create content that helps YOU create fantastic presentations; especially if you have never been a designer. We’ve started our blog with non-designers in mind, and we have got some amazing content on our site to help you design better.
If you have any topics in mind that you would want us to write about, be sure to drop us a comment below. In case you need us to work with you and improve the design of your presentation, write to us on [email protected] . Our team will be happy to help you with your requirements.
Lastly, your contribution can make this world a better place for presentations! All you have to do is simply share this blog in your network and help other fellow non-designers with their designs!
How to Start a PowerPoint Slideshow
Last updated on March 1st, 2024

PowerPoint is a powerful tool for creating presentations that can be used in a variety of settings, from business meetings to educational lectures. One of the most important aspects of creating a PowerPoint presentation is knowing how to start a slideshow. Starting a slideshow is essential for presenting your content to an audience, whether it’s in person or an online presentation. In this article, we will provide you with step-by-step instructions on how to start a PowerPoint slideshow .
What are possible ways to start a slideshow in PowerPoint?
1. start a slideshow from a pps file.
If you got a PowerPoint presentation by email or from any social network as a PPS File then when you click it in your computer file explorer then normally it will start the slideshow automatically. Even if you have the presentation file as .ppt you can rename it to .pps in order to use this method.
2. Press F5 in PowerPoint to start the slideshow presentation from the beginning
The shortcut F5 inside PowerPoint editor will start your presentation.

3. Click on the small slideshow icon
Instead of F5, you can start your presentation in the current slide in your editor by clicking on the small slide show icon.

4. Configure a shortcut to run PowerPoint slide show
You can use your terminal or configure a shortcut in your system to run the PowerPoint slideshow by passing the argument /s to Powerpnt.exe and then the file name.
While the above methods are not the only ways to start a PowerPoint presentation, they are certainly useful to know. If you’re new to PowerPoint or simply need a refresher on how to start a slideshow, these steps can be a helpful guide, alternatively, you can follow the step by step instructions below.
How to Start & Play a PowerPoint Slideshow Presentation? Step by Step
Step 1: open your powerpoint presentation.
The first step in starting a PowerPoint slideshow is to open your presentation. To do this, open Microsoft PowerPoint and navigate to the file menu. From there, select the “Open” option and browse to the location of your presentation file. Once you have located your presentation, select it and click the “Open” button.
If you received a .pps file (which is pre-configured as a slideshow and will start automatically), you can just double click on the .pps file and PowerPoint will auto play it.
Step 2: Select the Slide Show Tab
Once you have opened your presentation, you will need to select the “Slide Show” tab. This tab is located in the ribbon at the top of the screen and is indicated by a small icon of a projector screen.
PRO Tip: Use the keys F5 or Shift+F5 in PowerPoint to start the slideshow. F5 in PowerPoint will start the slideshow from the first slide, while Shift+F5 in PowerPoint will start the slideshow from the current slide that you have selected in PowerPoint.
Step 3: Choose Your Slideshow Options
Before starting your slideshow, you may want to adjust some of the settings to ensure that your presentation runs smoothly. To do this, select the “Set Up Slide Show” option from the Slide Show tab. Here, you can choose whether to run your slideshow in full screen mode, choose the display mode, and even set up timings for each slide.
Step 4: Start Your Slideshow
Once you have selected your slideshow options, you are ready to start your presentation. To do this, simply click the “From Beginning” button in the “Start Slide Show” group on the Slide Show tab. This will start your slideshow from the beginning of your presentation.
Alternatively, if you want to start your presentation from a specific slide, you can select the “From Current Slide” option in the “Start Slide Show” group. This will start your slideshow from the currently selected slide.
Step 5: Navigate Your Slideshow
During your slideshow, you can navigate between slides by using the arrow keys on your keyboard or by using the navigation buttons on the bottom left of the screen. You can also use the spacebar to advance to the next slide and the backspace key to go back to the previous slide.
To start a PowerPoint slideshow presentation from the beginning, press F5 in PowerPoint. Alternatively, go to Slide Show tab in the Ribbon and press From Beginning button.
If you want to start a presentation slideshow from the current slide in PowerPoint, press Shift+F5. Alternatively, go to Slide Show tab in the Ribbon and press From Current Slide button
F5 key is one of the most productive shortcuts in PowerPoint, as it allows you to start a presentation from the beginning. It is very useful if you are switching from the Edit view to Slideshow view or want to start running a slideshow when starting a presentation or opening your speech .
Starting a PowerPoint slideshow is a simple but essential task for presenting your content to an audience. By following these steps, you can ensure that your presentation runs smoothly and that your audience is engaged throughout. Remember to adjust your slideshow options as needed and to navigate your slideshow with ease to make the most of your PowerPoint presentation. With these tips in mind, you can confidently start your next PowerPoint slideshow and deliver an engaging and effective presentation.
We will send you our curated collections to your email weekly. No spam, promise!
Stack Exchange Network
Stack Exchange network consists of 183 Q&A communities including Stack Overflow , the largest, most trusted online community for developers to learn, share their knowledge, and build their careers.
Q&A for work
Connect and share knowledge within a single location that is structured and easy to search.
Automatically open Powerpoint in presenter mode, on correct screens
We have a laptop that we only use to present an induction course which is just a powerpoint presentation.
We have a second screen hooked up and when the presentation opens up someone has to navigate to and hit the start presentation button, at that point and it opens in presenter view with the notes on the laptop and the presentation on the second screen.
What I'd like to be able to do is avoid that on element of interaction.
Is it possible to launch a power point directly into presentation mode with no additional user interaction?
- microsoft-powerpoint
3 Answers 3
Save the file in PowerPoint Show (*.ppsx) format . It will open automatically in presentation mode.
From Microsoft's site :
PowerPoint Show .ppsx A presentation that always opens in Slide Show view rather than in Normal view. Tip: To open this file format in Normal view so that you can edit the presentation, open PowerPoint. On the File menu, click Open, and then choose the file.
Note: If you need macros enabled save as a .ppsm. If you're in PowerPoint 2003 the older format you need is .pps.
- it opens the presentation on screen 2 correctly but you don't get the presenters view on screen 1. Can't see an option for configuring it... – Patrick Commented Jul 7, 2017 at 14:59
- 1 Hmmm. Seems you're right, there's no way to force visibility of the Presenter View in .ppsx files. That's annoying, and weird. So, my next method would be to save as a .pptm (macro-enabled .pptx) and use VBA to launch the slideshow, which would bring up Presenter View. But irritatingly, PowerPoint doesn't allow you to execute macros on open - so we need another workaround. You could download an auto_open PowerPoint add-in to give this functionality, or you could use something like a macro-enabled Excel file to call the .pptx on open. Bit painful but it can be done. – Andi Mohr Commented Jul 7, 2017 at 15:51
- Frustrating, so close and yet so far. I think I'll just leave an instruction on screen 'open powerpoint, click these two buttons' and be done with it. There is only so much you can automate away :) Thanks for you help. – Patrick Commented Jul 10, 2017 at 8:38
I achieved this by the following
I Added a macro to the Powerpoint presentation
Then start the powerpoint presentation from the command line with
I used a 2003 presentation in 2016 - so the extension for presentations containing macros is ppt not pptm.
The remaining issue I have is that when I close the presentation it prompts to save - it does not do this if I load and run it using the GUI.
I think I'm a bit late, but this might be helpful to others.
The best way I could find to start in presenter mode is by pressing Alt F5 . It will start from the first slide, though. If you want to start from the current slide, you might need to use the sequence Alt S C . But it doesn't work if you press each individually, they have to be pressed at the same time. Also, this second metho does a weird error sound and I couldn't figure out why.
Anyway, if you are ok about starting on the first slide, Alt S will do just fine.
Source: https://support.office.com/en-ie/article/use-keyboard-shortcuts-to-deliver-powerpoint-presentations-1524ffce-bd2a-45f4-9a7f-f18b992b93a0
- (1) The question says “with no additional user interaction”. It sounds like you’re just offering a different form of user interaction. (2) Or rather, three different forms. What’s the relationship between Alt+F5 and Alt+S? – Scott - Слава Україні Commented Jun 27, 2019 at 23:38
You must log in to answer this question.
Not the answer you're looking for browse other questions tagged microsoft-powerpoint ..
- Featured on Meta
- We've made changes to our Terms of Service & Privacy Policy - July 2024
- Introducing an accessibility dashboard and some upcoming changes to display...
Hot Network Questions
- Conservation of energy in a mechanical system with a discontinuous potential function
- Generating a mesh with fine elements around certain areas
- How do I resolve license terms conflict when forking?
- She's a black belt in judo
- Simulation Lorenz83 Attractor
- Server Error: self-signed certificate During local setup of Sitecore Headless SXA with Next.js
- Is Marisa Tomei in the film the Toxic Avenger?
- How to use Mathematica to plot following helix solid geometry?
- Can the Bible be the word of God, when there are multiple versions of it?
- Automatically closing a water valve after a few minutes
- Solving the "Reverse" Assignment Problem with an Added Constraint?
- Which Boolean Math mode should I use?
- Cycloheptatrienyl anion is antiaromatic or non-aromatic?
- How important is a "no reflection" strategy for 1 Hz systems?
- Why do I see different declension tables for the same noun in different sources?
- How can flipflops sense the edges of the signals?
- Delexing a finitely complete category
- A funny Fantasy short story about a telekinetic who loses his power when he thinks about it
- SSH connectivity issues between local server and remote server
- Tips/strategies to managing my debt
- Why don't programming languages or IDEs support attaching descriptive metadata to variables?
- 16 of them stay the same, some of the rest are "questionable"
- When can a citizen's arrest of an Interpol fugitive be legal in Washington D.C.?
- Is there an English equivalent to the Hindi proverb, "A washerman's dog belongs neither at home nor at the riverbank"?

Play a video automatically in a slide show
When you’re delivering your presentation, you may want a video to play automatically as soon as the slide appears onscreen.
Play a video automatically when a slide appears in Slide Show
In Normal view, click the video in your slide.
Click on the Playback tab.
Next to Start , click the down arrow, and select Automatically .
When you are delivering your presentation in Slide Show View or Presenter View, the video will play automatically when you arrive at the slide.
If your slide doesn’t have a video in it yet, you can add one. Go to Add and play a video in a presentation for more information.
Important: Certain older video file formats may not compress or export properly in Office on a Windows RT PC. Instead, use modern media formats such as H.264 and Advanced Audio Coding (AAC), which PowerPoint 2013 RT supports. Want to know what version of Office you’re using?
Another option: Play in Click Sequence
Beginning with PowerPoint 2016, one more video playback option is available: Play in Click Sequence . With that option set, when you click anywhere on the slide to advance to the next step (or when you press the Spacebar, Right arrow key, or other key that advances to the next step), the video plays.
See Play a video automatically or when clicked for more details about Play in Click Sequence .

Need more help?
Want more options.
Explore subscription benefits, browse training courses, learn how to secure your device, and more.

Microsoft 365 subscription benefits

Microsoft 365 training

Microsoft security

Accessibility center
Communities help you ask and answer questions, give feedback, and hear from experts with rich knowledge.

Ask the Microsoft Community

Microsoft Tech Community

Windows Insiders
Microsoft 365 Insiders
Was this information helpful?
Thank you for your feedback.
How to Automatically Start a PowerPoint Presentation
I would like to cover how to automatically start a PowerPoint presentation on Mac OS X. Unlike Keynote, starting a PowerPoint presentation requires a little bit of AppleScript. If you are not familiar with AppleScript, do not worry. We will walk through each step needed.
We recently discussed how to both automatically start a Keynote presentation , and how to automatically stop a Keynote presentation , all to a schedule.
This time, I would like to cover how to automatically start a Microsoft PowerPoint presentation on Mac OS X using Power Manager . Unlike Keynote, starting a PowerPoint presentation requires a little bit of AppleScript. If you are not familiar with AppleScript, do not worry. We will walk through each step needed.
Preparing Your PowerPoint Presentation
Open your presentation in Microsoft PowerPoint .
Select the menu item Slide Show > Set Up Show…
Select the Browsed at a kiosk (full screen) option.
Save a copy of your presentation on the Desktop.
For this example, I am calling my presentation My Great Presentation.pptx . You will need to use the name of the file in your AppleScript.
Your presentation is now ready to be started by a Power Manager event.
Scheduling Your PowerPoint Presentation to Automatically Launch
Launch System Preferences and select Power Manager .
Click Add… to create a new event.
Choose the template Run a script daily .
Continue and where Power Manager asks Script to run , copy and paste the following AppleScript in the text field:
Continue to the next When step.
Select the time and days to begin your presentation.
Continue through the remaining steps until your event is created.
Your PowerPoint presentation is now ready and scheduled to automatically begin playing. Power Manager will wake up your Mac if it is asleep when the presentation is due to start.
If you need to power on and power off your Mac , Power Manager can help with these tasks as well.
Your current User-Agent string appears to be from an automated process, if this is incorrect, please click this link:
IMAGES
COMMENTS
Make a slide show that starts automatically when opened. Select File > Save as (or Save a Copy ). Click More options. Browse to the folder where you want to save your presentation. In the File name box, type a name for your presentation. Under Save as type, select PowerPoint Show. The file is saved as a .ppsx file.
From Microsoft's list of command line switches, you can use the /S switch to start a presentation: C:\path\to\POWERPNT.exe" /S "Presentation.pptx". To get the slideshow to start on boot-up create a shortcut to the path given above and put it in the Startup folder in the Start menu. Share. Improve this answer.
Click OK. To set up a presentation to run automatically, but those watching the slide show do NOT have control over when slides advance: Click the Slide Show tab in the Ribbon and then click Set Up Slide Show. A dialog box appears. Under Show type, select Browsed by an individual (window). Click OK.
Start in Settings (1) and select the tools you will be using. You have the option to use a microphone, or you can record yourself talking on camera. Choose your microphone and/or camera for recording. Next (2), decide whether you want to have the microphone or camera you selected turned on.
How to loop a PowerPoint presentation. 1. Open the Microsoft PowerPoint presentation that you want to loop. 2. With your PowerPoint presentation open, click on the "Slide Show" tab, then click on ...
Choose the File tab. Select Save As. Pick the Save as type as PowerPoint Show. Type a name for your slide show in the File name text box (you can use the same name and location as your .pptx/presentation file) and click Save. Your PowerPoint slide show file is saved with a .ppsx extension. Now, the next time you or anyone else opens your ...
With Microsoft PowerPoint, you can use a self-running presentation to run unattended in a booth or kiosk at a trade show or convention, or you can save it as...
Start a Slideshow in PowerPoint's Web App. To play a slideshow on the web, launch your preferred web browser and access PowerPoint on the web. Then, open your presentation. From PowerPoint's ribbon at the top, select the "Slide Show" tab. In the "Slide Show" tab, start your slideshow from the first slide by clicking the "From Beginning" option.
Autoplay allows you to keep a PowerPoint presentation running. In typical PowerPoint presentations, presenters click from slide to slide manually using a clicker or spacebar on a keyboard.
Click From Beginning. Holding down the Alt key and clicking From Beginning, the Presenter View will launch from the very first (non-hidden) slide in your presentation. You can also launch the presenter view from the beginning of your presentation at any time by clicking Alt + F5 on your keyboard.
If so, we'd suggest you save presentation file as .ppsx type file, if you are using PowerPoint in Windows, we'd suggest you go to PowerPoint File > Save as > Click More Options > select PowerPoint Show under Save as type, the file is saved as a .ppsx file. When the file is double-clicked, it opens as a slide show.
If you want a presentation to start immediately upon opening it, here's how you do it. First off, you need to create your presentation. You're on your own here. Once you have your presentation how you like it, Select File > Save as (or Save a Copy). Select the "PowerPoint Show" option and save your file.
Once you have completed a presentation in Powerpoint, you can save it as a PowerPoint Show. This means your audience will see the slide show run when they open the file, rather than seeing the slides in edit mode. With your presentation open, click File, Save as. Name your presentation, and then click the Save as type dropdown menu underneath.
I want a powerpoint presentation to start and run when I boot a computer. I have created a *.cmd file with the only string "C:\path-to-POWERPNT.exe" /S "c:\path-to-presentation.pptx" and placed it in ... I saved the presentation as a PowerPoint Slideshow with Macros enabled (*.ppsm) and put a shortcut to the ppsm-file in the startup folder. It ...
Step 1 - Open Microsoft PowerPoint on your computer. Step 2 - Click on "File", and then select "Open". Step 3 - PowerPoint will ask you to choose the destination of the PPSX file. Simply navigate to the folder in which the file has been saved. Step 4 - Select the file and click "Open" at the bottom of the window.
2. Press F5 in PowerPoint to start the slideshow presentation from the beginning. The shortcut F5 inside PowerPoint editor will start your presentation. 3. Click on the small slideshow icon. Instead of F5, you can start your presentation in the current slide in your editor by clicking on the small slide show icon. 4.
Make a slide show that starts automatically when opened. Select File > Save as (or Save a Copy ). Click More options. Browse to the folder where you want to save your presentation. In the File name box, type a name for your presentation. Under Save as type, select PowerPoint Show. The file is saved as a .ppsx file.
Click Open. Your wizard now lists POWERPNT as the task name. Since you want to play a particular presentation, change the name to something more meaningful and choose the One Time Only option, unless you want to run the presentation every day, week, or month. Click Next. On the next screen, enter the start time and date.
It will open automatically in presentation mode. From Microsoft's site: PowerPoint Show .ppsx. A presentation that always opens in Slide Show view rather than in Normal view. Tip: To open this file format in Normal view so that you can edit the presentation, open PowerPoint. On the File menu, click Open, and then choose the file.
Play a video automatically when a slide appears in Slide Show. In Normal view, click the video in your slide. Click on the Playback tab. Next to Start, click the down arrow, and select Automatically. When you are delivering your presentation in Slide Show View or Presenter View, the video will play automatically when you arrive at the slide.
I noticed that that the Startup was empty. I dragged the shortcut to slide show and placed it in startup. Next time, during the startup, the slide show played successfully. Then I cheked the folder in which you need to put the short cut: C:\Users\ [username]\AppData\Roaming\Microsoft\Windows\Start Menu\Programs\Startup.
I've created a desktop shortcut in windows to start the powerpoint slideshow. When I double click the shortcut for the slideshow, I have to click play slideshow to start it. ... The following link has the information how to automatically start your presentation when the file is opened. Make a slide show that starts automatically when opened ...
Scheduling Your PowerPoint Presentation to Automatically Launch. Launch System Preferences and select Power Manager. Click Add… to create a new event. Choose the template Run a script daily. Continue and where Power Manager asks Script to run, copy and paste the following AppleScript in the text field:
Six steps for creating a slide show. 1. Plan your slide show. Before getting too deep into your slide show project, it's a good idea to select and save the photos and videos you want to use. This helps you create a slide show more efficiently and purposefully, ensuring a better outcome. 4.