
Outline View in PowerPoint – Everything You Need to Know!
By: Author Shrot Katewa

Not a lot of people are aware that you can actually make a presentation by outlining your key points in a simple bulleted list format! This is where the Outline View in PowerPoint comes in handy!
In today’s article, we will take a look at the “Outline View” in PowerPoint, how to access it, and how to work with your presentation in the outline view!
So, let’s get started!
1. What is Outline View and Why is it Used?
The “Outline View” in Microsoft PowerPoint is a way of accessing the slides in a more simplistic manner. It removes the clutter of images and other infographics from your slides and helps you focus specifically on the text present on the slides.
In the outline view, you can see a list of the titles, subtitles as well as text on each slide. Using the outline view you can easily organize key information on your slides. You can also export or import the outline to and from other documents.
Furthermore, the outline view is also editable, which makes it easier to add or remove any text from the PowerPoint presentation.
2. How to Access the Outline View in PowerPoint?
In Microsoft PowerPoint, you can very easily access the outline view and navigate it.
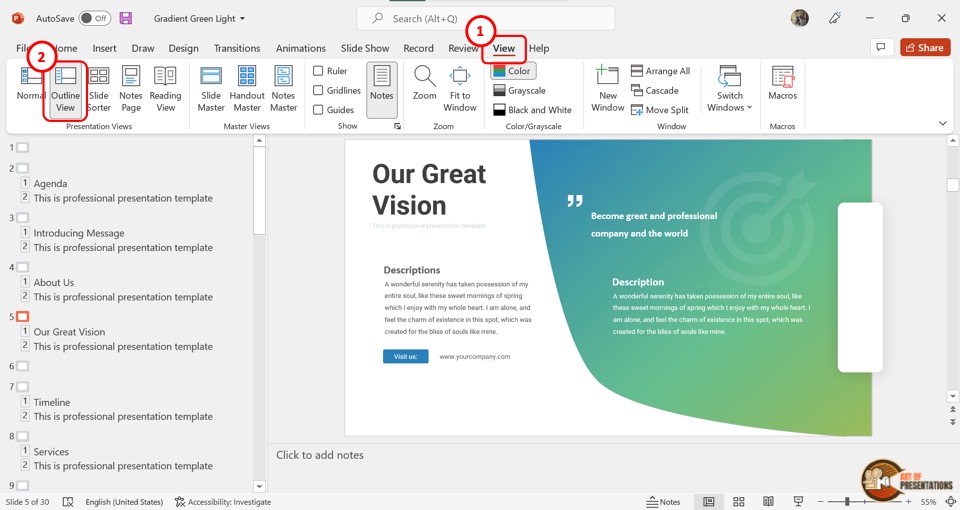
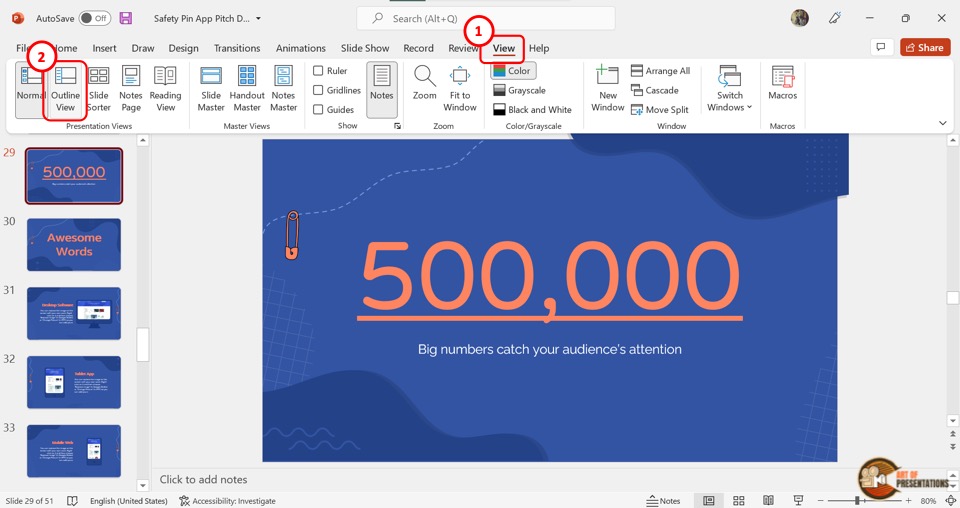
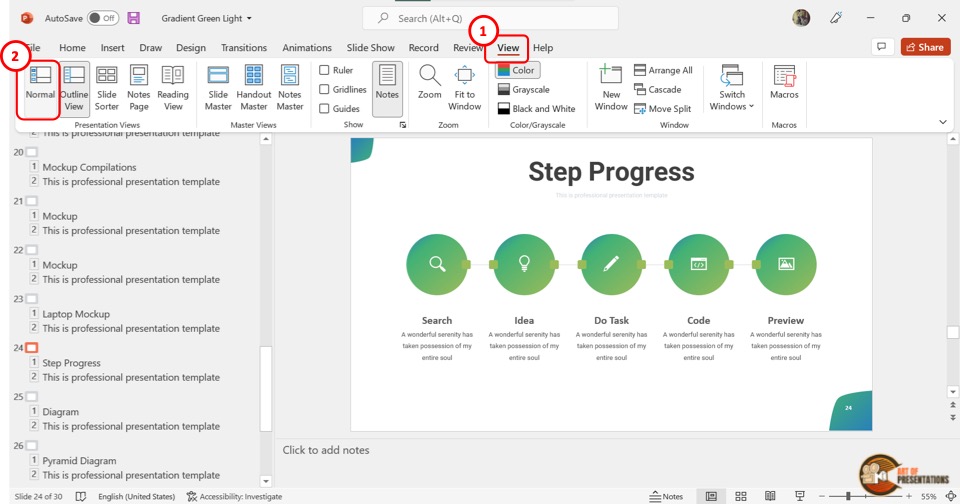
To access the outline view in PowerPoint, first, click on the “View” tab in the menu bar located at the top of the screen. In the “View” menu, click on “Outline View” which is the second option in the “Presentation Views” section.
This will show the presentation outline in a sidebar on the left side of the screen.
3. How to Expand Slides in Outline View?
In the “Outline View” , you can expand any or all slides to view all the content within the slide. There are 3 different methods you can use to expand the slides in the outline view.
3a. Method 1 – Using Right-Click
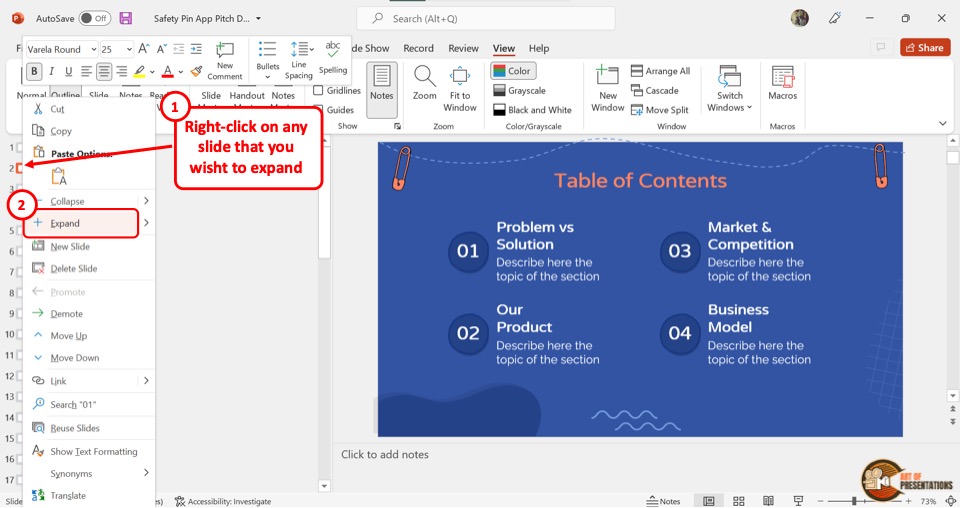
You have to first open the “Outline View” from the “View” menu. In the outline sidebar located at the left side of the screen, “Right Click” on the box beside the slide number which you want to expand.
Then click on the “Expand” option from the right-click menu.
3b. Method 2 – Using Double-Click
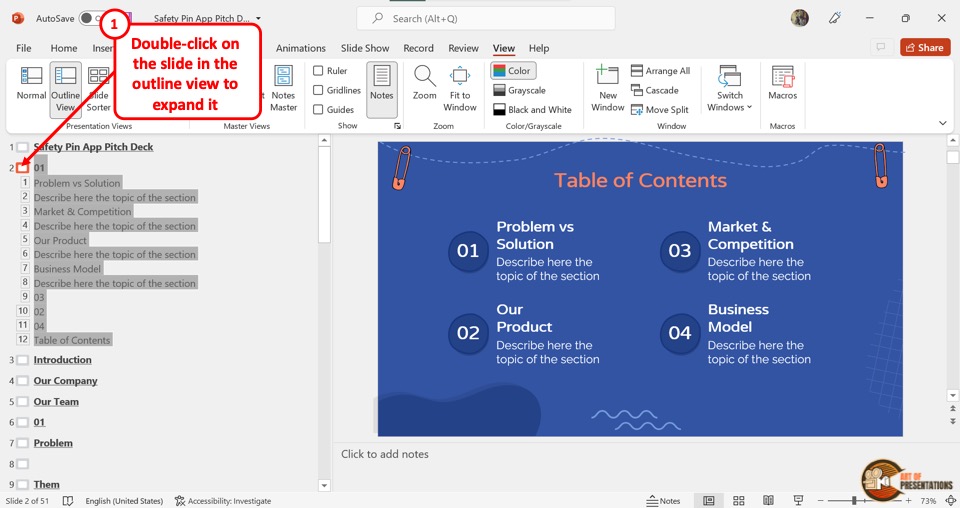
You can use the double-click method to quickly expand the slide outline. All you have to do is “Double Click” on the box located between the slide number and the slide title.
3c. Expand All Slides Using Expand All Feature
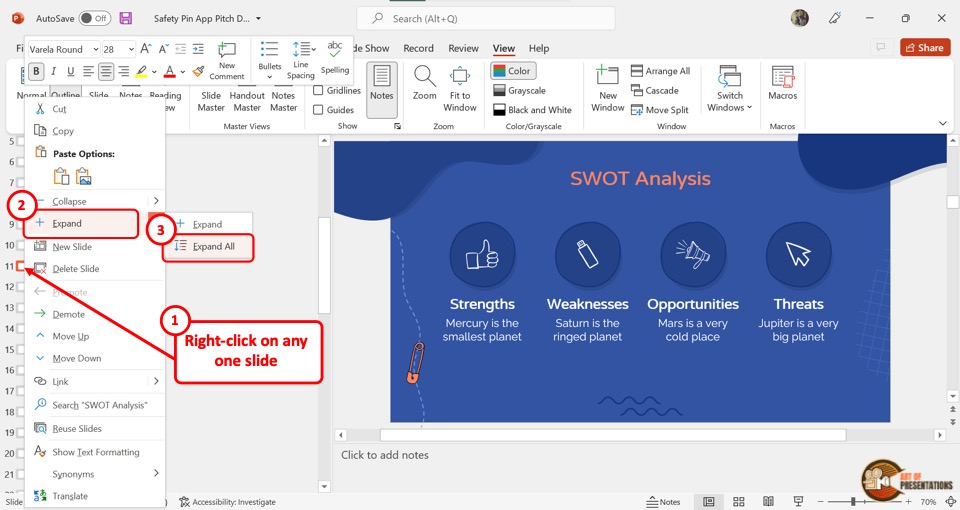
In the “Outline View” , you can also expand all the slides at once. To do so, “Right Click” on the box next to any slide. In the right-click menu, click on the arrow beside the “Expand” option to open another dropdown menu.
Then click on the “Expand All” option to expand all the slides.
4. How to Collapse Slides in Outline View?
Microsoft PowerPoint offers various methods to collapse slides in the “Outline View” . Collapsing the slides can help you see the list of the slides in a presentation easily.
4a. Using Right-Click
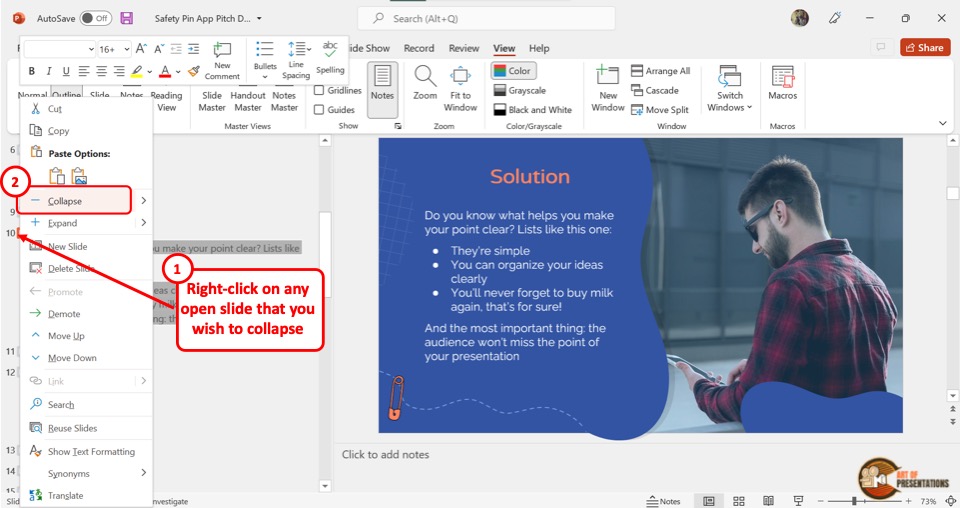
In the “Outline View” , locate the expanded slide from the sidebar on the left side of the screen. Then “Right Click” on the box next to the slide number and click on the “Collapse” option from the pop-up menu.
4b. Using Double-Click
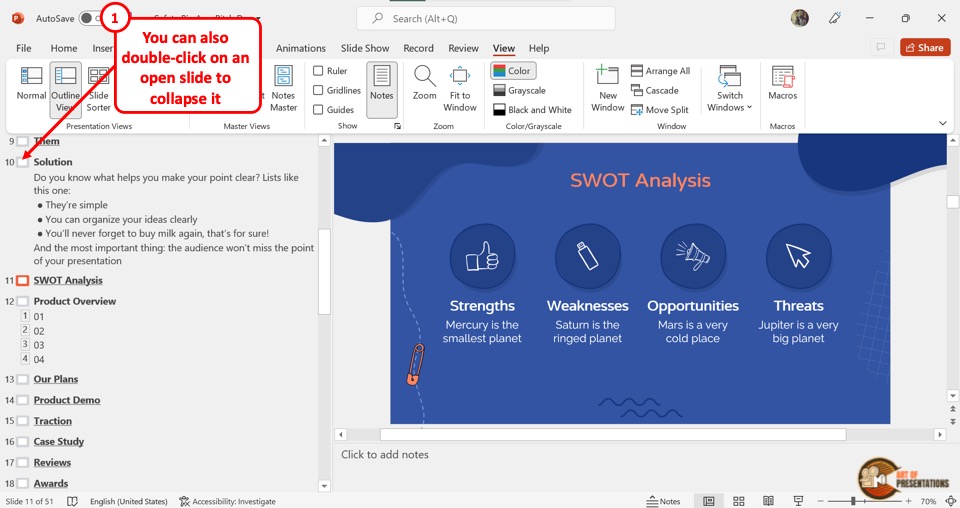
To collapse a slide using the double-click method, all you have to do is “Double Click” on the box at the left side of the expanded slide. The slide will immediately collapse hiding all the text except the heading.
4c. Collapse All Feature
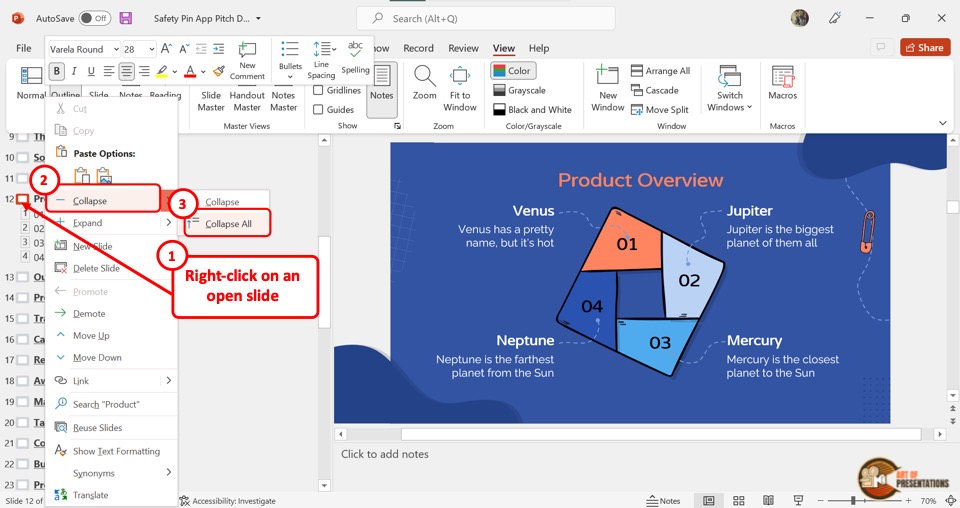
You can also collapse all the slides at once. To do so, “Right Click” on any slide in the outline. Then click on the arrow beside the “Collapse” option.
Finally, you have to click on the “Collapse All” option from the secondary pop-up menu.
5. How to Rearrange Slides in Outline View?
When reviewing the outline of a PowerPoint presentation, you may need to rearrange some slides based on their contents.
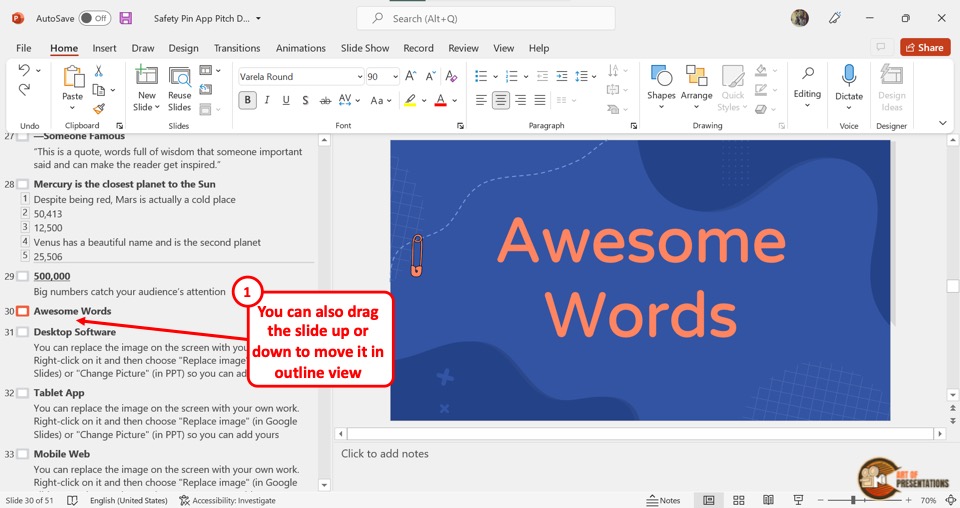
In the “Outline View” , you can move a slide in between the contents of another slide. You can also simply move a slide up or down.
5a. How to Move Up Slides in Outline View?
In the “Outline View” , you can move a slide up by one or even more slides. There are different methods to move up slides in PowerPoint. The first step is to click on the “Outline View” option from the “View” menu.
Method 1 – Using Right-Click
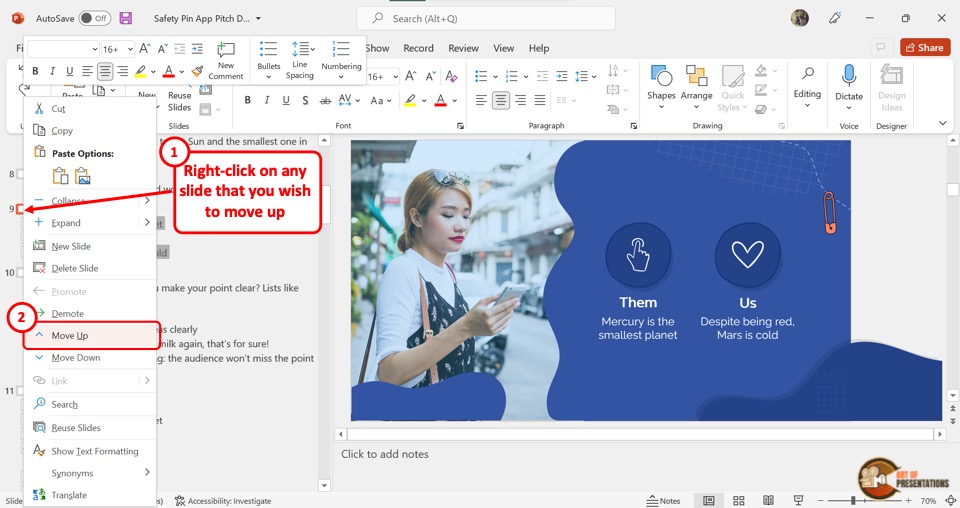
In the “Outline View” sidebar at the left side of the screen, “Right Click” on the slide you want to move up. Then click on the “Move Up” option from the right-click menu.
To move up the slide further, repeat the process until the slide reaches the preferred position in the outline.
Method 2 – Using Drag & Drop
You can also move up a slide quickly by using the drag and drop method. All you have to do is click and hold on to the box next to the slide number and then drag the slide up as much as you need.
5b. How to Move Down Slides in Outline View in PowerPoint?
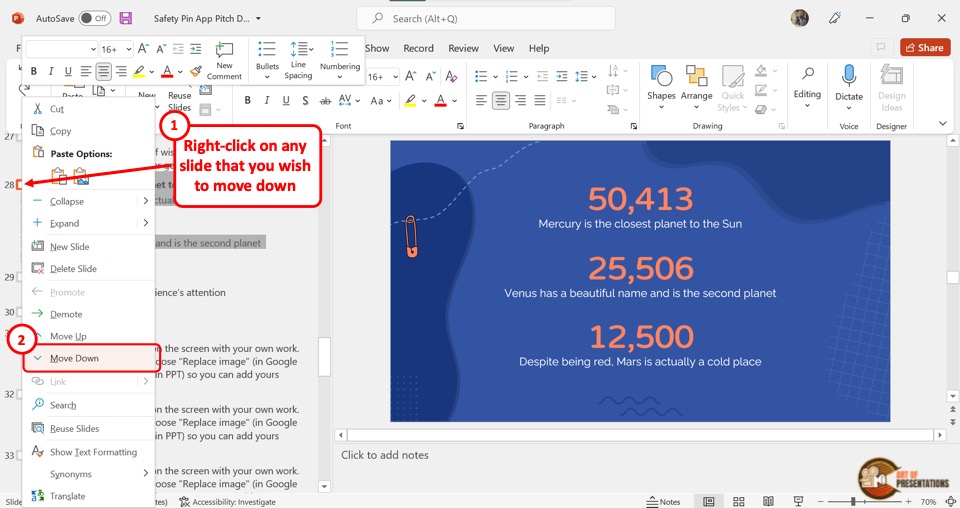
Similar to the process of moving up a slide, you can easily move down a slide. All you have to do is “Right Click” on the slide from the outlines on the left side of the screen.
Then click on the “Move Down” option from the pop-up menu. Alternatively, you can drag and drop the slide to the preferred position.
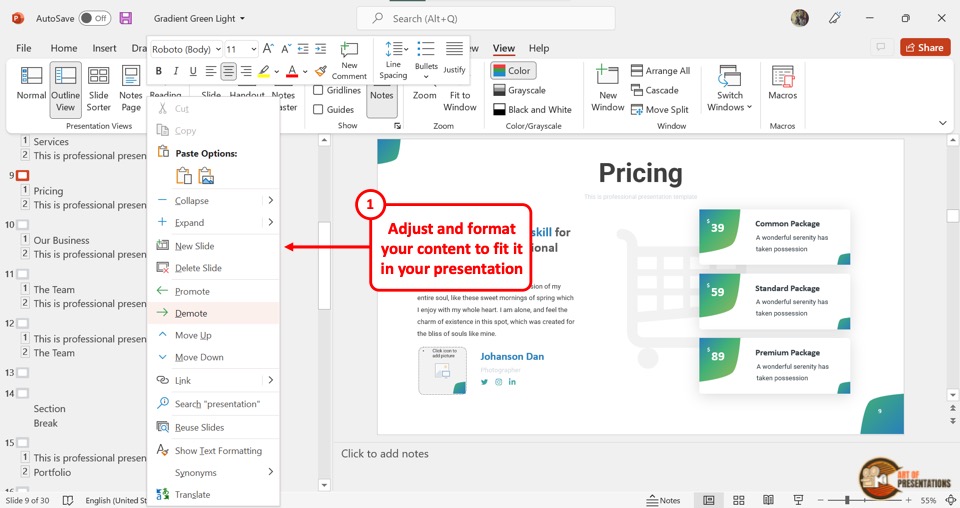
6. How to Add Content on Slides Using Outline View?
The presentation outline in the “Outline View” is editable. Thus, you can edit the content of a slide by editing the outline. To add content on slides using the “Outline View” , follow the 2 simple steps.
Step-1: Open the Outline View
In the menu ribbon located at the top of the screen, click on the “View” tab. You have to then click on the “Outline View” option which is the second option in the “Presentation Views” section of the “View” menu.
Step-2: Click on the slide and add content to the outline
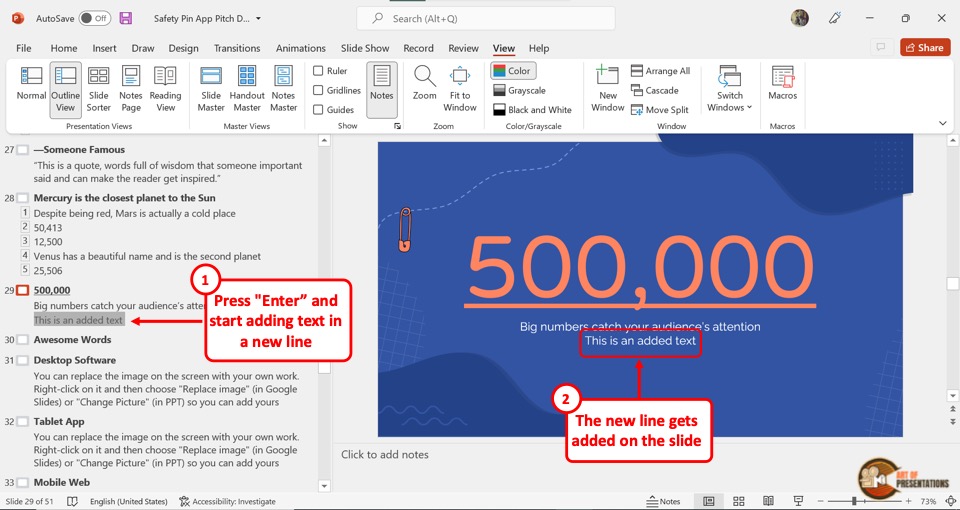
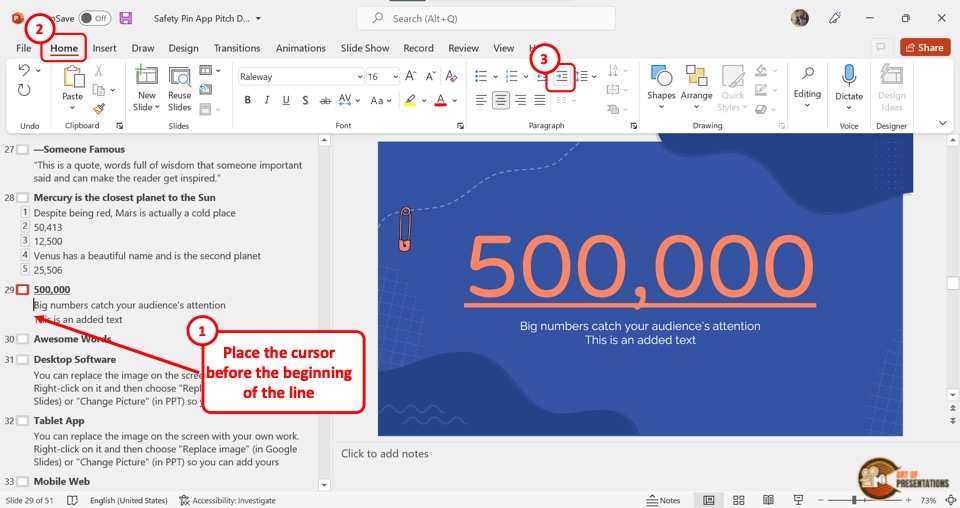
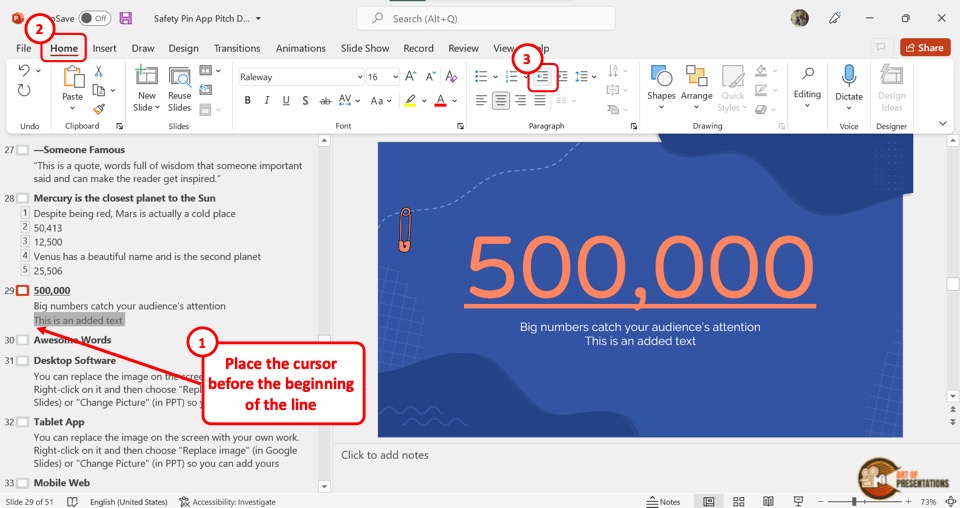
In the outline sidebar at the left side of the screen, click on the slide and heading level where you want to add content. Then type in the content. You will see the text being added to the presentation slide.
If you want to add text in a new line, simply press “Enter” and start adding the content. It will be visible separately on the slide.
6a. How to Increase or Decrease Indent of Content in Outline View?
To increase or decrease the indent of content in the “Outline View” , click on the “Home” tab in PowerPoint . Next, you have to click on the content in the outline sidebar for which you want to change the indentation.
Increase Indentation
By increasing the indent level, you push the content to the right. The content is thus moved to a higher list level. To increase the indentation, click on the “Increase List Level” option in the “Paragraph” section of the “Home” tab in PowerPoint.
Decrease Indentation
By decreasing the indent level, you can push the content to the left, and decrease the list level. To do so, click on the “Decrease List Level” option in the “Paragraph” section of the “Home” menu.
7. How to Change Content Hierarchy Using Outline View in PowerPoint?
In the “Outline View” , you can change the content hierarchy of the contents within a slide.
Content hierarchy is the order of the content in a slide. The top of the hierarchy is the heading and then the “List level 1” , “List level 2” and so on.
7a. Promote Content in Outline View in PowerPoint
Promoting content pushes the content up the hierarchy.
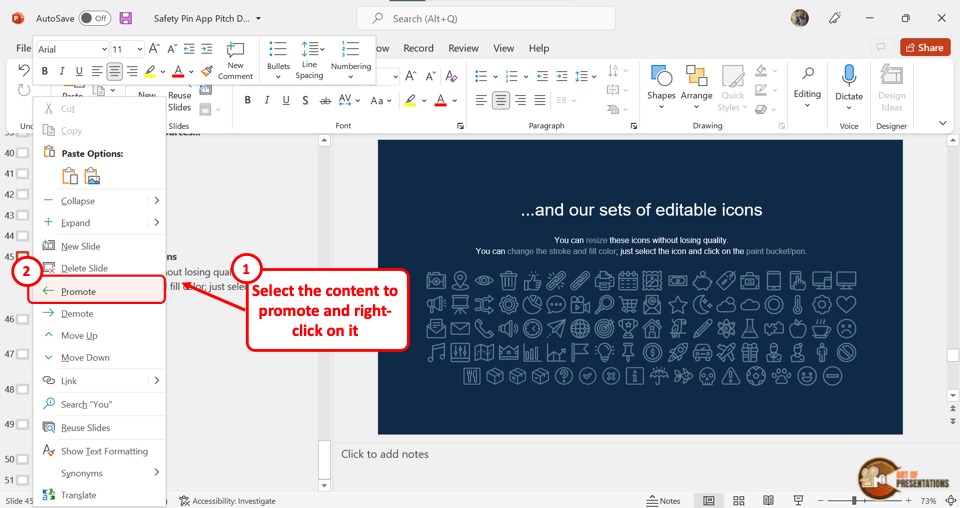
To promote content in outline view in PowerPoint, you have to first “Right Click” on the content in the outline sidebar. Then click on the “Promote” option from the right-click menu.
You can repeat this process to promote the content up to a few hierarchy levels. However, you cannot promote a “Heading” since it is the highest level in the hierarchy.
7b. Demote Content in Outline View in PowerPoint
When you demote content, it is pushed down the hierarchy.
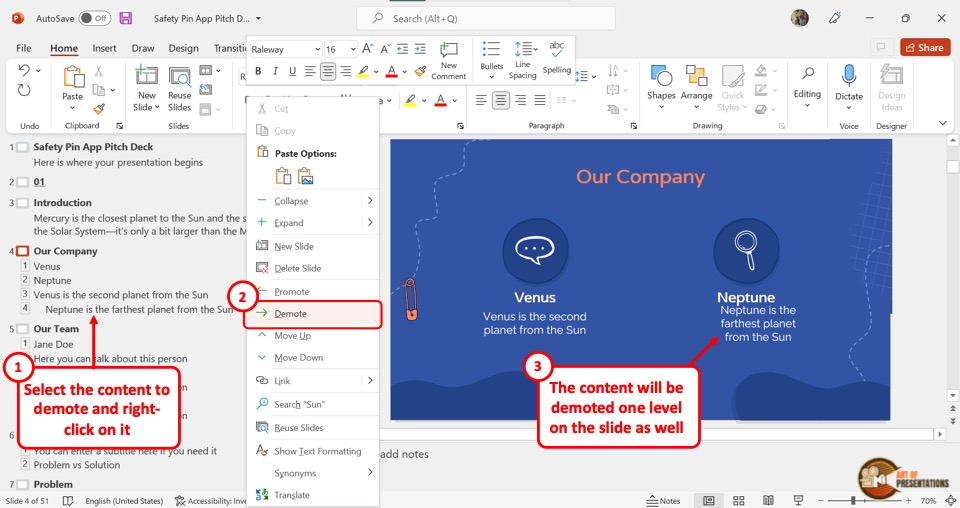
To demote content in outline view in PowerPoint, “Right Click” on the content in the outline that you want to demote. Then click on the “Demote” option.
You can repeat the process to move the content further down the hierarchy. For headings, you can only demote the heading of a text-only slide.
8. How to Go Back to Normal View from Outline View in PowerPoint?
If you want to exit the “Outline View” , you can easily return to the “Normal View” in PowerPoint.
To go back to “Normal View” from “Outline View” , all you have to do is click on the “View” tab in the menu ribbon. Then click on the “Normal” option which is the first option in the “View” menu.
9. How to Save Your PowerPoint Presentation as an Outline?
Besides viewing the presentation outline, you can also save your PowerPoint Presentation as an outline. All you have to do is follow the 4 easy steps.
Step-1: Click on the “Save As” option
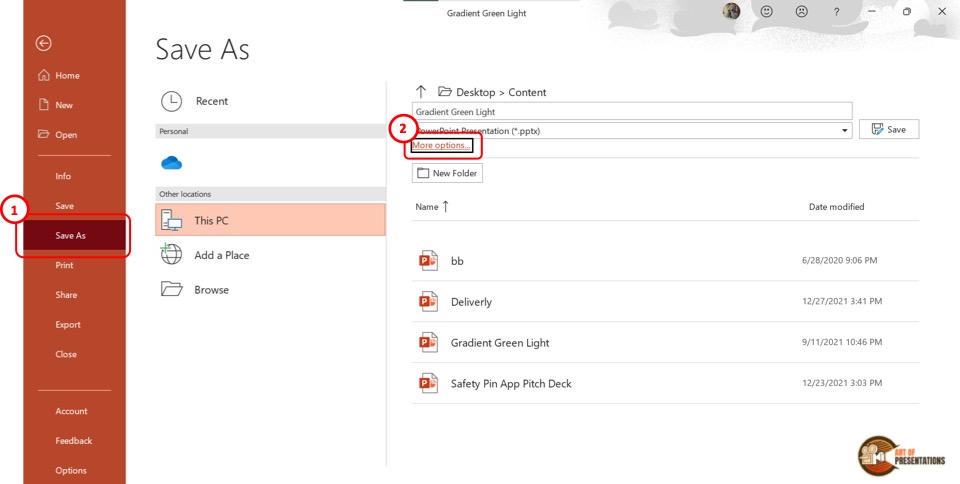
In the menu ribbon at the top of the screen, click on the “File” tab to open the “File” menu. Then click on the “Save As” option in the “File” menu.
Step-2: Click on “More options”
In the “Save As” screen, click on the “More options” option which is above the “New Folder” button (as shown in the image in step 1). This will open a dialog box.
Step-3: Click on “Outline/RTF”
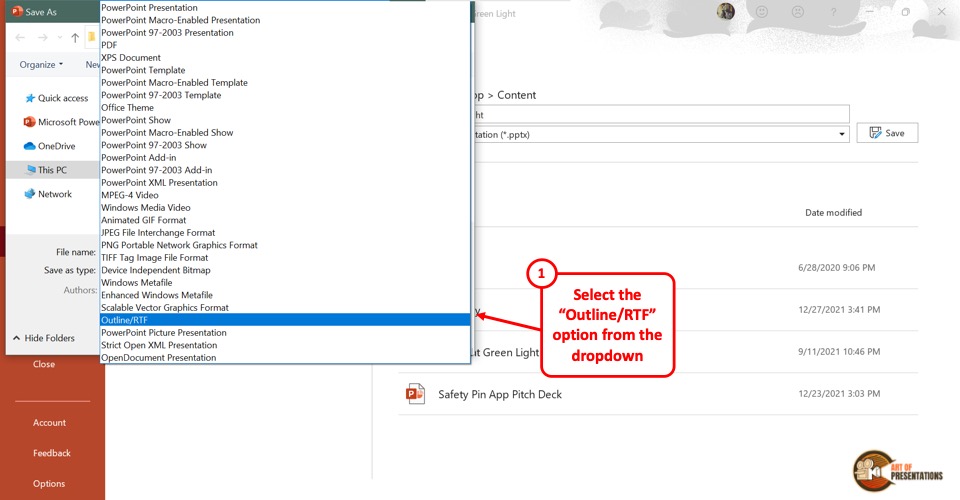
In the “Save As” dialog box, click on the “Save as type” box at the bottom. Then click on the “Outline/RTF” option from the pop-up menu.
Step-4: Click on the “Save” option
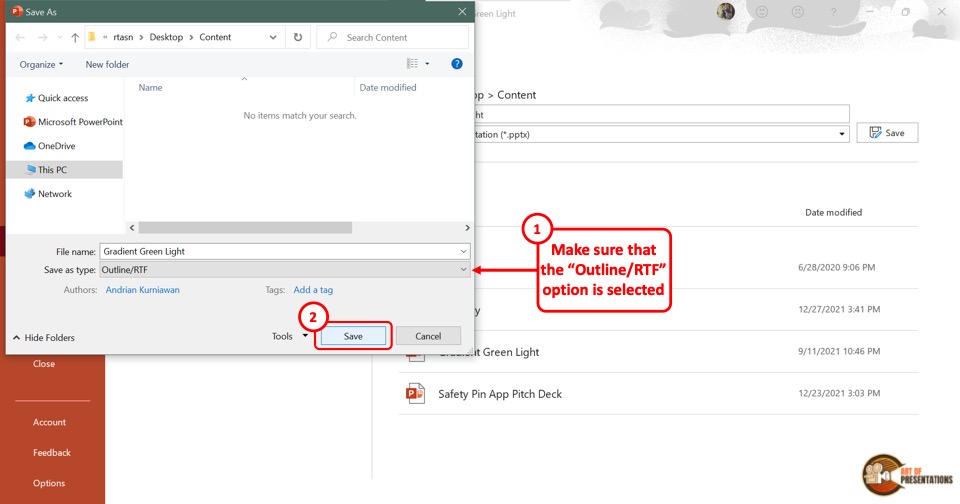
Now all you have to do is click on the “Save” button at the bottom of the “Save As” dialog box. This will save the PowerPoint presentation as an outline.
10. How to Print Outline View in PowerPoint?
Microsoft PowerPoint allows you to print the outline of the presentation only. All you have to do is follow the 3 simple steps.
Step-1: Click on the “File” tab
In the open PowerPoint presentation, click on the “File” tab from the menu ribbon located at the top of the screen. In the sidebar of the “File” menu, click on the “Print” option.
Step-2: Click on the “Print Layout” option
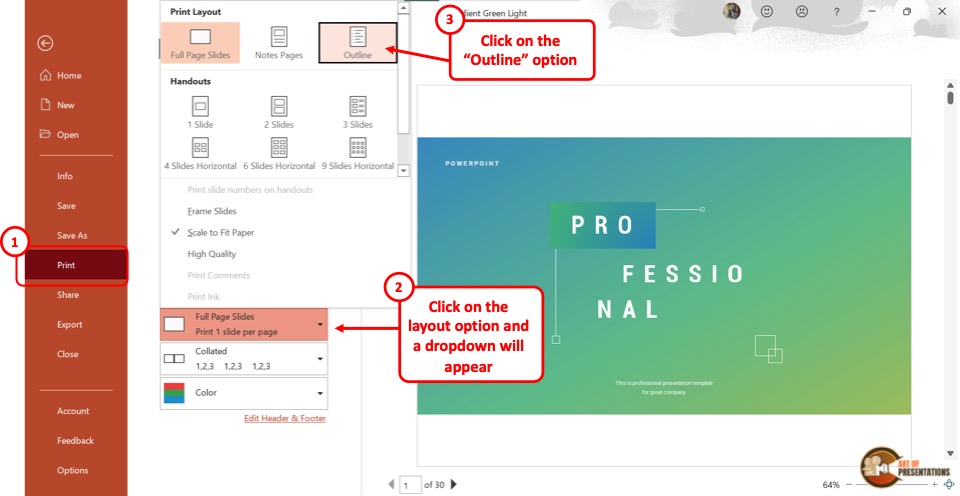
Under the “Settings” section, click on the box that says “Full Page Slides” . It will open a “Print Layout” pop-up menu. In the pop-up menu, click on the “Outline” option.
The presentation outline will appear on the preview screen.
Step-3: Click on the “Print” option
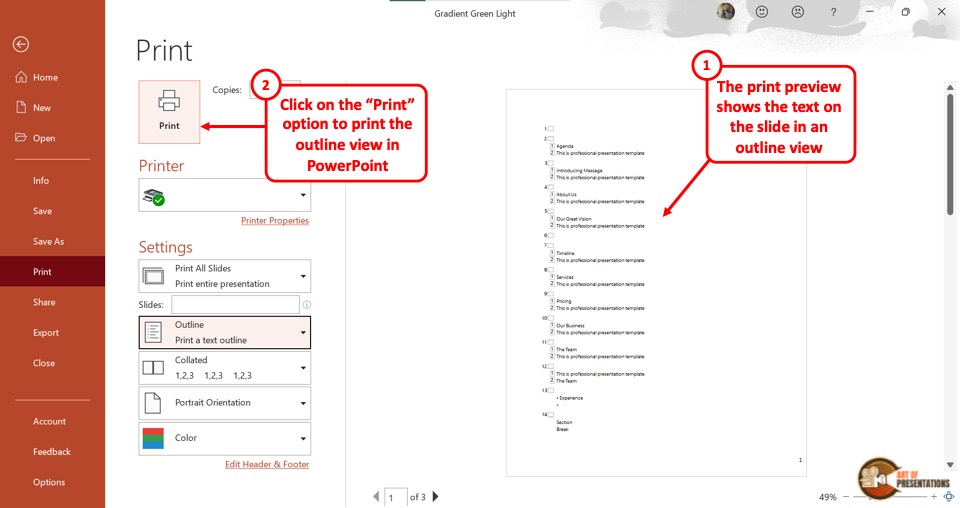
Finally, you have to make sure the device is connected to a printer. Then all you have to do is click on the “Print” button at the top of the screen.
11. How to Convert a Word Outline into a PowerPoint Presentation Using Outline View?
Microsoft PowerPoint allows you to import the outline from a Microsoft Word file. Importing an outline will automatically create slides for you. All you have to do is follow the 3 easy steps.
Step-1: Click on the “Slides from Outline” option
The first step is to click on the “Home” tab in the menu ribbon. In the “Slides” section of the “Home” menu, click on the “New Slide” option to open a dropdown menu.
Click on the “Slides from Outline” option from the bottom of the dropdown menu.
Step-2: Click on the “Insert” button
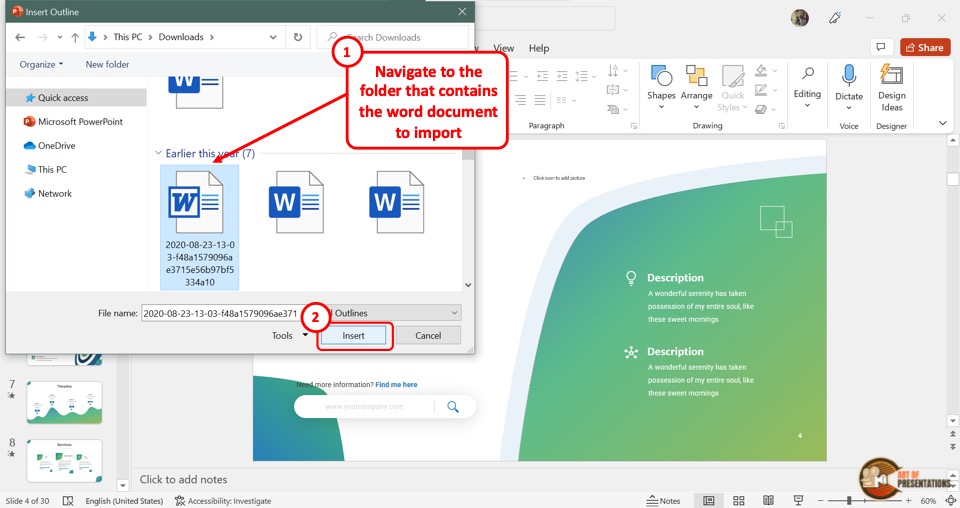
In the “Insert Outline” dialog box, click on the Microsoft Word document which you want to import. Then click on the “Insert” button at the bottom of the dialog box.
Step-3: Arrange the content
Since the process automatically transforms the Word outline into a PowerPoint outline, the content may need some adjustments. If the Word outline does not have any headings, each paragraph will be converted into a slide.
To arrange them, “Right Click” on the content, and then click on the preferred option from the “Move Up” , “Move Down” , “Promote” and “Demote” options in the right-click menu.
12. Outline View Not Showing Text? Here’s Why!
In Microsoft PowerPoint “Outline View” , the text in the content placeholder is automatically shown in the outline. So when a slide has no content placeholder, the outline will not show any text.
To solve the problem, you will first need to add a placeholder in PowerPoint . Follow the steps mentioned below –
Step-1: Click on the “Slide Master” option
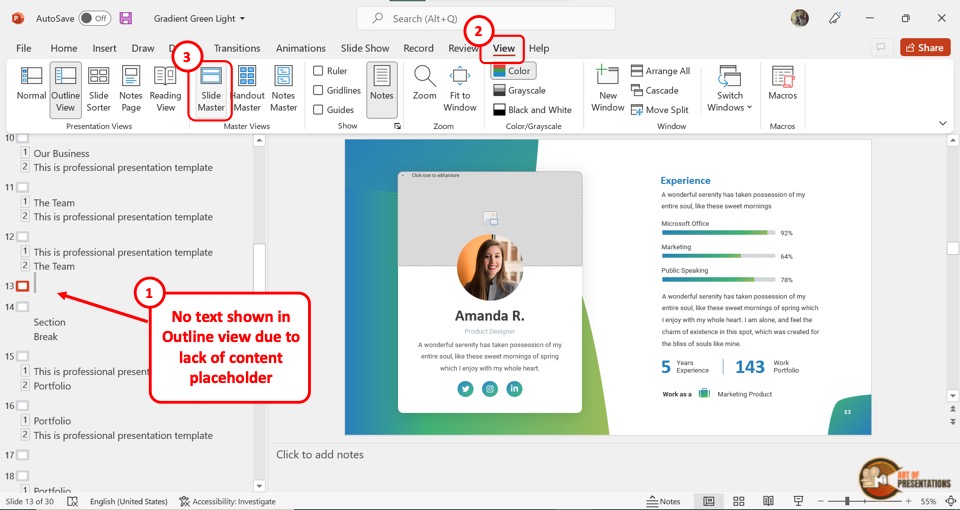
The first step is to open the slide where the “Outline View” is not showing any text. Then click on the “View” tab from the menu ribbon. In the “Master Views” section of the “View” menu, click on the “Slide Master” option.
Step-2: Click on the “Insert Placeholder” button
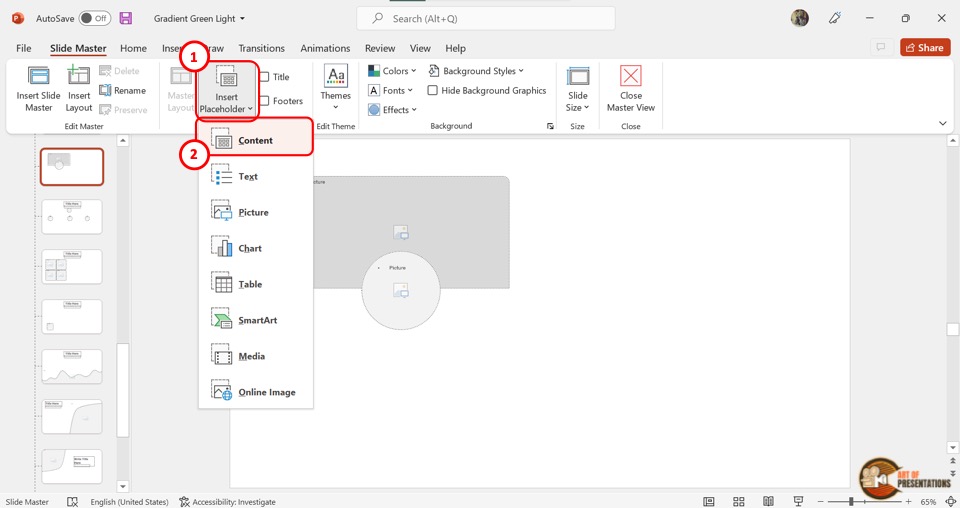
The next step is to click on the “Insert Placeholder” option in the “Master Layout” section of the “Slide Master” view. Then click on the “Content” option from the dropdown menu.
Step-3: Draw the “Content Placeholder”
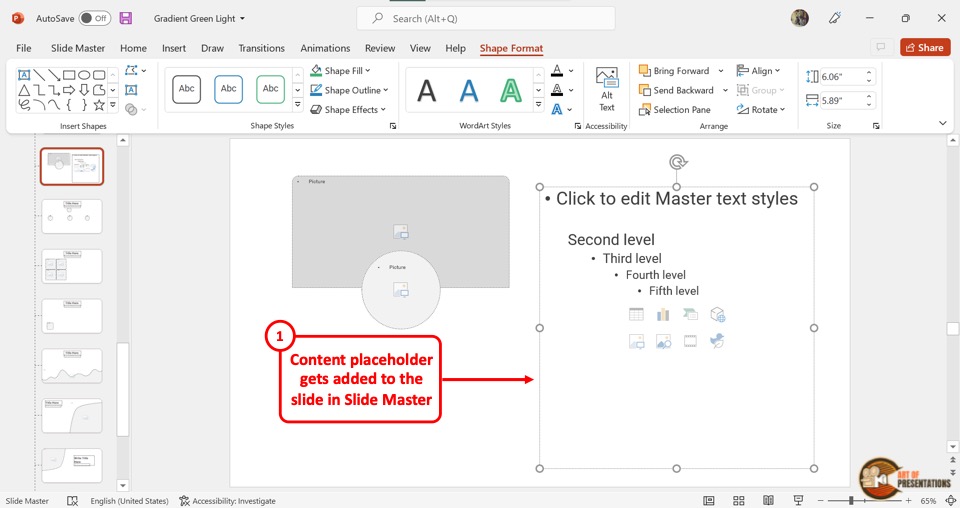
Now all you have to do is draw the “Content Placeholder” into the slide layout. You can also resize and reposition the placeholder.
Click on the “Shape Format” tab in the menu ribbon to access more options to edit the content placeholder.
Step-4: Click on the “Close Master View” option
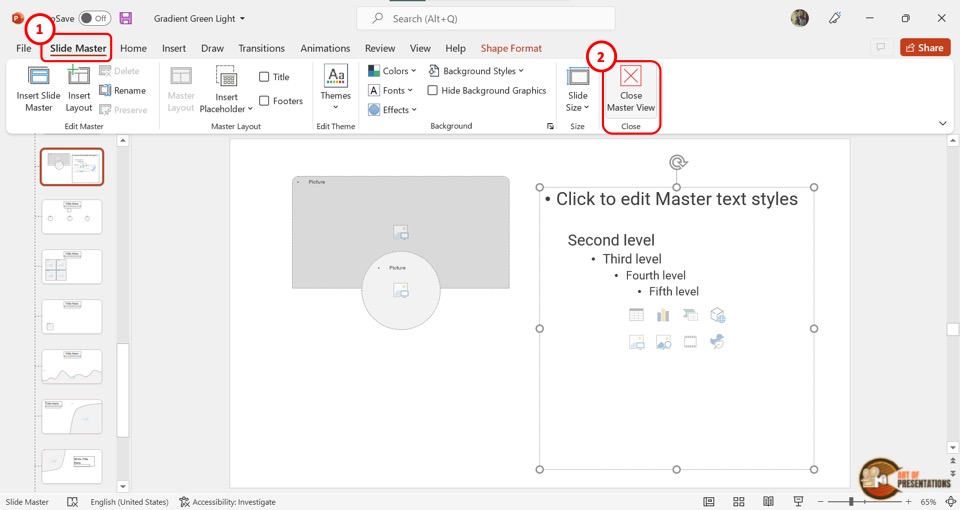
To save the content placeholder, click on the “Close Master View” option under the “Slide Master” tab. The screen will return to “Normal View” .
Step-5: Paste the text to the “Content Placeholder”
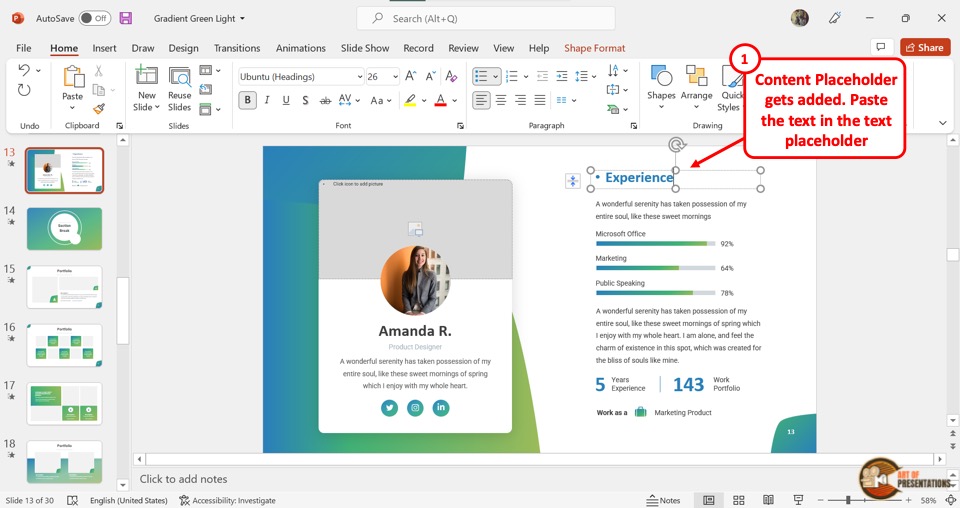
The final step is to cut the text in the slide and paste it into the “Content Placeholder” . To do so, select the text and press the “Ctrl+X” keys on your keyboard. Then click on the “Content Placeholder” and press the “Ctrl+V” keys.
Step-6: Click on the “Outline View” option
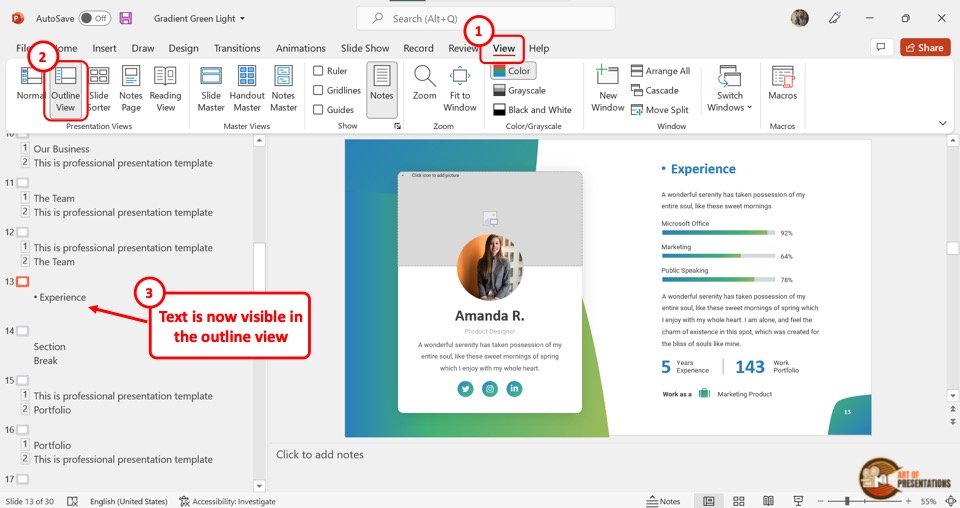
In the menu ribbon, click on the “View” tab and then click on the “Outline View” option. You will see that the text is now showing in the outline view.
Credit to Katemangostar (on Freepik) for the featured image of this article (further edited)
August 13, 2024
How to create a presentation outline (with examples)
Four methods to create a presentation outline and example outlines for inspiration
Co-founder, CEO
Like it or not, if you work in an office or go to school, you'll probably have to make a presentation sooner or later. But creating a great presentation can be challenging, especially if you're short on time or suffering from writer's block.
Luckily, there are many ways to get a head start on your presentation outline. In this article we'll walk through four options for creating a presentation outline and show you several examples of great presentation outlines.
Why should I write a presentation outline?
An outline helps you organize your ideas in a clear and logical way . Instead of getting bogged down on details like formatting or word choice, an outline presents the overarching story of your presentation with just a few main points. This helps to make sure you have a cohesive narrative before you dive into the nitty gritty work of wordsmithing individual bullet points or selecting the perfect slide theme.
If this sounds like a lot of work, it often is! But spending time writing a great outline will save you time and effort down the road because it will be easier to organize your work and create each slide when you understand how it fits in to the broader presentation.
Here are four ways you can get a start on creating your next presentation outline.
Method 1: Create your outline from scratch
Creating an outline from scratch may sound intimidating if you have never written a presentation outline before, but this is the most straightforward way to get started.
Start by jotting down the three main points you want to make in your presentation. Once you have your main ideas in order, write down a few supporting details and examples for each point.
Then, add an introduction (find an interesting image, quote, or question to help grab the audience's audience) and a conclusion (decide on the best way to summarize the takeaways from your presentation) to the outline, and you are ready to go.
This method is great for those who prefer to have complete control over their presentation and want to create a custom outline that works best for their needs.
Method 2: Create a presentation outline using an AI presentation maker
If you're short on time or looking for a quick way to get a first draft of a presentation outline that you can then refine, using an AI presentation maker is a great option.
Plus AI lets you type a short prompt like "Create a presentation that provides an overview of the Norwegian oil industry," and it will automatically generate an outline of a presentation for you. After Plus creates the outline, you can change the titles of slides, rearrange slides, and remove any pieces of the outline that are not necessary.

From there, once your outline is created, you can click the "Generate presentation" button, choose a template, and let the AI create the first draft of your entire presentation.
This method is a good option for those who want to create a polished presentation without getting stuck with a blank piece of paper. Instead, it frees you up to take a first draft presentation and customize it for your needs.
Method 3: Create a presentation outline using ChatGPT
ChatGPT is an AI chatbot that can help with a wide variety of tasks - everything from acting as a therapist, to sharing recipes, to helping you come up with presentation ideas and creating content for a presentation .
To have ChatGPT help you generate a presentation, you can take two different approaches:
- Use a custom GPT that has been trained to help people create presentations or
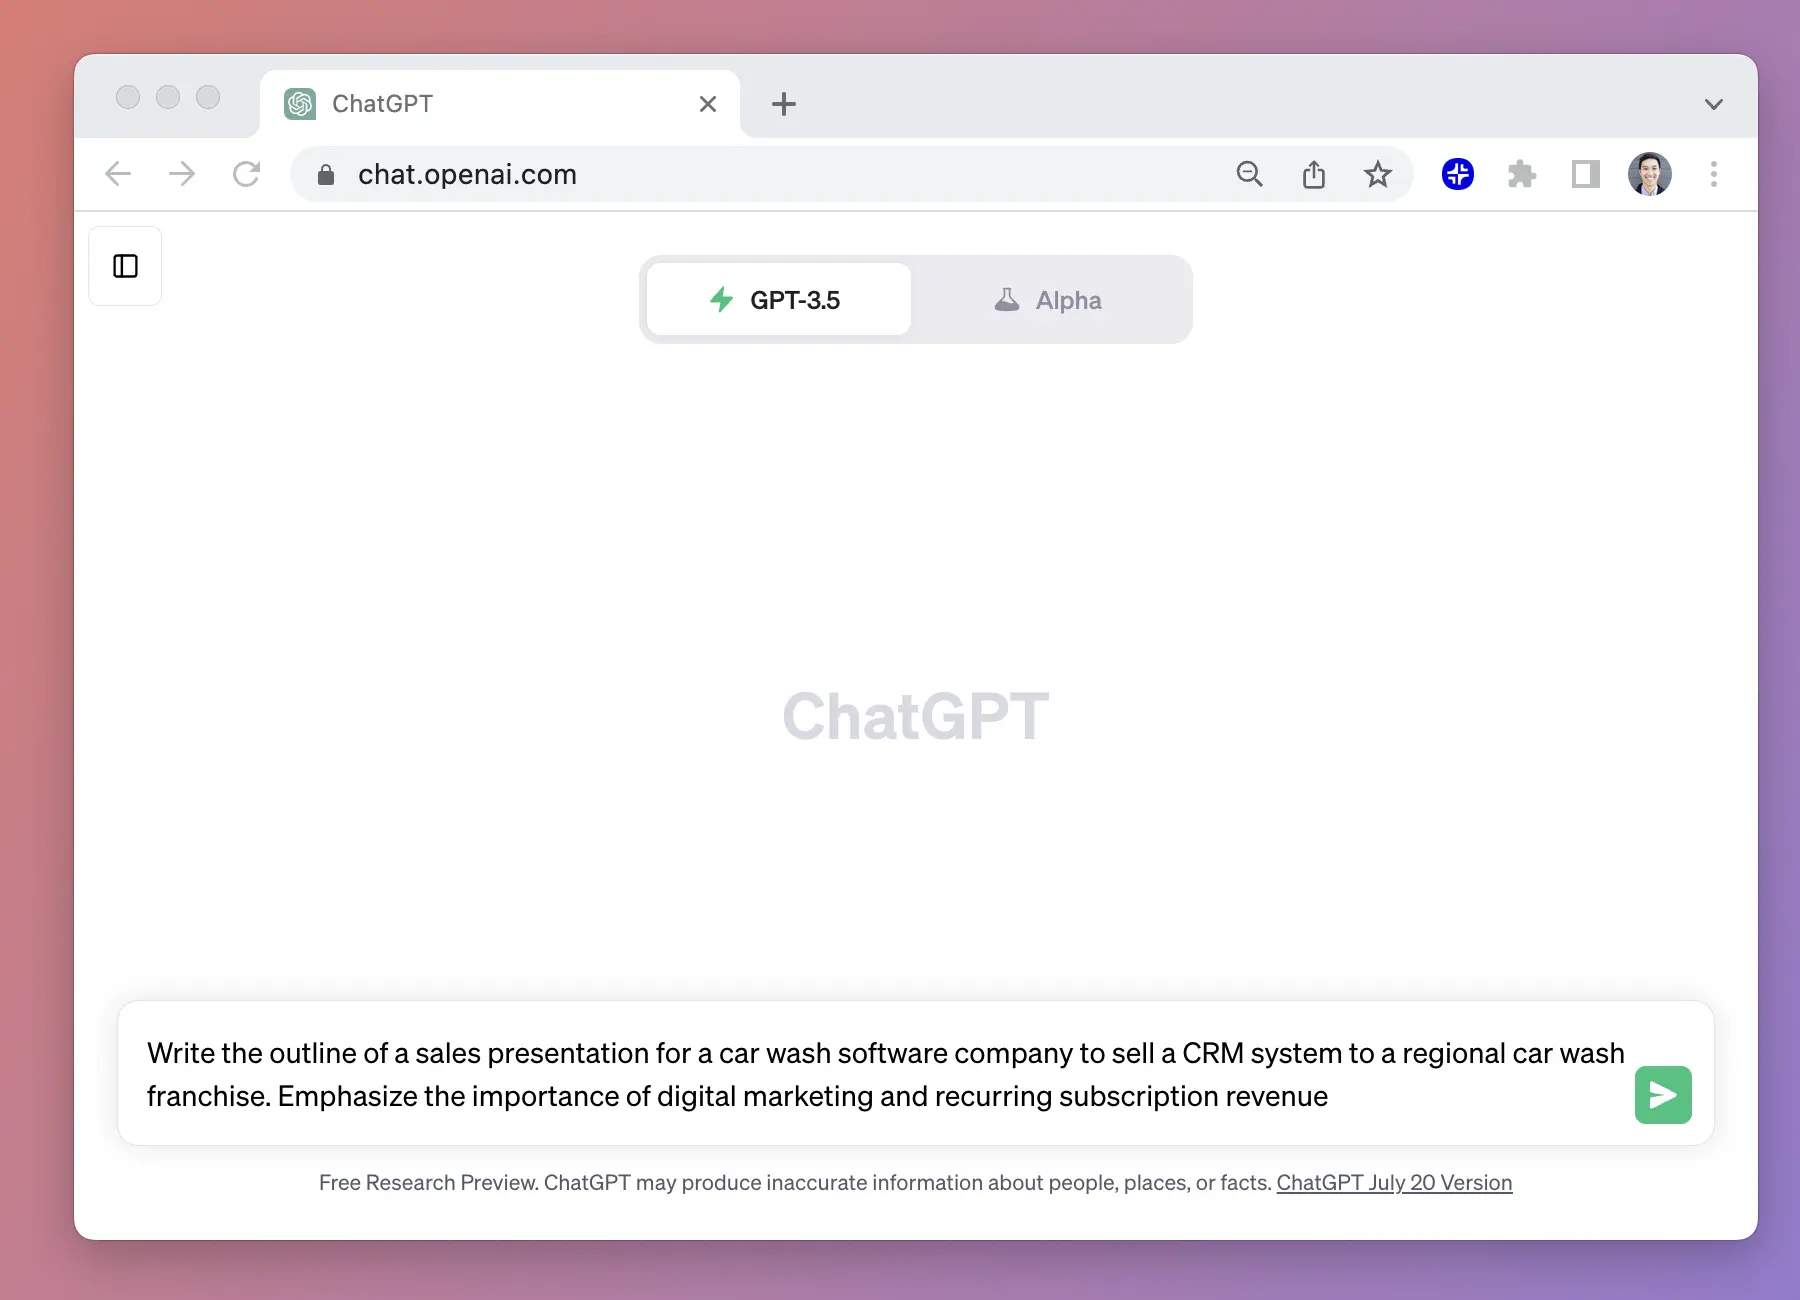
- Ask the general ChatGPT interface to "Create a presentation outline for me on the topic of [XYZ]."
Both approaches will yield similar results, but a custom GPT like Plus AI presentation maker will be more fine-tuned to helping people create presentations. It will also provide additional functionality like providing a visual preview of the slides and feedback on how to improve your presentation.
Method 4: Create a presentation outline using a template
Last but not least, using a template is a good way to speed up the process of creating a new presentation outline. Similar to using an AI presentation maker, a template can give you a first draft of an outline that is easier to edit and refine than starting from scratch.
Presentation templates often come pre-designed with example text and images, so all you have to do is fill in your own content. For example, this TED Talk presentation template provides some instructions on how to create an outline for a TED Talk-style slide deck.
The secret to using this method is to find the closest template to the type of presentation you want to create. You should use detailed search terms to and look across multiple sites and resources to find one that matches the content and style that you would like.
Once you have your template, start by reviewing the overall outline or structure and tweak it to meet your needs. Then, you can fill in the specific content (e.g., text and images) with your materials to make it your own to quickly make a beautiful presentation.
Presentation outline examples
Basic presentation outline example.
Let's take a look at a presentation outline and accompanying notes for a persuasive presentation on encouraging people to meditate every day:
I. Introduction
- Hook - find a striking image and tell a story
- Thesis statement - everyone should meditate for 10 min per day
II. Main point 1 - Meditation is one of the easiest ways to improve your health
- Physical health
- Mental health
III. Main point 2 - Meditation is backed up by thousands of years of practice and research
- One anecdote from antiquity
- One anecdote from recent research
IV. Main point 3 - You can get started with meditation today
- Basic technique
- Tips for newcomers
V. Conclusion
- Summarize key points
- Call to action
As you can see, this is a relatively lightweight plan for the presentation, but it provides an easy-to-understand framework that we can fill in with slides.
There are rough notes on specific content for the different points in the presentation, but we don't need to write out everything in fine detail, just the broad strokes.
Pitch deck outline example
Now let's review an outline for a pitch deck that someone might use to present their startup idea to prospective investors. This is for a startup that uses autonomous food trucks to deliver meals to people's homes and workplaces.
I. Problem statement - "Food delivery sucks, and here's why"
- Hook - pictures of typical food delivery headaches (e.g., late/no show, bad selection, etc)
II. Value prop - "FoodDrive revolutionizes the food delivery model"
- Compare value chain of FoodDrive to traditional restaurant and delivery service
- Show how $50 order gets allocated to different people
III. The product - "Customers love our trucks"
- Picture of food truck and menu
- Customer quotes and reviews
IV. Why now? - "Our self-driving technology is ready for prime-time"
V. Business model - "Each truck can generate $2-3M of revenue per year with a 60% gross margin"
- Show high-level financial forecasts on unit basis
VI. Competitive landscape - "FoodDrive's closest competitors don't come close"
- Comparison table with delivery services, in-house delivery, eating out-of-home, etc.
VII. Go to market strategy - "We've tested FoodDrive in 2 markets so far. Here's how we win in new markets"
- Overview of social media strategy
- Case study on new market launch
VIII. Team - "Our team has experience in autonomous vehicles, food delivery, and quick service restaurants"
IX. Traction - "We generate $5M of revenue per year with our 2 trucks, and we can ramp up new trucks immediately"
- Show revenue growth chart with focus on time to ramp new trucks to productivity
X. Fundraising goal - "We are raising $50M to expand FoodDrive to 10 more markets"
- Highlight key milestones we aim to reach with additional funding
Even though a pitch deck is a specialized type of presentation that often requires specific content, it's helpful to start with an outline to build out the 'story' behind the content. That way, you have a cohesive story rather than a set of disparate slides.
How can I create a presentation from an outline?
Once you have your presentation outline written, it's time to start writing your slides. Since you already know the main points you are trying to make in your presentation, the main decisions here are
- What type of visual style you want to follow
- How many slides you want in your presentation
- How you will present or share the slides
To get a head start on creating a first draft of your presentation, you could enter your outline into an AI presentation maker.
This will provide a first draft of the slides so that you can focus on making sure they tell a cohesive story or tweaking individual slides to leave a memorable impression.
Other tips and tricks for great presentations
Here are some resources to help you create great presentations:
- Make slides look good - Here are six tips for making visually appealing slides.
- Number of slides - Here is a calculator that can help you calculate how many slides you need for a presentation depending on how long you need to present.
- Unique presentation ideas - Here are 250 ideas for presentation topics that will help you create a great presentation.
Creating a presentation outline can be one of the most time-consuming parts of the creative process for making a new slide deck. Luckily, there are many tools and templates that can help you kickstart this process.
With these four methods, you can choose the one that works best for your needs and get started on your presentation outline today.
And once you have your outline, make sure to try out a tool like Plus AI presentation maker to quickly get your slides as well!
Latest posts
Latest post.

Announcing Plus AI for PowerPoint
The Plus AI PowerPoint add-in brings Plus AI to the Microsoft 365 ecosystem and offers new ways for teams and individuals to create PowerPoint presentations using AI
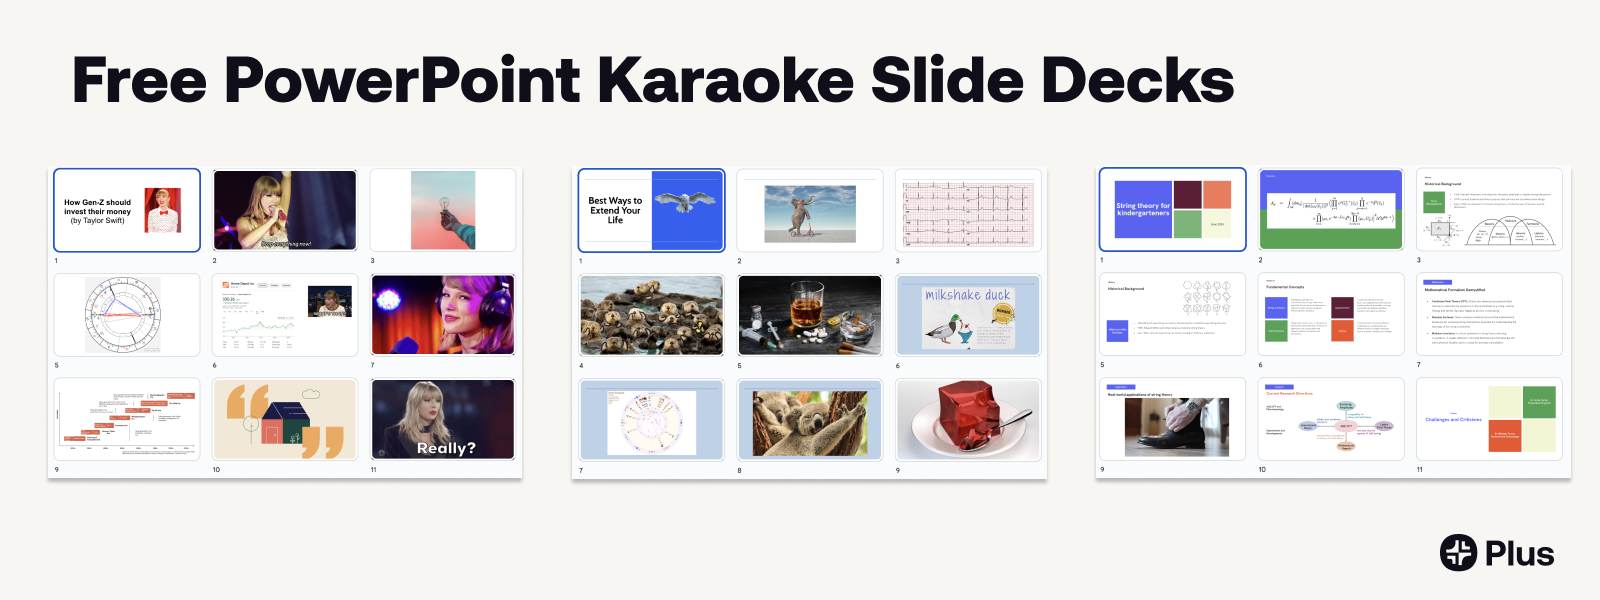
PowerPoint Karaoke: Rules, tips, and free slide decks
Overview of PowerPoint Karaoke, rules, and free slide decks for PowerPoint Karaoke
How to use ChatGPT to create a PowerPoint
Looking for ChatGPT for PowerPoint? Here's a step-by-step guide to using AI in PowerPoint and Google Slides
More resources
11 best websites for making a presentation (and how to choose one for your needs) .
Here are 11 of the best websites and programs to create free presentations online
How to embed Asana tasks In Notion
A step-by-step guide to embedding Asana tasks in Notion for increased team productivity

How to create a great onboarding presentation
Need help creating a presentation for your new employees? Our guide walks you through how to create a great onboarding presentation from start to finish.
Unsupported browser
This site was designed for modern browsers and tested with Internet Explorer version 10 and later.
It may not look or work correctly on your browser.
- Communication
How to Write Powerful PowerPoint Presentations Fast With Outlines
In this tutorial, you'll learn how to write a PowerPoint outline for a presentation . You'll see a presentation outline example that shows how beneficial the process can be. It might seem like an extra step while building a presentation. But creating a presentation outline saves you time in the long run.

Presentation outlines are a great way to save time. So are advanced PowerPoint templates. You'll see examples of professional PowerPoint templates from Envato Elements (unlimited downloads) in this tutorial while you learn how to write a presentation outline.
Why Should You Write a PowerPoint Presentation Outline?
You might think that learning how to write a presentation outline is an extra step. Writing a presentation outline takes time. But you might be surprised by how much time it ultimately saves in later steps.
It's important to see writing a presentation outline as a helpful step instead of extra work. Investing time in creating a PowerPoint outline helps you avoid rewriting and reworking your presentation.

When I was a rookie presenter, I made a lot of mistakes while writing a presentation. I'd open PowerPoint, spend too much time picking a theme, and then start writing my content. I jumped back and forth between slides adding points.
In short: this created an unfocused presentation. You could tell that there was a scatterbrained approach to writing content. When I started using outlines, the presentation felt more cohesive, and every point fell naturally into place.
But don't think that a PowerPoint presentation outline will be tossed in the trash when your presentation is finished. With a bit of creativity, PowerPoint presentation outlines can serve multiple purposes:
- Use an outline as a slide of its own to give your audience a sneak peek of the presentation's path.
- Send your outline as a pre-read with critical details to build anticipation for your presentation.
- Print your outline and keep it nearby to help you stay on topic while presenting.
Think of writing a presentation as a series of steps. Writing a presentation outline is the first step that saves time on all future steps. Learn how to do a presentation outline and more in our tutorial below:
Now, let's dive into our tutorial on PowerPoint presentation outlines.
How to Write a PowerPoint Presentation Outline
Once you've committed to writing a PowerPoint presentation outline, you might be wondering what the process looks like. Let's learn the keys to writing a presentation outline. Then, you'll learn how to incorporate that presentation outline into your PowerPoint.
The PowerPoint screenshots that you'll see in this section use a template called Brusher from Envato Elements .

Now let's look at how to create PowerPoint outlines:
1. Close PowerPoint (If It's Already Open)
If PowerPoint is open, close the application! If it's not open, don't even think about heading for the Start menu to launch it.
That's right. The most important part of writing a PowerPoint presentation outline is to leave out the app for the time being. If you don't do this, you risk spinning your wheels and redoing parts of your presentation over and over.

You might be surprised at how much focus a presentation outline brings to the process of learning how to write a presentation outline.
How many tutorials tell you to close the app while learning how to make a presentation outline? Well, this one just did, and it's crucial to the process of writing a presentation outline.
2. Set a Presentation Goal
It's vital that every presentation has a single, unifying goal. A PowerPoint presentation is a series of slides with supporting points that all tie back to that goal.
This goal is the guiding principle for everything you write. Setting the presentation's goal is the first step for writing your PowerPoint outline.
As you set your presentation's goal, it's also crucial to think about the type of presentation that you're giving. I divide presentation purposes into three key types, each with their nuances when it comes to writing. Here are the three types of presentation goals:
- To educate the audience on ideas and topics.
- To update colleagues on the latest status of a critical project or event (think of a meeting at work where you share a project update, for example).
- To persuade the audience to agree with and embrace your idea or position on an idea.
Before you start filling in the presentation outline, make sure that you've set this singular goal. Otherwise, you risk your presentation diverging into many ideas that don't support a common cause.

In summary, your first outline step is to write your presentation's goal . It's that singular measuring stick that you use as you add more content. Every time you add a new slide or supporting point, ask yourself, " does this content support my presentation's goal? "
Supporting points help reiterate the presentation's goal. But you can't support the key goal if you don't define the goal! Learning how to do a presentation outline comes back to setting a goal.
3. Add Headers for the Key Sections
Now that you've set your presentation's " north star ," you can begin to block in the critical sections that support the goal. Each section should give a new angle but play a part in reinforcing the central goal.
I tend to aim for three or four key sections per presentation. Each of those sections might include multiple PowerPoint slides.
This is commonly called the " body " of the presentation. It's the meat and bones of the presentation with the content that helps you drive your key point home. Fill in a goal as you see in the presentation outline example below:

Let's walk through an example. Let's say that I'm attempting to inspire my audience to learn Power Query, a popular Excel data tool. The goal is to encourage them to action. I'll use three key sections that support the goal:
- What's Power Query? It's best not to assume that your audience already knows.
- Why should you use Power Query? In a section like this, show the benefit of taking action. In this case, I'd show the audience how much faster data imports and transformations are when you use Power Query. This potential will inspire action.
- How to learn Power Query. Once I've given the audience a taste of the power of the tool at hand, it's essential to provide them with a " next step " as well. A few primary resources of tutorials can serve as a launching pad.
No two presentations are the same. The way that you support your points will vary based on the presentation's goal. Remember: Y ou're the presenter. It's your story to tell.
Now, start filling in the details for each supporting section. Just as we expanded on the goal with crucial sections, each section should have supporting points.
In your medium of choice, write several supporting sentences for each of your key sections. This gives you several points that support your idea. Use these support points to create individual slides.
See the screenshot below for a sample presentation outline in progress:

Learn more about the writing process in this tutorial:

4. Write the Supporting Points
"You can't boil the entire ocean... The best way to eat an elephant is one bite at a time... Divide and conquer the task at hand..."
All these phrases mean the same thing: the best way to tackle a project is to divide it into parts. When you're creating a PowerPoint, writing a presentation outline first is the best way to break the project into easy-to-conquer tasks.
5. Open PowerPoint and Add Your Outline
Once you've finished writing your PowerPoint presentation outline, it's time to jump back to the app finally. You've laid the groundwork for writing a presentation rapidly. Now, it's time to drop it into PowerPoint.
There are many ways to approach this task. For me, I paste the entire outline on the first slide. Then, I'll start carving that outline up, pasting the sections, and supporting points out to their slides. I use this PowerPoint outline slide to plan my presentation.

Now, start pasting those sections to their own sections. Using Outline view in PowerPoint or another tool, gradually pull your outline apart into unique sections. Instead of typing them one-by-one, just paste the sections onto new slides.
You don't have to stick with the exact text you wrote. Instead, paste the sections out and use them as the inspiration for content. By doing this, your presentation stays true to the original outline and on topic!

PowerPoint even has a helpful feature to focus on outlines in the app. Learn more about Outline view in PowerPoint in the tutorial below:

It might seem odd that we saved this step for last, but this approach helps you stay focused. Instead of jumping around inside PowerPoint while writing a presentation outline, consider using a separate tool.
5 More Powerful Presentation Writing Tips
Before writing your presentation outline think consider the following:
1. Have One Idea Per Slide

Your slides should just have your main points. If there's too much on your slide, it can be overwhelming for your audience. It can also be distracting. Instead of listening to you, your audience might be reading the text on the slide.
2. Simplify Your Sentences
Instead of having complete sentences on your slide, you can reduce text by having simple sentences.
For example, instead of saying, " When you study before a test, you will remember the material, raise your grade and be knowledgeable about the subject. " You can simplify the statement to look like this:
Benefits of Studying
- Remember Material
- Raise Your Grade
Simplifying your sentences, as shown above, makes it easier to follow the rules on minimizing text on your slides.
3. Have Powerful Visuals

Visuals engage your audience, especially when they're eye-catching. They can also show what you’re discussing in the presentation.
If you want to add an emotional element to your presentation, a high-quality image is a great way to do that. If the image is low-quality or irrelevant, it can distract the audience. It’s best to think carefully about your visuals and what you want to add to the presentation.
4. Remember Your Audience
While writing your outline, remember who you’re writing for. One of the things you need to know about your audience is their knowledge of the subject you’re discussing. Are you speaking to a group of professionals who understand the terminology and the subject well? Or are you talking to a group of students who don’t know much about the subject?
You must also keep your audience in mind if you’re adding humor to your presentation. If you offend your audience, even accidentally, they'll stop listening to you.
5. Don’t Use Your Slides as Notes

Don’t read off your slides. This is a common mistake that people can make. The audience can read your slides, so it can be boring to hear you repeat what’s written on the slide.
It’s more effective when you give the audience new information. If you want to have notes, you can use the speaker notes tool in PowerPoint. This tool lets you add notes that the audience won’t see.
The Best Source for PowerPoint Presentation Templates (With Unlimited Downloads)
Before we dive into how to write presentations quickly, let's take a look at another timesaver: presentation templates . PowerPoint templates already have most of the design work done for you.
On Envato Elements, you can source unlimited PowerPoint templates for a flat rate. The singular subscription gives you everything you need to create a presentation—fast! Many of these options include PowerPoint outline templates already built.
Explore PowerPoint Templates

Not only will you unlock unlimited PowerPoint templates, but you'll also gain access to many other creative assets. That includes stock photos, graphics, illustrations, and more!
Top Envato Elements Presentation Templates
As you finish up your PowerPoint outline, why not pair it with a presentation outline template to rapidly craft your presentation? Here are three of our favorites in the Envato Elements library, all included as a part of the subscription!
1. Outline - PowerPoint Template

The name might be a coincidence, but this PowerPoint presentation titled Outline is a perfect choice for many purposes. You've got 30 slides across five color schemes that are ready for practically any topic.
Flexible PowerPoint templates like this make it easy to adapt your presentation outline easily thanks to their well-designed structure.
2. Business Strategy Two PowerPoint Template

The strategy is the unifying direction for a business or project plan. They work well with PowerPoint outlines thanks to the focused approach. This template captures many of the most popular strategy deliverables like:
- triple bottom line analyses
- and so much more
3. Creativeplus - Agency PowerPoint Template

Are you running a creative agency? This PowerPoint template is sure to be a hit. It's useful for pitching projects or showing off your design chops. It's easy to update and has a fresh design that's certainly on-trend.
If you're still looking for presentation outline templates that save you time, Envato Elements might be right for you. Grab a template and design it rapidly!
More PowerPoint Presentation Templates
We've just scratched the surface of what's possible with templates for PowerPoint. Templates are the best way to save many hours of design work. Here are several articles with the best selection of PowerPoint templates:

More Powerful PowerPoint Resources
Learning how to write a presentation outline is just one of the many skills you need to become a confident presenter. Think of your learning journey in PowerPoint as a series of building blocks. Each skill gives you a steadier foundation.
Also, check our top-rated learning resource, How to Use PowerPoint (Ultimate Tutorial Guide.) It's a comprehensive source of the best learning materials to master PowerPoint.
You've already learned how to write an outline for a presentation. Keep learning with these three excellent tutorials:

Start Writing Your PowerPoint Presentation Outline Today
You learned how to make a PowerPoint outline for a presentation. Writing a PowerPoint outline is a surefire way to save time and improve your presentation. It brings a focus and consistency to the content.
Every presentation is different. That means that every PowerPoint outline will differ. This guide offers general guidelines to help you. But remember to be confident in your subject knowledge.
Before you start writing a presentation, remember that writing an outline first is the best way to do it. Set a goal, write a few key sections, and fill in your supporting details. Then, rapidly build the slides with your content.
Don't forget! PowerPoint presentation templates from Envato Elements are major time-savers too! Use them alongside your outline to write presentations quickly.
Editorial Note : This post was originally published in February of 2020. It's been updated for accuracy with help from Sarah Joy .

Home Blog PowerPoint Tutorials How to Use Outline View in PowerPoint
How to Use Outline View in PowerPoint

PowerPoint provides different views to help presenters manage their presentations and PowerPoint templates . The Normal view is often used when creating presentations, the Slide Sorter view helps sort slides easily, the Reading view gives ease of reading the slides for review purposes, whereas the Slideshow mode is used for presenting presentations. Similarly, if you need to review and manage your outlines, the Outline View in PowerPoint is the right option.
How to Switch to Outline View in PowerPoint
By going to View -> Outline View , you can see the outline for your presentation. This view displays the presentation as titles and text within slides to give you an overview of the slide content.

The PowerPoint Outline View can also help to define the structure of your presentation beforehand, or review your slides after you have created a basic outline and need to start working on your slides. This can help you review if the outline makes sense. You can also use it during or after the completion of your presentation for the same purpose.

There are numerous handy options in the PowerPoint Outline view accessible via the right-click context menu. This includes options to expand or collapse the list and delete, move, or add new slides.

How to Print an Outline of the Presentation
To print an outline for your slides, go to File -> Print and select Outline via Settings . Select the printer and click Print .

Outline View in PowerPoint is a view that displays your presentation in the form of titles and text outlines, allowing you to manage and review the structure of your slides.
To switch to Outline View, go to the View tab and select “Outline View.” This will display your slides as an outline of titles and text.
Outline View helps you easily review the structure of your presentation, manage content, and ensure that the flow of your presentation is logical. It also allows you to quickly move, add, or delete slides and text.
Yes, you can edit your slide titles and text directly in Outline View, which can help streamline the process of organizing and refining your presentation content.
To print an outline of your presentation, go to File -> Print, then select “Outline” in the Settings dropdown. Choose your printer and click “Print.”
The right-click menu in Outline View offers options to expand or collapse the outline list, add, delete, or move slides, and adjust the text within the outline.
You should use Outline View when you want to focus on the structure of your presentation, review your slide content in a simplified form, or make adjustments to the organization of your slides.
Final Words
When designing your presentation outline in PowerPoint, a few considerations should include the title, introduction to your topic, subheadings, the number of slides you intend to use, a summary of your slides to make your content memorable with key action points, and a conclusion. The Outline View in PowerPoint can be a good option to review the basic outline for your presentation to remain on track when working on your slides.
Like this article? Please share
Microsoft PowerPoint, PowerPoint Tools Filed under PowerPoint Tutorials
Related Articles

Filed under PowerPoint Tutorials • September 9th, 2024
How to Convert Illustrator to PowerPoint
Extract powerful graphics and integrate them into your presentation slides. Learn how to convert Illustrator to PowerPoint with this guide.

How to Convert InDesign to PowerPoint
Repurpose your indd files as presentations by learning how to convert InDesign to PowerPoint. Step-by-step guide for Windows and Mac users.

Filed under PowerPoint Tutorials • August 13th, 2024
How to Make Text Transparent in PowerPoint
Customize your presentation slides by learning how to make text transparent in PowerPoint. Ideal to create blended titles.
Leave a Reply
- Strategy & planning
How to make a presentation outline: a step-by-step guide

Georgina Guthrie
May 24, 2024
Whether you’re building a house, baking a cake, or creating a killer presentation — having a plan in place before you begin work will make the task much easier. Planning saves time and enhances the quality of your work. This is especially true for business presentations, which is why you should always start with a presentation outline.
A presentation outline is a streamlined version of your talk, capturing the general direction and key points. Its purpose is to shape your thinking, organize your thoughts, and ensure your material is presented logically.
In this article, we’ll explore what a presentation outline is, how storytelling can engage your audience, and how to create a flawless outline. Let’s dive in.
Defining your presentation’s goal
What are you trying to achieve with your presentation? A good starting point is to think about the overall purpose.
Types of presentation goals
There are six main types of presentation goals:
- Inspire action
- Inspire or motivate
In a business setting, ‘to inform’ is most common, but it’s usually coupled with at least one other. For example, if you’re there to talk about quarterly results, then you’ll want to inform and motivate. However, if you’re a business coach, your goals will likely be to inspire, motivate, and entertain.
Once you’ve defined your goal, you’ll want to understand the impact you hope to have on your audience. To answer this, ask these questions:
- What do I want people to take away from my presentation?
- How will what I talk about help others in the room?
- What do I want people to do after my meeting?
From here, you should be able to create a summary of your presentation’s goals and purpose in one or two sentences. Put that on your first slide for easy reference.
Understanding your presentation’s audience
Knowing your audience is crucial for crafting a presentation that resonates. Consider their knowledge level, interests, and what they hope to gain from your presentation. Tailoring your content to meet their expectations will make your presentation more engaging and effective.
Questions to understand your audience
- What is the demographic makeup of your audience (age, gender, profession)?
- What are their roles in the organization or industry?
- How familiar are they with the topic you will be presenting?
- Do they have any preconceived notions or misconceptions about the topic?
- What are their primary interests related to the topic?
- Why are they attending your presentation? What do they hope to gain?
- What are their current pain points or challenges related to the topic?
- How can your presentation address these challenges?
- Do they prefer visual aids, interactive sessions, or straightforward lectures?
- Are they more inclined towards data-driven insights or anecdotal evidence?
Choosing your story structure

Stories are powerful tools for bringing people and ideas together. Great stories persuade and inform; the best stories inspire and stay with us. But we don’t often see this happening enough in the boardroom.
Stats and numbers are important for supporting claims, but if you want to inspire your audience, you need to weave those stats into a story. T he truth is, most stories are formulaic, so once you’ve chosen your formula, filling in the blanks is pretty easy.
Let’s look at a few popular story structure formulas below.
1. Fact and story
Mixing storytelling with facts works in a kind of mutually supportive cycle. Facts add substance to the story; the story adds interest to the facts.
In this structure, you weave the two together and move back and forth between the two.
- Start with a ‘what if’ question. For example, if you were pitching a vacuum cleaner, your initial sales pitch might be ‘what if you didn’t have to lose suction?’
- Add facts that illustrate the current state of things. To continue with our example, it might be current stats on traditional vacuums losing suction. Keep alternating facts with fiction throughout the body of your presentation.
- End on a high note that makes the listeners feel like they learned something and want to move to action because of it. For example, to invest in your new product, or to sponsor your new app .
2. The hero’s journey
From Odysseus to Chihiro , adventure stories typically feature a hero who goes on a journey fraught with peril and learns a vital lesson at the end of it. It’s a formula employed by thousands of writers — and you can draw from it to add some drama to your presentation.
This structure works really well for inspirational personal stories, or tales about a company from its humble beginnings to the success it is today.
- Begin somewhere neutral. The situation is neither ideal nor unbearable.
- Introduce a challenge — one that needs to be solved.
- Present a worsening situation. The problem is being addressed, but things are still getting worse.
- Define rock bottom. The situation seems impossible; there is apparently no way forward and all seems lost. Until…
- Introduce a new discovery that offers hope.
- Show your work. Armed with your new abilities, you tackle the issue head-on.
- Resolve the problem, but instead of returning to the way things were before, the hero (you) discovers an even better way of living.
- Finish with a lesson, which you can share to inspire your audience.
3. The pitch
The ‘pitch’ style of presentation is commonly used by salespeople. The goal is to show how a product or idea can help an individual overcome a hurdle toward a positive outcome. The story should be relatable, so the audience can picture themselves in the situation and, therefore, benefitting from the solution.
- Start with a summary of the way things are in simple terms.
- Introduce the problem or hurdle that needs solving. Make it relatable to help your audience put themselves in the situation.
- Introduce a solution: give your audience a glimpse into a possible solution.
- Create a fork in the road: Give your audience a couple of options for solving the problem. Offer an average option first, then follow up with a better one.
- Close: Choose the better option and explain why that’s the best one (and only real suitable choice).
- Finish up by telling the audience exactly how to solve the problem , step by step.
- Talk about extra benefits that extend beyond simply solving the problem. Finish on an uplifting high.
4. The explanation
This presentation format is for when you want to teach your audience something — whether that’s a process, a new skill, or a way to overcome a problem. It has similarities with the fact and story structure, insomuch as facts should weave into the story.
- Explain how things are at the moment , what the goal looks like, and how you plan to get there. You can even start with a story to add emotional interest from the get-go.
- Take your first step on the journey toward the final destination.
- Add more steps that build on this.
- Take a moment to recap the points you’ve covered so far while tying them to the main point. This will help your audience visualize the ground you’ve covered and see where you’re heading.
- Add the finishing pieces to the puzzle and lead your audience to the end.
- End your journey so your audience feels as though they’ve learned something new.
5. The opportunity
A close relative of the pitch, this three-part structure swaps a hurdle for an opportunity. Here, you want to show your audience that a problem they thought they had actually had an easy fix.
- Start with the situation as it is now.
- Next, add a ‘but’ — this could be a small hiccup that stops things from being as good as they could be. For example, our chocolate pudding company is doing really well. But we could be doing better if we changed supplier.
- Talk about the opportunity, with as many facts and stats as possible to make it feel achievable and real.
- Add a conclusion.
- Explain why the product or service meets the challenges raised. Add more stats and facts to support your point.
Storyboarding your presentation outline
Now you’ve worked out your structure, it’s time to start building your presentation. Storyboarding is the best way to do this. In the same way that directors use storyboards to map out their films scene-by-scene, you’re going to use it to map out your presentation slide-by-slide.

(Don’t worry, you can do stick people and squiggles if drawing isn’t your strong point.) Image Source
The trick here is to avoid adding too much detail too quckly. Ideally, have one or two sentences on each slide summarizing what each one will address. Stick to one main point per slide and no more than 3 subpoints.
You can do this with pen and paper, but since you’ll likely end up going digital eventually, you might as well start there. It looks far neater, and it means that if you need to change something, it’s as simple as deleting or editing a cell or slide rather than starting over.
If you don’t want to start from scratch, a business presentation template is a great place to start. You can storyboard directly on the template, and then flesh out each of the slides in more detail once you’re ready.
Once you’ve got your storyboard mostly ready, all that’s left is to fill in the details! And of course: make it look great.
Formatting your presentation
Proper formatting is crucial to ensuring your presentation is visually appealing and easy to follow. Effective formatting helps to highlight key points, maintain audience engagement, and enhance overall comprehension. Here are some guidelines and best practices for formatting your presentation:
Choose a consistent theme
- Use a professional and clean template that aligns with your topic and brand.
- Ensure the template is consistent throughout the presentation to maintain a cohesive look.
- Choose a color scheme that is visually appealing and easy on the eyes.
- Stick to 2-3 primary colors to avoid visual clutter.
Organize your slides
- Include a title slide with the presentation topic, your name, and date.
- Add a relevant image or graphic to set the tone.
- Provide an agenda or outline slide to give the audience an overview of what to expect.
- Use section divider slides to clearly separate different parts of your presentation.
- Include a brief title for each section.
Keep text clear and concise
- Use easy-to-read fonts such as Arial, Helvetica, or Calibri.
- Avoid overly decorative fonts that can be hard to read.
- Ensure the font size is large enough to be readable from a distance.
- Titles should be at least 24-30 points, and body text should be 18-24 points.
- Use bullet points to break down information into digestible chunks.
- Keep each bullet point concise, ideally one line each.
Visual elements
- Include high-quality images, charts, and infographics to illustrate key points.
- Ensure visuals are relevant and add value to the content.
- Maintain consistency in the style and size of images and graphics.
- Align visuals properly to avoid a cluttered appearance.
- Use white space effectively to prevent slides from looking overcrowded.
- White space helps to highlight key elements and improves readability.
Multimedia and animation
- Embed short videos to demonstrate concepts or provide visual examples.
- Ensure videos are of high quality and relevant to the content.
- Use animations sparingly to emphasize important points without distracting the audience.
- Stick to simple transitions and avoid overly complex animations.
Data presentation
- Use charts and graphs to present data clearly and concisely.
- Label axes and include legends for clarity.
- Avoid overwhelming the audience with too much data.
- Highlight key data points and trends.
Final touches
- Review the presentation for spelling and grammatical errors.
- Ensure all information is accurate and up-to-date.
- Rehearse your presentation multiple times to ensure smooth delivery.
- Check the flow of slides and the timing of animations and transitions.
By following these formatting guidelines, you can create a presentation that is not only visually appealing but also effective in communicating your message. Proper formatting helps to keep the audience engaged and ensures that your key points are clearly conveyed.
Presentation tools
For those looking for an intuitive and efficient way to create professional presentations, consider using Cacoo , our online diagramming tool. Cacoo allows you to collaborate in real time, offering a variety of templates and design tools that make planning, designing, and presenting a breeze. Whether you’re working solo or with a team, Cacoo helps you streamline the presentation creation process, ensuring that your final product is polished and impactful.
Ready to take your presentations to the next level? Try Cacoo for free today and experience the difference it can make in your workflow.
This post was originally published on April 07, 2021, and updated most recently on May 24, 2024.

5 ways to use diagrams to visualize your ideas

How to create an amazing elevator pitch using mind maps
Subscribe to our newsletter.
Learn with Nulab to bring your best ideas to life
- Frequently Asked Questions (FAQ)
PowerPoint Tip: Start Your Presentation with an Outline
PowerPoint presentations are much like college essays. They present cited, relevant information that is meant to educate and inform. They are made for a wide audience. Do you remember what your teachers used to advise you to do when they assigned an essay writing assignment?
“Don’t forget to make an outline before you write.”
You can use the same concept in your next presentation. Just because it contains pictures and encourages interactivity doesn’t mean that it can’t be approached in a similar fashion. Outlining key points is a powerful strategy, and PowerPoint 2013 has a very useful tool to help you do it. This article will explain the importance of outlining and how to use the PowerPoint Outline View .
Why Create an Outline?
The answer is fairly simple: outlining focuses your presentation. It acts as a sort of pre-first draft, giving you leeway to throw ideas on the table and figure out which ones work best for your presentation. By putting everything you’ve thought of in one space, you can see your ideas and points side-by-side and more efficiently eliminate ones that don’t contribute to your overall message. By tightening the screws and oiling the gears, you will have a more cohesive presentation that works well both in presenting (on your end) and receiving (on the audience’s end).
PowerPoint Outline View
When you switch to Outline View in PowerPoint, you will see all the text currently within your title and text placeholders in a document-style format that appears on the left side of the screen. This will allow you to go through all the text and edit it without having to locate your text boxes one by one, slide by slide. It is a very useful tool to use when you want to focus on both text and image in a single go, consolidating your work from different areas of the screen.

Outline View can easily be switched on and off by using the Ctrl+Shift+Tab key combination or via VIEW → Outline View .

Text typed in Outline View will appear in the title of the current slide. Press Enter to add a new slide. By pressing Tab the current item will be indented and become a subitem of the previous item. Shift+Tab removes the indentation. All of these features are also accessible via the context menu, which can be accessed by right-clicking an outline item.
Importing an Existing Outline
If you have already created an outline in Microsoft Word, you can easily convert it into PowerPoint slides. PowerPoint will use the heading styles that you assigned to your text in Word to determine which paragraphs are titles and which are content. Heading 1 lines will become slide titles, Heading 2 lines will become bulleted items on the slides, and Heading 3 lines will become sub-bulleted items.
To import an existing outline file, click the drop-down menu under New Slide on the HOME tab, and select Slides from Outline . Navigate to the outline file, and click Insert .

Another option is to create an outline in .txt format using Notepad (or any other text editor), as shown in the screenshot below.

Normal paragraphs will be converted into slide titles, whereas paragraphs indented by tabs will result in bulleted lists.
All of the best presentations include three things: research, quality, and purpose. PowerPoint’s Outline View can help you achieve the quality work you desire as you create your presentation and impress your audience with your vision. By consolidating all of your important content into a single segregated window, you can more easily weed out the text you don’t want and refine the text you do want. That way, by the end, you’ll achieve your goal.
- Presentation Tips and Techniques
- April 25, 2016
About ShapeChef

Blog Categories
- Slides and Objects
- Video and Audio
Copyright © 2024 Wulfsoft. All rights reserved.
- Terms of Service
- Legal Notice
Google Slides
Create Effective Presentation Outlines: A Step-by-Step Guide with Tips & Examples

Table of Contents
What is a presentation outline.
A presentation outline is like a roadmap for organizing your thoughts and delivering your message smoothly during a presentation. It helps you structure your content logically, ensuring that your audience can follow along easily. By providing a clear framework, an outline enhances the clarity and effectiveness of your presentation.
Importance of Presentation Outline
1. Clarity and Focus
Using an outline keeps your presentation organized and focused, preventing you from going off track. It ensures that your presentation has a clear purpose and that all the information you share is relevant to your main points.
2. Logical Structure
A well-crafted outline ensures that your presentation flows logically, guiding your audience smoothly from one point to the next. This helps your audience follow your train of thought and understand your message more easily.
3. Enhanced Delivery
Having a clear outline can boost your confidence and make your delivery smoother. With a structured plan, you’re less likely to forget important points or ramble on, resulting in a more professional presentation.
4. Time Management
An outline helps you manage your time better by estimating how long each part of your presentation will take. This ensures that you stay within the allotted timeframe, keeping your presentation on track and engaging for your audience.

Create presentation slides with AI in Seconds in Google Slides
10M+ Installs
Works with Google Slides

How to Build Strong Presentation Outline s?
1. Purpose of Presentation
Understanding why you’re giving your presentation is crucial for planning its structure. Identifying your goal means thinking about what you want your audience to get out of it. This clarity forms the basis of your whole presentation. There are six potential reasons you might be presenting:
- Sharing information
- Teaching something new
- Making it enjoyable
- Inspiring action
- Convincing people of something
- Motivating them
Thinking about your goal will help you make a presentation that really grabs attention. Answering these questions can help you figure out what your goal is:
- What do I want people to learn or understand from my presentation?
- How will my presentation make a difference to those listening?
- What do I want people to do after my presentation?
Once you have the answers, you’ll have a good idea of what your presentation should cover and where to start.
2. Consider Color and Design
How you present your pitch matters just as much as what you say. Take a moment to think about the fonts and colors you’ll use on your slides. Research suggests that red can convey excitement and grab your audience’s attention, while white gives off a sense of simplicity and clarity.
3. Establishing Structure: Arrange Your Ideas in a Logical Order
When crafting your presentation, it’s important to structure your ideas in a clear and logical sequence. Start with an introduction to set the stage, followed by the main body where you delve into your key points, and wrap it up with a conclusion to summarize your main ideas.
4. Engaging Your Audience
When you’re getting ready for your presentation, think about how you can start off in a way that grabs everyone’s attention. You could ask a thought-provoking question, share an interesting story, or begin with a meaningful quote. The main thing is to get your audience interested right from the beginning and set the tone for the rest of your talk.
5. Adding Visuals
Give some thought to whether you want to include pictures, videos, or other visual stuff in your presentation. Even if your outline doesn’t mention exactly what visuals to use, you can suggest where they might fit in to help explain your ideas.
6. Encouraging Action
Come up with a clear and compelling message to encourage your audience to take action. Whether it’s encouraging customers to try out a new product or inviting people to join a demo, make sure they understand what’s in it for them. And if your presentation doesn’t really need a specific call to action, just wrap up by summarizing your main points and saying thanks for listening.
Alternatively, you can skip the hassle of crafting a presentation outline manually – try SlidesAI for seamless assistance .

Strategies for Crafting an Engaging Presentation
1. Understanding Your Audience
Take some time to know your audience by researching beforehand. This helps you adjust your presentation to connect with them better.
2. Enhance with Quotes, Testimonials, or Data
Make your presentation more interesting by adding extra info like quotes, testimonials, or data. It can make your audience more engaged and reinforce your message.
3. Visualize Your Concepts
How you show your ideas matters a lot. Tools like SlidesAI can help you express your concepts clearly and effectively.
4. Highlight Key Takeaways
Figure out the most important points you want your audience to remember. This makes it easier for them to recall and understand your message.
5. Seek Feedback
Ask for feedback to improve your presentation. It’s a good way to make sure it connects better with your audience.
Presentation Outline Example
Topic: The Impact of Social Media on Mental Health
Target Audience: College students
Time Limit: 15 minutes
I. Introduction (2 minutes)
Attention Grabber : Briefly discuss a real-life example of how social media can negatively impact mental health (e.g., cyberbullying, unrealistic beauty standards).
Introduce the topic : Clearly state the topic and its significance (e.g., “Today, I’ll be talking about the increasing impact of social media on mental health, particularly among young adults like yourselves”).
Preview : Briefly outline the key points that will be covered (e.g., “We’ll explore the positive and negative aspects of social media use, discuss common mental health concerns associated with it, and offer some tips for healthy social media habits”).
II. Main Body (10 minutes)
Positive aspects of social media:
Connection and community : Highlight how social media can help people connect with friends and family, build communities based on shared interests, and combat feelings of loneliness.
Information and self-expression : Discuss how social media can be a source of information, news, and inspiration, and provide a platform for self-expression and creativity.
Negative aspects of social media:
Social comparison and envy : Explain how constant exposure to curated online profiles can lead to social comparison, feelings of inadequacy, and envy.
Cyberbullying and harassment : Discuss the prevalence of cyberbullying and online harassment, their potential to significantly impact mental health, and the importance of online safety.
Addiction and anxiety : Explain how excessive social media use can lead to addiction, anxiety, and sleep disturbances.
III. Conclusion (3 minutes)
Summary : Briefly recap the key takeaways discussed in the presentation.
Call to action : Encourage the audience to be mindful of their social media usage and offer practical tips for developing healthy habits, such as setting time limits, curating their feed, and prioritizing real-life interactions.
Question and Answer : Allocate time for audience questions and address them thoughtfully.
- No design skills required
- 3 presentations/month free
- Don’t need to learn a new software

This is just a sample outline, and you can adapt and modify it based on your specific topic, audience, and time constraints. Remember, a well-structured and engaging presentation will effectively communicate your message and leave a lasting impression on your audience.
Frequently Asked Questions
How can ai help you create a presentation outline .
With the assistance of AI tools like ChatGPT and Gemini, crafting outlines becomes a breeze. Furthermore, you can utilize user-friendly online AI presentation tools such as SlidesAI to effortlessly generate your presentations.
Why is putting your outline on a slide a good idea?
Using a presentation outline can be helpful. It makes things clearer, boosts the speaker’s confidence, and helps manage information better. It also keeps the audience more engaged. But, if your presentation is fast-paced, casual, or focused on a specific area of expertise, you might want to keep the outline short and sweet. Just pick what works best for your situation and audience.
What is the format of the presentation outline?
There are various formats, but a common approach is using bullet points, numbered lists , or headings and subheadings. Choose the format that best suits your content and visualizes your information.
How can I adapt my presentation outline for different audiences?
Adapt your presentation outline by tailoring:
- Content : Depth, complexity, and examples based on audience expertise.
- Language : Formality, jargon, and storytelling to match audience and occasion.
- Visuals : Complexity and style to suit audience understanding.
- Delivery : Pace, volume, and even body language to audience energy.
- Focus : Highlight information most relevant to specific interests.
How long should a presentation outline be?
There’s no set rule; it depends on the complexity of your topic and presentation length.
Can I use a mind map to create a presentation outline?
Yes, mind maps can be a good way to visually brainstorm and organize presentation ideas.
What tools can I use to create a presentation outline?
You can use pen and paper, a word processing software like Microsoft Word, or dedicated outlining tools. Presentation software like PowerPoint also offers built-in outlining features.
Related Posts

8 Types of Presentation with Examples and Tips
Every presentation is different, reflecting your unique business and the information you share. But, some common presentation types are used across various fields and teams. Before diving into specific slides or organization, consider the type that best suits your audience.

How to Create a Table of Contents for PPT: Step-by-step Guide
Have you ever encountered a lengthy PowerPoint presentation where finding specific information felt like a challenge? Tables of contents (TOCs) are a common feature in various writing formats, helping users navigate content easily. Similar to Microsoft Word’s TOC functionality, PowerPoint offers methods for creating your own TOC. This guide will explore these methods, enabling you […]
Save Time and Effortlessly Create Presentations with SlidesAI

How To Turn Powerpoint Into Outline

Do you want to turn your PowerPoint presentation into an outline? You can do it easily by utilizing a built-in feature in PowerPoint. Keep reading to find out the steps to creating an outline from your PowerPoint presentation.
Step 1: Click On The “File” Tab
First, you will need to open up the PowerPoint presentation from which you want to create an outline. Click on the “File” tab in the upper left-hand corner of the screen.

Step 2: Select “Export”
Upon clicking “File”, new options will appear. Click on “Export” from the options in the File tab.

Step 3: Create Handouts
Click “Create Handouts” under the Export tab then press the “Create Handouts” icon.

Step 4: Select “Outline Only”
A popup will appear after clicking on the “create handouts” button. Select the “Outline Only” option and press “Ok”.

That’s it! Once you do so, PowerPoint will generate an outline, and it will open in the MS Word program. If you want to make edits to the outline, simply make them in Word and then save the document. We hope you found this helpful. Thanks for reading!
As you see, it’s quite easy to turn your presentation into an outline using PowerPoint’s built-in feature. All you need to do is follow the steps that are outlined in this article. Thanks for reading!
Related Posts:

How to Create a Presentation Outline: A Step-by-Step Guide with Examples
Master presentation outlines with our easy, step-by-step guide, complete with practical examples.
Why Should You Write a Presentation Outline?
- Enhanced Focus: It helps keep you focused and prevents you from straying off topic.
- Time Efficiency: You save time when creating the actual presentation because you have a clear plan to follow.
- Audience Engagement: A well-organized flow helps maintain the audience's interest throughout the presentation.
- Stress Reduction: Having a structured plan in place can significantly lower anxiety by making you feel prepared.
Method 1: Create Your Outline from Scratch
- Identify Main Points: Begin by determining the three to five central messages you wish to convey. These should form the backbone of your presentation.
- Support with Details: For each main point, include supporting sub-points or data. This might consist of statistics, case studies, or other relevant information that reinforces your primary arguments.
- Introduction and Conclusion: Craft an engaging introduction that captures your audience's attention right from the start. You might use a striking statistic or a pertinent quote to do this. Conclude with a strong summary of the key takeaways and a compelling call to action.
- Introduction: Begin with a surprising statistic or a relevant quote to grab attention.
- Main Point 1: The importance of digital literacy.
- Sub-point: Provide current statistics on global digital literacy rates.
- Sub-point: Discuss a case study on successful digital education programs.
- Main Point 2: The benefits of improving digital literacy.
- Sub-point: Highlight economic benefits.
- Sub-point: Discuss social implications.
Method 2: Use an AI Presentation Maker
- Provide a Prompt: Enter a brief description of your presentation topic into the AI tool.
- Customize the Output: Examine the generated outline. You may need to modify the titles of the slides and their order to better suit your needs.
- Generate Presentation: Utilize the tool to transform the outline into a preliminary draft of your presentation.
- Introduction to Renewable Energy
- Benefits of Renewable Energy
- Challenges and Solutions
- Case Studies
- Conclusion and Future Outlook
Method 3: The Mind Mapping Technique
- Central Idea: Begin by placing the central topic of your discussion at the center of your map.
- Branch Out: Extend branches from the central idea to outline each primary point or theme.
- Sub-branches: Append sub-branches to these main branches to include supporting details, examples, and data.
- Visual Elements: Incorporate colors, symbols, and images to highlight and distinguish various ideas.
- Importance of Sustainability
- Strategies for Implementation
- Future Trends
- Green Energy
- Waste Management
- Sustainable Supply Chains
Method 4: The Storyboard Approach
- Sketch Scenes: Draw or describe each slide or section of your presentation as a panel in a storyboard.
- Narrative Flow: Arrange the panels to ensure a logical progression of ideas.
- Detailing: Add notes for key points, transitions, and how you plan to engage the audience.
- Feedback: Review and rearrange the panels as needed to improve storytelling and impact.
- Panels: Introduction, Definition of Key Terms, Benefits, Challenges, Solutions, Case Study, Conclusion
- Details for 'Benefits' Panel: List of major benefits, supporting statistics, visual graph
Method 5: The Reverse Engineering Method
- Define Objective: Clearly state what you want your audience to learn or do after your presentation.
- Outcome-based Sections: Create sections that directly contribute to achieving the objective.
- Supporting Information: Add information that reinforces each section.
- Logical Sequence: Arrange sections in a way that naturally leads to your conclusion.
- Objective: Convince stakeholders to invest in renewable energy.
- Sections: Introduction, Benefits of Renewable Energy, Investment Opportunities, Success Stories, Call to Action
Method 6: The Comparative Layout
- Identify Topics: List the topics or elements you will compare.
- Comparison Criteria: Define the criteria or parameters for comparison.
- Matrix Setup: Set up a matrix or table in your outline to systematically compare each element.
- Conclusions: Summarize insights or recommendations based on the comparison.
- Topics: Traditional Marketing vs. Digital Marketing
- Criteria: Cost, Reach, Engagement, ROI, Adaptability
- Matrix: Create a table with criteria as rows and marketing types as columns, filling in details for each.
How to create a Presentation from an Outline?
How to use ai to create presentations from outline.
- Install MagicSlides Extension: Start by installing the MagicSlides extension from the Google Workspace Marketplace.
- Open Google Slides: Launch Google Slides where you’ll create your presentation.
- Activate the Extension: Open the MagicSlides extension within Google Slides.
- Enter Presentation Details: Input the topic of your presentation and specify the number of slides you need. This helps MagicSlides understand the scope of your presentation.
- Customize Your Content: You can also input specific text you wish to include on your slides. This step is optional but helps in personalizing the slides to better fit your presentation's theme and content.
Tips for Great Presentations
- Visual Appeal: Use high-quality images and consistent fonts.
- Conciseness: Keep slides concise; aim for no more than six words per bullet point.
- Engagement: Incorporate stories or questions to engage the audience.
- Practice: Rehearse your presentation multiple times to ensure smooth delivery.
Create PPT using AI
Just Enter Topic, Youtube URL, PDF, or Text to get a beautiful PPT in seconds. Use the bulb for AI suggestions.
character count: 0 / 6000 (we can fetch data from google)
upload pdf, docx, .png
less than 2 min
Sanskar Tiwari
Founder at MagicSlides
How to change shape of picture in PowerPoint
How to update PowerPoint
How to group shapes in PowerPoint
30 April 2024
What do text boxes allow you to do in a PowerPoint Presentation?
How to use copilot in PowerPoint
29 April 2024
How to change master slide in PowerPoint
5 AI PowerPoint Generators Who Are Transforming Presentation Creation
How to flip a shape in PowerPoint?
26 April 2024
Stunning presentations in seconds with AI
Install MagicSlides app now and start creating beautiful presentations. It's free!

Get AI-Generated Presentations Ready in Seconds
Free AI PPT Tools
How to Write an Effective Presentation Outline

A well-structured presentation is the key to delivering your message clearly and persuasively. An effective presentation outline not only organizes your content but also ensures a smooth flow that keeps your audience engaged from start to finish. Whether you’re preparing for a sales pitch, a board meeting, or a conference talk, having a strong outline is essential.
Here’s a guide on how to create a presentation outline, along with tips for each section and examples for different presentation scenarios.
1. Start with a Strong Opening: Grab Attention and Set the Tone
Your opening is your first impression, so it needs to grab your audience’s attention and set the stage for what’s to come. The introduction should clearly state your topic, establish your credibility, and give a preview of what the presentation will cover.
Key Components:
- Attention-Grabbing Hook: Start with a compelling story, a surprising statistic, or a thought-provoking question.
- Introduction of Topic and Purpose: Clearly define what you’ll be discussing and why it matters to your audience.
- Agenda Preview: Briefly outline the key points or sections of your presentation to give your audience a roadmap.
Example for a Sales Pitch:
- Hook: “What if I told you there’s a way to increase your sales by 30% in the next quarter with just one strategy?”
- Topic Introduction: “Today, I’m going to share how implementing targeted automation can help your sales team close more deals.”
- Agenda: “We’ll cover three main areas: why automation is critical, how to implement it effectively, and the results you can expect.”
2. Establish Context and Background: Provide Essential Information
Before diving into your main content, it’s important to set the stage by providing context or background information. This section helps your audience understand the significance of your topic and why it’s relevant.
- Background Information: Offer any necessary context, history, or definitions that your audience needs to follow your presentation.
- Problem or Opportunity Statement: Clearly identify the issue you’re addressing or the opportunity you’re highlighting.
- Audience Relevance: Explain why this issue matters to your audience and how it impacts them.
Example for a Board Meeting:
- Background: “As you know, our company has been focusing on expanding our digital presence over the last year.”
- Problem Statement: “However, recent data shows a decline in website traffic and conversion rates.”
- Audience Relevance: “This trend poses a risk to our growth targets and requires immediate action.”
3. Dive into the Main Content: Present Your Key Points Clearly
The body of your presentation is where you’ll dive into the details of your topic. Organize your content into clear, logical sections, each focused on a specific aspect of your topic. Make sure each point builds upon the last to create a cohesive narrative.
- Clear Sections: Break your content into 2-4 main sections, each with a clear headline.
- Supporting Evidence: Use data, examples, stories, or visuals to support each key point.
- Transitions: Smoothly transition between sections to maintain the flow of your presentation.
Example for a Product Launch Presentation:
- Section 1: “Market Trends: Why the Timing is Right for This Product”
- Section 2: “Product Features and Benefits: What Sets Us Apart”
- Section 3: “Go-to-Market Strategy: How We Plan to Capture Market Share”
4. Add Interactive Elements: Keep Your Audience Engaged
Audience engagement is key to retaining attention and making your presentation memorable. Incorporating interactive elements like Q&A sessions, polls, or short activities can make your presentation more dynamic and participatory.
- Questions: Pose thought-provoking questions to encourage audience participation.
- Activities or Demos: If relevant, include a quick demo or hands-on activity to illustrate your point.
- Check-ins: Periodically ask for feedback or input to ensure the audience is following along.
Example for a Training Session:
- Poll: “How many of you have already implemented this strategy? Let’s see where everyone stands.”
- Demo: “Now, I’ll walk you through a live example of how to set this up in your software.”
- Check-in: “Does everyone feel comfortable with these steps? Any questions before we move on?”
5. Address Potential Questions and Concerns: Preempt Common Objections
Anticipating and addressing potential questions or objections before the Q&A session can help reinforce your credibility and make your presentation more persuasive. This section can be woven into your content or addressed in a separate segment.
- Identify Common Questions: Think about concerns or doubts your audience might have and address them head-on.
- Provide Evidence: Use data, testimonials, or case studies to back up your points.
- Clarify Misconceptions: Address any potential misunderstandings or myths related to your topic.
Example for a Funding Pitch:
- Objection: “Some might wonder if our market is already saturated.”
- Response: “However, our research shows that demand is actually increasing, and our unique approach allows us to tap into an underserved segment.”
- Supporting Evidence: “In fact, similar companies in adjacent markets have seen a 20% growth in the past year.”
6. Conclude with Impact: Summarize and Issue a Clear Call to Action
Your conclusion should reinforce your main points, tie everything together, and leave your audience with a strong final impression. Whether you’re aiming to persuade, inform, or inspire, end with a clear call to action or key takeaway.
- Summary of Key Points: Recap the main ideas or solutions you’ve presented.
- Call to Action: Clearly state what you want your audience to do next.
- Memorable Closing Statement: End with a powerful quote, a thought-provoking statement, or a compelling vision.
Example for a Motivational Talk:
- Summary: “We’ve covered three principles that can transform your mindset and drive you toward success.”
- Call to Action: “Starting today, commit to implementing at least one of these strategies in your daily routine.”
- Closing Statement: “Remember, success is not just about reaching goals—it’s about embracing the journey.”
7. Prepare for the Q&A Session: Handle Questions Confidently
If your presentation includes a Q&A session, plan how you’ll manage it. Anticipate tough questions, and be prepared to handle them confidently while staying on topic.
- Encourage Questions: Invite your audience to ask questions and clarify any doubts.
- Stay Composed: Listen carefully to each question, and take a moment to formulate your response if needed.
- Be Honest: If you don’t know the answer, it’s better to admit it than to guess. Offer to follow up later.
Example for a Conference Presentation:
- Encouragement: “I’m happy to answer any questions you have about implementing these strategies.”
- Response Strategy: “That’s a great question—let’s dive deeper into that aspect.”
- Honesty: “I don’t have the exact figure on hand, but I can provide it to you after the session.”
A well-crafted presentation outline serves as the backbone of a successful presentation. By carefully structuring your content and considering each key section, you can guide your audience smoothly from the introduction to the conclusion while keeping them engaged and interested. Whether you’re preparing for a pitch, a seminar, or an internal meeting, following this outline template will help you deliver your message clearly, effectively, and with confidence.
Table of contents
- PowerPoint Training
Outline View in PowerPoint
How to Use Outline View in PowerPoint

PowerPoint Training Features:
Interactive bite-sized lessons
Get Certified
Accurate skill assessments
Customizable, LMS-ready content
4.9 out of 5 on G2

Outline View shows your presentation arranged as an outline and is ideal for quickly adding text to a slide or previewing the structure of a presentation.
View an Outline
- Click the View tab.

The Outline pane appears at the left, showing only the text in your presentation.
You can quickly create an entire presentation by pasting an outline from Word into the Outline pane.
Collapse and Expand Headings
In Outline View, you can collapse or expand headings, subheadings, and text.
- Right-click any slide title in the Outline pane.
- Click the Collapse list arrow.
- Collapse : Collapse only the selected slide.
- Collapse All : Collapse all slides in the Outline view.

You can expand or collapse a heading by double-clicking a slide icon in the Outline pane.
Rearrange Outline Content
- Right-click the slide you want to move.

Adjust the List Level
You can also change the level of slide text using the Outline pane.
- Select an Outline item.
- Increase List Level : Demotes a paragraph by moving it down one level in the outline, increasing its indent level.
- Decrease List Level : Promotes a paragraph by moving it up one level in the outline, decreasing its indent level.

FREE Quick Reference
Free to distribute with our compliments; we hope you will consider our paid training.
- LinkedIn-ready certificate
- Skill assessments
- Bite-sized, interactive lessons
- Saved progress
How-To Geek
How to make a powerpoint presentation from an outline.

Your changes have been saved
Email is sent
Email has already been sent
Please verify your email address.
You’ve reached your account maximum for followed topics.
Quick Links
Compose your outline, create the powerpoint presentation.
When you plan out your slideshow ahead of time, you might use an outline. This helps determine the content for each slide. In Microsoft PowerPoint, you can pull that outline right into the application and transform it into a presentation.
If you already have an outline, you're one step ahead. If not, you can use an application like Microsoft Word or Notepad for your outline.
Related: How to Create and Work with Multilevel Lists in Microsoft Word
Each line in the outline displays on a separate slide even if you have a multilevel outline .

If you use numbering or bullets in an application like Word , those normally won't carry over to the slides. But with software like Notepad, they may. So, depending on the application you use for the outline, this is something to keep in mind.
You can add the outline to an existing presentation, new blank slideshow, or one with a template . Open PowerPoint and choose the slideshow or make a new one.
Related: How to Create a Custom Template in PowerPoint
On either the Home or Insert tab, select the New Slide drop-down menu. Pick "Slides From Outline."

Browse for the outline file on your computer, select it, and click "Insert."

After a moment, you'll see your outline load into PowerPoint. As mentioned, each line of the outline is its own slide.

From there, you can add text, include images, insert animated charts , and use videos as you normally would.
Creating a PowerPoint slideshow from an outline gives you a good jump-start on your presentation.
- Microsoft Office
- Microsoft PowerPoint
- Presentations
- Most Recent
- Infographics
- Data Visualizations
- Forms and Surveys
- Video & Animation
- Case Studies
- Design for Business
- Digital Marketing
- Design Inspiration
- Visual Thinking
- Product Updates
- Visme Webinars
- Artificial Intelligence
How to Write an Effective Presentation Outline

Written by: Unenabasi Ekeruke
Creating a presentation can be nerve-wracking, especially when you're staring at a blank slate.
You’ve probably got tons of ideas bouncing around, but turning them into a slick, impressive presentation is proving a hard nut to crack.
News flash: You’re not alone.
About 80% of presentations fail to deliver their objectives due to poorly organized information, a lack of preparation and scruffy slide decks.
So, how do you avoid this disaster? It all boils down to having a solid presentation outline. Think of it as a roadmap that helps you organize and share your ideas in a clear and logical way.
With the right presentation outline, you can stay on track, keep your audience hooked and ultimately convey your message with clarity and impact.
So whether you're pitching to investors, partners or clients or preparing a presentation for a conference, this article has everything you need to know about writing an effective presentation outline.
Let’s get to it!
Table of Contents
What is the outline of a presentation, why is a presentation outline important, how to write a presentation outline, how to execute your presentation outline with visme.
- A presentation outline will help you organize your thoughts to communicate with your audience clearly and easily. It clarifies the presenter’s primary ideas and organizes the flow of your presentation.
- A presentation outline consists of critical components that are logically arranged for coherence. Utilize best practices, including formatting, audience analysis and visual cues, to deliver the message with impact.
- Use interactive elements from Visme, such as hotspots, polls, animations and links, to add interactivity to your presentation outline.
- Create a presentation outline by signing up for Visme's extensive online presentation tool without dealing with complicated tool setup or program installation issues.
A presentation outline refers to the barebones version of a talk or a speech that summarizes the main points and takes the general direction of the pitch. It allows presenters to structure the flow of information in a manner that is easy to understand.
Without an outline, your presentation can be a nightmare. You could end up shuffling slides around indefinitely and appearing confused. To avoid this situation, the outline clearly lists out everything you want your presentation to achieve.
Before creating your outline, consider the goal of your presentation, who will listen to it, and what interests them. This will help you organize your content to keep them engaged.
Here’s an excellent example of a presentation with an outline.

An outline for presentation is a valuable tool that can assist you in several ways:
- You can ensure that your thoughts flow smoothly and that important points are highlighted and not overlooked.
- Creating an outline for a presentation can help you generate ideas for your presentation and give you a clear notion of what to focus on.
- A presentation outline acts as a foundation for your speaking notes, allowing you to rehearse and prepare effectively.
- It helps you stay more confident because of your polished presentation.
Now that we know why we need to make a presentation outline, let’s dive deeper into how you can write a presentation outline.
1. Decide the Purpose of the Presentation
Decide on the goal of your presentation before you start writing any notes. It serves as a base for the remainder of your outline. Your presentation may have one of the following six objectives: to inform, convince, motivate, inspire action or entertain.
A business, for instance, might use presentations for various reasons. A sales presentation outline would try to convince potential customers to buy a product, while a training presentation might educate staff members on new techniques.
Once you determine this, answer the following questions to specify the purpose.
- What is the main message you want to convey to your audience?
- What problem are you trying to solve and how can your presentation help?
- What is the desired outcome of your presentation and how will you measure its success?
- What key takeaways do you want your audience to remember after your presentation?
- What challenges or objections may your audience have and how can you address them in your presentation?
Upon answering them, write your purpose and summarize it into one or two sentences, then put that on your first slide.
2. Prepare a Structure
Making an excellent presentation starts with a great outline. But the structure is what amplifies the impact of your delivery.
An eye-catching introduction, a body and a conclusion emphasizing your primary ideas are the three essential components of a successful speech .
Here’s what you should include while creating the structure of your presentation .
- An introduction
3. Flesh out Your Outline
Now that you know what to include in the structure, let’s break it down step by step about how to write the outline.
Gather Ideas
When brainstorming, consider the most important things you want to discuss. These could be key points, stories to share, or facts and numbers you want to tell your audience. Write them all down, even if they initially seem a bit random.
Organize your ideas and determine the main message
Armed with a bucket list of ideas, you must later organize and group them. Look for patterns, connections and relationships between your ideas.
Find the most important idea—the main thing you want to tell your audience. Make sure it's clear, short and something they'll find interesting. Recheck your ideas and remove anything that doesn't match your main message or the people you're talking to.
Create a Skeleton Outline
Now that you’ve gathered ideas, it's time to build the framework for your presentation.
Introduction
Begin by introducing your topic and explaining why it's essential. Think of it as the curtain-raiser that gets your audience's attention. Also, clearly state the main point you'll discuss—your "thesis" or purpose for the presentation.
Create a skeleton outline of your presentation by breaking down this main message into smaller parts. Use bullet points or headings to organize these bits of information.
Think of the main points as the big chapters and the subpoints as the smaller sections within those chapters.
To make your presentation flow smoothly, add transitions between your points. These can be simple phrases like "Let's move on to the next point" or "Now, let's build on what we've just discussed." And when you're nearing the end, use a transition like "In conclusion."
Once you have your skeleton outline, add supporting evidence to each point. It could include statistics, case studies, quotes, images, or videos. Make sure whatever you add fits well and backs up your main message.
As you reach the end of the presentation, tie everything together with a solid conclusion. Start by recapping the main points you covered throughout your presentation. It helps reinforce what you've shared and ensure your message sticks.
Next, emphasize the key takeaways—those crucial nuggets of wisdom you want your audience to remember long after the presentation.
Now, consider including a call to action. It is where you invite your audience to do something based on what they've learned. It could be as simple as asking them to share their thoughts, sign up for more information or even take a specific action related to your topic.
If you're feeling creative, create a unique call to action that inspires your audience to engage further.
For instance, if you’re presenting a project presentation to a group of people, you might seek to win their support for your idea or get them involved in its execution. Your audience should know what they get from taking action.
If you need help generating ideas for your presentation, Visme AI writer can help. You can enhance your outline content with fresh angles, Call to Action (CTAs), examples and data points.
Remind the audience of your central point and express gratitude for their attention in the conclusion if the presentation doesn't require a call to action.
As your presentation winds down, open the floor to questions or discussion. It encourages interaction and lets your audience clarify any doubts they may have.
Lastly, list the sources you used in your presentation and acknowledge any individuals or organizations that contributed to your research or material development. It adds credibility and respect to your work.
Read our guide to learn more about how to close a presentation with style . Also, watch this video to learn how to create CTAs that make your audience do your bidding.

4. Add Visual Content
Consider adding visual content, as it has a higher recall rate than text based or video content. It can add meaning to your message, increase interest and invite the viewer to click and consume your content.
Here’s an example of a presentation outline with a colorful image that makes the slide pop.

Visuals can be anything from infographics, videos, photos, GIFs or memes, screenshots or illustrations. However, if you’re including statistics and research findings in your presentation outline slide, consider creating a visual representation of that data.
Visme’s data visualization tools make this easy. They take your data and turn it into beautiful and comprehensive visuals.
Whether you want to create bar graphs, pie charts, line graphs, area charts, histograms, or donut charts, Visme has a wide range of options.
Remember that you don’t need to include all of these visuals while creating the outline. Just mention where and on which slide you’d place the visual elements. It’ll help you organize your ideas as you dive into the body of the presentation.

5. Pay Attention to Color and Design
You must pay attention to the colors, design, layout and style to capture the audience's attention and interest. It must look consistent to give a neat look and feel.
When creating an outline, finalize what color combination and typography you'll use throughout your creative presentation .

Below are the tips you should consider when deciding on it Use color moderately
Everyone enjoys color; that is obvious. Nevertheless, using too many colors might result in chaotic, unattractive presentations.
Your audience's understanding and reaction to your presentation may depend on your color scheme. For instance, choosing dark and subdued colors when discussing a serious subject may be effective. Bright and bold colors may be preferable if your theme is engaging or imaginative.
You don't want the colors in your design to appear intimidating or overpowering to your audience since every color has both good and bad connotations. Hence, understanding marketing color psychology becomes essential.
Watch this video to learn more about color psychology and how to use it in your upcoming presentation design.

Make use of clear and consistent typography
Optimizing your typography can impact how people interpret your message. Therefore, ensure your presentation slide looks well-organized and polished and conveys the intended information.
Here's how you can accomplish that:
- Use fonts that reflect your brand's essence.
- Throughout your presentation, maintain consistency in your text styles. We advise you to use up to three typefaces.
- Avoid using intricate fonts and small, difficult-to-read text. Use readable fonts like Arial, Times News Roman and Calibri for tiny and large screens.
- For titles and at least the body content, use a font size of 34–36.

When putting out your presentation outline, using a tool like Visme can significantly improve your ability to create visually appealing and polished presentations quickly.
The templates from Visme are professionally designed to help you save hours and effort.
Hear what one of our customers has to say about our designs:
Matt Swiren
Manager of Partnership Marketing
Let’s get started on how you can make a presentation outline.
1. Log in to Visme & Choose a Template
Log in or Sign up free to Visme and then click the "Create New" button.
Select "Presentations" from the "Project" menu to browse through Visme's collection of presentation templates. Use a blank or pre-designed template to start from scratch with your presentation design.
Visme offers 500+ presentation templates split into 20+ topic categories, including pitch decks, interactive, business and more. So even if you have no prior knowledge of presentation design, you will likely find an excellent template to use as a starting point.

2. Find the Right Visuals and Design Assets
After you select the template, decide what visuals you will use in the presentation outline. The visuals you select will significantly impact the presentation's overall appearance and feel
Visme gives you access to thousands of high-quality, royalty-free photos and design assets To find your preferred image, browse and select using a particular keyword.

And still, if you don’t find the perfect image for your design needs, you can use Visme's AI image generator to generate professional-quality photos, graphics, art, drawings and paintings.
You simply need to input an accurate prompt that describes what you want. The wizard will automatically generate and present multiple options for you. Additionally, you may use the Visme AI image photo editor to transform your photos into a masterpiece.
3. Choose Legible fonts
Selecting the right brand fonts for your presentation outline holds the same importance as choosing your brand colors .
If the chosen typefaces are of high quality, i.e., easy to read, it can positively impact the audience's understanding of the presentation's context.
But a font that’s too small or hard to read can lead to waning interest and the oversight of essential information. To overcome this situation, we recommend you check out the list of 20 best fonts for presentations for your upcoming one!

Remember to limit the fonts you use to three: one for the title, one for the subheaders and one for the body of your text.
When creating a presentation outline, use your brand fonts to ensure the presentation better reflects your brand voice. This helps maintain consistency and uniformity.

You can easily create and save your branding elements with the brand kit. Or use paste your website URL into Visme's brand wizard to automatically extract your brand assets (fonts, color and logo).
Moreover, to ensure that your key brand information is accurate across all slides while doing the outline, simply create new dynamic fields or edit existing ones. You can assign values and your data will update in real time, speeding up your editing process.
4. Make your Presentation Interactive
One of the most challenging tasks for a presenter is keeping their audience intrigued and engaged. Adding interactivity to your presentation can help attract and hold your audience's attention throughout the presentation.
The best part is that it doesn’t have to be a tough task. If you’re looking to create an immersive experience for your audience and increase engagement, Visme offers interactivity and animation features such as hotspots, hover effects and clickable menus.
You don't need to do everything while making your presentation outline; just remember where to place interactive elements to create an engaging experience for your audience.
5. Revise the Outline Flow
Once you have finished creating the outline, review your slides again to ensure each section flows into the next without disruption. This step is crucial for creating a smooth presentation overview and maintaining audience engagement.
Additionally, if you want to inform viewers about a new idea between portions, use visual cues. For instance, use an eye-catching design element or an inverted color scheme for every transitional slide.

Employee feedback across the company is often needed while creating a presentation outline. The marketing team may want to highlight your growing customer base, while the finance team may add some income and spending numbers.
After the review, feel free to eliminate any redundant or unnecessary information.
You can collaborate with your team and improve your project with Visme’s collaboration tools . Collaborators can access the document and pin, circle, annotate, highlight, add comments and more. This way, you can see your team members' feedback and resolve the comments in real-time.
6. Share It With the Team
We understand the frustration of investing hours of hard work into crafting a presentation only to have it rejected by our superiors or boss.
Sharing and showcasing your work can be beneficial for getting feedback on your presentation outline. You can easily share and publish your presentation online using Visme. It opens the door for simple access and review by enabling you to distribute it quickly using a generated URL or simply embed it on your website.
Watch this video to learn how to collaborate using Visme.
Presentation Outline FAQs
Q. what are the 5 steps to outlining a presentation.
Creating well-structured presentation outlines is essential for successful presentations. Here are the 5 steps:
- Define Your Presentation Goal: What do you want your audience to learn or do after your presentation?
- Brainstorm Ideas: Generate a list of main points and supporting ideas related to your goal.
- Organize Your Thoughts: Arrange your ideas in a logical flow, considering what information builds upon the previous.
- Create a Clear Structure: Craft a compelling introduction, a well-organized body with your main points, and a concise conclusion that reinforces your message.
- Refine and Polish: Review and revise your outline to ensure clarity, conciseness and a smooth transition between sections.
Q. What Are the Three Basic Parts of a Presentation Outline?
A presentation outline typically consists of three main parts:
- Introduction: Hook your audience, introduce your topic, establish your credibility and clearly state your main message or thesis.
- Body: This is the heart of your presentation, where you present your main points and supporting evidence. Use clear transitions between points and maintain a logical flow to keep your audience engaged.
- Conclusion: Briefly summarize your key points, repeat your main message for reinforcement and end with a strong call to action or a memorable takeaway for your audience.
Q. What is a Presentation Script Outline?
A presentation script outline is a detailed, word-for-word plan for your presentation. It includes everything you'll say, from opening to closing remarks. This outline helps ensure you deliver your message smoothly and stay on track, especially if you feel nervous or working on complex information.
Q. What Is the Difference Between a Presentation Outline and a Speaking Outline?
A presentation outline is your presentation's comprehensive blueprint, covering all the main points and supporting details. A speaking outline, or speaker note, is a shorter version used as a reference while presenting. It typically includes key phrases, cues and transitions to guide you through your talk.
Level Up Your Presentations with Visme
As we have explored the ins and outs of making a presentation outline, it's clear that this process goes beyond just putting bullet points in order.
By organizing each part of your outline, arranging sub-points and adding visuals, you're crafting an immersive experience for your audience. This experience grabs attention, helps them understand and keeps them engaged.
With Visme, you can create an impressive presentation outline with an intuitive editor and advanced features. Additionally, if you want your audience to watch your presentation at their convenience, you can use Visme's presentation recording software .
Visme offers a wide selection of templates to take your presentation outline to the next level. There are millions of pixel-perfect graphics, icons and design elements to make your presentation come to life.
Sign-up today and make your presentation shine.
Create beautiful and engaging presentations with Visme

Trusted by leading brands
Recommended content for you:

Create Stunning Content!
Design visual brand experiences for your business whether you are a seasoned designer or a total novice.
About the Author
Unenabasi is a content expert with many years of experience in digital marketing, business development, and strategy. He loves to help brands tell stories that drive engagement, growth, and competitive advantage. He’s adept at creating compelling content on lifestyle, marketing, business, e-commerce, and technology. When he’s not taking the content world by storm, Unenabasi enjoys playing or watching soccer.
- Interactive Presentation
Practical Presentation Outline Examples For Success (+ 8 Must Have Elements)
Jane Ng • 05 April, 2024 • 6 min read
Looking for Presentation Outline Examples ? Do you want to take your presentations from mediocre to magnificent? The secret weapon in achieving that transformation is a well-crafted presentation outline. A clear and organized outline not only guides you through your content but also ensures your audience stays captivated throughout your talk.
In this blog post, we're going to share practical presentation outline examples and 8 key elements for constructing your own outlines that will leave a lasting impression.
Table Of Contents
What is presentation outline, why is presentation outline important, 8 key elements of presentation outline , presentation outline examples, key takeaways , faqs about presentation outline examples.

Start in seconds.
Get free templates for your next interactive presentation. Sign up for free and take what you want from the template library!
| What is a presentation outline? | A structure that highlights the main points, ideas, and key elements in your presentation. |
| How many basic parts should be in the presentation outline? | 3 main parts, including the introduction, body, and conclusion. |

A presentation outline is a plan or structure that helps you organize and deliver a presentation or speech. It's like a map that guides you through your talk.
- It outlines the main points, ideas, and key elements you intend to cover during your presentation in a logical and organized sequence.
- It ensures that your presentation is clear, logical, and easy for your audience to follow.
In essence, it's a tool that helps you stay on track and communicate your message effectively.
A presentation outline is a valuable tool that enhances both the organization and delivery of your presentation.
- It benefits you as a presenter by reducing stress and improving focus, while also benefiting your audience by making your message more accessible and engaging.
- If you're using visual aids like slides, an outline helps you synchronize your content with your visuals, ensuring they support your message effectively.
- If you need to make last-minute changes or adapt your presentation, having an outline makes it easier to identify and adjust specific sections without overhauling the entire presentation.
Whether you're giving a business presentation, a school lecture, or a public speech, an outline is a key element in ensuring your presentation's success.

A well-structured presentation outline should include the following key elements:
1/ Title or Topic:
Begin your outline with a clear and concise title or topic that represents the subject of your presentation.
2/ Introduction:
- Hook or Attention-Grabber: Start with a compelling opening statement or question to engage your audience.
- Purpose or Objective: Clearly state the purpose of your presentation and what you aim to achieve.
- Main Points or Sections : Identify the major topics or sections that you will cover in your presentation. These are the core ideas that support your thesis statement.
3/ Subpoints or Supporting Details:
Under each main point, list the specific details, examples, statistics, anecdotes, or evidence that support and elaborate on that main point.
4/ Transition Statements:
Include transition phrases or sentences between each main point and subpoint to guide the flow of your presentation smoothly. Transitions help your audience follow your logic and connect the dots between ideas.
5/ Visual Aids:
If your presentation includes slides or other visual aids, indicate when and where you plan to use them to enhance your points.
6/ Conclusion:
- Summary: Recap the main points you've discussed during your presentation.
- Include any final thoughts, a call to action, or a closing statement that leaves a lasting impression.
7/ Q&A or Discussion:
If applicable, mention when you'll open the floor for questions and discussion. Be sure to allocate time for this if it's part of your presentation.
8/ References or Sources:
If you're presenting information that requires citations or sources, include them in your outline. This ensures you give credit where it's due and can reference them during your presentation if needed.
Here are some additional tips for creating a Presentation Outline
- Time Allocation: Estimate how much time you intend to spend on each section of your presentation. This helps you manage your time effectively during the actual presentation.
- Notes or Reminders: Add any reminders, cues, or notes to yourself that will help you deliver your presentation effectively. These can include tips on delivery, body language, or specific points to emphasize.

Here are a few presentation outline examples for different types of presentations:
Example 1: Sales Pitch Presentation - Presentation Outline Examples
Title: Introducing Our New Product: XYZ Tech Gadgets
Introduction
- Hook: Begin with a relatable customer problem.
- Purpose: Explain the presentation's goal.
- Thesis: "Today, I'm excited to introduce our innovative XYZ Tech Gadgets designed to simplify your life."
Main Points
A. Product Features
- Subpoints: Highlight key features and benefits.
B. Target Audience
- Subpoints: Identify potential customers.
C. Pricing and Packages
- Subpoints: Offer options and discounts.
Transition: "I'm glad you're interested in our product. Let's talk about the different ways you can purchase it."
Purchase and Support
- a. Ordering Process
- b. Customer Support
- Recap product highlights and benefits.
- Call to action: "Visit our website or contact our sales team to get your XYZ Tech Gadgets today."
Q&A Session.

Example 2: The Evolution of Jazz Music - Presentation Outline Examples
Title: The Evolution of Jazz Music
- Hook: Begin with a famous jazz quote or a snippet of iconic jazz music.
- Purpose: Explain the goal of the presentation.
- Thesis: "Today, we'll take a journey through time to explore the fascinating evolution of jazz music."
A. Early Origins of Jazz
- Subpoints: African roots, New Orleans as a melting pot.
B. The Jazz Age (1920s)
- Subpoints: Swing music, jazz legends like Louis Armstrong.
C. Bebop and Modern Jazz (1940s-1960s)
- Subpoints: Charlie Parker, Miles Davis, experimental jazz.
Transition : "Let's now turn our attention to the diversity of jazz styles, which is as vast and complex as the history of the music itself."
Different Styles of Jazz
- a. Cool Jazz
- b. Fusion Jazz
- c. Latin Jazz
- d. Contemporary Jazz
Influence of Jazz on Popular Music
- Subpoints: Jazz's impact on rock, hip-hop, and other genres.
- Summary of the evolution of jazz music.
- Call to action: "Explore the world of jazz, attend live performances, or even pick up an instrument to contribute to this ever-evolving art form."
Presentation outlines are indispensable tools that can elevate your presentations from good to great. They provide structure, organization, and clarity, ensuring that your message reaches your audience effectively. No matter if you're delivering an educational presentation, a convincing sales pitch, or an interesting speech, these presentation outline examples aim to offer you valuable information.
To take your presentations to the next level, leverage AhaSlides. With AhaSlides , you can seamlessly integrate interactive features into your presentation, such as spinner wheel , live polls , surveys , quizzes , and audience feedback features.
These interactive features not only enhance audience engagement but also provide valuable insights and real-time interaction, making your presentations more dynamic and memorable.
So, let’s explore our template library !
📌 Tips: Asking open-ended questions help you to create an outline for presentation easier!
What should a presentation outline include?
Title, Introduction, Key points, subpoints, transitions, visuals, conclusion, Q&A , and time allocation.
What are the 5 parts of a presentation?
Introduction, main points, visuals, conclusion, and Q&A.
How do you outline a project presentation?
Define objectives, list key topics, organize content logically, and allocate time.
Do you need an outline for a presentation?
Yes, an outline helps structure and guide your presentation effectively.
Ref: Indeed | EdrawMind

A writer who wants to create practical and valuable content for the audience
Tips to Engage with Polls & Trivia
More from AhaSlides

30 Perfect Presentation Outline Templates (+Examples)
A presentation outline template gives you an overview of what encompasses an entire presentation. Based on the outline, you can start dealing with one slide at a time and then into the nitty-gritty of it. You may consider as a roadmap that leads to a successful final presentation and impress the attendees .
- 1 Presentation Outline Templates
- 2 What is the outline of a presentation?
- 3 Presentation Outline Examples
- 4 How do you write an outline for a presentation?
- 5 PowerPoint Outline Examples
Presentation Outline Templates
What is the outline of a presentation.
You can make a presentation outline template using just a sheet of paper or a word processing software of your choice. For instance, if you intend to make a PowerPoint presentation, it would be best to create the whole thing from your computer itself.
Using presentation outline examples and templates can make it easier for you to come up with a standout presentation. Moreover, the template helps you organize your ideas in a logical way. This method ensures that you will include all of the most important details of your presentation.
The template allows you to collect all of the information needed to communicate with your target audience throughout your presentation. You can use headers, bullet points, footers, and even graphics that you need in your presentation. The outline helps you create and put together the perfect message that you want to deliver.
Since you will use the presentation outline template as your guide when presenting, it is therefore important to organize the points logically. For instance, the outline must begin with an introduction where you will invite your audience to your presentation.
Here, you will highlight what your presentation involves. The introduction plays a crucial role in your presentation since this is where you grab your audience’s attention from the start. You might feel stressed at the start but just try to remain calm. Making an amazing first impression isn’t as difficult as you may think.
After your introduction, you will come to the substance of your presentation – and you can find this in the body. This section consists of your main points followed by their own sub-points.
After the body comes the conclusion where you will give a summary of your whole presentation. If you’re making a sales pitch, have to conclude with a CTA. Another great way to conclude your presentation is with an entertaining anecdote or a powerful quote.
Presentation Outline Examples
How do you write an outline for a presentation.
In analogy, you can compare your presentation outline template to a roadmap you will use as a guide to move your audience from where they are at the start of your presentation to where you want them to be by the end of it. Here are some points to consider when composing your own PowerPoint outline example:
- Determine your goal When writing an outline for your presentation, the first thing you have to decide on is your goal. You should be specific with your goals and make sure these are highly achievable in the situation and timeframe you have. For instance, when making an oral presentation example, make sure you have enough time to discuss all of the points in your outline.
- Analyze your audience This determines the starting point of your presentation. Consider all of the aspects of your audience to help you determine where you should begin with your message. For instance, when making a sales presentation outline, you may want to present your audience with a problem that you know they all have. Then you can present the solution in the form of the products or services you offer.
- Plan the content of your presentation As soon as you have formulated your goal and analyzed your audience, you are now prepared to plan the content of your presentation. You can think about having 3 levels in your presentation outline template: The highest levels consist of the topics that you want to discuss – usually about 3 to 5 topics Break each of these topics into the points you want to make Decide on the supporting information you will use to prove or support each point.
- Ask for feedback and opinions To deliver an impactful presentation, it is important to ask for other people’s feedback and opinions. These people could be a mentor or somebody who gives a lot of presentations. These persons may help you make important changes that you might have overlooked. In the absence of this kind of help to criticize your outline, you may rehearse your presentation on your own then record yourself. Then send the recording to someone through email for their feedback and comments.
- Include visual elements Whenever possible, it’s a good idea to incorporate visual elements in your outline as they help greatly in improving your overall presentation. By nature, people understand visual content more than they do words. Besides, even a simple illustration or diagram can potentially summarize a significant amount of written text. It pays to use graphs, images, diagrams, and the like in your outline. To make it more effective, use a clear and standard font that’s easy to read for the text. Also, make sure that everyone can read the size of the text that you choose.
- Think about the most important information Usually, in presentations, you cannot accommodate all of the details. As such, it becomes vital to include only special information that you can easily forget like as names, locations, and dates. You should maintain a clear statement of what your presentation is all about. Remember that your thesis statement serves as a guide on what to include in your presentation. In addition, this also prevents you from straying away from your main topic. Also, you must keep your outline clear but simple.
- Consider creating an alphanumeric outline Consider the use of alphanumeric characters to organize your outline better. For instance, you can use capital letters for the main points and small letters for sub-points. Make sure to itemize each level of your outline. You can use Arabic numbers, Roman numbers, uppercase and lowercase letters, and so on.
- Follow a clear and logical structure There should be a logical sequence in the order of points or events in your outline. This enables your audience to easily understand your message without getting confused. For instance, when you’re creating a narrative – this should begin with an introduction, a body of content, and a conclusion. You will have an easier time with your presentation if your outline has a clear and logical structure.
PowerPoint Outline Examples
Related posts, 40 perfect recommendation letters for internship [word], 40 useful roles and responsibilities templates [word, ppt], 37 product requirements document templates [word].
Type above and press Enter to search. Press Esc to cancel.
The Presenter's Guide to Nailing Your Next PowerPoint
Updated: July 27, 2022
Published: February 11, 2021
Have a presentation coming up that involves PowerPoint slides? Creating the content and design for a new presentation can be a daunting task.

Between outlining, deciding on a design, filling it out, and finalizing the details, it's not uncommon for a few questions to pop up.
Where's the best place to start? Are some steps better to take before others? How can you make sure you aren't missing anything? And how on earth do you master those essential -- yet slightly technical -- design tricks that can take a presentation from good to great?
![→ Free Download: 10 PowerPoint Presentation Templates [Access Now]](https://no-cache.hubspot.com/cta/default/53/2d0b5298-2daa-4812-b2d4-fa65cd354a8e.png "presentation outline powerpoint")
We're here to make the process a little easier for you. We've talked to some of the best presenters at HubSpot and have included their tips throughout this blog.
With the following tips in your arsenal, you'll be able to navigate PowerPoint much more fluidly and give a standout presentation that'll leave your audience wanting more.
How to Structure a Powerpoint Presentation
1. decide on a working title and the main takeaways..
Beyond picking a topic, your first step should be coming up with a working title for your presentation. A working title is more specific than a topic: Think "How the Right Nutrition Can Strengthen Your Kids' Bones" instead of "Raising Healthy Kids." Keep in mind that a compelling presentation title is much like a compelling blog post title : short, accurate, and valuable.
Once you've got your working title, make a list of the main takeaways of your presentation to begin to give it some structure. This'll help you stay focused when writing your outline and elaborating on those sections.
Aja Frost, the Head of English SEO at HubSpot, says, "I try to structure my presentations around a story. Not only does this make the presentation more memorable and engaging, it's also easier to figure out which information is relevant."
To do this, Frost says to pick a protagonist. She adds, "It might be your team, your audience, your customer.... Then, identify the rising action, problem, climax, and falling action. It's just like grade school. This structure works whether you're talking about an accomplishment, a challenge, a big question—anything, really."
2. Create a short text outline with your audience in mind.
Once you have your main takeaways and your story in mind, it's time to begin outlining the content of your presentation in more detail, while keeping your specific audience in mind. A presentation on any topic should sound different if you're speaking to an audience of college students versus an audience of investors, for example. The tone, words, design, and delivery of your presentation should all cater to your specific audience for maximum impact.
Ask yourself: What do your audience members already know? What new information can you teach them? What are they expecting from your presentation? What's going to be interesting to them? What will keep them focused and engaged? Then, make choices during every stage of the presentation process accordingly.
Justin Champion, a content professor at HubSpot, says, "Before diving into a presentation, I create an outline of how it'll flow. I do this by creating an intro (what they're going to learn), the body (what they're learning), and finish with a conclusion (recap what they just learned) I use bullet point slide a lot for talking points I can expand on. Pro tip: use animations to guide the story. For example, instead of showing all the bullets at once, click through to each via animation."
3. Formulate your content as a narrative, if possible.
This may not apply for more formal presentation that have rigid structures (like performance reports), but for presentations that have more flexibility, presenting your content as a narrative can be much more compelling.
Stories appeal to people's emotional side in ways that information, facts, and figures can't. They help you relate to your audience -- and in turn, they'll make you and your message far more interesting to your audience. They also help make complicated concepts more easily understandable to your audience, who may not share the same experience level or work in the same industry.
Kyle Jepson, a senior professor at HubSpot, says, "Since I’m an educator, I always structure my presentations around the learning outcomes I want to achieve. If there are three things I want my listeners to understand at the end of the presentation, I’ll have three sections. Whenever possible, I put some sort of interactive element at the end of each section to assess their understanding. In a virtual event, this might be a poll or a question for people to respond to in the chat. In an in-person setting, workshop activities or small-group discussions work well."
4. Collect data and examples.
While sweeping statements can help you set the stage, supporting those statements with evidence will make your argument more interesting and credible. Data and examples give your argument content, and people will understand what you're saying much better.
But don't just slap random stats on your slides and expect to "wow" your audience. Be sure your data comes from a reputable source and that you're presenting it in a way that's easy to understand, like through accurate charts and graphs.
Finally, don't overwhelm your audience with too much data. According to psychologist George Miller , we can only remember approximately five to nine bits of information in our short-term memory at any given time. Keep that in mind as you collect your evidence.
5. Engage with your audience.
During a presentation, it's important to connect with your audience. But how can you do that when you're just talking at them?
Anni Kim, an INBOUND professor at HubSpot, says, "Staying engaged during a virtual presentation is tough, so provide plenty of opportunities for participation. You should add a slide at the beginning that points out how people can take advantage of the chat and ask questions throughout the presentation."
Once you've set the expectations, keep up on the chat and answer questions as they arise.
Now that you have a structure in mind, you'll start to write the content. Below, we'll give tips for how to start and end your presentation.
How to Start a Powerpoint Presentation
1. start with a story..
Not to be repetitive, but storytelling is one of the best ways to capture your audience's attention in general. Presentations are no different. Starting with a hook is a great way to get your audience invested in your content.
Champion says, "The best way to start a presentation is with an interesting story that connects to the content. A great way to keep you audience engaged is to make the content interesting."
2. Be yourself.
On the other hand, while you want to tell a story, you also want your audience to connect with you as the presenter.
Jepson says, "During the introduction, I think one of the most important things to do is to set expectations for your style as a presenter. You don't always need to start with a joke or a story. Start out by being you, and then keep being you for as long as you’re on stage."
3. Include surprising or unusual information at the beginning.
While you'll most likely use a standard approach with session title, presenter's bio, and an agenda, you don't want your audience to get bored.
Jepson adds "I think the standard approach (session title, presenter’s bio, agenda) is pretty effective except that it’s usually super boring. I try to include the standard information but sprinkle in things that are surprising or unusual."
Some examples include:
- Adding a photo of your family on the About Me slide. "A lot of presenters put a picture of themselves on their About Me slide. But I think that’s silly because I’m standing right there," Jepson says. "If people don’t know what I look like, they will by the end of the presentation! So I’ve started putting a picture of my wife and kids on that slide and saying something sweet or silly about that."
- Asking people to use their phones. "A lot of in-person presentations start with a request to silence cell phones," Jepson comments. "Sometimes I’ll do the opposite and say something like, 'Before we get started, I want you all to pull out your phones. You probably think I’m going to ask you to silence them. But I’m not. I’m here from HubSpot, and I’m here to help you however I can. So if there’s anyone from your team who might have questions or need help from a HubSpotter, I want you to send them a message and tell them to send their questions to you before we get to the Q&A section of presentation. To give you time to do this, I’m going to send a text to my wife to let her know I made it here safely.' And then I’ll literally pull out my phone and send a text message on stage."
Now that you've structured your post and have ironed out the details of your introduction, it's time to work on the end of the presentation.
How to End a Powerpoint Presentation
1. recap what the audience has learned..
First and foremost, the end of your presentation should tie everything together.
Champion adds, "Recap what they just learned, explain next steps based on learnings, and offer any associated resources to continue learning."
This will help people remember the content and give them resources to learn more or reach out if they have questions.
2. Q&A.
Another great way to end a presentation is with a Q&A.
Jepson remarks, "I always end with Q&A. The only tricky thing about that is knowing how to cut it off if you’re getting more questions than you have time to answer or if you aren’t getting any questions at all. In both of those situations, I do essentially the same: I cut it off and tell people to come talk to me individually."
For in-person meetings, Jepson will tell the audience to come find him after the presentation to ask more questions. However, for virtual meetings, he'll let people know how to reach him, whether that's via LinkedIn or email.
3. Call to action.
Calls to action are an important component of any piece of content and presentations are no different. What do you want your audience to do with this information?
In your recap, include actionable ways for your audience to incorporate your information into their day-to-day (if applicable). You can also let people know to reach out to you with questions so they know the next steps in case they want to discuss the presentation further.
Now that you have an idea of what you're going to be talking about and how you'll be laying it out, it's time to open up a new PowerPoint presentation and apply those basic design elements.
Outlining Your PowerPoint Design
1. pick a color scheme..
Before you begin translating your text outline into PowerPoint, you'll want to start by adding some very basic design elements to your PowerPoint slides. First, choose a color scheme -- one that has enough contrast between colors to make colors stand out. Whether you decide to use two, three, or four different colors in your presentation is up to you, but certain color combinations go together better than others. Read the sections on creating color schemes in this blog post to figure out a good color combination.

Image Source
2. Design your slide backgrounds.
In PowerPoint, less is more. You don’t ever want to let the design distract from your message. But at the same time, you want to get more creative than a plain, white background -- even if you're going for a very simple design.
The three main ways to add a background design to a PowerPoint presentation are: 1) to use a predesigned template from PowerPoint; 2) to create a custom background using a solid color; or 3) to create a custom background using an image. Here's how to do each of those things.
(We also have a few general PowerPoint templates available for download here , which come with a series of videos to teach you some basic PowerPoint creation tips.)
How to Browse Predesigned Templates in PowerPoint
PowerPoint comes with a series of predesigned templates to choose from.
To browse these templates on a Mac: Click on the slide or slides you want to add the background to. Then, click the "Themes" tab at the top of the screen.

You can either scroll through your options up there, or you can access the themes gallery in a bigger window by hovering your mouse over the theme previews and clicking the dropdown arrow that appears below them.
Right-click the background style that you want. To apply the background style to the selected slides, click "Apply to Selected Slides." To apply the background style to all of the slides in your presentation, click "Apply to All Slides."
To browse these templates on a PC: Click on the slide or slides you want to add the background to. Then, click the "Design" tab at the top of the screen. In the "Background" group, click the arrow next to "Background Styles" to open up the theme gallery.

Pro Tip: You can also apply any PowerPoint template you already have as a theme, even if it doesn't show up in the theme gallery. To do that, click the "Browse Themes" option you'll find at the bottom of the dropdown themes gallery, and navigate to wherever the given presentation, template, or theme is located on your computer. Then, click "Apply."
How to Create a Custom Background Using a Solid Color
Want your slide background to be a simple, solid color? The steps to do this are almost identical on a Mac and a PC.
Simply right-click the slide(s) you want to add a background color to, then click "Format Background." In the window that appears, click "Fill" and then "Solid." Notice you can also adjust the gradient or make the background a pattern. Click "Apply" at the bottom to apply the changes.

How to Create a Custom Background Using an Image
Sometimes, making the slide background a high-definition image can really make that slide pop. It also encourages you to cut down on text so that only a few keywords complement the image. PowerPoint makes it easy to create a custom background using an image you own.

First, choose your image. Size matters here: Be sure it's high resolution so that it can fill your slide without becoming blurry or distorted. Here are the 17 best free stock photo sites to help you find some large, great quality images.
To create a custom background using an image on a Mac: Click the slide that you want to add a background picture to. To select multiple slides, click a slide and then press and hold CTRL while you click the other slides.
Next, click the "Themes" tab at the top of your screen. In the "Theme Options" group, click "Background," then "Format Background."

In the window that appears, click "Fill," then "Picture or Texture." To insert a picture from a file, click "Choose Picture..." and then locate and double-click the picture you want to insert. If you want to use this picture as a background for just the slides you selected, click "Apply." If you want to use the picture as a background for all the slides in your presentation, click "Apply to All."
To create a custom background using an image on a PC: Click the slide that you want to add a background picture to. To select multiple slides, click a slide and then press and hold CTRL while you click the other slides.
Next, click the "Design" tab at the top of your screen. In the "Background" group, click "Background Styles," then "Format Background."
In the window that appears, click "Fill," then "Picture or texture fill." To insert a picture from a file, click "File" and then locate and double-click the picture you want to insert. If you want to use this picture as a background for just the slides you selected, click "Close." If you want to use the picture as a background for all the slides in your presentation, click "Apply to All."
Filling In the Content
1. fill in the text on your slides using concise language..
Your slides are there to support your speech, not replace it. If your slides contain too much information -- like full sentences or (gasp) paragraphs -- then your audience members won't be able to help but read the slides instead of listening to you. Plus ... that's boring. Instead, use slides to enhance keywords and show visuals while you stand up there and do the real work: telling a story and describing your data.
When it comes to your slide text, focus on the main phrases of a bullet point, and cover details verbally. We recommend using up to three bullet points per slide and making any text as simple and concise as possible. A good rule of thumb is this: If you're using more than two lines per slide or per idea, then you've used too much text. Depending on the type of presentation, two lines might even be a little text-heavy.
Are you planning on sending your slides to your audience afterward? If you're concerned about putting enough information on the slides for people to understand your presentation when they go back to it later, you can always add little details into the slide notes in PowerPoint. You can find the Notes pane at the bottom of your PowerPoint screen, right below your slides. Click and drag the edge of the pane to make it larger or smaller.

2. Brainstorm your final title with someone else.
Once all your content is there, you're ready to finalize your title. First, refine your working title as best you can on your own. Is it compelling and interesting enough to engage your audience from the very start? Does it accurately reflect your presentation?
Next -- and this is important -- connect with someone else to brainstorm the final title together. Read this blog post for a helpful walkthrough on writing a great title and title brainstorming with others.
Filling In Your PowerPoint Design
1. choose a font that's easy to read..
Choose either one font to use throughout your presentation, or two (one for your headers and one for your body text) that contrast each other well. Here's a list of 35 beautiful fonts you can download for free to get you started.
If you decide on two fonts, your header font should be bold and eye-catching, and your body text font should be simple and easy to read. (For more guidance on what fonts work best together, take a look at this visual guide .)
2. Embed your font files.
Fonts changing from one computer to another is one of the most common problems PowerPoint presenters have -- and it can really mess up your presentation and flow. What's actually happening in this case is not that the fonts are changing; it's that the presentation computer just doesn’t have the same font files installed .
If you’re using a PC and presenting on a PC, then there is a smooth workaround for this issue. When you involve Mac systems, the solution is a bit rougher.
On a PC: When you save your PowerPoint file, click "Save As" and then "Save Options." Then, select the "Embed TrueType fonts" check box and press "OK." Now, your presentation will keep the font file and your fonts will not change when you move computers (unless you give your presentation on a Mac).
On a Mac: In PowerPoint for Mac, there's no option to embed fonts within the presentation. So unless you use ubiquitous typefaces like Arial or Tahoma, your PowerPoint is likely going to encounter font changes on different computers. The best way to avoid this is to save the final version of your presentation slides as JPEGs, and then insert those JPEGs onto your PowerPoint slides. In other words, make each slide a JPEG picture of your slide. (Note that the file size of your PowerPoint will increase if your presentation includes a lot of JPEGs.)
Mac users can easily drag and drop the JPEGs into PowerPoint. If you don't use actions in your presentation, then this option works especially well.
If you want your presentation to appear "animated," then you'll need to do a little tinkering. All you need to do is save JPEGs of each "frame" of the animation. Then, in your final presentation, you'll just display those JPEGs in the order you'd like the animation to appear. While you'll technically have several new slides in place of one original one, your audience won't know the difference.
If you're a Mac user and want to use this option, then be sure to add this to your checklist as the final step.
3. Adjust the font sizes.
Once you've chosen your font, you can start playing around with font size. Carefully choose the font sizes for headers and text, and consistently use the same font face and sizes on all your slides to keep things clean and legible. Be sure your font is big enough so even the audience members in the way back of the room can read them.
4. Adjust line and character spacing.
The biggest PowerPoint no-no is using too much text on a slide. The most effective slides use text sparingly and present it in a way that's easy to read. One trick to make text more legible without changing the font size or layout is to increase or decrease the space between each line and each letter.
To adjust line spacing:
Select the text you'd like to adjust. On the "Home" tab, in the "Paragraph" group, click "Line Spacing" and choose "Line Spacing Options." In the Paragraph dialog box's "Spacing" section, click the "Line Spacing" dropdown list and choose "Exactly." In the "At" text box, adjust the value accordingly. Click "OK" to save your changes.

To adjust character spacing:
Select the text you want to change. Then, on the "Home" tab, find and click the "Font" button." Choose "Character Spacing Options" from the dropdown menu. Adjust spacing as needed.

5. Add images.
Great visual cues can have a huge impact on how well your audience understands your message. Using gorgeous images in a slide presentation is the perfect way to keep things interesting.
It's important, though, that you don't use images to decorate. This is a very common mistake. Remember: Images are meant to reinforce or complement your message, but they can be distracting. Focus on finding high resolution images so that they look good when expanded without becoming blurry or distorted.
If you don't have your own images to use, check out our roundup of the 17 best free stock photo sites .
Pro Tip: If you're finding that the background of an image is distracting, you can actually remove it before putting it into your presentation directly inside PowerPoint -- no Photoshop required. Read this blog post for instructions .

6. Use multimedia, but sparingly.
Using multimedia in your presentation, like video and audio, can be an effective way to capture your audience's attention and encourage retention of your message. In most cases, it's best to avoid using more than one or two video or audio clips so you don't detract from your talk or your message.
PowerPoint lets you either link to video/audio files externally, or embed the media directly in your presentation. You should embed these files if you can, but if you use a Mac, you cannot actually embed the video. We'll get to that in a second.
PC users: Here are two great reasons to embed your multimedia:
- Embedding allows you to play media directly in your presentation. It'll look much more professional than switching between windows.
- Embedding also means that the file stays within the PowerPoint presentation, so it should play normally without extra work (except on a Mac).
Mac users: You need to be extra careful about using multimedia files. You'll always need to bring the video and/or audio file with you in the same folder as the PowerPoint presentation. It’s best to only insert video or audio files once the presentation and the containing folder have been saved on a portable drive in their permanent folder. You can also record voiceovers for your presentation or hire a voice actor through Voice123 .
If your presentation is going to be played on a Windows computer, then Mac users need to make sure their multimedia files are in WMV format . That can get complicated, so if you want to use PowerPoint effectively, consider using the same operating system for designing and presenting no matter what (if that's something you can control).
7. Design your title slide.
The title of your presentation is often the first impression it gives off -- especially if it's going to be on display as people file in to your presentation -- so it's important to put some time and careful thought into its design.
Here are 20 layout ideas for PowerPoint title slides from Chris Lema :
8. Add any consistent elements, like your company logo.
There's a reason this is at the end. If you add things like your logo that you want to be in the same place on every slide, any adjustments you make to individual slides could slightly alter the alignment ... and you'll have to go back and adjust them all over again.
Preparing For the Presentation
1. review and edit your slides..
Spend some time on your own flipping through your slides while practicing your talk. Make sure you can check all of the following off the list:
- Your slides flow well and align with your talk.
- Your slides are free of all grammatical, formatting, or design errors.
- Your multimedia files work.
- You've double-checked any mathematical calculations you made yourself.
- You've properly attributed any statistics, data, quotes, ideas, etc. to the original source.
- You've double-checked you're actually allowed to use the photos/images you used . (Don't skip this step. Here's a cautionary tale about internet copyright law .)
- You're sure nothing in your presentation could potentially harm any of your partners, stakeholders, audience members, or your company.
- You've checked with a friend that nothing in your presentation might offend certain people in your audience -- or, if so, that it's worth it.
2. Know your slides inside out.
The best presenters don't read off your slides, so it's important to prepare and practice your presentation ahead of time. You never want to be the person finalizing your talk or presentation half an hour before an event ... that's just poor planning. Plus, what if the projector fails and you have to give your talk without slides? It can happen, and if does, you'll be incredibly happy you spent so much time preparing.
3. Practice using "presenter view."
Depending on the venue, you might have a presenter's screen available to you in addition to the main projected display that your audience can see. PowerPoint has a great tool called "Presenter View," which includes an area for notes, a timer/clock, a presentation display, and a preview of the next slide.
Make sure "Presenter View" is turned on by selecting it in the "Slide Show" tab of your PowerPoint.
To practice using "Presenter View," open the "Slide Show" tab within PowerPoint. In the "Presenter Tools" box, click "Presenter View."

4. Bring your own laptop and a backup copy of your presentation.
This isn't just a bonus step -- it's an essential one. Technology can mess up on you, and you need to be prepared. Between operating systems or even between different versions of Microsoft Office, PowerPoint can get a little wonky. One way to avoid problems is to ensure you have all the right hardware with you. Bring along your own laptop when you're presenting, just in case.
Even if you bring your laptop, but especially if you for some reason cannot, bring a backup copy of your PowerPoint file on a flash drive.
What other tips do you have for nailing PowerPoint presentations?
Editor's note: This post was originally published in October 2015 and has been updated for comprehensiveness.
![Blog - Beautiful PowerPoint Presentation Template [List-Based]](https://no-cache.hubspot.com/cta/default/53/013286c0-2cc2-45f8-a6db-c71dad0835b8.png "presentation outline powerpoint")
Don't forget to share this post!
Related articles.
![How to Create an Infographic in Under an Hour — the 2024 Guide [+ Free Templates]](https://www.hubspot.com/hubfs/Make-infographic-hero%20%28598%20%C3%97%20398%20px%29.jpg "presentation outline powerpoint")
How to Create an Infographic in Under an Hour — the 2024 Guide [+ Free Templates]
![20 Great Examples of PowerPoint Presentation Design [+ Templates]](https://www.hubspot.com/hubfs/powerpoint-presentation-examples.webp "presentation outline powerpoint")
20 Great Examples of PowerPoint Presentation Design [+ Templates]
![How to Create the Best PowerPoint Presentations [Examples & Templates]](https://knowledge.hubspot.com/hubfs/powerpoint.webp "presentation outline powerpoint")
How to Create the Best PowerPoint Presentations [Examples & Templates]
![17 PowerPoint Presentation Tips From Pro Presenters [+ Templates]](https://www.hubspot.com/hubfs/powerpoint-design-tricks_7.webp "presentation outline powerpoint")
17 PowerPoint Presentation Tips From Pro Presenters [+ Templates]
![How to Write an Ecommerce Business Plan [Examples & Template]](https://www.hubspot.com/hubfs/ecommerce%20business%20plan.png "presentation outline powerpoint")
How to Write an Ecommerce Business Plan [Examples & Template]

Get Buyers to Do What You Want: The Power of Temptation Bundling in Sales

How to Create an Engaging 5-Minute Presentation
![How to Start a Presentation [+ Examples]](https://www.hubspot.com/hubfs/how-to-start-presenting.webp "presentation outline powerpoint")
How to Start a Presentation [+ Examples]

120 Presentation Topic Ideas Help You Hook Your Audience
![How to Create a Stunning Presentation Cover Page [+ Examples]](https://www.hubspot.com/hubfs/presentation-cover-page_3.webp "presentation outline powerpoint")
How to Create a Stunning Presentation Cover Page [+ Examples]
Download ten free PowerPoint templates for a better presentation.
Marketing software that helps you drive revenue, save time and resources, and measure and optimize your investments — all on one easy-to-use platform
Newly Launched - AI Presentation Maker
AI PPT Maker
Powerpoint Templates
Icon Bundle
Kpi Dashboard
Professional
Business Plans
Swot Analysis
Gantt Chart
Business Proposal
Marketing Plan
Project Management
Business Case
Business Model
Cyber Security
Business PPT
Digital Marketing
Digital Transformation
Human Resources
Product Management
Artificial Intelligence
Company Profile
Acknowledgement PPT
PPT Presentation
Reports Brochures
One Page Pitch
Interview PPT
All Categories
Top 10 Outline PowerPoint Presentation Templates in 2024
Outline is a versatile and user-friendly PowerPoint template that offers fully editable and customizable presentation slides. With a sleek and modern design, Outline is perfect for professionals looking to create impactful and visually appealing presentations. This template includes a variety of slide layouts, such as title slides, content slides, and image slides, making it easy to organize information and create a cohesive presentation. Whether you are preparing a business pitch, a project proposal, or a creative portfolio, Outline provides the tools you need to showcase your ideas effectively. Its clean design and customizable features allow users to tailor the presentation to their specific needs, ensuring a polished and professional result every time. Elevate your presentations with Outline and make a lasting impression on your audience.

Outline presentation images
Presenting this set of slides with name - Outline Presentation Images. This is a six stage process. The stages in this process are Project Introduction, Market Feasibility, Project Particulars, Financial Analysis, Project Conclusion And Proposal.
Ease your cost burden with our Outline Presentation Images. They are cheaper than you expect.
- Project Introduction
- Market Feasibility
- Project Particulars
- financial analysis
- Project Conclusion And Proposal

Compliance patch management ppt powerpoint presentation outline files cpb
Presenting this set of slides with name Compliance Patch Management Ppt Powerpoint Presentation Outline Files Cpb. This is an editable Powerpoint five stages graphic that deals with topics like Compliance Patch Management to help convey your message better graphically. This product is a premium product available for immediate download and is 100 percent editable in Powerpoint. Download this now and use it in your presentations to impress your audience.
Our Compliance Patch Management Ppt Powerpoint Presentation Outline Files Cpb are topically designed to provide an attractive backdrop to any subject. Use them to look like a presentation pro.
- Compliance Patch Management

Sales methodology ppt powerpoint presentation show outline cpb
Presenting this set of slides with name Sales Methodology Ppt Powerpoint Presentation Show Outline Cpb. This is an editable Powerpoint five stages graphic that deals with topics like Sales Methodology to help convey your message better graphically. This product is a premium product available for immediate download and is 100 percent editable in Powerpoint. Download this now and use it in your presentations to impress your audience.
Acquire gains beyond imagination with our Sales Methodology Ppt Powerpoint Presentation Show Outline Cpb. You will experience a bonanza.
- Sales Methodology

View project management outline example powerpoint guide
Presenting view project management outline example powerpoint guide. This is a project management outline example powerpoint guide. This is a five stage process. The stages in this process are analysis, evaluation, design, testing, implementation.
Get them to bury the hatchet with our View Project Management Outline Example Powerpoint Guide. Bring all fights to an end.
- implementation

Timeline investment plans ppt outline structure
Introducing Timeline Investment Plans Ppt Outline Structure. to increase your presentation threshold. Encompassed with four stages, this template is a great option to educate and entice your audience. Dispence information on timeline, 2018 to 2021, using this template. Grab it now to reap its full benefits.
Our Timeline Investment Plans Ppt Outline Structure are topically designed to provide an attractive backdrop to any subject. Use them to look like a presentation pro.
- 2018 To 2021

Strategy outline powerpoint presentation
Presenting strategy outline PowerPoint Presentation. Change PowerPoint structure, font, text, color and design as per your requirements. Easy data entry options to put in company logo, brand or name. Ideal for marketing professionals, business managers, entrepreneurs and big organizations. This presentation theme is totally attuned with Google slide. Easy conversion to other software’s like JPG and PDF formats. Image quality remains the unchanged even when resize the image or portray on large screens.
Wondering what to include in your strategic plan, download our strategy outline PowerPoint Presentation. This presentation layout of strategy outline will help you outline your strategic plan and presents description of where you want your organization to be in the future and how you’re going get there. Our sample of a strategic plan PPT slide is well crafted document and describes company's vision, mission statement, goals, its strategies for reaching goals and objectives based on environment company operates. This slide is also helpful you to consider questions such as how to write a strategic plan template and useful in drawing picture of the company in three to five years in terms of physical appearance, activities and size. This business strategy PPT template outlines will assist you set the clear objectives, and these should cover areas such as market, growth, profitability and technology. With the help of this strategic plan power point template you can define the purpose of an organization and help you evaluate the implementation. Give them great grooming with our Strategy Outline Powerpoint Presentation. They will be good for the future.
- Mission Statement
- Company History
- Business Profile
- Industry Profile
- Management Team
- business strategy

Outline sponsorship opportunities ppt professional layout ideas
Presenting this set of slides with name - Outline Sponsorship Opportunities Ppt Professional Layout Ideas. This is a five stage process. The stages in this process are About Us, About The Event, Sponsorship Opportunities, Benefits To Sponsors, Sponsorship Form.
Get behind folks to give it that extra bit with our Outline Sponsorship Opportunities Ppt Professional Layout Ideas. Be able to handle insubstantial effort.
- About The Event
- Sponsorship Opportunities
- Benefits To Sponsors
- Sponsorship Form

Outline powerpoint presentation examples
Presenting Outline PowerPoint Presentation Examples. This easy to download PPT theme can be easily opened and saved in various formats like JPG, PDF, and PNG. You can alter the font size, font type, font color, and shape used according to your needs as this PPT layout is 100% customizable. This PowerPoint template is Google Slides compatible and is easily accessible.
Employ this Outline PowerPoint Presentation Examples for letting your clients know about your firm. Using this marketing PPT layout, the potential customers and prospective employers can learn about your enterprise and its long term objectives. This sales and advertising PowerPoint template can showcase the entire framework of launching a product in the market. The steps like product idea screening, analysis, and screening of the product, the techniques, and tools required for product lifecycle and market analysis can be highlighted with this business PPT theme. The branding campaigns, development plans, cost analysis, and product feasibility can be showcased with this product lifecycle PowerPoint template. This company introduction PowerPoint layout aids in showcasing the unique features of your company and influence the brand presence in the market. The complete procedure of product development until it is launched in the market can be illustrated. Hence, download this article introduction PowerPoint slide on your website or blog and promote your professional brand.
- Product Idea Screening
- New Product Analysis
- Product Lifecycle
- Tools And Techniques
- market analysis
- Development Plans

Outline introduction forecasting ppt powerpoint presentation summary good
Presenting this set of slides with name - Outline Introduction Forecasting Ppt Powerpoint Presentation Summary Good. This is a seven stages process. The stages in this process are Outline, Introduction, Forecasting, Quality, Business.
Enhance approvals beyond expectations. Our Outline Introduction Forecasting Ppt Powerpoint Presentation Summary Good boost attractiveness.
- introduction
- forecasting

Embed core values ppt powerpoint presentation outline portrait cpb
Presenting Embed Core Values Ppt Powerpoint Presentation Outline Portrait Cpb slide which is completely adaptable. The graphics in this PowerPoint slide showcase four stages that will help you succinctly convey the information. In addition, you can alternate the color, font size, font type, and shapes of this PPT layout according to your content. This PPT presentation can be accessed with Google Slides and is available in both standard screen and widescreen aspect ratios. It is also a useful set to elucidate topics like Embed Core Values. This well structured design can be downloaded in different formats like PDF, JPG, and PNG. So, without any delay, click on the download button now.
Our Embed Core Values Ppt Powerpoint Presentation Outline Portrait Cpb are topically designed to provide an attractive backdrop to any subject. Use them to look like a presentation pro.
- Embed Core Values


Create and print a presentation in Outline view
Outline view in PowerPoint displays your presentation as an outline made up of the titles and main text from each slide. Each title appears on the left side of the pane that contains the Outline tab, along with a slide icon and slide number. The main text is indented under the slide title. Graphic objects appear only as small notations on the slide icon in Outline view.
Working in Outline view is particularly handy if you want to make global edits, get an overview of your presentation, change the sequence of bullets or slides, or apply formatting changes.
When you're creating your outline, think about how many slides you need. You probably want at least:
A main title slide
An introductory slide that lists the major points or areas in your presentation
One slide for each point or area that is listed on the introductory slide
A summary slide that repeats the list of major points or areas in your presentation
By using this basic structure, if you have three major points or areas to present, you can plan to have a minimum of six slides: a title slide, an introductory slide, one slide for each of the three major points or areas, and a concluding summary slide.
If you have a large amount of information to present in any of your main points or areas, you may want to create a sub-grouping of slides for that material by using the same basic outline structure.
Consider how much time each slide should be visible on the screen during your presentation. A good standard estimate is from two to five minutes per slide.
Create a presentation in Outline view
On the View tab, in the Presentation Views group, click Outline .
In the slide thumbnail pane, place the pointer, and then either paste your content or begin typing text.
The first text you type will be a title, indicated by boldface type. Press ENTER when you've completed the title.
PowerPoint uses the Enter key on the keyboard to start a new line in an outline. The new line is automatically at the same hierarchical level as the one you just typed. To change that hierarchical level:
Press the Tab key on the keyboard to move the current line downward one level in the outline hierarchy.
Press Shift+Tab to move the current line upward one level in the outline hierarchy.
View a presentation in Outline view
Print a presentation in outline view.
Open the presentation that you want to print.
Click File > Print .
In the Print dialog box, under Settings , select the second box (which by default is set to Full Page Slides ) to expand the list of options. Then, under Print Layout , select Outline .

You can choose a page orientation (Portrait or Landscape) in the Printer Properties dialog box.
Click Print .
(For more complete information on printing, see the article Print your PowerPoint slides or handouts .)

Need more help?
Want more options.
Explore subscription benefits, browse training courses, learn how to secure your device, and more.

Microsoft 365 subscription benefits

Microsoft 365 training

Microsoft security

Accessibility center
Communities help you ask and answer questions, give feedback, and hear from experts with rich knowledge.

Ask the Microsoft Community

Microsoft Tech Community

Windows Insiders
Microsoft 365 Insiders
Was this information helpful?
Thank you for your feedback.
- Tour the interface
- Create designs
- Build design systems
- Create prototypes
- Import and export
- Work together in files
- Use AI in Figma Design
- Inspect designs
- Turn designs to code
- Dev Mode across your org
- Work on boards
- Run meetings
- Use AI in FigJam
- Create and edit slides
- Present slide decks
- Use AI in Figma Slides
- Use the Community
- Creator resources
- Visit Community
- Work across Figma
- Integrations
- API documentation
Learn about the new features we announced at Config 2024, from AI to Figma Slides!
For everyone
- Manage settings
- Change preferences
- Use the file browser
- Manage files and projects
- Sharing and permissions
For administration
- Manage seats
- Manage your plan
- Pay for Figma
- Manage a team
- Login and authentication
- Deploy Figma
- Members and guests
- Libraries and resources
- Billing groups
- Security features
Find out more
Level up your Figma skills with these comprehensive skill-based courses.
Get hands-on experience in Figma with these practical bite-sized projects.
Explore tools and features by watching and following along with these expert-led video tutorials.
Get solutions
Troubleshoot
Get help with common issues and troubleshoot unexpected behavior.
Work with support
Submit a bug report, get help collecting log files, and find your system information.
Common questions
Get answers to frequently asked questions.
Figma Community Forum
Ask the community, share ideas, and connect with other Figma users.
Generate a slide deck outline from a FigJam board using Figma AI
🚧 Figma Slides is currently in free beta. In early 2025, Figma Slides will be available on free and paid plans, starting at $3 or $5 per user/month depending on your plan. Learn more about beta features →
Before you Start
Who can use this feature
Available on any plan
Anyone with can edit access to a FigJam board can generate a slide deck outline from content on the board
After hosting an engaging team brainstorm or user research session in FigJam, you may have a lot of content to sift through before you can share your findings in a Figma Slides deck. With Figma AI, you can generate a slide deck outline from a FigJam board, giving you a good starting point that you can use to build the rest of your presentation.
Generate a slide deck outline
You can generate a slide deck outline from any FigJam board you have can edit access to. There are a few ways to generate a slide deck outline:
From Figma Slides
- Click New slide in the left sidebar to open the template picker.
- Click Start with an outline .
- Choose a FigJam board to summarize.
- If the FigJam board you selected has multiple pages, use the dropdown menu to select a specific page or choose All pages to summarize the entire board.
- Click Next .
- Select a template to use for the deck or click Create outline without template .
Figma AI sorts and summarizes the content on the FigJam and generates a slide deck outline. You can modify the generated slides and add additional slides to the deck, as needed.
From FigJam
- Open the board you want to use.
- Go to Main menu > File > Create Figma Slides outline
- Click More actions next to a page and select Create Figma Slides outline
- Click Share in the top toolbar and select Create Figma Slides outline
- Select sticky notes on the board, right-click and select Create Figma Slides outline
- You’ll be redirected to the template picker in Figma Slides. Select a template to use for the deck or click Create outline without template .
Figma AI sorts and summarizes the content on the FigJam board and generates a slide deck outline. You can modify the generated slides and add additional slides to the deck, as needed.
COMMENTS
Step-1: Open the Outline View. In the menu ribbon located at the top of the screen, click on the "View" tab. You have to then click on the "Outline View" option which is the second option in the "Presentation Views" section of the "View" menu. Step-2: Click on the slide and add content to the outline.
Open the presentation that you want to print. Click File > Print. In the Print dialog box, under Settings, select the second box (which by default is set to Full Page Slides) to expand the list of options. Then, under Print Layout, select Outline. You can choose a page orientation (Portrait or Landscape) in the Printer Properties dialog box.
Insert outline text into a PowerPoint presentation. In a new PowerPoint presentation file, click the first slide. Or, in an existing presentation file, click the slide that you want the outline to appear after. On the Home tab, click the arrow next to New Slide, and then click Outline.
Presentation outline examples Basic presentation outline example. Let's take a look at a presentation outline and accompanying notes for a persuasive presentation on encouraging people to meditate every day: I. Introduction. Hook - find a striking image and tell a story; Thesis statement - everyone should meditate for 10 min per day; II.
When you're creating a PowerPoint, writing a presentation outline first is the best way to break the project into easy-to-conquer tasks. 5. Open PowerPoint and Add Your Outline. Once you've finished writing your PowerPoint presentation outline, it's time to jump back to the app finally. You've laid the groundwork for writing a presentation rapidly.
By going to View -> Outline View, you can see the outline for your presentation. This view displays the presentation as titles and text within slides to give you an overview of the slide content. Example of PowerPoint Outline. The PowerPoint Outline View can also help to define the structure of your presentation beforehand, or review your ...
Organize your slides. Include a title slide with the presentation topic, your name, and date. Add a relevant image or graphic to set the tone. Provide an agenda or outline slide to give the audience an overview of what to expect. Use section divider slides to clearly separate different parts of your presentation.
To import an existing outline file, click the drop-down menu under New Slide on the HOME tab, and select Slides from Outline. Navigate to the outline file, and click Insert. Another option is to create an outline in .txt format using Notepad (or any other text editor), as shown in the screenshot below. Normal paragraphs will be converted into ...
Lesson 1 - Creating a Presentation Outline. Too many presenters start creating a presentation in one of the two following ways: a) they sit down at their computer, open PowerPoint, and start creating slides, or b) they open a past PowerPoint presentation, copy some of the slides into a new file, and hope to add new slides that will complete ...
Enhance with Quotes, Testimonials, or Data. Make your presentation more interesting by adding extra info like quotes, testimonials, or data. It can make your audience more engaged and reinforce your message. 3. Visualize Your Concepts. How you show your ideas matters a lot.
Click on the "File" tab in the upper left-hand corner of the screen. Step 2: Select "Export". Upon clicking "File", new options will appear. Click on "Export" from the options in the File tab. Step 3: Create Handouts. Click "Create Handouts" under the Export tab then press the "Create Handouts" icon. Step 4: Select ...
Here are the steps to follow: Provide a Prompt: Enter a brief description of your presentation topic into the AI tool. Customize the Output: Examine the generated outline. You may need to modify the titles of the slides and their order to better suit your needs.
A well-crafted presentation outline serves as the backbone of a successful presentation. By carefully structuring your content and considering each key section, you can guide your audience smoothly from the introduction to the conclusion while keeping them engaged and interested. Whether you're preparing for a pitch, a seminar, or an internal ...
The Outline pane appears at the left, showing only the text in your presentation. You can quickly create an entire presentation by pasting an outline from Word into the Outline pane. Collapse and Expand Headings. In Outline View, you can collapse or expand headings, subheadings, and text. Right-click any slide title in the Outline pane.
How to create a presentation outline. Follow these steps when creating an outline for your presentation: 1. Consider the purpose of your presentation. When creating a presentation outline, determine your goal. To find this, think about what you want your audience to obtain or support after your discussion. For example, a nonprofit that builds ...
On either the Home or Insert tab, select the New Slide drop-down menu. Pick "Slides From Outline." Browse for the outline file on your computer, select it, and click "Insert." After a moment, you'll see your outline load into PowerPoint. As mentioned, each line of the outline is its own slide. From there, you can add text, include images ...
1. Decide the Purpose of the Presentation. Decide on the goal of your presentation before you start writing any notes. It serves as a base for the remainder of your outline. Your presentation may have one of the following six objectives: to inform, convince, motivate, inspire action or entertain.
Make your presentations organized and visually appealing with an outline PowerPoint template. Whether you're a student, teacher, or business professional, these templates will help you structure your ideas and deliver a clear message. With customizable slides, you can easily manage your content and create a professional-looking presentation.
This helps you manage your time effectively during the actual presentation. Notes or Reminders: Add any reminders, cues, or notes to yourself that will help you deliver your presentation effectively. These can include tips on delivery, body language, or specific points to emphasize. Presentation Outline Examples. Image: freepik.
30 Perfect Presentation Outline Templates (+Examples) A presentation outline template gives you an overview of what encompasses an entire presentation. Based on the outline, you can start dealing with one slide at a time and then into the nitty-gritty of it. You may consider as a roadmap that leads to a successful final presentation and impress ...
To select multiple slides, click a slide and then press and hold CTRL while you click the other slides. Next, click the "Themes" tab at the top of your screen. In the "Theme Options" group, click "Background," then "Format Background." In the window that appears, click "Fill," then "Picture or Texture."
Outline powerpoint presentation examples. Presenting Outline PowerPoint Presentation Examples. This easy to download PPT theme can be easily opened and saved in various formats like JPG, PDF, and PNG. You can alter the font size, font type, font color, and shape used according to your needs as this PPT layout is 100% customizable.
Open the presentation that you want to print. Click File > Print. In the Print dialog box, under Settings, select the second box (which by default is set to Full Page Slides) to expand the list of options. Then, under Print Layout, select Outline. You can choose a page orientation (Portrait or Landscape) in the Printer Properties dialog box.
Go to Main menu > File > Create Figma Slides outline; Click More actions next to a page and select Create Figma Slides outline; Click Share in the top toolbar and select Create Figma Slides outline; Select sticky notes on the board, right-click and select Create Figma Slides outline; You'll be redirected to the template picker in Figma Slides.