- Locations and Hours
- UCLA Library
- Research Guides
- Research Tips and Tools

Poster Presentations
- Size, Layout, and Text
Elements of a Poster
Change size in powerpoint, using the ruler, grid, and guides in powerpoint, more powerpoint training, template resources, font choice, text alignment.
- Colors and Images
Your poster should include these elements:
- Author(s), with affiliations and emails
If your poster is a representation of a research study, you will want to include the following sections:
- Introduction or objective
- Conclusions and/or discussion
- Acknowledgements
If your poster is a representation of an event or other kind of project, you may want to forego formal abstract sections in favor of the 5 Ws:
- Who (introduce the author, organization, or community)
- What (what did you do? how did you do it?)
- Where (where did you do it?)
- When (when did it take place?)
- Why (what are the outcomes, implications, or future possibilities?)
To change the size in Powerpoint:
- Go to the Design tab and choose "Slide Size" (it's on the right size of the ribbon)
- Choose "Custom Slide Size"
- Change "Slides sized for:" to "Custom"
- Fill in your desired width and height.
Click the View tab to see checkboxes that will allow you to turn on the Ruler, Grid, and Guides (click the image below to see a screenshot).

Ruler : Allows you to see the dimensions of your slide. You'll see a vertical and horizontal ruler.
Grid : By default, the gridlines are 1 inch apart. Right click in white space of your poster to get more options for spacing. This enables precise alignment.
Guides : By default, you'll get one horizontal and one vertical guide placed in the center of your poster. Right click on a guide to add more guidelines, or to delete one. You can use Guides to invisibly define columns of your poster, margins, and more. This gives you manual control, alternatively, you can use Smart Guides (see below).
Smart Guides : Powerpoint has a built-in system for showing you alignment as you move objects around. The video below demonstrates what Smart Guides look like.
Once you've got your slide layout set, you'll want to start creating Shapes and Text Boxes. Here are some tips and tricks for working with objects:
- Use Ctrl+D to duplicate any object.
- Then you can format them all at once, identically!
- You can also group them, for easier movement and alignment (right click to see the Group option).
Most posters are landscape (horizontal) orientation. The title/author(s) will be across the top, with 3–4 columns below that contain the rest of the poster elements. Make sure you leave plenty of white space in your design—a poster crammed full of text and images is very difficult to read.
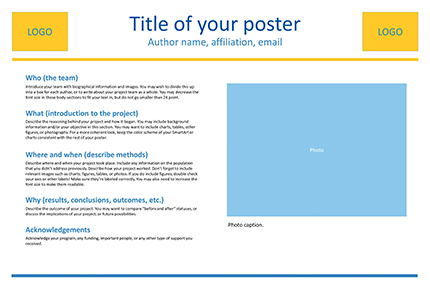
Here is an example of a 2 column poster layout using the 5 Ws for headings (who, what, where, when, and why):
Use the links below to download this template and other similar templates in two sizes: 24x36 and 36x48. These templates include a variety of placeholder elements for photos and figures.
- 2 column Powerpoint template, size 24x36
- 3 column Powerpoint template, size 24x36
- 3 column Powerpoint template, size 36x48
- 4 column Powerpoint template, size 36x48
Below are some additional web resources where you can search for templates. Keep in mind that you may need adjust the size of a template for your own poster. Alternatively, you can use the resources on this page to design your own layout in Powerpoint.
- David Geffen School of Medicine poster templates Although this is labeled for the sciences, the information can be used in many disciplines.
- Penn State poster template
- PhD Posters
- MakeSigns.com poster templates
- The body of your poster should have a minimum 24 point font . Viewers should be able to read your smallest text from a few feet away.
- The title of your poster should have a 50+ font size, depending on the size of your poster and the length of the title.
- Do not use all uppercase letters for the title or body of the poster.
- Avoid using more than 2 or 3 different fonts in one poster.
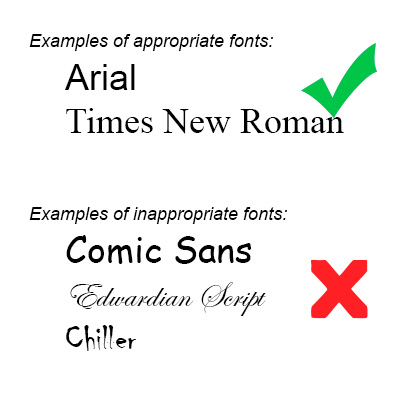
- Stick with basic fonts like Times New Roman or Georgia for serif, or Arial or Helvetica for sans-serif. Avoid elaborate, difficult-to-read, or cartoon-like fonts.
- In general, left-align your text boxes (with the possible exception of your title and any image captions). Avoid centering the text on your whole poster.
- << Previous: Home
- Next: Colors and Images >>
- Last Updated: Nov 9, 2023 2:31 PM
- URL: https://guides.library.ucla.edu/posters
Scientific Poster Tutorials

Ready to Order?
PosterNerd.com is easiest way to print your poster.
Print My Poster
Poster Sizing
It can be challenging to change the size of your poster once it is designed so starting out with the correct size will save you a few headaches.
Determining Poster Size
Answering these questions in order will help you figure out what size to make your poster:
- 1 Do my poster sections flow logically? The sections of your poster should be organized and follow the general structure of introduction → data → conclusion.
- 1 Does your event require a specific size poster? It’s best to first check if there a size requirement or set of guidelines given by your the event where you are presenting.
- 1 How large is your presentation space? Typically your poster will be attached to a presentation board and those come in various sizes. Before choosing your size, make sure you know if it will fit. You may want to make the width of your poster slightly smaller than the total space so you can stand to the side of it and not block anything.
- 1 Does your school or organization recommend a specific size? Occasionally, a school or organization will set guidelines for poster sizes. If this is the case, they may have a template you can start with.
If none of the above applies, we recommend a 48” x 36” poster. This is a standard size that fits most presentation spaces and is the most common size we see printed.
Document Setup
If you are using Powerpoint to make your poster, be mindful that there is a 56” limit on both the height and the width of a slide. However, any proportional size can be printed at the size you need. The easiest way to accomplish this is to just divide your width and height by 2. For example, if you want a 72” x 48” poster, set up your document at 36” x 24”.

As explained in Images, Charts, and Graphs , you should make sure all the elements of your poster look good when zoomed in 100%. If you plan on getting your poster printed at twice the size of the file, make sure you zoom to 200% when checking that images look crisp.
Questions, Comments, or Concerns
If you have any further questions or comments about our tutorials, we would love to help you out.

- Thompson Rivers University Library
- Research Guides
- Creating an Academic Poster: Tips and Tricks
Orientation and Size
- Academic Poster: Basic Components
- Editing and Organizing Content
- Colour and Contrast
- Typefaces and Font Sizes
- Graphs, Charts, and Images
- Poster Templates
- Citing Your Sources
A typical academic poster will have a three- or four-column layout, with variations of course.
The first example below is a typical academic poster in landscape format (wider than it is high), including a header with three columns. Many landscape format posters have four columns--the format will depend on the requirements for a particular conference and discipline.
The second example below shows an academic poster in portrait format (higher than it is wide).
Be sure to consult the conference or event requirements to see if there are specific rules for formatting posters.
Poster in landscape format: 48" wide x 36" high (121.92 x 91.44 cm)

Poster in portrait format (less common)

- << Previous: Academic Poster: Basic Components
- Next: Audience >>
- Last Updated: Sep 19, 2023 10:24 AM
- URL: https://libguides.tru.ca/academicposters

Designing a Research Poster
- Getting Started
- Sections of a Poster
- Design Tips
- Using Images
Creating a Poster using PowerPoint
Tips & tricks for designing in powerpoint, choose a background, adding content.
- Poster Examples
* These directions are for PowerPoint 2013*
Start by resizing your poster. This is an essential first step! If you resize the poster later, all your text and images will come out stretched and blurry.
Click on the Design Tab , Slide Size, then Custom Size.

Conferences and gatherings will let you know what size posters are acceptable.
Enter in the required dimensions.

You will be prompted to either Maximize or Ensure Fit of your content due to choosing a custom slide size. Because you have no content on your slide yet, choose Maximize.

Click on the Themes Tab , page Setup, then Custom Size.

You may be prompted by the following box. Click OK.

Grouping Content
Grouping content is very helpful when you want to move more than one element on your poster but keep original spacing, formatting, etc. To group content like shapes, charts, and text boxes you can 1) click and drag the mouse over the selected element until you see all elements are selected or 2) select one element then to hold the Shift key and click on the remaining elements until they are all selected. Click on the Format tab and select "Group".
Evenly Sizing Content
If you have an image or text box that you'd like to equally size (i.e. keep original proportions but make larger or smaller) click on the element, hold the Control key, and size the element with your mouse.
Moving Content
If you need to minimally move content, you can use your keyboard instead of your mouse. Just select the element and use the arrow buttons on your keyboard.
Duplicate Content
To duplicate shapes, charts, and other elements, use the keyboard shortcut Ctrl + D.
After formatting the slide size and before adding content to your poster, choose a background. You can choose a solid or gradient color and also change the transparency of the background. You can also upload an image to use for the poster background. If you do use an image, make sure it does not distract from the content or make your poster look too busy.
Select the Design Tab and then the Format Background button.

Select the ThemesTab and then the Background button. Select Format Background. Choosing Format Background will open another box.

Choose from a variety of background type such as solid, gradient, picture or patterned design.

Before adding content, add gridlines, guides, or ruler views to aid in the layout of your content.
Select the View Tab and then check the appropriate box.

Now you're ready to start adding content! You'll use the Insert Tab to add images, tables, charts, text boxes, and shapes to your poster. To create columns, select the rectangle shape from the shapes box or create a colored text box. You can overlay a textbox over a shape to add text.
Don't forget to use your gridlines and ruler to keep spacing even and create a margin for the border of your poster.

Select View from the main menu and then choose the appropriate option.

Now you're ready to start adding content! From the Home tab, you'll use the Insert section to add images, text boxes, and shapes to your poster. To create columns, select the rectangle shape from the shapes box or create a colored text box. You can overlay a textbox over a shape to add text.

You will use the Tables and Charts Tabs to insert addition content. These can be great options to visually represent your research.

You can find simple Poster Presentation templates freely available on the Internet. If you'd rather use a template, go ahead! Remember to d ouble check that the size of the slide is correct before you begin adding content.
- Canva Invite more people to attend talks and seminars by promoting the research topics on custom-designed posters from Canva's collection.
- Poster Presentations Free poster presentation templates that you can modify
- Scientific Posters from Makesigns Check out this site for inspiration on poster design (remember: these templates are not free).
- Designing Conference Posters A great blog post by Colin Purrington about designing research posters. Includes several free poster templates.
- << Previous: Using Images
- Next: Poster Examples >>
- Last Updated: Jun 4, 2024 11:15 AM
- URL: https://libguides.butler.edu/researchposter
QUICK LINKS
Library Hours Study Rooms My Library Account Library Website
- Queen's University Library
- Research Guides
Research Posters: A 'how to' guide
- Size and Orientation: Using Powerpoint
- Components of a Poster
- Printing Posters on Campus
The dimensions of your poster are often dictated by the conference or event you plan to present at. However, the standard size of most conference posters is 48" x 36" . (3ft x 4ft or 91cm x 122cm)
To design your poster, we recommend using MS PowerPoint or Keynote. Here are some additional tips:
- Portrait or landscape is fine, unless a requirement is explicitly stated.
- Create a "custom slide size" in PowerPoint or Keynote and enter the desired dimensions.
- The design of the poster is essentially a collection of shapes and text boxes.
- Use features such as 'viewing the grid' in PowerPoint to help you align your graphics and text boxes.
- Be sure to leave sufficient space around the outer edges because a printer can not print all the way to the edge.
- For additional help using PowerPoint refer to the YouTube video How to Make an Academic Poster in Powerpoint .
- When you are ready to take it for printing, you can either take the PowerPoint file, or save it as a pdf.

- Last Updated: Jun 3, 2024 12:25 PM
- Tags: Bracken Library , health sciences , HS Research , Presentations , Research Posters
Want to create or adapt books like this? Learn more about how Pressbooks supports open publishing practices.
Scientific Posters
Characteristics of a scientific poster.
- Organized, clean, simple design.
- Focused on one specific research topic that can be explained in 5-15 minutes.
- Contains a Title, Authors, Abstract, Introduction, Materials & Methods, Results, Discussion, References and Acknowledgements.
- Has four to ten high-resolution figures and/or tables that describe the research in detail.
- Contains minimal text, with figures and tables being the main focus.
Scientific Poster
A scientific poster ( Fig.1 ) is an illustrated summary of research that scientists and engineers use to present their scientific discoveries to larger audiences. A typical poster is printed on paper with dimensions of 36-inches (height) by 48-inches (width).
Figure 1. Scientific Poster

Posters are displayed at events such as symposiums, conferences and meetings to show new discoveries, new results and new information to scientists and engineers from different fields. A large event can have hundreds of posters on display at one time with scientists and engineers standing beside their individual posters to showcase their research. A typical interaction between a poster presenter and an audience member will last 5-15 minutes.
Scientific posters are organized systematically into the following parts (or sections): Title, Authors, Abstract, Introduction, Materials and Methods, Results, Discussion, Acknowledgments and References ( Table 1 and Fig. 2 ). Organizing a poster in this manner allows the reader to quickly comprehend the major points of the research and to understand the significance of the work.
Table 1. Characteristics of a Scientific Poster

The most important parts of a scientific poster will likely be its figures and/or tables because these are what an audience will naturally focus their attention on. The phrase “a picture is worth a thousand words” is certainly true for scientific posters, and so it is very important for the poster’s author(s) to create informative figures that a reader can understand. The “ideal” figure can be challenging to create. Providing too much information in a figure will only serve to confuse the reader (or audience). Provide too little information and the reader will be left with an incomplete understanding of the research. Both situations should be avoided because they prevent a scientist from effectively communicating with their audience.
Authors use different sizes of font for their poster text ( Table 2 ). The general rule is to use a font size that can be read from a distance of 3-feet (1 meter), which is the approximate distance that a person will stand when viewing a poster. The largest fonts (e.g., 40-120 point font) will be used for the title, author list and institutions. Section headings will use 30-40 point font. Section text, table captions, figure captions and references will typically use 20-30 point font. Font sizes smaller than about 20-points can be difficult for an audience to read and should only be used for the References and Acknowledgements sections ( Table 2 ).
Table 2. Poster Font Size and Style

A poster abstract contains all text (no figures, no tables) and appears at the beginning of the poster ( Fig. 2 ). An abstract is one paragraph containing 200-300 words in length. The Introduction section ( Fig. 2 ) appears after the abstract and typically contains 100-200 words of text, a figure(s) and/or table(s) and a caption for each figure and table consisting of 25-100 words for each caption. The Material and Methods sections ( Fig. 2 ) appears third and consists of 100-200 words of text, a figure(s) and/or table(s) and a caption for each figure and table consisting of 25-100 words for each caption. This is followed by the Results section and Discussion section ( Fig. 2 ). Each of these sections contain 100-200 words of text, a figure(s) and/or table(s) and a caption for each figure and table consisting of 25-100 words for each caption. Sometimes these two parts of a poster are combined into one large section titled Results and Discussion. Some posters contain a Conclusion section, which follows the Discussion section. The example shown is Figure 2 does not contain a Conclusion section. The final parts of a poster are the References and Acknowledgements sections ( Fig. 2 ).
Figure 2. Parts of a Scientific Poster

An audience will focus most of their attention on the poster title, abstract, figures and tables. Therefore, it is important to pay particular attention to these parts of a poster. A general rule is that less text is best and a figure is worth a thousand words. The text contained within a poster should be reserved for the most important information that a presenter wants to convey to their audience. The rest of the information will be communicated to the audience verbally by the scientist during their presentation.
Its very important for a scientist to thoroughly understand all the data and information contained within their poster so that they can effectively communicate the research to an audience both verbally (i.e., during their presentation) and visually (i.e., using the figures and tables contained within the poster). It is also important that the References section of a poster contains a thorough summary of all publications pertinent to the research presented in the poster. This way, if an audience member wants more information on a particular topic (e.g., instrument, technique, method, study site) the presenter can direct the audience to the publication(s) where more information can be found.
Scientific Posters: A Learner's Guide Copyright © 2020 by Ella Weaver; Kylienne A. Shaul; Henry Griffy; and Brian H. Lower is licensed under a Creative Commons Attribution-NonCommercial 4.0 International License , except where otherwise noted.
Share This Book
Lynn University
Academic posters.
- APA Academic Poster Template & Formatting
- Humanities Posters
- Tips for Poster Planning
- Sample Posters (Scientific, Humanities, Aviation)
- Lynn Sample Posters & Templates
- APA Citation Help

Academic Poster Template

There is no APA Poster format, but this PowerPoint template uses APA citation and tables/figures format. There are other tools you can use to create a poster; just be sure to follow APA guidelines for figures/tables and citations.
- 48"x36" PowerPoint Poster Template Click to open the PowerPoint Poster Template!
Poster Headings/Sections
Typical poster sections .
See your professor or conference for your required sections. Typical posters follow the IMRaD format: Introduction, Methods, Results, and Discussion/Conclusion. See the Humanities Poster page for more section ideas.
Other sections include:
- Introduction
- Literature Review
- Research Question/statement/hypothesis
- Future Research
- Funding Acknowledgement
Academic Poster Setup
Powerpoint setup.
Most of these instructions are for Powerpoint on a desktop.
- Go to the Design tab > Slide size > Custom Slide Size > Set the width and height, and choose landscape (if a message pops up that "the current page size exceeds the printable area of the paper in the printer" just click OK)
- Standard Poster size is 48” wide x 36” tall - but check with your professor or with the conference and your printer (if you are presenting at a conference)
- The header in this poster is created with a rounded rectangle
- Go to the Insert tab > Shapes > choose a rounded rectangle (or other shapes)
- This header box is 4" tall x 47" wide
- To see and manage box sizes, use the grab handles on the shape OR go to the Format tab > size
- Change the shape, fill color, and outline on the Format tab - this shape has Lynn blue fill
- Three columns are common but not required
- The columns in the poster template are rectangles
- Go to the Insert tab > Shapes > choose a rectangle (or other shapes)
- The two side boxes are 30.5" tall x 14" wide; the center box is 30.5" tall x 17" wide
- On a desktop: on the Format tab
- On an iPad: click on the shape to select it, then on the "Shape" button near the top right
- Save your poster as a PDF (for printing). Go to the File tab > Save as Adobe PDF > choose "yes" to save the file, then name it and save
PowerPoint: change the size of the slide to poster size

Google Slides Setup
- Go to the File tab, select Page Setup > In the drop-down menu, choose custom, enter the numbers, and click apply.
- Go to the Insert tab > Shape > Shapes > choose a shape
- To see and manage box sizes, use the blue grab handles on the shape OR go to Format Options > Size & Rotation

Style: Fonts, Colors, & Sizes
Required font.
See the Lynn Style guide .
- Use Helvetica Neue Light, Bold, Italic, and Bold Italic.
- Ariel is an acceptable substitution if Helvetic Neue is not available.
Lynn Colors
- CMYK 100.68.2.2
- RGB 0.61.165
- Web (Hex) #003DA5
- CMYK 0.0.0.0
- RGB 255.255.255
- Web (Hex) #FFFFFF
- PMS Cool Gray 5
- CMYK 13.9.10.27
- RGB 177.179.179
- Web (Hex) #B1B3B3
Suggested Font sizes
This depends on the size of your poster. Follow these suggestions for best accessibility.
- Main title: 72 point (minimum) - 158 point (ideal)
- Section headings: 42 point (minimum) - 56 point (ideal)
- Body text: 24 point (minimum) - 36 point (ideal)
- Captions: 18 point (minimum) - 24 point (ideal)
- See this article for examples of 24, 72, 150, and 300 dpi: DOI, Resolution, and Proportion
- See this article for more details about dpi and resolution: Resolution Explained
- For the best outcome, see Creative Services in the library before printing to ensure your images will print clearly.
Note that an image that looks good on the computer screen will not necessarily print well (Elements drawn with PowerPoint’s drawing tools will retain their sharpness at any size)
Compare 72 dpi (left) and 300 dpi (right)

Image Source: https://alexanders.com/additional-resources/dpi-resolution-and-proportion/
About Tables, Figures, & Images
Tips for images, figures, and tables:.
- Follow copyright law and university policies for the university logo and any images (do not use the university seal, that is reserved for official use only).
- Follow APA format for Figures and Tables . Graphics should have clear labels; if you did not make the table, figure, or chart, include an APA citation in a note below the chart (see sample image).
- Insert images directly into PowerPoint, do not copy and paste.
- Do copy and paste excel charts and graphs into PowerPoint.
- Use the corner “grab handle” (the small box in the corner when an image is selected) or the size section on the format tab to resize images– this will avoid skewing or stretching the image out of proportion.

- Next: Humanities Posters >>
- Last Updated: Aug 8, 2024 12:28 PM
- URL: https://lynn-library.libguides.com/Academic_Posters

Presenting Your Research: Research Posters and Presenting to Different Audiences
- Summer MAPs at Burling Materials
- Creating Content
- Design Tools
- Basic Design Principles
- Graphs & Graphics
- Presenting your research to different audiences
Grinnell College Resources
In true KISS style, you can Keep It Simple by forgoing creating your own design and using the resources and templates provided to you for posters and graphic design.
- Grinnell College Visual Language The Office of Communication put together a resource page that details the logos, fonts, and colors that the college uses for its websites, publications etc. Feel free to use these resources to ensure that your fonts, colors and logos are visually pleasing and work well together.
- Grinnell College Poster Printing Find information on printing posters as well as templates for research posters
Accessibility
The most important thing to consider when designing your poster is accessibility. Accessible posters not only ensure that people with disabilities can engage with your research but they also tend to make your research more engaging and impactful for everyone.
The Yale University Guide "Academic Poster Resources; Accessibility" provides excellent resources on how to ensure your poster meets accessibility guide lines.
- Yale University's Academic Poster Resources: Accessibility A guide providing resources and tips on creating accessible posters and checking the accessibility of posters.
Things to consider before choosing a size for your text:
- Remember the context that you are presenting your poster in. Is it a crowded conference exhibit hall or a digital venue? How close are people going to need to be to see your poster? This will help you determine the size of the text you need.
- Sometimes, conferences will have specific guidelines on what size text should be used.
- Different fonts will be bigger or smaller, even if they are set to the same size.
- Be consistent with your size. All heading should be the same size, all captions should be the same size, etc.
- The size of your poster will be key in deciding the size of your text. You can't fit 85 pt text on an 8.5/11 poster.
- If your text doesn't fit in your design, change the amount of text, not the size of the text.
Here are some general guidelines for text size based on a 36 x 46 poster size:
Title: 85 pt
Authors: 56pt
Headings: 36 pt
Body Text: 24 pt
Captions: 18 pt
- Choose simple, professional fonts. Sans serif fonts typically read better and are viewable from a distance.
- Use the same font throughout the poster. Finding different fonts that look good together is much harder than it seems, and different fonts can be distracting and ruin the flow of the poster. If you are choosing to use different fonts, be sure to use the same font for each text element (i.e all body text is in the same font).
- Do not use all UPPER CASE type in your posters
- Left-align text. Using fully justified text will create large gaps between some words and make it difficult to read.
Use font hierarchy. Title is the largest, headers are mid sized, and body text is the smallest. This helps the readers understand the flow of your research narrative and it looks professional.
Title
Color Scheme
- Make things easy on yourself. Use the Grinnell Branding color scheme as someone was paid a lot of money to make sure those colors were pleasing to look at together.
- It is always best to use a white background with black text to ensure that the contrast is high and text is legible
- Stick to 2 or 3 colors. Anymore than that makes a poster look too busy and overwhelming
- Be consistent with colors of like-elements in your design. All box outlines should be the same color, all heading boxes should be the same color, all text of the same hierarchy should be the same color etc.
- If you have images or other items with colors already, use the color picker or eyedropper tool to pick out colors from that image and apply to the theme of your poster.
- Do not use color to denote meaning in your poster. Many people are colorblind, and you do not want important insights of your work to be missed.
- What you see on your screen may not be what it looks like printed out. Use CMYK color profile to avoid issues.
Space and Content
You have to hit the right balance when it comes to the amount of space and content that appear on your poster. Too much content is a common issue, and it makes it hard for people to engage with your research. Too little (a rarity in research posters) can do your research a disservice. In general, there are two rules of thumb to follow:
- If you can't decide if you have too much content - you have too much content. Less is (almost) always more when it comes to research posters
- Poster should have roughly 20% text, 40% visuals like figures or images and 40% space (margins, space between lines of text, space between columns, etc). This rule can vary greatly by discipline, but typically good posters have far less text than first time poster makers expect.
Flow & Layout
Adhere to a typical layout so readers can easily follow the “flow” of your narrative. Please do not choose the layout as the place you “get funky with it”.
- In Western cultures, people expect things to start at the top left and work their way down and to the right.
- Visual indicators to show the end of a column is helpful - even if it is just white space!
- If you are "getting funky with it", use visual indicators to show people the flow. Once again, it is strongly recommended that you do not do this.
- << Previous: Design Tools
- Next: Graphs & Graphics >>
- Last Updated: Jun 26, 2024 3:34 PM
- URL: https://grinnell.libguides.com/c.php?g=1407948
USF Libraries Hours by campus
Search the usf libraries, libraries locations.
- Libraries Hours
- Outages & Maintenance Alerts
- Grad Students
- Alumni & Public
- Ask A Librarian
- Subject & Course Guides
- Research Tools
- Find My Librarian
COLLECTIONS
- Special Collections
- Digital Initiatives
- Digital Commons @ USF
- Center for Digital Heritage & Geospatial Information
- Administration
- Get Help With...
- USF Health Libraries
Research Posters: Toolkit
- Writing Abstracts
Template Options
Best practices, additional considerations.
- Data Visualization
- Design Choices
- Before you Print
- Virtual Presentations
- In-Person Presentations
- Publishing Your Poster
- Citing Sources
- Workshop: Creating Research Poster Presentations
Selecting a Layout
Once you have gathered the content of your project, you can decide how to organize the content on your poster. Choose the structure that best showcases the significant findings of your research.
In many academic disciplines, particularly the sciences, research projects are often organized according to the IMRAD format:
- Introduction/Background
- Results AND
- Discussion/Conclusion
If your research uses a historical or an experimental approach, consider alternate layouts such as timelines, Q&As, or any other narrative format that correlates well with your research.
Each of these templates are highly customizable. Please feel free to make adjustments to the color schemes and fonts and to add photographs, icons, illustrations, charts, and other design elements. We strongly encourage you to make your poster stand out!

The 4-column poster template is widely used for research posters and works well for the IMRAD format. Information is read from top to bottom, left to right.
The 3-column template is also suited for the IMRAD format, but may also be used for timelines, etc. Information on this template is read from top to bottom, left to right. This template is nearly identical to the Four Column Poster Template, but accommodates larger images and figures.
The Alternative Poster Template has a minimalist design, so consult with your instructor before opting to use this template. Information on this template is read a little differently; audience members will first be drawn to the large heading in the center, then read the information in the left column, and then look at the images and figures in the right column. Because this template is a minimalist design, you may want to use a QR code to link to a web site with additional details that don't fit on the poster itself.
Research posters are designed to provide the significant highlights of a research project in a visual, eye-catching way. Here are some best practices to guide you:
- Catchy title
- Clear statement of purpose
- Readable design: Horizontal layouts usually include 3-5 columns with balanced combination of text and graphics
- Be brief: 500 – 1,000 words, comprised of short paragraphs and bulleted lists
- Figures/Tables should have a clear purpose and be clearly labelled
- Major findings/results should be the focus
- Bibliography should be selective, usually 3 – 5 citations
Most people naturally read Four-Column posters from left to right, top to bottom. If your poster layout deviates from this, you will need to make the organization clear to your audience through the use of arrows or other icons to show how the audience should read the information.
The layout of any poster can be improved with the intentional use of images, figures, icons, headings, and any other means of breaking up the text of your research poster. That being said, approximately 40% of your poster should be "blank space" that is free of text, figures, and images.
- << Previous: Writing Abstracts
- Next: Data Visualization >>
- Last Updated: Jul 24, 2024 12:11 PM
- URL: https://guides.lib.usf.edu/ResearchPosters
Learn more about how the Cal Poly Humboldt Library can help support your research and learning needs.
Stay updated at Campus Ready .

- Cal Poly Humboldt Library
- Research Guides
Creating a Research Poster
- Getting Started
- Creating your poster step by step
- Citing Images
- Creative Commons Images
- Printing options
- More Resources
Formatting your poster
- Start with resizing your design in the design tool of your choice. This will help make sure your design is scaled correctly when you print it at poster size.
- Be creative in your display, think beyond mounting the text of your paper. You can use boxes, formatting, font and images to break up the sections of your research poster.
- Think carefully about your title. If you would like a longer, more descriptive title, consider a subtitle. Brainstorm several titles and have a peer/collegaue/friend/teacher rank them. The title needs to highlight your subject matter, but it does not need to state all your conclusions. Some good titles simply ask questions, others answer them.
- You can section your poster according to the major points about your research you want to convey. For example: title, abstract, methodology, data, results and conclusion. Consider the flow of your poster, these should be in a logical, easy-to-read order. Remember that most people read from left to right and top to bottom.
- Qualitative data (e.g. quotes from references and/or interviews) can also be shared on your poster.
- Design your poster as if you were designing for a professional publication. Be consistent with your layout, color choices, fonts and sizes.
- Keep It Simple. In succinct, brief, jargon-free terms, your poster must explain: 1) the scientific problem in mind (what’s the question?), 2) its significance (why should we care?), 3) how your particular experiment addresses the problem (what’s your strategy?), 4) the experiments performed (what did you actually do?), 5) the results obtained (what did you actually find?), 6) the conclusions (what do you think it all means?), and, optionally, 7) caveats (any reservations?) and/or 8) future prospects (where do you go from here?).
- What is the number one mistake made in poster presentations? Too much information! Try to keep your poster to the point and and clear. You can always include more information in your handout or on a website.
- Remember to include acknowledgements, your name and institutional affiliation.
Font and text considerations
- Remember that your poster is supposed to promote discussion between you and the viewer, therefore try to limit the amount of wording on your poster.
- Your title should use approximately a 72 font size. It should be readable by the viewer from at least 10 feet away.
- All text of your poster should be *at least* 24 font size and an easy-to-read font style (e.g. Arial or Verdana). Anything smaller is too difficult to read.
- Don't use more than two fonts on your poster: one for the title and one for the text.
- Make sure you include captions, legends, annotations, citations, and footnotes, where necessary.
- Use graphics, photos, images, statistics and color.
- Columns are easy to follow. You can use colored boxes and headings to divide the sections of your poster.
- Strive for a consistent, clean, and readable poster.
- << Previous: Creative Commons Images
- Next: Printing options >>
How to Create a Research Poster
- Poster Basics
- Design Tips
- Logos & Images
What is a Research Poster?
Posters are widely used in the academic community, and most conferences include poster presentations in their program. Research posters summarize information or research concisely and attractively to help publicize it and generate discussion.
The poster is usually a mixture of a brief text mixed with tables, graphs, pictures, and other presentation formats. At a conference, the researcher stands by the poster display while other participants can come and view the presentation and interact with the author.
What Makes a Good Poster?
- Important information should be readable from about 10 feet away
- Title is short and draws interest
- Word count of about 300 to 800 words
- Text is clear and to the point
- Use of bullets, numbering, and headlines make it easy to read
- Effective use of graphics, color and fonts
- Consistent and clean layout
- Includes acknowledgments, your name and institutional affiliation
A Sample of a Well Designed Poster
View this poster example in a web browser .

Image credit: Poster Session Tips by [email protected], via Penn State
Where do I begin?
Answer these three questions:.
- What is the most important/interesting/astounding finding from my research project?
- How can I visually share my research with conference attendees? Should I use charts, graphs, photos, images?
- What kind of information can I convey during my talk that will complement my poster?
What software can I use to make a poster?
A popular, easy-to-use option. It is part of Microsoft Office package and is available on the library computers in rooms LC337 and LC336. ( Advice for creating a poster with PowerPoint ).
Adobe Illustrator, Photoshop, and InDesign
Feature-rich professional software that is good for posters including lots of high-resolution images, but they are more complex and expensive. NYU Faculty, Staff, and Students can access and download the Adobe Creative Suite .
Open Source Alternatives
- OpenOffice is the free alternative to MS Office (Impress is its PowerPoint alternative).
- Inkscape and Gimp are alternatives to Adobe products.
- For charts and diagrams try Gliffy or Lovely Charts .
- A complete list of free graphics software .
A Sample of a Poorly Designed Poster
View this bad poster example in a browser.

Image Credit: Critique by Better Posters
- Next: Design Tips >>
- Last Updated: Jul 9, 2024 5:34 PM
- URL: https://guides.nyu.edu/posters

Research Posters
- Getting Started
- Sections of a Poster
- Design Tips
- Formatting a Poster
- Instructions for Printing
- Some Examples
Design Considerations
Color scheme, choose a simple yet dynamic color scheme before you begin to add content. , the poster's main goal is to promote discussion between you and the viewer. try to limit the amount of wording on your poster. keep your word count around 1,000 words for the entire poster., font size and type, the title should use at least 70 pt—font size. it should be readable by the viewer from at least 6 feet away., all poster text should be at least 24 pt—font size., use easy-to-read, sans-serif fonts such as arial, calibri, or verdana., limit the number of fonts on your poster (one font for the title and headings and another for the text)., create a logical flow of information. columns are easy to follow, so arrange your content in three or four columns., include at least a 1-inch margin on your poster. this ensures that no content is lost in the printing process and that no content is covered when you hang it up., don't forget to utilize white space. this will help keep your content well organized and easy to read., incorporating images & graphics, create visual balance by distributing elements evenly across the poster and avoiding overcrowding any particular section. use white space strategically to help guide the viewer's eye and prevent the poster from feeling cluttered., your images and graphs should highlight your research and not just be place fillers., always include captions for any charts or graphs you use to explain your research findings., always give credit to any images or graphics you use in your poster (except if you are using free images)., use the "insert" command (rather than paste) when adding images to your poster., evaluating your poster, use the following rubric and checklist to critique and evaluate your poster. , rubric for scientific posters (harvard catalyst), before you print your poster: , print your slide on an 8 1/2" x 11" sheet of paper to ensure everything is proportional. for a larger option, use 11" x 17" sheet of paper, which is available at the library copier/scanner., have someone read your poster to double-check all spelling and grammar. once your poster is printed in large size, mistakes will be very noticeable..
- << Previous: Sections of a Poster
- Next: Images >>
- Last Updated: Jun 13, 2024 10:36 AM
- URL: https://guides.luther.edu/research_posters

Research Posters and Poster Sessions: The Poster: Top to Bottom
- The Poster: Top to Bottom
- Poster Sections
- Graphic Design Tips and Tricks
- About Poster Sessions
- Printing A Poster
- Submitting a Poster to Uspace
- Center Image 48"X36" Poster
This template is for a standard, 4' by 3', research poster designed for minimal text use.
- Key Image 48"X36" Poster
This template is for a standard, 4' by 3', research poster presenting a layout designed around a focal image.
- Red Panel 48"X36" Poster
This template uses a dramatic center column to highlight key concepts. It is standard size, 4' long by 3' high.
- Rule of Thirds 48"X36" Poster
This template is for a standard, 4' by 3', research poster which follows the design principle of "rule of thirds."
- Basic, text-focused, 48'X36" Poster
This template is for a standard research poster, 4' long by 3' high.
- Basic, text-focused, 36"X36" Poster
This template is for a square poster, 3' by 3'.
Office of Undergraduate Research Poster Template
- Template for use in UROP poster sessions
General Information About Research Posters
Open up one of the templates and follow along referring to the template from top to bottom. Before you actually start creating the poster collect all the images, logos, etc. you will possibly need and write up the text for the different sections of the poster (described below). Doing this first simplifies the procedure. Once all the elements are added to the poster, then you can rearrange to enhance the total image. Then you will then be able to select colors that will further enrich the overall look of the poster (described further in Graphic Design Tips and Tricks) .
Guidelines, Gridlines and Rulers: These were added to each of the templates and how to add them is outlined in The Poster Workbook using MS Powerpoint 2010. The poster is large and the computer image is small in comparison. These tools assist in guiding you around the poster as you add elements and zoom in or out. The guidelines are shapes inserted from the Ribbon, which you can choose to keep or delete depending on the overall design of the poster.
Logos: The University has official logos as do most departments. If your department has a logo it is usually combined with the University’s logo and therefore you will not need to add a separate University logo. To obtain a departmental logo ask the professor you are working with or the Administrative Assistant to the department head.
Title: The title should convey the subject of the project and draw people to your poster. The minimum font for the title is 72pt, but make the font as large as you can (shorten the title).
Authors: If you are the only author give your complete name. If there are many authors using initials is ok to save space. Let the audience know who is presenting by underlining the name(s). The font size should be smaller - ½ to 2/3 the size of the font used for the title.
Affiliations: List the department or program in which you conducted the project, followed by the University of Utah. If there are multiple authors and departments, list each department/program once. If there are multiple authors for each department/program, then use superscripts to indicate affiliation. List the University of Utah on a separate line or if space is tight, then leave it out. The logo will indicate the University.
Creative Commons: Your poster is your work, protect it. To let people know that the work is yours, apply for Creative Commons . It only takes a few minutes. With a Creative Commons license, you keep your copyright, but allow people to copy and distribute your work provided they give you credit — and only on the conditions you specify. For additional information on copyrights and Creative Commons contact the Scholarly Communications and Copyright Librarian, Allyson Mower .
- << Previous: Home
- Next: Poster Sections >>
- Last Updated: Jun 19, 2024 6:01 PM
- URL: https://campusguides.lib.utah.edu/posters
Popular Products
- Stickers & Labels
- Business Cards
- Large Format Printing
- Graphic Design
- Campaign Printing
- Same Day Printing
- Direct Mail
Printing Services
- Announcements & Invites
- Badges & Lanyards
- Black EDGE Cards
- Booklets & Catalogs
- Door Hangers
- Drink Coasters
- Event Tickets
- Foil Printing
- Greeting Cards
- Health & Safety
- Letterhead & Envelope
- Linen Uncoated
- Luster Cards
- Plastic Cards
- Presentation Folders
- Restaurant Menus
- Roll Labels
- Sample Packet
- Sell Sheets
- Table Tents
Large Format
- Poster (Wide)
- Window Graphics
- Canvas Printing
- Every Door Direct Mail
Promo Products
- Shirt Printing
- Social Cards
- Buttons & Mugs
- Announcements & Invites
- Badges and Lanyards
- New Products
- Brochure Printing In Atlanta
- Business Card Printing in Atlanta
- Cheap Flyers Printing in Atlanta
- Flyer Printing Services
- Flyers Graphic Design
- Sticker Printing in Atlanta
- Booklets & Catalogs
- Buttons and Mugs
- CD Inserts & Duplication
- Drink Coaster Printing
- Elite Business Cards
- Health & Safety
- Letterhead & Envelope
- Postcards: 16pt Stock
- Promotional Products
- Tag Me Cards
- Window Cling
Additional Information
- Direct Mail Services
- Direct Mail Quote Form
- Frequently Asked Questions
- Printing & Design Tips
- PRINTING in ATLANTA
- Custom Quote
- Blog: Clash Graphics Print Shop Atlanta Flyer Printing
- Disclaimer & Policies
- Turnaround Times
- Deals & Coupons
- Artwork & Files
- UPS Ground Transit Map
Site Information
- Call us on 678-235-3464
- Gift Certificates
- Sign in or Create an account
- 678-235-3464
Recent Posts
- Creating a Small Business Marketing Plan
- QR Code Marketing
- Mastering Brand Typography and Fonts
- What is Prepress?
- Eco Solvent Printing
- Printing & Design Tips
Standard Poster Sizes Guide
Posted by Clash Graphics on 31st Jul 2023
Are you feeling overwhelmed by your choices of poster sizes and printing options? Whether creating a captivating movie poster or an informative academic presentation, selecting the right size and printing method is essential for ensuring your message is effectively conveyed. Fear not; this guide to standard poster sizes will help you confidently navigate the world of poster printing.
In this comprehensive article, we'll explore standard poster sizes, delve into custom sizes for specific purposes, discuss the importance of selecting the right paper and printing method, share design tips for effective posters, and help you choose between DIY printing and professional services. Let's embark on this journey to create captivating posters!

Short Summary - Standard Poster Sizes
Familiarize yourself with standard poster sizes to plan and benefit from the cost-effectiveness and availability of the best options for your project.
The most frequently used poster sizes are 11x17, 18x24, 24x36, and 27x40; these standard sizes can produce nearly any poster you can imagine.
Consider the text size and readability; also think of the balance between text, images & white space when designing a medium-sized poster or large poster.
Select the right paper and printing method considering the weight, cost, lifespan, and acid-free status. Also, consider digital vs. offset printing when deciding your desired poster quality & budget.
The Most Common Poster Sizes
Understanding the standard poster sizes - small (11" x 17"), medium (18" x 24"), and large (24" x 36" and 27" x 40") - can help you choose the right size for your specific needs. These four poster dimensions will work for nearly any project, so consider them for your next poster printing project.
Standard poster sizes offer numerous benefits, such as the availability of paper rolls, multiple frame options, and print enlargements tailored to these standard sizes. Choosing a standard poster makes printing them cost-effective and readily accessible through online or local poster printing services .
Now, let's dive deeper into standard poster sizes and tips for creating your own poster in small, medium, and large sizes.
11" x 17" - Small Posters

Small posters are often 11 x 17 inches. This standard size is ideal for store windows, restaurants, bathrooms, bulletin boards, and interior displays in high-traffic areas. Known as "bulletin posters," these are the right size for event advertising, indoor notices, around lounges, waiting rooms, and bathrooms.
Their compact size allows them to fit in tight spaces without consuming much wall space, making them perfect for displaying on community bulletin boards or alongside other posters in retail stores. Small posters are placed on doors and street lights for outdoor use, which suits the 11" x 17" poster well.
When designing a small poster, it's crucial to employ large, bold fonts to ensure readability, concise copy, and visually arresting visuals. A minimalist design and simple messaging is the perfect approach to grab attention and convey your message effectively at this size.
Examples of creative uses for mini-posters include music and movie posters, advertisements, personal wall art, promoting events, smaller window advertisements, and subway posters.
18" x 24" - Medium Posters

Medium posters, measuring 18 x 24 inches, are one of the most requested poster sizes. They offer slightly more space than smaller posters for larger images and minimal text. This size provides ample space for promoting events, festivals, and concerts and is perfect for retail advertisements and home decor.
These versatile standard-size posters can be used indoors or outdoors for various purposes, such as medical posters, retail ads, and in bus stop or subway displays. These posters are often used in offices, clinics, and larger bulletin boards.
When designing a medium poster, it's important to consider the proportion of text and images. This poster has a 3:4 aspect ratio, and with more space than a small poster, you have extra room for content. Here are additional tips for creating a compelling and eye-catching medium poster for your next project:
Strike the right balance between text, images, and white space
Ensure that your text and images are legible and visually appealing
Use a suggested minimum height of twelve points for text on a medium poster
These tips help you create a medium-sized poster that grabs attention and effectively communicates your message.
24" x 36" - Large Posters

The large poster dimensions are typically 24 x 36 inches and are ideal in busy areas. It is the most popular large poster and is commonly used for commercial advertising due to its size and ability to grab attention. As a go-to in high-traffic areas, this poster is perfect for trade shows and exhibits, and retail stores often print their posters in 24" x 36" poster dimensions.
This poster has a 2:3 aspect ratio, enabling abundant options if you need your poster framed. In addition, the large poster dimensions offer ample space for incorporating additional details and creativity into your poster design. With the benefit of a larger canvas, you can include intricate graphics and designs to make the poster more eye-catching.
Large-format poster printing on high-quality materials, such as polyester fabric, can ensure the longevity and vibrancy of your large-format posters, whether displayed in retail stores, outdoor venues, or advertising locations.
27" x 40" - Large Movie Posters

Measuring 27 x 40 inches, this large poster is the last of the most-common standard poster sizes. The 27" x 40" is often seen announcing and advertising upcoming movies. These iconic film posters are frequently seen in theaters and malls and framed as signs or billboard posters inside displays.
In addition to being the standard movie poster size, this poster is also commonly used as bus stop ads due to its ability to be seen from a distance. While framing the 27" x 40" poster might not be as straightforward or budget-friendly, it remains an excellent choice for those seeking a very large standard poster.
This movie poster provides enough space for high-resolution images, graphics, and sizable text. When designing, take advantage of the size, and incorporate vivid graphics, but use the white space properly to make it easily legible and ensure your messaging is seen.
Custom Poster Sizes
While standard poster sizes are versatile and widely used, custom poster sizes cater to specific purposes, such as concert promotions, advertising, and academic presentations. In addition to the standard sizes, posters can be printed in many other dimensions and sizes to meet your needs.
|
| ||||
|---|---|---|---|---|
|
|
|
|
|
|
| 8.5 x 11 in. | 215.9 x 279.4 mm. | 21.59 x 27.94 cm | Digital, Inkjet, Offset | ANSI-A, Letter |
| 11 x 17 in. | 279.4 x 431.8 mm. | 27.94 x 43.18 cm. | Digital, Inkjet, Offset | ANSI-B, Ledger, Tabloid |
| 12 x 18 in. | 304.8 x 457.2 mm. | 30.48 x 45.72 cm. | Digital, Inkjet, Offset | Mini-Poster |
| 16 x 20 in. | 406.4 x 508.0 mm. | 40.64 x 50.80 cm. | Inkjet, Offset | Portrait Pictures |
| 18 x 24 in. | 457.2 x 609.6 mm. | 45.72 x 60.96 cm. | Inkjet, Offset | Medium Poster, Architectural C, 1/2 size |
| 24 x 36 in. | 609.6 x 914.4 mm. | 60.96 x 91.44 cm. | Inkjet, Offset | Large Poster, Architectural D |
| 27 x 39 in. | 685.8 x 990.6 mm. | 68.58 x 99.06 cm. | Inkjet, Offset | One Sheet Movie Poster (bulk) |
| 27 x 40 in. | 685.8 x 1016.0 mm. | 68.58 x 101.60 cm. | Inkjet | One Sheet Movie Poster |
| 48 x 36 in. | 1219.2 x 914.4 mm. | 121.92 x 91.44 cm. | Inkjet | Research Poster, Academic Poster |
| 40 x 60 in. | 1016.0 x 1524.0 mm. | 101.60 x 152.40 cm. | Inkjet | Bus Stop, Subway Poster |
As seen above, custom posters can range in size. Let's explore some unique custom poster applications in detail.
Concert and Band Posters

Concert and band posters come in various sizes, ranging from handbills and flyers to large posters. Handbills typically measure 8.5" x 10" or 8.5" x 5", while large flyers and small letter-sized posters used for promotional purposes outside the venue measure 8.5" x 11". These posters are designed to grab attention and effectively promote events regardless of size.
The most requested size for band posters is 11" x 17" to 24" x 36". One cost-effective large-format advertising medium for concerts and events is wheatpasting posters, frequently observed adorning walls and fences repetitively. These posters allow bands and event organizers to reach a wider audience without breaking the bank.
Academic and Research Posters
Academic and research posters typically measure 48" x 36" and are used to present research findings or academic projects in a visually appealing and informative manner. These posters balance visuals with text, providing an overview of the research project and relevant commentary regarding the discoveries made throughout the process.
Inkjet printing is the most commonly used method for printing academic posters because it produces high-quality images and text. When designing an academic or research poster, it's essential to consider the balance between text and visuals, ensuring the information is presented clearly, and easy for the viewer to consume.
Selecting the Right Paper and Printing Method
Choosing the right paper and printing method is crucial for creating long-lasting, high-quality posters. Factors to consider include the poster's appropriate weight, cost, and desired lifespan. Paper weight is measured in grams per square meter (GSM), and it is suggested that the minimum weight for poster paper should be 90 GSM or g/m2 (60 pounds). If you have a decent budget, choose a heavier paper weight (120-170 GSM). In addition to giving your poster a more luxurious feel, it will make it more durable and longer lasting.

Let's look at two essential aspects of poster printing: using acid-free paper stock and choosing between digital and offset printing.
Acid-Free Paper
Acid-free paper has a neutral or basic pH, meaning it is devoid of sulfur and lignin, which can cause discoloration if not eliminated. Printing posters on acid-free paper prevents yellowing over time, ensuring the color of your poster remains vibrant and intact.
While acid-free paper may be slightly more expensive than standard printer paper, the investment is well worth it to preserve your poster's appearance long-term. This is especially important for posters displayed in public areas or those with sentimental value, as the colors and quality of the printed poster will remain intact for years to come.
Digital vs. Offset Printing
Digital and offset printing methods offer different advantages, depending on your poster's size and purpose. Digital printing is a more efficient and less labor-intensive process that is ideal for short-run production (smaller quantity) and when a rapid turnaround is necessary. On the other hand, offset printing provides higher-quality results and is more suitable for large-run production (larger quantity) and when a higher quality is required.
When deciding between digital and offset printing, consider factors such as the number of posters needed, the desired quality, and your budget. For small-scale projects or when time is of the essence, digital printing may be the best option. However, if you require a large number of posters or desire the highest possible quality, offset printing will be the better choice.
Design Tips for Effective Posters
The intent and goal of creating a poster is to grab attention and convey a message or information quickly. Good design accomplishes this, and effective poster design incorporates the following to do so:
Visual hierarchy
By using these design elements strategically, you can ensure that your poster captures the attention of your target audience and effectively conveys your message. Let's explore these design principles in more detail.

Minimalism and Visual Hierarchy
Minimalism in design emphasizes simplicity, functionality, and elegance. Using a restricted color palette, basic forms, and negative space, you can create a straightforward and practical design highlighting important elements and attracting the viewer's attention. Minimalism is particularly relevant for small and medium-sized posters, as a high concentration of text can render the poster challenging to read and ultimately ignored.
On the other hand, visual hierarchy refers to guiding the viewer's gaze through the poster using eye-catching graphics and text. You can create a clear and ordered poster that effectively conveys your message by arranging design elements to emphasize and highlight the most important information.
Typography and Contrast
Typography is the art and technique of arranging letters and text to make written language legible, readable, and aesthetically pleasing when displayed. Bold typography can be employed as a singular image on posters, creating an eye-catching focal point that draws the viewer in.
Contrast, on the other hand, can be employed to create visual interest and direct attention to certain aspects of a poster. By utilizing different colors, sizes, and font weights, you can increase the readability of your text and ensure that your poster effectively communicates its intended message.
Combining typography and contrast can create visually appealing designs that enhance your poster's aesthetics and effectiveness.
Printing Your Poster: DIY or Professional Services?

Deciding between DIY printing and professional services depends on quality, cost, and convenience. While DIY printing can be more affordable, it may result in lower-quality posters, especially for large sizes. On the other hand, professional printing services offer higher quality and a wider range of options, ensuring your poster looks its best.
Let's weigh the pros and cons of each option.
Pros and Cons of DIY Printing
DIY printing can be cost-efficient and require less time and effort than a professional printing company. This may be an attractive option for those on a tight budget or who need a small number of posters printed quickly for their poster printing project. However, the quality of the print may not be as high as that of professional printing, which could impact your poster's overall effectiveness and appearance.
In addition, DIY printing may be limited in terms of the available printing methods and materials, which could affect the longevity and vibrancy of your poster. If you're considering DIY printing, weighing the potential savings against the potential drawbacks in terms of quality and durability is essential.
Benefits of Professional Printing Services
Professional printing services provide higher quality prints and a broader selection of options than DIY printing. They use higher-quality materials and have access to more advanced printing technology, ensuring that your poster looks its best. Professional printing services also offer various finishing options, including lamination, mounting, and framing, which can help protect your poster and make it look more professional.
In conclusion, a professional printing company can provide superior quality, a more comprehensive selection of finishing options, and printing services that include:
Higher quality materials
Access to more advanced printing technology
A selection of finishing options, such as lamination, mounting, and framing - to safeguard and make your poster appear more professional
Throughout this reference of standard poster sizes, we've explored the dimensions and purposes of small, medium, and large posters and specific applications for custom-size poster projects. We delved into the importance of selecting the right paper and printing method. Lastly, we shared design tips for creating compelling, easy-to-read, and eye-catching posters.
By understanding the nuances of poster sizes, design principles, and printing methods, you can confidently create captivating posters that effectively convey your message and leave a lasting impression. Now go forth and unleash your creativity, and produce a captivating poster!
Is 18x24 a standard poster size?
Yes, 18x24 is a standard poster size as well as the most popular medium poster size.
Is 24x36 a standard poster size?
Yes, 24x36 is a standard poster size, often used at trade shows, exhibits, and to display home decor/art.
What is the standard poster size ratio?
The most common poster size ratios are 2:3 and 4:3. Popular sizes include 18" x 24", 24" x 36" and 27" x 40".
16:9 is also used for widescreen digital posters, with 48" x 36" being the most common size for print posters.
What is the importance of acid-free paper in poster printing?
Acid-free paper is essential to poster printing as it preserves vivid colors and prevents discoloration over time, ensuring your poster remains vibrant.
What is the difference between digital and offset printing?
Digital printing is ideal for short-run production and when a rapid turnaround is necessary, while offset printing is better suited to large-run production and when a higher-quality result is desired.
Clash Graphics Print Shop Atlanta Flyer Printing
2233 Peachtree Rd NE Ste 202 Atlanta , GA 30309 (678) 235-3464
- Band Poster
- Movie Poster
- Poster Dimensions
- Poster Printing
- Poster Printing Atlanta
- Poster Size
- Poster Sizes
Enter your email in the box below to sign up for our newsletter. You will receive news & updates from Clash Graphics as well as coupons & other promotional items.
Enter your email in the box below to sign up for our newsletter. You will receive news & updates from Clash Graphics as well as coupons & other promotional items.
Quick Links
Clash Graphics offers affordable flyer printing in Atlanta, business cards and same day printing services. As one of the best printing companies in Atlanta, you can be confident your order will be done right and on time. Call or stop by our print shop in Atlanta when you need flyers, graphic design or other printing services.
All prices are in USD . © 2024 Clash Graphics. Sitemap Powered by BigCommerce
PRINT DESIGN EDUCATION
The ultimate guide to standard poster sizes & dimensions, a guide to common poster sizes.
In a time where much of what we see is presented in digital formats, posters continue to be an effective and high-impact way to widely share information. Whether for decorative purposes or advertising and marketing campaigns, knowing how to scale your poster for peak impact adds a professional element to any project, but it can be hard to conceptualize the correct poster size for your project without seeing a few compared side by side.
As a full-service commercial print shop offering poster printing , we’ve seen it all, so we created this guide to help print designers and buyers easily reference the most common poster sizes and see how they compare to one another at a glance. We believe that having a basic understanding of our poster sizes can help you zero in on the right poster size sooner, avoiding the costly process of printing posters at several different sizes to decide.
What you’ll find in this blog post
Below, we’ll display the most common or standard poster sizes that are available for print, provide you with an idea of how large the standard poster sizes are in relation to one another, and help you understand how sizing can affect your print budget.
To make the guide more helpful for both US-based designers and for designers using international paper sizes, we’ve included information about the closest international size equivalents for our standard poster sizes. Our aim is to provide better context for designers and teams producing assets for final printed designs.

At a Glance: Comparing Standard Poster Sizes
To help display the relative sizing between the most common poster sizes, we’ve taken photos of each of the common sizes next to one another. Below, we’ve also taken photos of a model holding a poster of each standard size. We’ve taken each of these photos from the same distance away to help show the scale of each standard print size.
You can use the table of contents to jump directly to any of the individual poster sizes in the article, which will include:
- an image of a model next to a print of the poster size for scale
- the poster’s dimensions in millimeters, pixels and the closest equivalent international paper size.
We hope you find the resource helpful!
Jump to a section in this post
Download a free starter file for each poster size., table of common poster sizes and their international & pixel size equivalents.
Common Name
Size in Inches
Size in Pixels (300ppi)
Size in Millimeters
Closest International Size
Closest International Size in Millimeters
Letter Size Posters
2550 x 3300
215.9 x 279.4
Bulletin Posters
3300 x 5100
279.4 x 431.8
Photo Posters
4800 x 6000
406.4 x 508
concert Posters
5400 x 7200
457.2 x 609.6
Large Posters
7200 x 10800
609.6 x 914.4
Movie Posters
8100 x 12000
685.8 x 10¹⁶
Bus Stop Posters
12000 x 18000
1016 x 1524
1000 x 1414
The Most Common Poster Sizes, Visualized:

Letter Poster Size: 8.5 x 11 inches or A4
Size in mm: 215.9mm x 279.4mm Size in pixels: 2550px x 3300px at 300ppi Closest International Size: A4 (210 x 297 mm / 8.3 x 11.7 in)
Letter-sized posters, 8.5”x11”, are the smallest standard poster size and a great option for announcements and advertisements. Posters of this size can often be found on bulletin boards and street posts advertising events, schedules, and conveying basic information. Design-wise, these posters tend to work best when they have a balance of design and text elements to ensure legibility.

Bulletin Poster Size: 11 x 17 inches or A3
Size in mm: 279.4mm x 431.8mm Size in pixels: 3300px x 5100px at 300ppi Closest International Size: A3 (297 mm x 420 mm / 11.7 in x 16.5 in)
The bulletin poster size, 11”x17”, is commonly selected when a letter-sized poster isn’t enough. Due to its larger size, a bulletin poster can be more eye-catching and professional with room to include key dates and calls to action. Bulletin posters are most frequently used indoors to advertise community events and concerts, most often on a bulletin board

Photo Poster Size: 16 x 20 inches or A2
Size in mm: 406.4mm x 508mm Size in pixels: 4800px x 6000px at 300ppi Closest International Size: A2 (420 x 594 mm / 16.5 x 23.4 in)
Perfect for art prints and large-scale photography, a 16”x20” poster size provides ample space to include high-quality images. This size is often used for retail or in-store advertising and to display fine art or photos.

Concert Poster Size: 18 x 24 inches or B2
Size in mm: 457.2mm x 609.6mm Size in pixels: 5400px x 7200px at 300ppi Closest International Size: B2 (500 × 707 mm / 19.7 × 27.8 in)
An 18”x24” or medium poster size is best for displaying information such as public health notices, where written information and accompanying graphics coexist. This poster size is also a go-to for concerts, school clubs, and athletic teams, as it provides space for larger images and text without overcrowding.

Standard Poster Size: 24 x 36 inches or A1
Size in mm: 609.6mm x 914.4mm Size in pixels: 5400px x 10800px at 300ppi Closest International Size: A1 (594 x 841 mm / 23.4 x 33.1 in)
The 24”x36” poster size is a standard for large posters. Posters of this size are commonly used for advertising purposes, as well as for trade shows and exhibits, as they are large enough to command attention in high-traffic areas where people might be passing by and taking in information quickly.

Movie Poster Size: 27 x 40 inches or B1
Size in mm: 685.8mm x 1016mm Size in pixels: 8100px x 12000px at 300ppi Closest International Size: B1 (707 × 1000 mm / 27.8 × 39.4 in)
We are all familiar with classic movie posters, which, technically speaking, are 27”x40” poster size. These posters, while traditionally used to advertise movies by showcasing minimal graphics and large text, are also a great option for outdoor advertising. For our large posters, we recommend sizing text to a large enough scale that it can be easily read by passersby.

Bus Stop Poster Size: 40 x 60 inches or B0
Size in mm: 1016mm x 1524mm Size in pixels: 12000px x 18000px at 300ppi Closest International Size: B0 (1000 × 1414 mm / 39.4 × 55.7in)
The standard size for posters displayed at bus stop shelters and in subways is 40”x60”. Design decisions make a large impact on posters of this size, as they are meant to command attention both from afar and up close. If the standard bus stop or subway poster size isn’t sufficient, a billboard poster, 46”x67”, offers slightly more real estate to convey your messaging whether for an advertising campaign or otherwise.
Consider Your Use Case to Determine the Best Poster Size for Your Project
When determining which poster sizes work best for your project, it’s helpful to consider the amount of information that needs to be conveyed in text, as well as any accompanying artwork and images. A well-designed poster will balance text and visual elements while remaining easily legible. Audience and messaging can also impact decisions regarding poster size. Bulletin sized posters, for instance, will most likely be viewed up close with and with a greater level of attention than a bus stop poster, which will be viewed both up close and from a distance or passing glance. Details like this can impact the type of design and how much messaging you choose to display.
Custom Poster Sizes and Post-Production Options
Aside from the standard or most commonly printed poster sizes, a good large format printer should be able to produce posters in most any size you can dream up. Custom poster sizing offers some flexibility between standard sizes and can be scaled to dimensions as large as 52 inches wide and any length of your choice.
If you plan to print a large poster or if it will be used outdoors or in heavily frequented public spaces it may be worth considering having your printer mount the poster to foam board after the poster is printed. Mounting and lamination are key components to consider when determining where and how to display your poster. For instance, an outdoor poster display might require more reinforcement than a poster intended for indoor use, as it will be exposed to the elements, accelerating any basic wear and tear.
Follow Print Design Best Practices When Producing Your Poster
Aside from poster size, there are other design elements to consider when printing your poster. Following best practices for print design will help ensure your poster printing job rolls off the press perfectly the first time.
- Design your poster in CMYK: Thomas Group offers black-and-white and full color printing services, as well as a wide array of paper types and weights. However, your colors won’t print correctly if you’re not using the correct color space for your document. Make sure to design and export your file using CMYK colors, which are optimized for print, rather than RGB colors, which are optimized for on-screen viewing.
- Use bleed properly: To ensure the best quality of your poster, we recommend adding a bleed, or an extra .125” of background image, to ensure that your poster’s design fully extends across the poster, rather than leaving a seam of white background after the printing and trimming process.
- Use 300 dpi images: It’s important to use the right image resolution for all print work but it’s especially important for posters, as their large sizer will more easily show blurry photos. If you’re using photos on your posters, make sure they are 300dpi.
- Outline fonts: Before sending your poster printing job to your printer, make sure all fonts are outlined. Your printer may not have the same fonts installed as you especially if you’re using custom fonts in your designs. Outlining your fonts helps to ensure your font will print correctly by vectorizing the text, turning it into non-editable curves and points on the design rather than editable text, which will appear in a default font if the printer doesn’t have it installed.
- Eliminate some guess work and download a free starter file: Use the form below to get a free starter file for your poster design project. The file is a blank canvas for your creativity with the technical details taken care of that designers often overlook.
Work With An Experienced Commercial Printer on Your Poster Printing Project
When you’re working on a printed piece for your company, the quality of the work should reflect the quality of your brand. Thomas Group Printing has a deep understanding of the demands of commercial printing and exists to ensure your entire printing experience is fast, seamless and error-free. We’re trusted by some of the world’s largest brands and by independent print designers alike.
Thomas Group Printing is located in New York City and offers fast and convenient shipping nationwide. If you’re seeking an experienced and high quality printer for your next poster printing job, consider reaching out to us for a custom quote . Our seasoned print production team is here to help.
Follow Thomas Group Printing for More Print Design Education & Inspiration
We believe in taking the time to serve as a resource to our clients and help them navigate the often confusing process of print production for high volume, high-visibility print jobs, or to just help them brush up on their print design skills. If you’ve found this resource helpful, here are a few other ways to keep learning and stay inspired:
- Thomas Group Print Education Blog: Access free print design and production resources to help you level-up your print design skills. View the blog here or subscribe for email updates to get our best educational resources delivered monthly.
- Thomas Group Print Inspiration Blog: Check out the coolest designs rolling off of our press. As an NYC-based printer, we’re privileged to produce print work for some of the most creative minds in the industry. We photograph and share unique print work we’ve helped to produce and spill the details on the specs of the jobs to help you take inspiration from other clients. View the blog here or subscribe for email updates to get our best educational resources delivered monthly.
Free Custom Designed Poster Templates
Available in both Canva and InDesign so you can use your favorite software to create your custom poster.
Our poster templates are fully editable, free, and ready to print!

Restaurant Poster Template
Travel Poster Template
Retail Promotion Poster Template
Sustainability Poster Template
Beauty Promotion Poster Template
Art Gallery Poster Template

Bakery Promotional Poster Template
Summer Clearance Poster Template
Wine Tasting Event Poster Template

Sale Poster Template
Get started on something amazing.
Thomas Group Printing is a family-owned print shop that ships nationwide. In addition to a variety of standard-sized printed resources, our experienced team can help you quote and print any custom job you can imagine. Get started on a print job with us today and experience the difference in print quality and service.
Related content:

Thomas Group Printing

Products & Services
Customer Reviews
How to confirm your research poster's size.
To find that your poster is the wrong size after you have invested a lot of time designing it can be very frustrating and time-consuming. Here is how to confirm the size of your template BEFORE you start working on your presentation.
IMPORTANT TO KNOW:
The powerpoint 56" page size limitation and how to work around it.
PowerPoint has a maximum page size limit of 56x56 inches. The only way to print a poster larger than 56 inches is to create a page half the size of the final poster. For example, if you need to print a 48x72 research poster, the page size should be 24x36 inches. The poster will be printed at 200% resulting in a 48x72 poster. It is also important to note that anything you add to the poster will be printed at 200%. A 20pt font will result in a 40pt printed font, etc. Zoom into 200% magnification to check the quality of your images. If they look good at 200%, they will print well on the final poster.

Click to view
Powerpoint for Windows
To confirm the template's dimensions in Windows: 1 - Click on the DESIGN tab. 2- Click on Slide Size on the upper right side of the window. 3- Click on Custom Slide Size to see the poster dimensions.

Powerpoint for Mac
To confirm the template's dimensions on the Mac: 1 - Go to the File menu. 2- Click on Page-Setup
To confirm the template's dimensions on the Mac: 1 - Click on the DESIGN tab. 2- Click on Slide Size on the upper right side on the window. 3- Click on Custom Slide Size to see the poster dimensions.
PosterPresentations.com 2117 Fourth Street STE C Berkeley California 94710 USA
Copyright © 2024
Poster Printing
Research paper posters
Fabric posters
Trifold poster boards
Rollup banners
Dry-erase whiteboards
PowerPoint poster templates
Poster-making tutorials
Google Slides support
Terms and Privacy
Poster design services
New Services
Virtual poster meetings
- Virtual poster handouts
IMAGES
COMMENTS
If your poster is a representation of a research study, you will want to include the following sections: ... Right click in white space of your poster to get more options for spacing. This enables precise alignment. ... The title of your poster should have a 50+ font size, depending on the size of your poster and the length of the title. ...
01. Follow the guidelines provided by the conference organizers to choose the maximum allowable size for your poster. Use the drop-down menu for selection. If unsure of the conference's specified size, opt for the largest size you might consider printing. The representation of the space allowed will adjust accordingly in the dark box on the left.
However, any proportional size can be printed at the size you need. The easiest way to accomplish this is to just divide your width and height by 2. For example, if you want a 72" x 48" poster, set up your document at 36" x 24". As explained in Images, Charts, and Graphs, you should make sure all the elements of your poster look good ...
Orientation and Size. A typical academic poster will have a three- or four-column layout, with variations of course. The first example below is a typical academic poster in landscape format (wider than it is high), including a header with three columns.Many landscape format posters have four columns--the format will depend on the requirements for a particular conference and discipline.
To group content like shapes, charts, and text boxes you can 1) click and drag the mouse over the selected element until you see all elements are selected or 2) select one element then to hold the Shift key and click on the remaining elements until they are all selected. Click on the Format tab and select "Group". Evenly Sizing Content.
The dimensions of your poster are often dictated by the conference or event you plan to present at. However, the standard size of most conference posters is 48" x 36". (3ft x 4ft or 91cm x 122cm) To design your poster, we recommend using MS PowerPoint or Keynote. Here are some additional tips:
A scientific poster ( Fig.1) is an illustrated summary of research that scientists and engineers use to present their scientific discoveries to larger audiences. A typical poster is printed on paper with dimensions of 36-inches (height) by 48-inches (width). Figure 1. Scientific Poster.
Change the size of the slide to create a poster (see screenshot below): Go to the File tab, select Page Setup > In the drop-down menu, choose custom, enter the numbers, and click apply. Create a header and columns: Go to the Insert tab > Shape > Shapes > choose a shape. To see and manage box sizes, use the blue grab handles on the shape OR go ...
The size of your poster will be key in deciding the size of your text. You can't fit 85 pt text on an 8.5/11 poster. If your text doesn't fit in your design, change the amount of text, not the size of the text. Here are some general guidelines for text size based on a 36 x 46 poster size: Title: 85 pt. Authors: 56pt. Headings: 36 pt. Body Text ...
Template Options. Each of these templates are highly customizable. Please feel free to make adjustments to the color schemes and fonts and to add photographs, icons, illustrations, charts, and other design elements. ... The 4-column poster template is widely used for research posters and works well for the IMRAD format. Information is read from ...
Research and scientific posters from Powerpoint. Free research poster templates. Customer Care: 866.649.3004 . Before you begin Poster presentation size options Before you start working on your poster presentation you have to decide what size to make your poster. Each conference publishes poster session guidelines indicating the space they are ...
All text of your poster should be *at least* 24 font size and an easy-to-read font style (e.g. Arial or Verdana). Anything smaller is too difficult to read. Don't use more than two fonts on your poster: one for the title and one for the text. Make sure you include captions, legends, annotations, citations, and footnotes, where necessary.
Research posters summarize information or research concisely and attractively to help publicize it and generate discussion. The poster is usually a mixture of a brief text mixed with tables, graphs, pictures, and other presentation formats. ... easy-to-use option. It is part of Microsoft Office package and is available on the library computers ...
The PowerPoint 56" page size limitation and how to work around it. PowerPoint has a maximum page size limit of 56x56 inches. The only way to print a poster larger than 56 inches is to create a page half the size of the final poster. For example, if you need to print a 48x72 research poster, the page size should be 24x36 inches.
Briefly describe your research methods and any equipment or software you may have used. You may also add figures, tables, flow charts, photographs, or drawings that describe your design. Wordcount: 100-200 Font size: Headings about 44; Main text about 32 Captions about 28
Design Considerations. Choose a simple yet dynamic color scheme before you begin to add content. The poster's main goal is to promote discussion between you and the viewer. Try to limit the amount of wording on your poster. Keep your word count around 1,000 words for the entire poster. The title should use at least 70 pt—font size.
This template is for a standard, 4' by 3', research poster which follows the design principle of "rule of thirds." Basic, text-focused, 48'X36" Poster. This template is for a standard research poster, 4' long by 3' high. ... The font size should be smaller - ½ to 2/3 the size of the font used for the title.
WHAT IS THE SIZE OF YOUR RESEARCH POSTER? Before you start, resize the document to the actual size of your poster. Research poster options: 24x36 and 36x48 Make sure the Hope College logo is downloaded from the Public Affairs and Marketing website; hope.edu/marketing. Download a PNG format and insert into the document.
Overwhelmed by your choices of poster sizes and printing options? This standard poster sizes guide will help you confidently navigate the world of poster printing. Popular Products. Flyers; ... Research Poster, Academic Poster: 40 x 60 in. 1016.0 x 1524.0 mm. 101.60 x 152.40 cm. Inkjet: Bus Stop, Subway Poster:
Photo Poster Size: 16 x 20 inches or A2. Concert Poster Size: 18 x 24 inches or B2. Standard Poster Size: 24 x 36 inches or A1. Movie Poster Size: 27 x 40 inches or B1. Bus Stop Poster Size: 40 x 60 inches or B0. Consider Your Use Case to Determine the Best Poster Size for Your Project. Custom Poster Sizes and Post-Production Options.
Our online order form will show you shipping options and pricing. We offer free 2 Day shipping for orders of two or more scientific research posters. No matter what size you choose, there is always a 10% discount on orders of 5 or more research posters ordered together. We can print special sizes up to 60 inch width and 30 foot length.
Standard Sizes for Research Posters Select the actual size of the poster. Checklist to Review Before Starting a Poster ... resize the document to the actual size of your poster. Research poster options: 24x36, 36x48, and Tri-fold 24x72 (DO NOT select 42x48) Make sure the Hope College logo is downloaded from the Public Affairs and Marketing website,
Out of the 455 initially identified studies, 178 full texts were screened. Ultimately, 29 studies were included in the final analysis, including 20 comparative studies and 9 RCTs. 18 studies reported dichotomous outcomes and 27 studies reported continuous outcomes, which resulted in a cumulative total of 48 dichotomous outcomes and 265 continuous outcomes for analysis.
BACKGROUND AND AIM[|]Conventional methods are often not adapted to address challenges posed by small-to-moderate size populations, costs and feasibility constraints, ethical considerations, and socially marginalized communities. This talk presents methodological approaches to address these challenges in our community-university research partnership with Asubpeeschoseewagong Anishinabek (Grassy ...
Poster 278: Low Distal Femoral Epiphysis Height May Be a Risk Factor for Growth Disturbance Following All-inside All-Epiphyseal Anterior Cruciate Ligament Reconstruction Damiano Salvato , Peter Cirrincione , […] , Danielle E. Chipman , Emilie Lijesen , and Daniel W. Green , MD +2 -2 View all authors and affiliations
PowerPoint has a maximum page size limit of 56x56 inches. The only way to print a poster larger than 56 inches is to create a page half the size of the final poster. For example, if you need to print a 48x72 research poster, the page size should be 24x36 inches. The poster will be printed at 200% resulting in a 48x72 poster.