
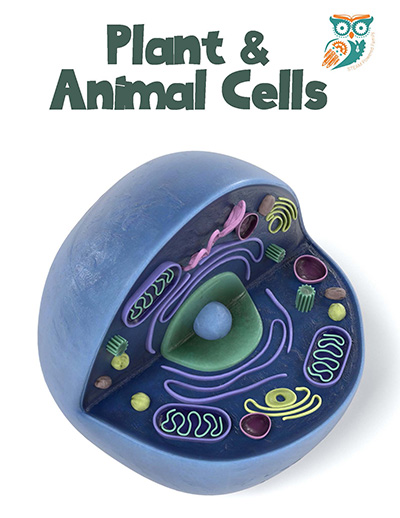
Build a Cell Model and Lesson
Did you know that every single living thing is made up of teeny, tiny unit structures? You have more than 75 trillion of them in your body – they’re called cells and they are amazing! Today we are exploring the fascinating world of cells including learning all the parts of the cells, the similarities and differences between animal cells and plant cells, then we will learn how to build a plant cell model and an animal cell model. This helps students visualize the parts of the cell up close. The perfect science and biology lesson for the classroom.
Animal and Plant Cell Model Project
What you will discover in this article!

Disclaimer: This article may contain commission or affiliate links. As an Amazon Influencer I earn from qualifying purchases. Not seeing our videos? Turn off any adblockers to ensure our video feed can be seen. Or visit our YouTube channel to see if the video has been uploaded there. We are slowly uploading our archives. Thanks!
What are Cells?
A cell is the tiniest thing that still has all of the properties it needs to live. Some tiny, tiny living things like bacteria have just one cell. Human beings are made up of between 30 and 40 trillion cells – that’s right TRILLION. So you can imagine how tiny these cells have to be to fit that many inside your body. Cells are the building blocks of your entire body. Cells are tiny but inside that tiny structure are more tiny structures, and different cells have different functions to make your body work the way it needs to. So let’s learn more about cells!
The Differences Between Animal Cells and Plant Cells
I know you’re still trying to visualize all of those cells dancing around in your body – but did you know that plants have cells too? There are lots of ways these cells are the same, but there are important ways they are different.
Just like our heart and brain and kidneys all have a specific job all of the parts of a cell have a different job – these parts of the cells are called organelles .
Plant and animal cells have a lot of similar organelles and then some that are specific to each type of cell. Let’s explore cell organelles.
Parts of the Animal Cell
First, here is a diagram showing the parts of the animal cell so you can visualize the cell. Remember these cells are really tiny, and these parts even smaller. You will need a very powerful microscope to see these parts of the cell.

Parts of the Plant Cell
Now compare that animal cell to this plant cell. Can you spot the differences? What is the same?

Read on to learn more about the similarities and differences between Plant Cells and Animals Cells. Then we will build our own cell model.
How are Animal Cells and Plant Cells the Same?
Both Animal and Plant Cells have a nucleus – this is the powerhouse of the cell where all of the genetic information is stored (chromosomes and DNA). Inside of the nucleus in both plants and animals we find a nucleolus – this is the core of the nucleus and its job is to produce ribosomes .
Animal and Plant Cells have cytoplasm – this is all of the fluid in a cell but not inside its nucleus. Chemical reactions that happen in a cell, happen in the cytoplasm.
Both Animal and Plant Cells have ribosomes – a ribosome’s job is to synthesize proteins.
Both animal and plant cells have mitochondria . This is the true powerhouse of any cell. The mitochondria produce energy for the cells!
Both animal and plant cells have endoplasmic reticulum . This membrane helps form networks, and synthesize proteins and lipids.
Both animals and plants have a Golgi Apparatus which helps grow and transport proteins.
Both animals and plants have lysosomes . This organelle is basically the recycler of the cell and is filled with digestive enzymes.
Both animal and plant cells have vesicles . Vesicles move materials that are an organism for survival and they are used in waste recycling.
Both animal and plant cells have a cell membrane – this basically just holds everything together and protects it. But there are some differences. More on that in a second.
Both animal and plant cells have vacuoles which control water. There are differences between Animal and Plant cell Vacuoles, which we will explore in a moment.
How are Plant and Animal Cells Different?
Plant cells have a different structure than animal cells. Looking at an animal cell and plant cell side by side the most striking difference between animal and plant cells is their shape – an animal cell is more circular where a plant cell is squared off. This is because a plant cell has a cell wall surrounding its cell membrane and an animal cell doesn’t. This is specific to plant cells and gives them protection from the outside environment.
Vacuoles – although a plant vacuole is much bigger than an animal vacuole. This is because the vacuole helps the plant to maintain its water levels. Animals have more control over their water levels so the large central vacuole is unnecessary.
Another part only found in plants is chloroplast . Chloroplasts conduct photosynthesis which is what gives plant cells their energy and produce chlorophyl which gives plant leaves their colours. Want to do an experiment exploring chlorophyl? Try a Leaf Lab .
Animal Cells have centrioles – these are paired barrel-shaped organelles that help organize when it’s time to divide, a process called cell division .
Although both animal and plant cells have chromosomes , plant cells possess fewer chromosomes than animal cells. Chromosomes are made up of DNA . Segments of DNA in specific patterns are called genes . You can learn more about DNA in our DNA model project or Strawberry DNA extraction experiment .
How To Build An Animal Cell Model and Plant Cell Model
To get a better feeling for what these cells look like we can have students draw and label the parts of each type of cell. You can use our diagrams earlier in this article to inspire their own drawings.
If you want to go a little more in depth try making a felt model of each type of cell. I love using felt for a project like this for a few reasons – it comes in tons of great colors, it is relatively inexpensive and the felt kind of adheres to itself so that you can put the elements in place without them sliding all over like paper might. However, if you don’t have felt, you can use construction paper.
Depending on the ages of your students you can cut out all of the elements and have the students assemble them or you can give the kids the different colors and have them create their own.
Here is our Animal Cell Model with labels

Here is our Plant Cell Model with labels

Once the cell models are assembled have the students label all of the parts. This is a nice, visual project with minimal mess that is easily put aside for additional study later on. Or glue them together to create a wonderful, colourful wall display of cells!
Extension Activities and Printables
Looking to do even more with cells in your lesson? We have a printable Plant and Animal Cells lesson available in the STEAM Powered Family Shop.
You can also get hands on with exploring animal cells with this egg in vinegar experiment that includes a dissection element learning about the parts of the cell.

Enjoy getting hands on with cells!

More Biology Lessons For Kids
Virtual Dissections and Labs
DNA Model Project
Strawberry DNA Extraction Lab
Build a Heart Model
Build a Lung Model
Build a Hand Model
5 Days of Smart STEM Ideas for Kids
Get started in STEM with easy, engaging activities.

Weird, Unsocialized Homeschoolers
Honest. Quirky. Real. Stereotype-smashing humor for homeschooling families.
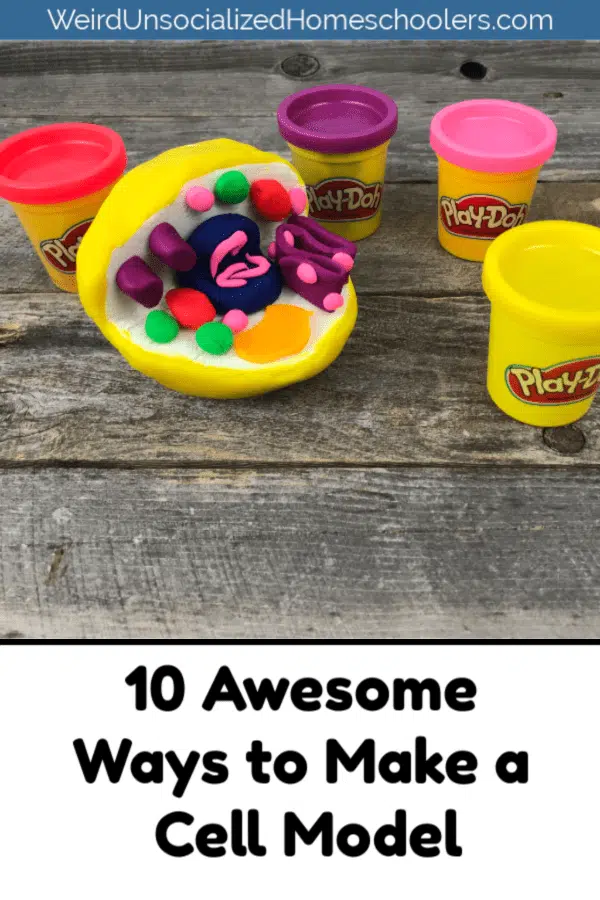
10+ Awesome Ways to Make a Cell Model

Did you like this article? If so, please help by sharing it!
- Facebook 802
- Pinterest 16.9K

Is your student studying biology? Choose any one of these awesome ways to make a cell model to create a colorful, hands-on project to help them learn all those sometimes hard-to-remember cell parts!
It doesn’t matter where they attend school – home, public, or private – at some point nearly every teen is going to take biology. When they do, the first thing they’ll likely study is the cell. And, chances are their instructor is going to assign them a cell model project.
Do you feel like you just read some weird, homeschooled teenager version of If You Give a Mouse a Cookie ? You’re welcome.
If you’re a homeschooling parent and your teen’s science curriculum doesn’t include building a cell model as one of their projects, do it anyway because it’s lots of fun!
There are lots of different ways to ways to make a cell model, whether you choose a plant or an animal cell. But, the following are some of our favorites. Some are edible, some are not, but they’re all super cool.
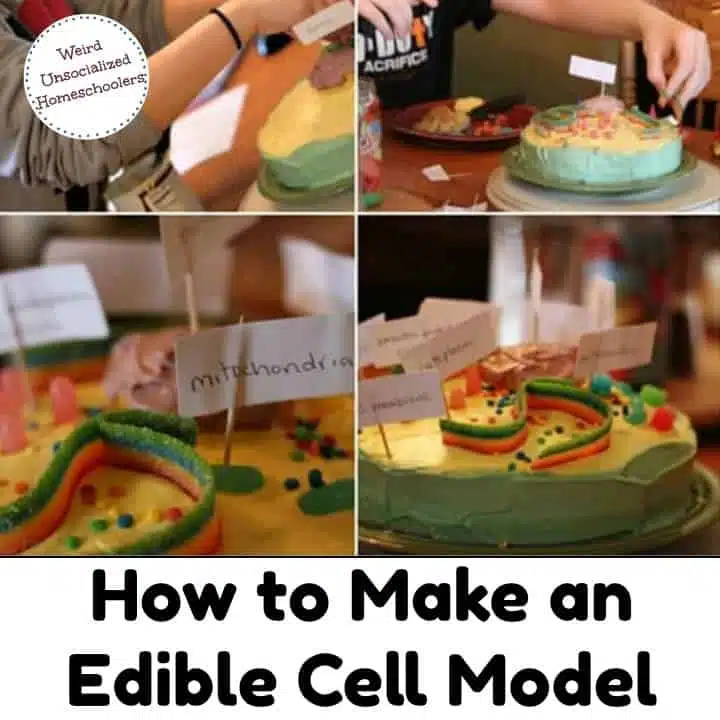
1. Cell Cake
Starting with my family’s all-time favorite, this cell cake uses a cake as its base with an icing cell wall, a cupcake nucleus, and a variety of candy organelles. We probably should have branched out a bit, but we made this model for a couple of kids’ biology lessons. Not only was it colorful and fun, but it made studying cells much more interesting because it was delicious!
Plus, it’s just funny to me imagining my kids at some future point in their lives thinking, “Mitochondria – was that the Mike and Ikes or the gummy worms??”
2. Jell-O Cell
Many, many eons ago, when my oldest was around twelve, we made our first Jell-O cell model . It was not pretty, y’all. And it was definitely not appetizing. As well as I can recall, we followed the directions and used what we had on hand, but I don’t care how great a slice of boiled egg represents a cell nucleus, eggs do not belong in Jell-O.
Even if I could find the obscure blog post featuring the tiny, grainy photo of that cell model, I wouldn’t subject y’all to that. This model from 123 Homeschool 4 Me is much prettier and more appetizing than the one we made.
My best tip if you make a cell model using Jell-O? Choose foods like fruits, marshmallows, gummies, and nuts to represent the organelles so that you’ll actually want to eat it when you’re finished. A banana slice makes a much better nucleus than an egg slice for a Jell-O cell.

photo credit 123 homeschool 4 me
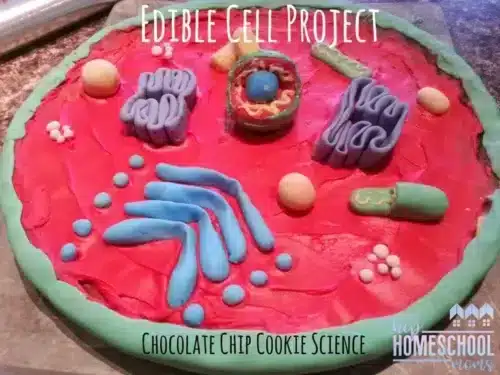
3. Cookie Cell
Another tasty edible option is a cookie cell model . This one at Hip Homeschool Moms starts with a large chocolate chip cookie as the base. Bake the cookie in a pizza pan for an animal cell model or in a jellyroll pan for a plant cell. Then use icing, fondant, and candies to represent the organelles. Yum! This multi-use project lets you study science, brush up on some home ec skills , and provide dessert for the family after dinner all in one tasty project.
4. Pizza Cell
For edible models, you can’t go wrong with pizza, either. You can make a regular pizza cell model or a fruit pizza cell model . Or, do both! Make an animal cell pizza and a plant cell fruit pizza like the one pictured. You can study both cell types, compare and contrast them, and then eat your projects for lunch and dessert!

photo credit proverbial homemaker
5. 3D Cell Model
This 3D animal cell made from Styrofoam is fantastic! If edible projects aren’t your thing or you just want something more permanent, this is perfect.
Unfortunately, the Crafts N Coffee site is no longer active, but I thought you could still use their photo as a guide to make your own Styrofoam cell model! It features a foam craft ball with a wedge cut out as the base with the orange paint representing the cell wall. Use the leftover foam wedge to form the nucleus. Then, use a variety of self-stick foam dots and shapes or cut your own from foam craft sheets to represent the organelles.

photo credit crafts n coffee
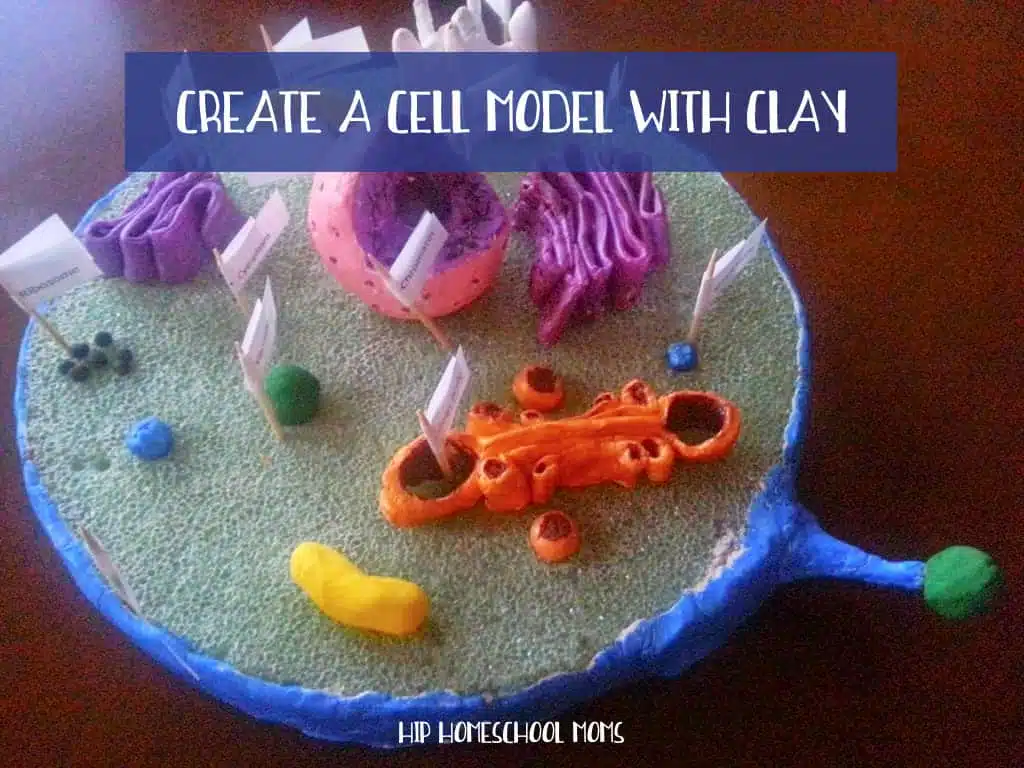
6. Clay Cell
If you like the idea of creating a foam model but want something a little more sophisticated than foam-shape organelles, check out this article from Hip Homeschool Moms on how to make a cell model from styrofoam and clay . It’s fantastic! I love the idea of forming the organelles from modeling clay ! What a great way to review the shape of each and its job!
7. Sandwich Cell
If you’re short on time or have younger siblings who want to get in on the cell model making fun, try this simple edible sandwich cell idea. If you want to get more detailed, try using a large round biscuit or cookie cutter to create an animal cell model, or leave the bread square for a simple plant cell option. Then choose your favorite toppings for the organelles.
This example uses a caramel candy for the nucleus, which is one of my favorites, but you could also use a banana slice with other fruits like apples and raisins for other organelles. I do suggest sticking with the butterscotch and chocolate chip organelles, though, because yum!

photo credit adventures in mommydom
8. Shrinky Dinks Cell
Because my oldest used to love Shrinky Dinks, this Shrinky Dink cell model idea is one of my favorites! I wish I’d found it when my kids were younger. The article includes a tutorial with printable templates that your students can color in and label for both a plant cell and an animal cell. And Amazon has Shrinky Dink paper if you can’t find it locally.

photo credit Teacher Thrive
9. Lego Cell
If you’ve got a Lego lover, this Lego cell model is the perfect fit! My son definitely would have loved this one! No, you won’t get the right cell shape for an animal cell using Lego blocks, but it might be better to let that detail slide if the result is a learning activity that engages your Lego-loving kid.
Let your Lego fans design their own organelles and create a chart or labels to indicate what each represents. I love the way the kid who made the example pictured even created his own label markers out of Lego parts.

photo credit homegrown learners
10. Rice Krispies Treat Cell
For another tasty edible cell model idea, try this Rice Krispies treat cell . The original article is no longer available, but the photo provides plenty of inspiration. I’m pretty sure that’s a Fruit Roll-up cell wall and I’m here to testify that Fruit Roll-ups make a delicious addition to Rice Krispies treats! When my kids were little, we paired the two for some sweet “sushi rolls” when we studied Japan. Delicious! (Though, you may be dealing with a bit of a sugar rush craziness after your kids consume this one.)

11. Spielgaban Cell Model
Have you seen the Speilgaban educational sets? They’re amazing, open-ended, hands-on learning tools featuring all kinds of kid-friendly manipulative parts. If you’ve got one, you’re going to love this idea for creating a 3D Model using the Spielgaban educational set.
And if you don’t have the set, I bet you can still use the inspiration to use similar items like blocks and craft supplies that you have at home to create your own cell model.
This is another opportunity to get younger students (or interested siblings) involved in the creative learning process.

Bonus: Cell Printable Packs!
For more hands-on learning fun and activity ideas, add this Animal Cell Printable Pack or Plant Cell Printable Pack to your cell study. Or check out the Animal Cell Interactive Notebook .

Have you made a cell model that isn’t represented here? Leave your idea in the comments!
Pin this post so you can find it when you get ready to make cell models!
You Might Also Like:
- 100 Hands-On Activities for Middle and High School
- 10 Hands-On History and Geography Activities
- 13 Hands-On Activities to Enhance Any Study

Kris Bales is a newly-retired homeschool mom and the quirky, Christ-following, painfully honest founder (and former owner) of Weird, Unsocialized Homeschoolers. She has a pretty serious addiction to sweet tea and Words with Friends. Kris and her husband of over 30 years are parents to three amazing homeschool grads. They share their home with three dogs, two cats, a ball python, a bearded dragon, and seven birds.
- Kris Bales https://www.weirdunsocializedhomeschoolers.com/author/kris_wuhsmom/ How to Make a Simple Pizza Cell Model (6 Easy Steps!)
- Kris Bales https://www.weirdunsocializedhomeschoolers.com/author/kris_wuhsmom/ New School Year? 6 Steps for a Smooth Start
- Kris Bales https://www.weirdunsocializedhomeschoolers.com/author/kris_wuhsmom/ How to Plan a High School Reading List
- Kris Bales https://www.weirdunsocializedhomeschoolers.com/author/kris_wuhsmom/ 10 Easy Ways to Help Your Homeschooler Find Friends
These all look so awesome! I hope to try a few of them while we’re on break.
Love these! We did a pizza and jello/candy– why didn’t I ever think of Legos??
These are totally awesome! I want to make the fruit pizza with my kids!
These look fantastic! Can’t wait to try them all! 😊
Doing a school project! Thanks for all of the great ideas!!!!!!!!!!!!
I am all about hands-on learning! Thank you for these great ideas that will inspire my students to achieve greatness! This follows the BJU curriculum and the assignment gives the assessment I need for those tacticle learners. Thanks for sharing!
Using play dough for 3 d is plant cell. Will the play dough get hard or change colors What can i.use on the play dough to keep the colors bright
theses are so cute i love them i am going to definety do one for my school project
my teacher is using these for our cell project and I saw the cake and was like yes thanks for the inspiration to my teacher
Leave a Reply Cancel reply
Your email address will not be published. Required fields are marked *
Notify me via e-mail if anyone answers my comment.
This site uses Akismet to reduce spam. Learn how your comment data is processed .
How Can You Make a Model of a Cell?
Purpose: The purpose of this project is to make a 3D model of a cell in order to better understand the parts and workings of a cell.

Designing a cell model using household objects can be a creative and engaging way for students to understand the structure and components of a cell. Here's a step-by-step guide they can follow:
1. Gather Materials:
Gather all the household objects and materials you'll need. These objects will represent the different organelles and structures within the cell.
2. Identify Cell Parts:
Review the different parts of a cell (organelles like nucleus, mitochondria, cytoplasm, cell membrane, etc.). Assign specific household objects to represent each part based on their shape or function.
- A small bead or marble could represent the nucleus.
- Pieces of pipe cleaners or wires can be shaped to represent the endoplasmic reticulum.
- Small candies or beads might be used for lysosomes.
- Play-doh or clay can also be used to represent structures
- Food items, like macaroni or beans can also represent structures
3. Prepare the Base:
The base can be cardboard (like a shoebox) or a styrofoam ball cut in half. You can be creative if you think other bases could work.
4. Labeling and Coloring:
Use paint, markers, or colored paper to paint or label the different parts of the cell. You could also attach a "key" that identifies each part.
Grading Rubric
| Cell Project Rubric | ||||
| Category | Scoring Criteria | Excellent (3 pts) | Satisfactory (2 pts) | Minimal (1 pt) |
| Craftsmanship | Model is creative, shows effort | |||
| The model is 3 dimensional | ||||
| Model stays together, not too messy or difficult to move around | ||||
| Cell Parts | Key, legend, or labeling is easy to use to identify parts on the model | |||
| Functions of cell parts included (accurate) - at least 5 inlcuded in model | ||||
| Appropriate material is used so that it looks like the cell part it is modeling | ||||
| Parts of organized within the cell in their appropriate places | ||||
| Written Word | Basic grammar, spelling on key and any other writing used in model | |||

Science By Sinai
Middle School Science Tips, Ideas, and Resources
Create a Cell Model with Recyclables
Do you want your students to create a creative cell model project, using recyclables, but you’re not sure where to start and how to structure it?

Karen Sinai

October 11, 2023
I put together a structured set of directions so that the students don’t get distracted and off task. I believe accountability and time management are the secret to any successful project.
Using Creativity to Select Organelle Materials
What I like about this project is that the students are using their creativity as they research the organelle’s shape and function. Using only recycled materials, students try to replicate the approximate shape of each plant or animal cell organelle. I don’t allow food because I don’t want ants and other critters crawling around my classroom as I put these on display.
I keep these projects in the back of the classroom for a while so we can refer to them throughout our life science unit.
The Cell Model Project Parameters
I learned the hard way to put size restraints on the cell projects. I usually say it shouldn’t be bigger than a large pizza or smaller than a dessert plate. You will need to determine whether the students are working on this in your classroom or at home. With my population, I have had success with them working on it at home because of the project check-ins. However, you could easily set up an area of your classroom with materials for them to work on it.
Students are required to represent each organelle and they should try their best to match the basic shape that they have learned through research. They will label the cell with typed labels or reference numbers for a typed key. They will also need to briefly describe what each organelle does for the cell.
After assembling the cell, students will present it to the class through a video or an in-person presentation.

The Project Specifics
Students are given a list of twelve organelles to include and two extra ones for plant cells, which are the chloroplasts and the cell wall. I tell students that they will get more credit if they tackle a plant cell.
We start with a brainstorming session, in school, where students will figure out what their base will be. I have found this to be super important because they may start building their cell and then they find that they can’t pick it up! Students have used cookie sheets, heavy cardboard, boxes etc. to support their projects.
One of the things I ask students at the beginning is how they will get the cell to school if they ride a bus. They need to think about how big their project will be and how stable. This is super important to talk about at the FRONT end of the project. I definitely learned THAT the hard way!
During the brainstorming session, they should also have ideas for what materials they will be using to represent the organelles. I’ve had students use pieces of old toys, batteries for the mitochondria, yarn, balloons, dental floss, etc. They have fun going through their house looking for materials to fit the shape of the organelles!
Cell Project Check-in Forms
Since I tend to have students do this project at home, I require project check-ins. The check-ins have students write one or two sentences about what they have done on the project so far. I ask them what they will do next and if they need any help. In my product I have included a rubric just for grading the check-ins. That makes a big difference in accountability, plus it’s extra grading data for you.
If you are doing this in your classroom, I recommend still having a project check-in that the students must fill out. They include what they have accomplished so far and what they plan to do next.
I am in the unique and wonderful situation that allows the students to bring their iPads home every night. I have them do PHOTO check-ins as well. Seeing a picture is worth 1000 words!

I tend to give the students at least a week to finish this project if it is at home. If I’m doing it in class, it is generally three 40 minute class periods. I let them know when the presentation date will be and the students will either create a video or do a standard classroom presentation. I have included a final project rubric to help grade it. I always show the students the final rubric somewhere near the beginning of the project so they know what they are working towards.
What I love about this project is that, year after year, the students are super creative and come up with completely different projects than I have seen before! Because they are working with the vocabulary, while creating the key with the organelle functions, student retention has increased.
You can find the project directions, check-ins and rubrics for this cell project at Teachers Pay Teachers in my store called Science by Sinai.

Similar Posts

Animal Courtship Behavior Activities for Valentine’s Day
Animal Courtship Behavior Activities for Valentine’s Day Are you looking for a meaningful activity to do with your science class for Valentine’s Day? Why not discuss animal courtship and how well it reflects human behavior? During this activity I focus on six main animal behaviors. I use my courtship matching cards and courtship reading passage…

Make Speed and Acceleration Labs Fun with Pullback Cars!
Make Speed and Acceleration Labs Fun with Pullback Cars! Are you looking for ways to teach speed and acceleration, including their relationship to mass, potential and kinetic energy? Are you teaching the Laws of Motion and NGSS MS-PS2-2? This standard states: “plan an investigation to provide evidence that the change in an object’s motion depends…

Inspiring Middle School Students to Minimize Their Impact on Municipal Waste
Inspiring Middle School Students to Minimize Their Impact on Municipal Waste Do your students have any idea of their personal impact on municipal waste? Are you introducing a unit on human impact as part of the NGSS standard MS-ESS3? Let’s start the unit with relatable scenarios. Your mom asks you to clean your bedroom. You…

Move the Plates! Teaching Plate Tectonics is Fun
Move the Plates! Teaching Plate Tectonics is Fun Are you teaching plate tectonics and looking for a way for students to manipulate the plates while learning the types of boundaries? Would you like a digital component to add to your earth science unit? Utilizing plate tectonic drag and drop activities with Google Earth analysis helps…

Teaching a Unit on Newton’s Laws of Motion
Teaching a Unit on Newton’s Laws of Motion Are you teaching a unit on Newton’s Laws of Motion as part of your MS- PS2–1 or MS- PS2–2? Are you struggling to come up with ideas to help students understand how the laws apply to their everyday life? My focus, during my two to three week unit…

7 Steps to Teaching Chemistry to Middle School Students
Are you teaching chemistry to middle school students and you need help with the scope and sequence? How do you introduce chemistry to prepare the students for understanding more complex concepts later? This is introductory unit involves teaching chemistry to middle school students so that they completely understand the basics of atomic structure, analyzing molecules…
Click here to cancel reply.
Don't subscribe All new comments Replies to my comments Notify me of followup comments via e-mail. You can also subscribe without commenting.
- PRO Courses Guides New Tech Help Pro Expert Videos About wikiHow Pro Upgrade Sign In
- EDIT Edit this Article
- EXPLORE Tech Help Pro About Us Random Article Quizzes Request a New Article Community Dashboard This Or That Game Happiness Hub Popular Categories Arts and Entertainment Artwork Books Movies Computers and Electronics Computers Phone Skills Technology Hacks Health Men's Health Mental Health Women's Health Relationships Dating Love Relationship Issues Hobbies and Crafts Crafts Drawing Games Education & Communication Communication Skills Personal Development Studying Personal Care and Style Fashion Hair Care Personal Hygiene Youth Personal Care School Stuff Dating All Categories Arts and Entertainment Finance and Business Home and Garden Relationship Quizzes Cars & Other Vehicles Food and Entertaining Personal Care and Style Sports and Fitness Computers and Electronics Health Pets and Animals Travel Education & Communication Hobbies and Crafts Philosophy and Religion Work World Family Life Holidays and Traditions Relationships Youth
- Browse Articles
- Learn Something New
- Quizzes Hot
- Happiness Hub
- This Or That Game
- Train Your Brain
- Explore More
- Support wikiHow
- About wikiHow
- Log in / Sign up
- Education and Communications
How to Make an Animal Cell for a Science Project
Last Updated: July 3, 2024 Fact Checked
This article was co-authored by Bess Ruff, MA . Bess Ruff is a Geography PhD student at Florida State University. She received her MA in Environmental Science and Management from the University of California, Santa Barbara in 2016. She has conducted survey work for marine spatial planning projects in the Caribbean and provided research support as a graduate fellow for the Sustainable Fisheries Group. This article has been fact-checked, ensuring the accuracy of any cited facts and confirming the authority of its sources. This article has been viewed 329,943 times.
Cells are one of the important building blocks of living organisms. If you're learning biology in school, your teacher might ask you to create your own model of an animal cell to help you understand how cells work. You might also wish to build a model of a cell as part of a science fair. With some simple materials, you can build your own animal cell to help reinforce your knowledge and teach others.
Best Ways to Make an Animal Cell Project
Students often cut and carve a Styrofoam ball into an animal cell, painting it and gluing knickknacks to it to represent organelles. Students also often make cells out of gelatin, and insert edible foods for the structures.
Preparing for Your Project

- Are you supposed to come up with your own design for an animal cell, or are you supposed to follow your teacher's instructions?
- Do the cells have to be edible or non-edible?
- Which components of an animal cell must be included?
- How large must the cell model be?
- When must the cell model be completed?
- Must the cell model be 3D?

- Nucleus. The nucleus is in the center of the cell. DNA is contained here, and the nucleus also governs protein synthesis. [1] X Research source
- Nucleolus. This is an organelle where RNA is produced. It is contained within the cell's nucleus. [2] X Research source It is usually a slightly darker color than the nucleus.
- Nuclear membrane. This is a thin membrane surrounding the nucleus. [3] X Research source
- Centrosomes. These help create microtubules and are located just outside the nucleus. [4] X Research source
- Cell membrane. The cell membrane is the thin outside barrier of the cell, made out of protein and fat. [5] X Research source It allows certain materials though while keeping other organic materials safely within the cell.
- Cytoplasm. This substance is contained by the cell outside of the nucleus and within the cell membrane. It contains the other organelles of the cell that govern cell function, and it has a jellylike consistency. [6] X Research source
- Lysosomes. These organelles digest nutrients, and they are round in shape. [7] X Research source
- Ribosomes. Ribosomes are very small and grain like in appearance. They aid protein synthesis. [8] X Research source
- Golgi bodies. These look like a stack of flat circles, and they help construct membranes for other organelles.
- Vacuoles. These are asymmetrical sacs filled with fluid and surrounded by a membrane. They are used to store waste material.
- Endoplasmic reticulum. This is a set of connected, folded tubes within the cell, used to transport material from one part of the cell to another. An endoplasmic reticulum that is covered with ribosomes is referred to as a rough endoplasmic reticulum and one that is not covered with ribosomes is a smooth endoplasmic reticulum. Smooth endoplasmic reticulum branches off from the rough endoplasmic reticulum.
- Mitochondria. Mitochondria convert glucose into energy for the cell. They can be round or rod-shaped. [9] X Research source

Building an Edible Animal Cell Model with Gelatin

- A light-colored gelatin mix, such as a lemon-flavored jello. You can also purchase a clear or light-colored fruit juice (like lemonade or limeade) along with unflavored gelatin packets. This will eventually be your cytoplasm. It is important that you pick a light color so that the other cell components will stand out.
- A large, pitted fruit to represent a nucleus (the fruit) and the nucleolus (the pit). Depending on how large your model is, you might use a plum, peach, apricot, or cherry.
- Small, round candies or fruits. These will represent your lysosomes. For example, M&Ms, Skittles, gumballs, or grapes might serve as effective lysosomes. [10] X Research source
- Oval- or rod-shaped candies or fruits. These will represent your mitochondria. Raisins, craisins, Mike & Ike's, or dried apricots would all work, depending on the size of your model.
- Slightly larger, irregular candies or fruits. These will represent your vacuoles. Small banana slices, jawbreakers, or gummy rings are good options. [11] X Research source
- Very small, grain-shaped candies. These will represent your ribosomes, so they must be considerably smaller than your other cell components. Some good possibilities could include: Tic-Tacs, Nerds, or extra-small jelly beans.
- A round, dense piece of candy. This will represent your centrosome. Gumdrops or Gushers could make an effective centrosome.
- Long, stringy pieces of candy. These will represent the endoplasmic reticulum. If you want to be very precise, you can buy one type that is coated in sugar (to represent the rough endoplasmic reticulum) and one type that is smooth (to represent the smooth endoplasmic reticulum). Some excellent options include gummy worms, sour worms, and various kinds of licorice rope. [12] X Research source
- Long, flat candy or fruit roll-up. When you fold up a long, flat piece of candy or fruit snack, you will have an excellent representation of Golgi bodies. Try bubblegum tape, fruit roll-ups, or other kinds of fruit leather to create this organelle. [13] X Research source

- Dissolve the gelatin in boiling water in a heat-proof bowl, stirring carefully.
- Add cold water equal to the amount of boiling water.
- Let the gelatin cool slightly.
- Carefully pour the mixture into the lined bowl you prepared.
- Seal the bag and place it in the refrigerator until it is not-quite-set (45 minutes to an hour).
- Remove the bag from the refrigerator when the gelatin is stiff enough to suspend your cell components but soft enough to insert fruits and candies deep within the mold.

- If you have to transport the model for long distances, it is a good idea to use a cooler to make sure that your model doesn't melt in the heat.
Building an Edible Animal Cell Model with Cake

- Enough cake batter to make a two-layer round cake. You can choose to bake any flavor of cake you wish, in a light or a dark color. You could even choose to bake one layer of each. This is the base of your cell.
- A cupcake top, a large piece of fruit, or a round cookie cutter to create the shape of your nucleus in the center of your cake.
- At least two different colors of frosting. You could choose to use two different flavors (such as lemon and raspberry) or you could add food coloring to a light-colored frosting to create a second color. You should use the lighter-colored frosting as your cytoplasm on top of the cake, and the darker color as the cell membrane to the sides of your cake. [16] X Research source
- Fondant and food coloring. If you wish to sculpt your own cell components out of fondant, you can purchase fondant in a store along with various kinds of food coloring to differentiate your organelles from one another. It is also possible to make your own fondant . If you do not wish to sculpt your cell components, you can choose appropriately shaped fruit, candy, and nuts to represent them instead.
- Small, round candies or fruits. These will represent your lysosomes. For example, M&Ms, Skittles, gumballs, or grapes might serve as effective lysosomes. [17] X Research source
- Oval- or rod-shaped candies, nuts, or fruits. These will represent your mitochondria. Raisins, craisins, Mike & Ike's, almonds, or dried apricots would all work, depending on the size of your model.
- Slightly larger, irregular candies, nuts, or fruits. These will represent your vacuoles. Small banana slices, jawbreakers, brazil nuts, or gummy rings are good options. [18] X Research source
- Very small, grain-shaped candies or sprinkles. These will represent your ribosomes, so they must be considerably smaller than your other cell components. Some good possibilities could include: Tic-Tacs, Nerds, and various kinds of sprinkles or funfetti.
- A round, dense piece of candy. This will represent your centrosome. Gumdrops or Gushers could make an effective centrosome. [19] X Research source
- Long, stringy pieces of candy. These will represent the endoplasmic reticulum. If you want to be very precise, you can buy one type that is coated in sugar (to represent the rough endoplasmic reticulum) and one type that is smooth (to represent the smooth endoplasmic reticulum). Some excellent options include gummy worms, sour worms, and various kinds of licorice rope. [20] X Research source
- Long, flat candy or fruit roll-up. When you fold up a long, flat piece of candy or fruit snack, you will have an excellent representation of Golgi bodies. Try bubblegum tape, fruit roll-ups, or other kinds of fruit leather to create this organelle. [21] X Research source

- Small, round lysosomes
- Tiny, granular ribosomes
- Long, thin endoplasmic reticulum
- Round, dense centrosomes
- A flat, circular stack of Golgi bodies
- Rod-shaped mitochondria
- Asymmetrical, hollow vacuoles

Building a Non-Edible Animal Cell Model Out of Common Household Materials

- Modeling clay or play-doh in many different colors
- Styrofoam balls of varying sizes
- Several colors of paint
- Scissors and/or a sharp knife
- Pipe cleaners
- Construction paper
- Small, round objects such as buttons, dry noodles, beads, pieces of cardboard or foamboard, glitter/confetti, or small pieces of plastic

- If the ball is not yet colored, paint the outside of the ball any color you wish. You could also use your favorite color of play-doh or modeling clay to coat the outside of the ball in a solid color. [24] X Research source

- For your nucleus: a small ball of play-doh or clay, a smaller styrofoam ball (cut in half), a ping-pong ball (cut in half), the plastic top of a large milk jug, or a plastic egg
- For your endoplasmic reticulum: string, twine, pipe cleaners, rubber cords, or bungee cord
- For your Golgi bodies: a small stack of cardboard circles glued together, a folded piece of ribbon
- Ribosomes: confetti, glitter, dry rice
- Lysosomes: buttons, small plastic circles, small paper or cardboard circles, small clay balls
- Mitochondria: dry macaroni noodles, oval-shaped buttons or toggles, almond-shaped beads, dry beans
- Vacuoles: glass marbles, hollow rubber balls cut in half, bottle caps, small cut-up pieces of a plastic bag

Community Q&A
- Do not leave this project until the last minute. Edible projects might not work right the first time (sometimes gelatin does not set, and sometimes cakes burn!), and other components might require some trial-and-error. Leave yourself time to re-do components and fix your mistakes. Thanks Helpful 2 Not Helpful 0
- Remember if this is your first science project it's okay to not get things right the first time. Failure and hope are the keys to success. Just be sure to start early so that you can learn from your mistakes. Thanks Helpful 1 Not Helpful 0
- Make sure that every structure in the cell is represented with some object or feature in your project, and make sure that every component of your model corresponds to a real part of the cell. Thanks Helpful 1 Not Helpful 0
Tips from our Readers
- I made my animal cell out of a Styrofoam mannequin head, instead of just a plain old Styrofoam ball, and the teacher loved the creativity!
- If you're making yours edible, go ahead and eat the materials to help you have more fun. Just don't eat the cell itself!

- When baking cakes or working with boiling water, be sure that you take care not to burn yourself. Use oven mitts and heat-proof cookware to minimize the chance of accidents. Thanks Helpful 14 Not Helpful 9
- Take particular care when cutting with sharp blades or scissors. If you are a young student, ask a parent or older sibling to assist you with complicated cutting and slicing tasks. Thanks Helpful 12 Not Helpful 12
- If you plan on serving an edible cell model to others, be sure they are not allergic to any of your ingredients. Thanks Helpful 0 Not Helpful 0
You Might Also Like

- ↑ https://micro.magnet.fsu.edu/cells/animalcell.html
- ↑ https://byjus.com/biology/animal-cell/
- ↑ http://www.enchantedlearning.com/subjects/animals/cell/jello/
- ↑ http://www.weirdunsocializedhomeschoolers.com/how-to-make-an-edible-cell-model/
- ↑ http://www.woojr.com/cell-model-school-craft-project/
About This Article

- Send fan mail to authors
Reader Success Stories
Stella Stone
Oct 31, 2019
Did this article help you?
Merritt Joiner
Oct 27, 2020
Addison Harbison
Jan 17, 2023
Mayanaisse Baglefeild
Apr 12, 2018
Oct 9, 2016

Featured Articles

Trending Articles

Watch Articles

- Terms of Use
- Privacy Policy
- Do Not Sell or Share My Info
- Not Selling Info
wikiHow Tech Help Pro:
Level up your tech skills and stay ahead of the curve
Build a Model of a Human Cell

Introduction: Build a Model of a Human Cell

In this project we will be making a model of a Animal (Human) cell and talking about the various structures within an animal cell. I made my cell out of just cardboard and paper, but you can use anything you have around the house to make your cell. Things like bits of fabric, buttons, and pipe cleaners could all be used.
A cardboard circle. I took a cardboard box and traced a plate on it to get my circle shape.
Colored Pencils
Glue (I used a glue stick, but forgot to include it in my picture.)
Step 1: Create Your Nucleus.

The first thing you’ll want to draw is a circle to be the Nucleolus for your cell. Then you’ll draw a bigger circle around that. This bigger circle is the Nucleus. The Nucleus of a cell has 2 main functions, it contains all the DNA of the cell and functions as a “brain” for the cell. The Nucleolus is the smaller circle within the nucleus, and it’s where Ribosomes are made. Ribosomes will be discussed in a later step.
Step 2: Create Your Endoplasmic Reticulum

The Endoplasmic Reticulum is connected to the nucleus by the Nuclear Membrane. Because of this you’ll want to start by drawing a circle to fit around your nucleus, before drawing the rest of the cisternae. Endoplasmic reticulum may be either rough or smooth, and both serve different functions. Rough endoplasmic reticulum has Ribosomes bound to it and helps modify and transport the proteins made by those ribosomes. Smooth endoplasmic reticulum modifies lipids.
Step 3: Create the Golgi Apparatus

The Golgi Apparatus is made of cisternae much like the Endoplasmic Reticulum, but the cisternae are not interconnected. The golgi apparatus’ job is to take in molecules produced by the cell, make any modifications, and then package them into Vesicles. These vesicles can then ship the proteins either within the cell itself, or can send the proteins outside the cell.
Step 4: Create Your Ribosomes.

Ribosomes are small organelles made of RNA. The way I made mine was to first make a square, before cutting the square in smaller and smaller bits of paper. I then glued these bits where they were needed. Make sure you glue some onto your endoplasmic reticulum, and to also glue them around the rest of your cell. Ribosomes help with protein synthesis (making proteins) within the cell.
Step 5: Create Your Mitochondria.

Mitochondria are larger organelles with an inner and outer membrane, and they also have their own DNA.
Mitochondria are where oxygen and glucose are taken into the cell, before being converted into energy.
Step 6: Create Your Cell Membrane

The Cell Membrane is the outer edge of the cell and forms the cell’s boundary. To create cell membrane I first traced my entire cell onto a sheet of paper. I then colored around the edge, before cutting the whole thing out. I then folded the paper in half and cut out another circle. You can then glue down the outer circle to form your membrane.
Step 7: Create Your Vacuole

Vacuoles are small pockets formed by a membrane layer. They contain the gas and fluids found in cells, such as oxygen or water.
Step 8: Futher Information and Learning
https://www.cellsalive.com/cells/cell_model.htm
https://www.khanacademy.org/science/biology/struct...
Choose an Account to Log In

Notifications
Science project, 3d animal cell model.
Grade Level: 3rd; Type: Life Science
Buildings are made of multiple bricks; you are made of millions of cells. The cell is the basic unit of all living things. The cells in your body vary in size, a single nerve cell can be up to a 1 meter long, but the more typical cells lining the inside of your cheek are .05 millimeters. The cell is made of many important parts, called organelles , that do different jobs
- A pie pan or round casserole dish
- Clear or yellow gelatin mix
- Measuring cup
- Refrigerator
- Clear plastic wrap
- Assorted food items (see procedure)
- Gather the foods that will represent the organelles your cell. The following table includes a summary of the organelle’s and appearance function and some suggested items. Feel free to substitute.
|
|
|
|
| Cell Membrane | Thin film, regulates what comes in and out of cell | Clear plastic wrap that you put between gelatin and dish |
| Nucleus | Spherical, the control center of the cell | Plum, apricot, or any spherical fruit with a pit |
| Nucleolus | Involved in building proteins, found inside nucleus | Plum pit or apricot pit |
| Nuclear Membrane | Thin film, regulates what comes in and out of nucleus. | Skin of fruit |
| Endoplasmic Recticulum (ER) | Smooth and rough folds and tubes, where cell materials are manufactured | Red vines or other string-like candy |
| Mitochondria | Spherical and rod-shaped, provides energy for cell | Raisins |
| Ribosomes | Small and in clusters, make proteins | Sprinkles |
| Lysosome | Round, break down waste in cell. | Chocolate chips, Skittles, or other small, round candy |
| Golgi Body | Stacked layers near nucleus, package materials to be sent out of cell | Folded up Fruit-by-the-Foot |
| Vacuole | Large and filled with fluid, storage tanks for cell waste | Gumball, or other larger spherical candy |
Your 3d animal cell model may not look like typical cell diagrams, but actually building a 3D model will help you visualize and remember the parts of the cell. The gelatin in your cell model represents cytosol . The cytosol is the clear liquid within the cell that surrounds the organelles. Together, the cytosol and organelles in the cytosol are called the cytoplasm . Just like the gelatin, real cytosol has proteins, sugars, and other large molecules in it.
Related learning resources
Add to collection, create new collection, new collection, new collection>, sign up to start collecting.
Bookmark this to easily find it later. Then send your curated collection to your children, or put together your own custom lesson plan.
Resources: Course Assignments
Module 4 assignment: cell builder.
Create a model of a eukaryotic cell using any material of your choice. In your model be sure to include all the organelles appropriate to your cell (either plant or animal). Once complete, take multiple photographs of your model from all angles. Include these images in a document that also contains the following in table format:
- A detailed key/legend that matches the model;
- Each organelle or part with its basic function;
- A disease or disorder that is associated with the malfunction of each cellular component
- How this organelle is visualized microscopically
Note for the disease information, you can list a disease in either animals or plants, regardless of what type of cell you are modeling. In other words, its okay to discuss a “human” disease even if you are making a plant model, provided the organelle is present in both types of cells.
Some suggestions for 3D models include Legos, a decorated cake with candy toppings, or standard Styrofoam base with appropriate pieces attached. You can also draw or illustrate a model. Here is an example of what you might make.
Basic Requirements (the assignment will not be accepted or assessed unless the follow criteria have been met):
- Assignment has been proofread and does not contain any major spelling or grammatical errors
- Assignment includes appropriate references
- Assignment includes photographs or images of created model from all angles.
- Assignment includes a key documenting how each organelle is represented in the model.
- Assignment includes a completed table such as the one illustrated in the example document.
- Assignment includes a disease caused by malfunction of each identified component in the model.
- Assignment includes at least 7 organelles in the model and table.
| Cell Builder | ||||
|---|---|---|---|---|
| Outcome: Identify and explain a variety of cellular components | ||||
| Criteria | Ratings | Pts | ||
| At least 7 membrane-bound organelles found in eukaryotic cells are contained in the model and their functions identified in the table. | Organelles and functions are outlined in detail. 5.0 pts | Organelles and functions are outlined in minimal but accurate terms. 4.0 pts | Organelles and functions are mismatched in the table or insufficiently discussed. 0.0 pts | 5 pts |
| The structure and function of cell membranes is included in the model and table. | Cell membranes are illustrated in detail in model and discussed in detail. 5.0 pts | Cell membranes are included and explained in the table/model in minimal but accurate terms. 4.0 pts | Cell membranes are inaccurately discussed. 0.0 pts | 5 pts |
| At least 2 components of the cytoskeleton are identified by form and function in the model and table. | Components of the cytoskeleton and functions are outlined in detail. 5.0 pts | Components of the cytoskeleton and functions are outlined in minimal but accurate terms. 4.0 pts | Components of the cytoskeleton are mismatched in the table or insufficiently discussed. 0.0 pts | 5 pts |
| At least one cell surface specialization is included in the model and table. | Cell surface specialization(s) is/are illustrated in detail in model and discussed in detail. 5.0 pts | Cell surface specialization(s) is/are included and explained in the table/model in minimal but accurate terms. 4.0 pts | Cell surface specialization(s) is/are inaccurately discussed. 0.0 pts | 5 pts |
| Total points: 20 | ||||
- Performance Assessments: Cell Builder. Authored by : Shelli Carter. Provided by : Columbia Basin College. Located at : https://www.columbiabasin.edu/ . License : CC BY: Attribution

Sciencing_Icons_Science SCIENCE
Sciencing_icons_biology biology, sciencing_icons_cells cells, sciencing_icons_molecular molecular, sciencing_icons_microorganisms microorganisms, sciencing_icons_genetics genetics, sciencing_icons_human body human body, sciencing_icons_ecology ecology, sciencing_icons_chemistry chemistry, sciencing_icons_atomic & molecular structure atomic & molecular structure, sciencing_icons_bonds bonds, sciencing_icons_reactions reactions, sciencing_icons_stoichiometry stoichiometry, sciencing_icons_solutions solutions, sciencing_icons_acids & bases acids & bases, sciencing_icons_thermodynamics thermodynamics, sciencing_icons_organic chemistry organic chemistry, sciencing_icons_physics physics, sciencing_icons_fundamentals-physics fundamentals, sciencing_icons_electronics electronics, sciencing_icons_waves waves, sciencing_icons_energy energy, sciencing_icons_fluid fluid, sciencing_icons_astronomy astronomy, sciencing_icons_geology geology, sciencing_icons_fundamentals-geology fundamentals, sciencing_icons_minerals & rocks minerals & rocks, sciencing_icons_earth scructure earth structure, sciencing_icons_fossils fossils, sciencing_icons_natural disasters natural disasters, sciencing_icons_nature nature, sciencing_icons_ecosystems ecosystems, sciencing_icons_environment environment, sciencing_icons_insects insects, sciencing_icons_plants & mushrooms plants & mushrooms, sciencing_icons_animals animals, sciencing_icons_math math, sciencing_icons_arithmetic arithmetic, sciencing_icons_addition & subtraction addition & subtraction, sciencing_icons_multiplication & division multiplication & division, sciencing_icons_decimals decimals, sciencing_icons_fractions fractions, sciencing_icons_conversions conversions, sciencing_icons_algebra algebra, sciencing_icons_working with units working with units, sciencing_icons_equations & expressions equations & expressions, sciencing_icons_ratios & proportions ratios & proportions, sciencing_icons_inequalities inequalities, sciencing_icons_exponents & logarithms exponents & logarithms, sciencing_icons_factorization factorization, sciencing_icons_functions functions, sciencing_icons_linear equations linear equations, sciencing_icons_graphs graphs, sciencing_icons_quadratics quadratics, sciencing_icons_polynomials polynomials, sciencing_icons_geometry geometry, sciencing_icons_fundamentals-geometry fundamentals, sciencing_icons_cartesian cartesian, sciencing_icons_circles circles, sciencing_icons_solids solids, sciencing_icons_trigonometry trigonometry, sciencing_icons_probability-statistics probability & statistics, sciencing_icons_mean-median-mode mean/median/mode, sciencing_icons_independent-dependent variables independent/dependent variables, sciencing_icons_deviation deviation, sciencing_icons_correlation correlation, sciencing_icons_sampling sampling, sciencing_icons_distributions distributions, sciencing_icons_probability probability, sciencing_icons_calculus calculus, sciencing_icons_differentiation-integration differentiation/integration, sciencing_icons_application application, sciencing_icons_projects projects, sciencing_icons_news news.
- Share Tweet Email Print
- Home ⋅
- Science Fair Project Ideas for Kids, Middle & High School Students ⋅
How to Make an Animal Cell Model Using Recyclable Material

What Are Some Materials I Could Use to Make Plant Cells?
Creating a model animal cell can be an exciting and informative project. Using recycled materials is one way to turn trash in to a great project while encouraging students to use their imaginations. Using unusual materials to represent the parts of an animal cell adds a unique perspective to each project.
Study a science text book or similar reference materials to learn about cell structure and function. If this is a school project, list every part that must be included as you study. Elementary teachers will often not require as many cell parts to be included as middle or high school teachers.
Create the basic shape of the cell using cardboard or another type of sturdy material. Cardboard is an excellent choice for this because it maintains its shape and can support the other materials as they are added. Covering the cardboard with plastic is one way of representing the cell membrane or the cytoplasm. Plastic bags can also be scrunched up and glued along the edges of the cardboard to represent the cell membrane.
At some point, you'll probably study plant cells too. One of the key differences between an animal cell model and a plant cell model is the presence of a rigid cell wall that surrounds the membrane of a plant cell. This structure is absent in an animal cell.
Choose an item that will represent the nucleus of the cell. It should be round, like a bowl or cup, and should be the largest organelle (or cell part) in your model. Secure this item in the middle of the cell.
Select other items to represent the different organelles and parts within your cell. Small straws could be glued together to represent the cytoskeleton. Bottle lids make excellent vacuoles and several packaging peanuts glued together look a lot like the Golgi Complex. Bubble wrap can be placed in different parts of the cell to represent mitochondria.
Use paper or felt to make labels for each part of the cell and glue these in place. It's also a good idea to include a short description of what each cell part does.
Things You'll Need
- The items listed for this project are examples. You do not have to use every item and you should use other things you find around your house or apartment to make your project unique.
Related Articles
Animal cell shoe box project, ideas for making a 3d model of a cell, plant cell model ideas for kids, how to build a 3d model of a plant cell, how to make a plant cell model step-by-step, how to make edible plant cells, how to make an animal cell for a science project, how to make a 3d model of a plant cell with a styrofoam..., how to build a model of a human cell, how to make cytoplasm for a cell project, how to build a seventh-grade model of an animal cell, science projects: how to make a skeleton, plant & animal cell activities for fourth grade, how to make an animal cell diagram, how to make your own cooler as a science project, cell model project for high school biology, how to make a cell model styrofoam ball, how to make a 3d plant cell.
- University of Hawaii: Cell Extension Activity
- Science NetLinks: Make a Model Cell
About the Author
Kendra Young has been a professional educator and science curriculum writer since 2005. She also works as a faculty advisor and content reviewer for the National Science Teacher’s Association. Young holds a Master of Education in instructional design, and is completing a Master of Science in geology.
Photo Credits
Thinkstock/Comstock/Getty Images
Find Your Next Great Science Fair Project! GO
- Grades 6-12
- School Leaders
Have you gotten your free poster delivered? ✨
17 Creative Plant Cell Project Ideas To Try This Year
These ideas won’t leaf you disappointed!

Making science come alive in the classroom is important because it helps keep students engaged. By fifth grade, most students begin to learn some biology basics, including what a plant cell is and how it’s structured. While many plant cell project ideas and lessons are geared toward upper elementary school students, the simpler concepts can be taught to younger students using supplies like play dough.
Whether you have your students create 3D plant cell projects in school or as part of a take-home assignment, they can really help kids better understand cells and their organelles. A plant cell project can be complicated (stitching a cell), but many are fairly easy and require little more than the supplies you likely already have on hand.
3D Plant Cell Projects
1. jelly plant cell model.

First, you’ll need to make Jell-O in a lightly greased container. Then, you’ll add candies to represent each organelle. Finally, use toothpicks and stickers to label everything. Bonus: Once you’re finished, you get to eat the leftover candy!
Learn more: Jell-O Plant Cell Model at Science Sparks
2. Clay Model

Grab some Air-Dry Modeling Clay and then get building! Print out the various names of the parts of the cell, including the cell wall and membrane, and then create little flags out of them with toothpicks.
3. Altoids Model

These Altoids tins make for the perfect and oh-so adorably pocket-sized home for a mini 3D plant cell model. You can use card stock to make the various parts of the model and then use two layers of mounting tape or craft foam to make it pop.
Learn more: 3D Mint Tin Cell Model at Teacher Thrive
4. Cardboard Plant Cell Model
This one is somewhat time-consuming, but it requires little more than some recycled cardboard and construction paper or card stock. If a younger child is doing this project, you’ll want an adult to handle the X-Acto knife.
5. Plant Cell Model From Seeds
This 3D plant cell project will take a while, but the results will be well worth it. We especially love the idea of using seeds to create the various parts of the plant cell!
6. LEGO Plant Cell
Kids love LEGO so why not incorporate them into your science unit on plant and animal cells? ADVERTISEMENT
7. Plant Cell Cake

This idea is so creative and all you need is a cake pan, frosting, and some candy. Add some toothpicks with labels and your delicious cake just became educational!
8. Stitched Model

You’ll definitely want to have sewing experience before tackling this plant cell project. Since it is time-consuming and requires skill, we think it would be perfect for a handy teacher to create to use as a teaching tool.
Learn more: Stitched Plant Cell at Becky Button
9. Peanut Butter Cell

Another edible option! This one is so simple that it will be easy for young kids to recreate. Since some kids have peanut allergies, you can replace the peanut butter with a more allergy-friendly spread. And you’ll have a tasty treat once the learning is done!
Learn more: Edible Cell Model for Elementary School at Adventures in Mommydom
10. Play-Doh Model

Kids love playing with Play-Doh, so they will really enjoy creating an animal or plant cell in different colors. We especially love that supplies are minimal. Creating each individual part of the plant cell will help kids remember their names and purposes.
Learn more: Introducing Animal and Plant Cells to Kids at Spongy Kids
11. Whole-Class Plant Model

This idea takes a 3D plant cell project to the next level! Students are divided into groups by organelles and then they need to create a blueprint for and build their plant cell component to scale. The giant plant cell is created from clear painter’s drop cloths and then inflated using fans. This activity will engage all your students while also being fun and educational.
Learn more: Biology Students and the Giant Plant Cell at Teachers Network
Other Plant Cell Projects
12. plant cell drawing tutorial.
Kids love to follow drawing tutorials, and this one will be no exception. The muscle memory involved in actually drawing each part should help them with remembering the various components of the plant cell.
13. Rock ‘n Learn Video
This cute video uses relatable characters to teach about the different parts of a plant cell while also highlighting the differences between plant and animal cells.
14. Two-Minute Lesson
This is another video lesson, but this one is geared toward slightly older kids. It’s a great video for kids to bookmark so they can refresh their memories later.
15. Shrinky Dinks Model

Shrinky Dinks have been around for decades, so many teachers and parents probably remember crafting with them at some point in their childhood. They are essentially thin sheets of plastic that you cut and color and then bake in an oven. Once baked, you have a tiny version of what you created.
Learn more: Shrinky Dinks Cell Models at Teacher Thrive
16. Cut-and-Paste Worksheet

These worksheets are a great way to introduce the concept of a plant cell and the various organelles. Grab scissors and glue sticks and get to work learning about plant cells and their organelles!
Learn more: Free Build-Your-Own Animal and Plant Cell Worksheet at You’ve Got This Math
17. A Complete Lesson Plan

This is a complete lesson plan that has students travel to different stations while learning all about animal and plant cells. Students will learn different things when making their way through the four E’s in this plan—engagement, exploration, explanation, and elaboration.
Learn more: Plant and Animal Cell Lesson at Kesler Science
Continue the STEM learning with these 54 Fifth Grade Science Projects .
Plus, sign up for our newsletters to get all the latest teaching tips and ideas straight to your inbox..

You Might Also Like

Best 2024 Competitions for Students in Grades K-12
Competitions in STEM, ELA and the arts, and more! Continue Reading
Copyright © 2024. All rights reserved. 5335 Gate Parkway, Jacksonville, FL 32256
Get Your ALL ACCESS Shop Pass here →
Animal Cell Diorama (Free Printable)
Science can be incredibly engaging when paired with hands-on activities, and our free Animal Cell Diorama Printable is the perfect tool to help your students explore biology. Whether you’re a teacher or a parent, this project is designed to make learning about cells fun, interactive, and memorable.

Supplies Needed For An Animal Cell Diorama
Cells are the building blocks of all living organisms, and understanding their structure and function is essential for grasping more complex biological concepts. This diorama helps kids visualize and understand cell anatomy creatively.
To get started, you’ll need just a few basic supplies:
- Printed Animal Cell Diorama Template: Download and print our free printable below (black and white and color options available).
- Glue or tape
- Colored pencils or markers
- A shallow container or a piece of cardstock: For the diorama base.
How to Make Your Animal Cell Diorama
STEP 1: Start by printing the animal cell diorama template. This includes all the cell parts you will cut out and assemble.
STEP 2: Carefully cut out the different parts of the cell along the dotted lines.
STEP 3 (Optional): Add color to each part to make your cell model more vibrant.
STEP 4: Use glue or tape to attach the cell parts to the diorama base. Arrange them according to the layout provided in the instructions.
STEP 5: Once assembled, use the labels provided in the printable to name each part of the cell.

Parts of the Cell: A Simple Overview
Animal cells are fascinating structures that play an essential role in the life of all animals. Animal cells contain a nucleus and structures called organelles, which have different functions.
A single cell can form a living organism. In higher-order animals, cells are organized together to form structures such as tissues, organs, bones, blood, etc., and will have specialized tasks.
Animal cells are different from the cells of plants. They don’t make food like plant cells do. Learn about plant cells here.
- Cell Membrane . This is a thin barrier that surrounds the cell and acts as a guard for the cell. It controls what molecules are allowed in and out of the cell.
- Cytoplasm. A gel-like substance that fills the cell and helps it to keep its shape.
- Nucleus. This organelle contains the cell’s genetic material or DNA and controls the activities of the cell.
- Nucleolus. It is found within the nucleus, and is responsible for producing and assembling the cell’s ribosomes which are then transported to the cytoplasm.
- Vacuole. A simple storage unit for food, nutrients or waste products.
- Lysosomes. Break down materials such as lipids, carbohydrates, and proteins into their parts. They also are responsible for breaking down and getting rid of waste products from the cell.
- Centrioles. Animal cells have 2 centrioles which are located near the nucleus. They help with cell division.
- Golgi Apparatus. Also called golgi body. These organelles package proteins into vesicles (a fluid like sac or vacuole) so they can be transported to their destination.
- Mitochondria . An energy molecule that provides power to almost every function throughout the cell.
- Ribosomes. Tiny particles found in large numbers in the cytoplasm, which make proteins.
- Endoplasmic reticulum. A large folded membrane system that puts together lipids or fats and creates new membranes.
Free Printable Animal Cell Diorama
This activity works for upper elementary to middle school students (grades 5-8). It provides an excellent introduction to cells and a hands-on supplement to lessons.

More Plant and Animal Activities
- Animal Cell Coloring Sheet
- Strawberry DNA Extraction Lab
- Candy DNA Model
- DNA Coloring Worksheet
- Plant Cell Collage Activity
- How Plants Breathe Experiment
- Photosynthesis Worksheets

Printable Animal and Plant Cell Pack
Want to explore animal and plant cells even more? Our project pack features extra activities to learn all about cells. Grab your pack here and get started today.

Leave a Reply
Your email address will not be published. Required fields are marked *

Subscribe to receive a free 5-Day STEM Challenge Guide
~ projects to try now ~.

Lesson Plan on Cells & Building a Cell Project: Hands On Learning
- Categories : Lesson plans for high school science
- Tags : High school lesson plans & tips
Creating a Cell Project: Lesson Plan
Studying animal and plant cells is a wonderful way for students to understand life at its most basic level. No matter how complex or simple the organism all plants and animals are made up of cells - from the microscopic single celled paramecium to the hundreds of billions of skin, bone, nerve and muscle cells that make up you. Yet when viewing cells under a microscope, or looking at slides or pictures, it may be difficult to grasp the cell is a three dimensional unit capable of carrying out all of life processes all on its own. All cells have the ability to metabolize food for energy, respond to the environment as well as grow and reproduce. Building a cell model not only clarifies this concept for students but also provides hands on learning of a cell’s individual components, their functions and how they work together as a system. During the lesson, keep in mind the following learning objectives:
- Compare and contrast structures of plant and animal cells
- Identify various parts of the cell in slides, pictures, and/or lab models
- Demonstrate your knowledge of the cell as a basic unit of life by constructing a three dimensional model of a plant or animal cell and identifying its components and functions.
Plant or Animal
Begin your lesson plan by introducing the two main types of cells: the plant cell and the animal cell. If you have access to microscopes, make plant cell slides by placing bits of lettuce leaf on slides. For animal cells, have students use the flat end of a toothpick to scrape the inside of their cheek for cells. Dob the toothpick in a small droplet of water on the slide. Place a cover slip over both lettuce leaf and cheek cell slide samples and view under the microscope. Have your students sketch a drawing of what they see. They should be able to see and label the nucleus, cell membrane, and cytoplasm for both samples as well as the cell wall for the lettuce leaf slide.
Point out what animal and plant cells have in common and how they are different. For example, both contain a nucleus, cytoplasm, a cell membrane and genetic material for reproduction. Next, emphasize their differences. Plant cells are square shaped, have a cell wall and use chloroplasts to make glucose for food. By contrast, animal cells are round, do not have a cell wall and use mitochondria to generate ATP from food for energy.
Cell Parts and Functions
The components of the cell work together to carry out the functions of life. Introduce the individual components, pointing them out on pictures, models or slides. Then divide the class into groups of two or three students. Give each group a slip of paper labeled with a particular cell organelle. Have each group explain to the class the following: Would you find this cell component in a plant or animal cell or both? What is this organelle’s function and how does it help the cell? What would happen if this component was missing from the cell? For example, the cell membrane is found in both plants and animals, lies on the outer boundary of the cell and controls the movement of materials in and out of the cell. Without a cell membrane, its contents would leak out and harmful substances could get in.
Building a Model
Build a three dimensional cell model. Materials may be edible or nonedible. They can include large styrofoam spheres (pre-cut half spheres can be obtained from a craft store) or a shoebox for the cell shell, colored or plain playdough or clear gelatin for the cytoplasm, colored chenille sticks (pipecleaners), puff balls, buttons, yarn, pasta and other items to represent the cellular components. Encourage the students to be creative and use lots of different material in their model and that they should choose items to accurately represent each organelle in size, shape, and location. Have them follow these guidelines for the project:
1. Choose a plant or animal cell.
2. Make a list of components you would find in your cell. A plant cell would contain a cell wall, cell membrane, cytoplasm, nucleus, DNA, ribosomes, chloroplasts, Endoplasmic reticulum (smooth and rough), golgi complex, ribosomes, lysosomes, and vacuoles. An animal cell would contain a cell membrane, cytoplasm, nucleus, DNA, mitochondria, endoplasmic reticulum (smooth and rough), ribosomes, golgi complex,ribosomes, lysosomes, and vacuoles. Select different materials to represent each of the organelles present in that cell. Shape and size the material to realistically resemble the organelle. Place each in its appropriate location in cell body.
3. Label each of the components. Print out organelle names, cut them into small labels and use toothpicks to attach to each label with some tape.
4. Create a separate key that shows each of the cell components and describes its function in the cell.
5. Use the cell grading rubric to get maximum points for your project.
Cell Grading Rubric
Grading rubric will look at the following qualities of your cell model:
Creativity and Design
- Animal or plant cell model is appropriate shape. Animal cells are round and plant cells are square.
- Construction is a 3-D model using four or more different media/materials. The model must be 3-D and not a drawing. Materials may be edible or nonedible. Be creative in choosing materials. Use your imagination and look for things around the house (buttons, chennile sticks, dried pasta, yarn, playdough, gelatin, candy of different shapes and sizes)
- Care is taken to choose materials that accurately represent each cellular component in shape, size and location in cell. For example, the mitochondria and chloroplasts are kidney-bean shaped and are roughly the a quarter of the size of the nucleus. The nucleus is round, located in the center of the cell body and should be the largest organelle in the cell model.
Organization
- Cell components for that particular cell (plant or animal) are present with none missing. Components are accurate as well. For example, mitochondria are found in animal cells but chloroplasts are found in plant cells.
- Cell components are labeled appropriately
- Separate key lists cellular components and their functions
Extra points for the following :
- Create a particular type of animal cell (muscle, nerve, bone, blood) with accurate representation of cellular components. Example: skeletal muscle cells have many nuclei; red blood cells have none because their nuclei pop out before entering the blood stream from the bone marrow.
- On a separate piece of paper give a simple explanation for photosynthesis and state which organelle is involved with this process.
Create a Stand for Cell Model
You may use a paper towel roll with tape or the top from a gift box to place your cell model on. You will want to tape or glue the bottom of your model to reduce wobbling and make it secure.
Cell Component Checklist
Animal Cells :
- cytoskeleton
-cell membrane
-endoplasmic reticulum (smooth and rough)
-chromosomes
-golgi apparatus
-ribosomes (on ER as well as free floating ribosomes in the cytoplasm)
-mitochondria
Plant Cell :
-Cell membrane
- centriole
- endoplasmic reticulum (smooth and rough ER)
- ribosomes (on ER as well as free floating in cytoplasm)
-chloroplasts (remember to make the chloroplasts green since they are filled with chlorophyll)
Study Hint :
After learning the anatomy of the cell and its components, research the functions of each part. Quiz yourself or work with a study buddy to help you remember the functions. You will be expected to provide a key that describes the functions of each component on your cell model.
The Tech Edvocate
- Advertisement
- Home Page Five (No Sidebar)
- Home Page Four
- Home Page Three
- Home Page Two
- Icons [No Sidebar]
- Left Sidbear Page
- Lynch Educational Consulting
- My Speaking Page
- Newsletter Sign Up Confirmation
- Newsletter Unsubscription
- Page Example
- Privacy Policy
- Protected Content
- Request a Product Review
- Shortcodes Examples
- Terms and Conditions
- The Edvocate
- The Tech Edvocate Product Guide
- Write For Us
- Dr. Lynch’s Personal Website
- The Edvocate Podcast
- Assistive Technology
- Child Development Tech
- Early Childhood & K-12 EdTech
- EdTech Futures
- EdTech News
- EdTech Policy & Reform
- EdTech Startups & Businesses
- Higher Education EdTech
- Online Learning & eLearning
- Parent & Family Tech
- Personalized Learning
- Product Reviews
- Tech Edvocate Awards
- School Ratings
The Bachelorette Recap: Reverse Uno
A weekend at the immersion larp festival, everything to know about the oropouche virus, also known as sloth fever, tesla’s ttpoe at hot chips 2024: replacing tcp for low latency applications, ‘the bachelorette’: where is hakeem today ‘paradise’ might be next, tecno unveils the phantom ultimate 2 trifold concept phone, today’s wordle hints, answer and help for aug. 28, #1166, today’s nyt strands hints, answers and help for aug. 28, #178, today’s nyt connections hints, answers and help for aug. 28 #444, states keep denying rfk jr.’s requests to be removed from their ballots, which was key to his plan to help trump win, 4 ways to make an animal cell for a science project.
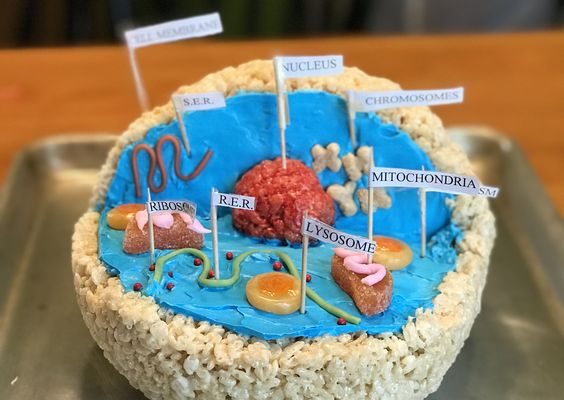
An animal cell is a fascinating topic within the science curriculum as it provides an opportunity for students to explore the building blocks of life. Creating an animal cell model is an excellent way to engage in hands-on learning and can make understanding these complex structures more accessible. Here are four creative methods for constructing an animal cell model for your science project.
1. Clay Model
One of the most popular ways to create an animal cell model is by using clay or playdough. Begin by choosing different colors of clay to represent the various parts of the cell, such as the nucleus, mitochondria, endoplasmic reticulum, Golgi apparatus, and cell membrane. Use reference materials to help you sculpt each component accurately and create a base for your model. Label each part with toothpicks and small tags to explain their functions within the cell.
2. Edible Model
An edible animal cell model creates a fun, sweet treat that not only looks impressive but also allows you to share your project with classmates or family members. Create a base using a large round cake or cookie, frosting it with icing that represents the cytoplasm’s color. Use different candies to represent various cell parts; for example, gummy worms can be fashioned into rough endoplasmic reticulum or licorice twists could become mitochondria. Label each candy with a toothpick tag before you dig in!
3. 3D-Printed Model
As technology advances, 3D printing has become accessible for many schools and households. Use computer software or online templates to design a detailed three-dimensional animal cell model before sending it off to be printed in layers of colored plastic filament. These models can be incredibly accurate and are an excellent way to learn about the intricacies of cellular structures.
4. Water-Filled Balloon Model
For a more interactive and hands-on approach, try creating an animal cell model using a water-filled balloon, clear hair gel, and various craft supplies. Begin by filling a balloon with the clear hair gel to create the illusion of cytoplasm. Carefully suspend different colored craft supplies within the gel to represent each organelle, ensuring they are placed accurately and proportionately. Finally, use a thin marker to label the organelles on the balloon’s surface.
In conclusion, making an animal cell model for a science project can be creative and enjoyable using various materials like clay, edible items, 3D printing, or even balloons. Regardless of the method chosen, an animal cell model will help foster a deeper understanding of cellular functions and promote hands-on learning.
How to Make a Kite: 14 Steps
How to make an origami dragon.

Matthew Lynch
Related articles more from author.

How to Play Defense in Soccer
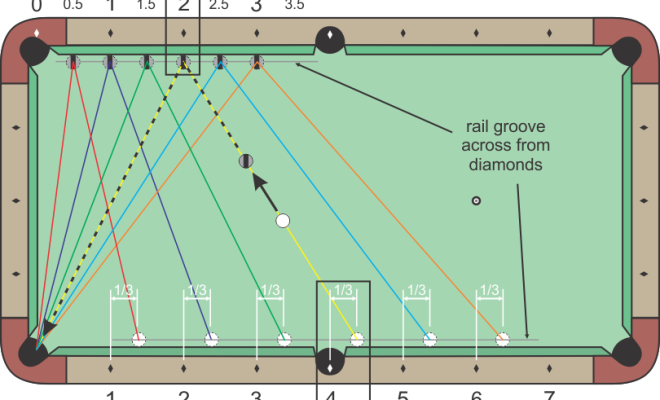
3 Ways to Bank in Pool

3 Ways to Soften Cream Cheese

3 Ways to Do a Full Split

How to Build an Outdoor Fort: 12 Steps

How to Hug Your Girlfriend: 9 Steps
BIOLOGY JUNCTION
Test And Quizzes for Biology, Pre-AP, Or AP Biology For Teachers And Students
Cell Model Instructions
Construct a 3-dimensional eukaryotic plant or animal cell that includes the organelles listed in the table below. Your cell must show all of the cellular organelles listed on the table. These organelles should be LABELED with straight pin “flags” with the FUNCTION of each organelle written on the back Make sure that your cell has a FLAT NOT round bottom so it will sit on a table or shelf.
- NO FOOD ITEMS MAY BE USED IN THE CONSTRUCTION OF YOUR CELL MODEL!
- DO NOT USE CLAY OR PLAY DOUGH AS THE CELL WILL BE TOO HEAVY OR NOT STAY TOGETHER!
| Cell Membrane | Nucleus | Nucleolus |
| Cell Wall (plants) | Chromatin | Rough ER |
| Smooth ER | Attached Ribosomes | Mitochondria |
| Chloroplast (plant) | Lysosome | Golgi Bodies |
| Vacuole | Free Ribosomes | Centrioles (animal) |

Plant Cell Model – Edible Science Project

Making a plant cell model is a great way to have some fun with your kids in the kitchen! This fun, edible science project is both educational and tasty!
Looking for more activities and projects to do with your kids? Here are a couple more we love – Fun at the Train Station , and No TV, No Problem !

A 3D Science Project Assignment
My sixth grader came home with the assignment to make a 3D model of a plant cell. We were given no guidelines as far as what it needed to look like or what materials we had to use. We decided to get a little creative and made it using a cake and other items so the entire model would be edible!
Making this plant cell model proved to be much more fun than the styrofoam animal cell I made with his older sister a couple of years ago! Here is what we used and how we made it –
How To Make An Edible Plant Cell Model
MATERIALS + INGREDIENTS –
- One vanilla cake mix + ingredients on back of box
- disposable rectangle pan (as close to 13×9 as you can)
- Plant cell labels (download below)
- cell wall — mini marshmallows
- cell membrane — red licorice
- cytoplasm — green frosting
- nucleus — 2 glazed donuts, 1 cut in half
- nucleolus — powdered sugar donut hole
- central vacuole — Twinkie
- mitochondria — orange slices gummy candy + black cookie icing
- smooth endoplasmic reticulum — red licorice bites
- rough endoplasmic reticulum — water, red licorice bites + black sprinkles
- free ribosomes — black sprinkles
- chloroplasts — green Mike & Ikes + a green Airhead
- Golgi body — Fruit by the Foot
- lysosome — wafer cookie

DIRECTIONS
- Base – Make your cake according to package directions in your disposable cake pan. Let it cool completely.
- Cytoplasm – Add your “cytoplasm” by spreading green frosting over the entire cake.

- Cell Membrane – Add a “cell membrane” by putting red licorice on the frosting, up against the row of marshmallows around the entire perimeter of the cell.
- Nucleus – Place your “nucleus” in the corner – one donut on the frosting, then half of a donut sitting on top of that donut.

- Central Vacuole – Place a Twinkie on the cake to represent the central vacuole.
- Mitochondria – Make your “mitochondria” by drawing a squiggly line with black frosting on top of an orange candy slice. Place this on your cell.
- Smoot Endoplasmic Reticulum – Add a border of red licorice bites around half of one side of your nucleus donut. This will be the smooth endoplasmic reticulum.

- Ribosomes – Sprinkle some black sprinkles in a few clusters on top of your frosting to represent the free ribosomes.

- Golgi Body – Unwrap a fruit by the foot, then fold it “accordion style” and stick in on your cake. This will be the Golgi body.
- Lysosome – Place a wafer cookie on your cake to be a “lysosome.”
- Label It – Download and print the cell parts printable, then cut each label out. Wrap one end of each label around a toothpick, and tape it to secure. Stick a toothpick and label into each plant part, and you’re done!!!

Plant Cell Model Labels Printable
Enter your name and email address below for immediate access to these free plant cell model labels –
This edible plant cell project is such a fun science project, right?? And for those of you who care, he got an A+. 😉

Edible Plant Cell Recipe
Ingredients.
- 1 box vanilla cake mix
- 1 package mini marshmallows
- 1 package red licorice
- 1 container green frosting
- 2 glazed donuts
- 1 powdered sugar donut hole
- 1 package orange slices gummy candy
- 1 package black cookie icing
- 1 package red licorice bites
- 1 bottle black sprinkles
- 7 green Mike & Ikes
- 1 green Airhead
- 1 Fruit by the Foot
- 1 wafer cookie
Instructions
- Make your cake according to package directions and let it cool.
- Spread green frosting over the entire cake.
- Place mini marshmallows around the entire perimeter of the cake
- Place red licorice on the frosting, up against the row of marshmallows around the entire perimeter the cake
- Place one donut on the frosting, then half of a donut sitting on top of that donut.
- Place your “nucleolus” on top of your donut, up against the halved donut.
- Place a Twinkie on the cake
- Draw a squiggly line with black frosting on top of an orange candy slice. Place this on the cake.
- Add a border of red licorice bites around half of one side of your nucleus donut.
- Coat several pieces of licorice bites in water, then roll them in black sprinkles. Line them up next to your smooth endoplasmic reticulum to finish the border around your donut.
- Sprinkle some black sprinkles in a few clusters on top of your frosting.
- Cut a green airhead in half, lengthwise. Wrap the airhead around to form a circle, then stick it into the frosting. Fill the inside of the Airhead circle with green Mike & Ikes that are standing on their ends.
- Fold the fruit by the foot “accordion style” and stick in on your cake.
- Place a wafer cookie on your cake.
- Label each part of the cell
- Aluminum baking tray
Other Notes

Busy moms, this one is for YOU!
Leave a review cancel reply.
I love hearing from you! Submit your question or review below. Your email address will not be published. Required fields are marked*.
Notify me via e-mail if anyone answers my comment.
I consent to Somewhat Simple collecting and storing the data I submit in this form. (Privacy Policy) *
I’m glad you found it helpful! Thanks for stopping by!
I am very grateful for your help. I want to help my grandson with his cell project and this is a God send. 😀
I’m so glad you found this helpful! Thanks for your nice comment!
You’re so welcome…I’m glad it helped you out!
I can’t find the printable labels. Did I miss them somewhere?
I’m so sorry about that! We just did a site update and a lot of our printable forms were deleted. I just added the form back, so you should see it near the bottom of the post. Thanks so much for letting me know!
Thanks Ashleigh!
going to have to do this for my biology project
It’s such a fun project to make. Let me know how it turns out.
I know, right?!
I’m so glad they enjoyed it!

What are you looking for?
Get on the list.
By clicking GO, you're consenting to be added to our newsletter list. Don't worry, we won't ever send you spam and you can unsubscribe at any time.
Rate This Recipe
Recipe ratings without comment.
COMMENTS
Here is our Plant Cell Model with labels. Plant Cell Model. Once the cell models are assembled have the students label all of the parts. This is a nice, visual project with minimal mess that is easily put aside for additional study later on. Or glue them together to create a wonderful, colourful wall display of cells!
which cell model you are making (Plant or animal) Your cell must be 3-dimensional, as was shown in class. This means it needs to have a. front, back, and sides. It cannot be a piece of paper with things glued on it. Your. plant cell must be rectangular or your animal cell must be circular. Project may be edible but critters in the building have ...
3. Cookie Cell. Another tasty edible option is a cookie cell model. This one at Hip Homeschool Moms starts with a large chocolate chip cookie as the base. Bake the cookie in a pizza pan for an animal cell model or in a jellyroll pan for a plant cell. Then use icing, fondant, and candies to represent the organelles.
Step 3: Consider the Parts of the Cell. Now, you need to make a list of all the parts, or organelles, that need to be included in your 3D cell model. Organelles are the "mini organs" that are found inside every plant and animal cell. Each organelle has a different function and physical appearance, and together, they work to keep the cell alive.
Add the components to the flat side of the styrofoam using toothpicks. If you're making a plant cell, remember to add a cell wall to your model. 5. Attach labels to the cell parts. You can do this by taping the labels to toothpicks or pins and sticking the pins into the styrofoam ball next to the applicable component.
5. Add the cell parts. Add the parts to your cell base (the styrofoam). This can be done by using hot glue, regular glue, toothpicks, pins, staples, or a number of other methods. In some cases you may also need to literally dig or carve out space in the styrofoam to fit in the parts.
Raspberries=lysosomes: place 3 in the cell. Small cereal marshmallows=centrioles: place 2 near middle of cell. Raisins=ribosomes: the bound ribosomes are already on your banana slices. Scatter 5-10 "free ribosomes" around your cell. Chocolates=mitochondria: place 2-3 chocolates in the bowl.
Here's a step-by-step guide they can follow: 1. Gather Materials: Gather all the household objects and materials you'll need. These objects will represent the different organelles and structures within the cell. 2. Identify Cell Parts: Review the different parts of a cell (organelles like nucleus, mitochondria, cytoplasm, cell membrane, etc ...
Cell Model Assignment Name: Objective: To better understand the structures that are present in animal and plant cells. Assignment: You are expected to create a 3-D model of a cross section of either an animal cell or a plant cell. - this assignment will be done individually - include all the organelles that we have learned about in class
You can find the project directions, check-ins and rubrics for this cell project at Teachers Pay Teachers in my store called Science by Sinai. #cell model# cell project#science class#stem. Create a cell model project using recyclables to represent the organelles and cell parts in your middle school science class.
Small, round objects such as buttons, dry noodles, beads, pieces of cardboard or foamboard, glitter/confetti, or small pieces of plastic. 2. Use a solid, spherical object as the base of the cell. A large Styrofoam ball is probably the best option for you to use as your cell base.
Step 1: Create Your Nucleus. The first thing you'll want to draw is a circle to be the Nucleolus for your cell. Then you'll draw a bigger circle around that. This bigger circle is the Nucleus. The Nucleus of a cell has 2 main functions, it contains all the DNA of the cell and functions as a "brain" for the cell.
3D Animal Cell Model. Grade Level: 3rd; Type: Life Science. Buildings are made of multiple bricks; you are made of millions of cells. The cell is the basic unit of all living things. The cells in your body vary in size, a single nerve cell can be up to a 1 meter long, but the more typical cells lining the inside of your cheek are .05 millimeters.
Module 4 Assignment: Cell Builder. Create a model of a eukaryotic cell using any material of your choice. In your model be sure to include all the organelles appropriate to your cell (either plant or animal). Once complete, take multiple photographs of your model from all angles. Include these images in a document that also contains the ...
Tips. Choose an item that will represent the nucleus of the cell. It should be round, like a bowl or cup, and should be the largest organelle (or cell part) in your model. Secure this item in the middle of the cell. Select other items to represent the different organelles and parts within your cell. Small straws could be glued together to ...
If a younger child is doing this project, you'll want an adult to handle the X-Acto knife. 5. Plant Cell Model From Seeds. This 3D plant cell project will take a while, but the results will be well worth it. We especially love the idea of using seeds to create the various parts of the plant cell! 6. LEGO Plant Cell.
Use the 3D Animal Cell Model Project and Rubric to engage your students' scientific knowledge and creativity. Perfect for 6th grade, your students will build a 3D cell to demonstrate their understanding of organelles, and create a key to describe their functions. Also included, is an easy-to-use grading rubric for teachers!What's more, this activity is ...
STEP 1: Start by printing the animal cell diorama template. This includes all the cell parts you will cut out and assemble. STEP 2: Carefully cut out the different parts of the cell along the dotted lines. STEP 3 (Optional): Add color to each part to make your cell model more vibrant. STEP 4: Use glue or tape to attach the cell parts to the ...
Building a cell model not only clarifies this concept for students but also provides hands on learning of a cell's individual components, their functions and how they work together as a system. During the lesson, keep in mind the following learning objectives: - Compare and contrast structures of plant and animal cells.
Labels and descriptions of organelles must be typed! • Identify your model cell as plant or animal using a label. Project should not be larger than a Frisbee in size. Prepare a base for your model. Put your name and period on the base of your model. model best of show! Number. 1.
1. Clay Model. One of the most popular ways to create an animal cell model is by using clay or playdough. Begin by choosing different colors of clay to represent the various parts of the cell, such as the nucleus, mitochondria, endoplasmic reticulum, Golgi apparatus, and cell membrane. Use reference materials to help you sculpt each component ...
Biology Junction Team April 21, 2017 Cells, Resources. Cell Model Construct a 3-dimensional eukaryotic plant or animal cell that includes the organelles listed in the table below. Your cell must show all of the cellular organelles listed on the table. These organelles should be LABELED with straight pin "flags" with the FUNCTION of each….
Place one donut on the frosting, then half of a donut sitting on top of that donut. Place your "nucleolus" on top of your donut, up against the halved donut. Place a Twinkie on the cake. Draw a squiggly line with black frosting on top of an orange candy slice. Place this on the cake.